- blog.vmpress.org
- Страницы
- понедельник, 11 января 2016 г.
- Установка и настройка VMware Horizon Client for Linux для Ubuntu 14.04
- Установка клиента
- Настройка аутентификации по смарт-картам
- Смарт-карты Aladdin eToken
- Смарт-карты Aladdin JaCarta
- Docs
- Prerequisites
- Procedure
- Results
- What to do next
- Install VMware Horizon 7 Lets Encrypt SSL Certificate
- What is Let’s Encrypt?
- Install VMware Horizon 7 Lets Encrypt SSL Certificate
- Running the Win-Acme Tool
- Install the Let’s Encrypt PEM SSL Certificate on the UAG boxes
- Wrapping Up
blog.vmpress.org
Страницы
понедельник, 11 января 2016 г.
Установка и настройка VMware Horizon Client for Linux для Ubuntu 14.04

Из функций, которые на текущий момент не поддерживаются в клиенте для Linux: MMR (Multimedia Redirection), проброс сканеров и serial портов, подключенных к клиентским устройствам.
В качестве примера рассмотрим установку клиента под 32-битной версией ОС Ubuntu 14.04.3 (64-битная версия Ubuntu 14.04 на текущий момент официально не поддерживается).
Установка клиента
Перед установкой клиента загрузите последние актуальные обновления для ОС:
Создайте символическую ссылку на библиотеку libudev (требуется для работы USB Redirection и RTAV):
В Ubuntu Software Center доступна устаревшая версия клиента VMware View Client 2.2, поэтому загрузите с сайта VMware последнюю версию VMware Horizon Client 3.5 и запустите процедуру установки:
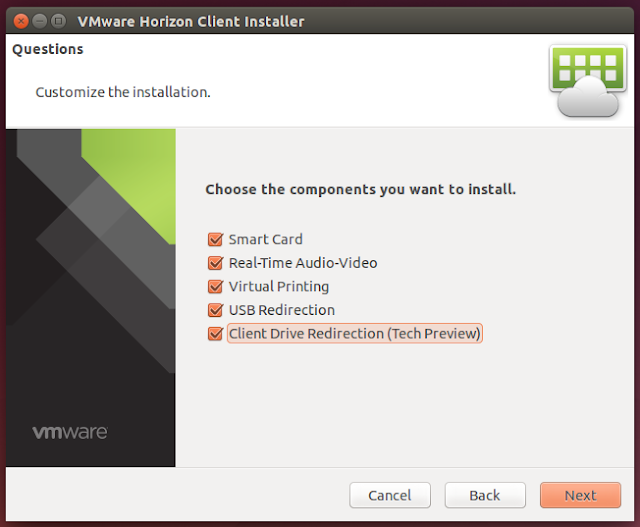
Примите лицензионное соглашение и выберите компоненты, которые требуется установить.
Клиент готов к работе и может быть запущен из консоли с помощью команды vmware-view, что довольно неудобно. В качестве альтернативного варианта можно создать ярлык и добавить его на панель Unity Launcher. Для этого создайте файл-описание:
Добавьте в него следующее содержимое:
Зарегистритуйте приложение, используя файл-описание:
Теперь приложение появится в списке доступных для запуска, и его можно будет вынести на панель launcher’а.

Настройка аутентификации по смарт-картам
Для аутентификации через клиент Horizon Client по смарт-картам требуется дополнительная настройка. В качестве примера приведено описание настройки для CCID карт-ридера и смарт-карт Aladdin eToken.
Для начала установите необходимые записимости:
Если вы используете CCID карт-ридер с драйвером libccid, то он автоматически определится ОС, для других моделей может потребоваться установка дополнительных драйверов (например, Athena ASEDrive IIIe). Список карт-ридеров и драйверов можно посмотреть на сайте wiki.debian.org/Smartcards.
Проверьте, что карт-ридер корректно работает, используя команду:

Смарт-карты Aladdin eToken
Для аутентификации с использованием eToken смарт-карт потребуется установить ПО SafeNet Authentication Client.
Перед установкой SAC загрузите и установите две библиотеки (libhal1 и libha1-storage1):
Загрузите дистрибутив SAC с сайта (для примера используется версия SAC 8.3). Установите ПО:
Запустите SafeNet Authentication Client Tools и проверьте, что ОС видит сертификаты на смарт-карте.

Создайте каталог и символическую ссылку на библиотеку eToken:
Теперь аутентификация по смарт-картам должна заработать.

Смарт-карты Aladdin JaCarta
Для работы со смарт-картами Aladdin JaCarta вам потребуется загрузить ПО JaCarta PKI for Linux (http://www.aladdin-rd.ru/support/downloads/39875/).
После загрузки распакуйте архив и установите клиент JaCarta PKI:
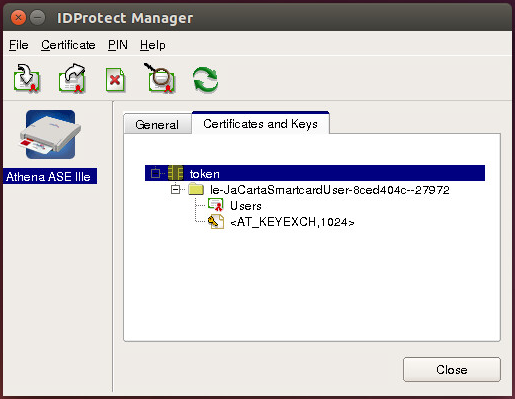
При помощи утилиты IDProtect Manager проверьте, что смарт-карта видна в ОС.
Создайте каталог и символическую ссылку на библиотеку JaCarta:
Теперь аутентификация по смарт-картам должна заработать.
Источник
Docs
—> share-line
—> —> —> —> plus
You can download and run a Horizon Client installer bundle from the VMware Downloads page. This installer contains modules for features such as USB redirection, Real-Time Audio-Video, smart card, and client drive redirection. To upgrade Horizon Client for Linux, you first uninstall the existing version from the client system and then run the installer bundle for the new version.
Prerequisites
- Verify that the client system runs a supported operating system. See System Requirements for Linux Client Systems.
- Become familiar with the installation options. See Installation Options.
- Verify that you have root access on the client system.
- Verify that VMware Workstation is not installed on the client system.
- If you plan to use the RDP display protocol to connect to a Horizon desktop, verify that you have the appropriate RDP client installed. See System Requirements for Linux Client Systems.
- Uninstall any earlier version of the Horizon Client software. See Uninstall Horizon Client for Linux.
- If you plan to use the command-line installer, become familiar with the Linux command-line installation options. See Command-Line Installation Parameters for the Linux Client.
- Confirm that version 2.x or 3.x of Python is installed on the client system. If the system does not have the Python 2.x or 3.x package, run the necessary command to install it.
- If you are using a thin client, confirm that libgtk 3.14 or later is installed on the system. If needed, obtain version 3.14 or later of the libgtk library and install it on the thin-client system.
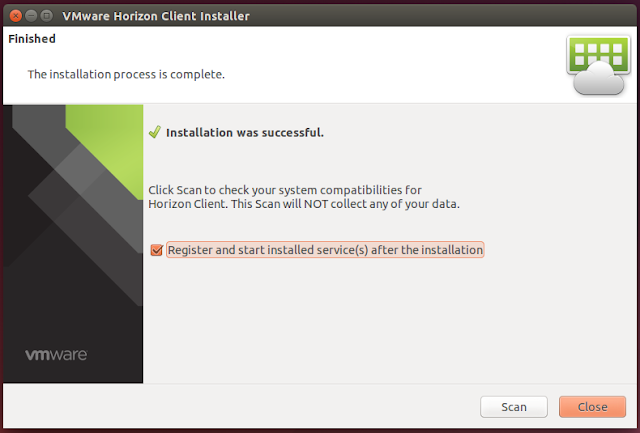
As part of the installation process, the installer runs a scan of the system libraries to determine whether the system is compatible with Horizon Client , although you can select to skip the scan.
Procedure
- On the Linux client system, download the Horizon Client installer file from the Horizon Client Product Downloads page at http://www.vmware.com/go/viewclients.
Run the installer using the appropriate command.
| Option | Command |
|---|---|
| For the GUI wizard, if you have set executable permissions | |
| For the GUI wizard, if you have not set executable permissions | |
| For the command-line installer, if you have set executable permissions | |
| For the command-line installer, if you have not set executable permissions |
The installer wizard appears, prompting you to accept the end-user license agreement.
| Result Value | Description |
|---|---|
| Success | All required libraries were found. |
| Failed | The specified library was not found. You must locate and install the required library version on the client system. For more details, refer to the documentation and support information for your Linux distribution. |
Results
Log information about the installation is recorded in /tmp/vmware-root/vmware-installer- pid .log .
What to do next
Start Horizon Client and verify that you can log in to the correct virtual desktop. See Connect to a Remote Desktop or Published Application.
Источник
Install VMware Horizon 7 Lets Encrypt SSL Certificate
If you have ever used Let’s Encrypt SSL certificates, you know they are easy to use and free! The free part is the best part of the solution. Especially if you run a home lab, Let’s Encrypt provides a great option for installing proper certificates in your environment. What about VMware Horizon? I wanted to go through the steps to show how to install a Let’s Encrypt certificate in a VMware Horizon environment. How do you do this for your UAG box and your Load balancer as well as DNS configuration considerations for internal clients? Let’s look at how to install VMware Horizon 7 Lets Encrypt SSL certificate and see how this can be done.
What is Let’s Encrypt?
First, what if Let’s Encrypt is totally foreign to you? What is it? By their own defination, they are a free, automated, and open certificate authority CA that has been established for the benefit of the public. It is provided by the Internet Security REsearch Group (ISRG).
Since the security of the data that is transmitted across the Internet relies on SSL encryption, SSL certs are a huge deal. You want to have SSL certificates installed on all your forward facing sites, and other services. By now that should be a basic requirement that is by default, no questions asked.
Now that we have great resources like Let’s Encrypt, it makes SSL certificates a non issue from a cost perspective as well. What are the key concepts behind Let’s Encrypt?
- It’s free
- It can be automatically configured to renew, etc
- Secure – uses TLS security best practices
- Transparent security – all certs are available for viewing and scrutiny
- Open standard
- Joint effort – Let’s Encrypt is a joint effort to benefit the Internet community with better security across the board
Install VMware Horizon 7 Lets Encrypt SSL Certificate
The workflow that I will be following to install Let’s Encrypt certificates in my VMware Horizon 7 environment is as follows:
- On the Windows-based Horizon Connection Server, run the Let’s Encrypt “win-acme” program to generate the certificate in the local certificate store
- Also generate a PEM formatted certificate for use on the UAG boxes
- Install the Let’s Encrypt certificate on UAG boxes
- Install the Let’s Encrypt certificate on Load balancer in front of connection servers
- Reconfigure the thumbprint of the certificate on the UAG boxes to match the new thumbprint presented by the Let’s encrypt certificate
- Test
Running the Win-Acme Tool
Let’s Encrypt has a free tool available on Github that can be used for creating, or renewing your certificates. We will use this to generate a new certificate for our Horizon environment.
The win-acme tool is basically a wizard via the command line that provides a workflow based on the inputs you give to the menus. Here we are going to Create new certificates with advanced options.
Here we are choosing to manually input the host names.
Next, choose the hostname and friendly name for the certificate.
Choose how you want to validate the certificate. There are many options for this including from memory, DNS records, scripts, and others. Also, we are going to place the certificate in the certificate store of the Horizon connection server.
A note here, the cert created in the certificate store is not actually going to be assigned to the Connection Server. However, placing it here gives you options to export and other capabilities. The PEM files will be used to import to the UAG boxes.
In the next step, as mentioned, we are creating PEM files in addition to the certificate store placement. This will produce the PEM format needed for the UAG boxes without having to do any converting using OpenSSL. You have to define a path for the output of the PEM files.
Finally, the utility actually creates the certificate and outputs the additional PEM files to the folder.
You get two PEM files. One is the PEM “key” and the other is the certificate.
Install the Let’s Encrypt PEM SSL Certificate on the UAG boxes
Login to your UAG admin interface. Navigate to Advanced Settings > TLS Server Certificate Settings
Now, I have copied my certificate files to my admin workstation that were created on the Horizon Connection Server to a folder on my desktop. After logging into the UAG box, I select key and chain files accordingly for the TLS Server Certificate settings.
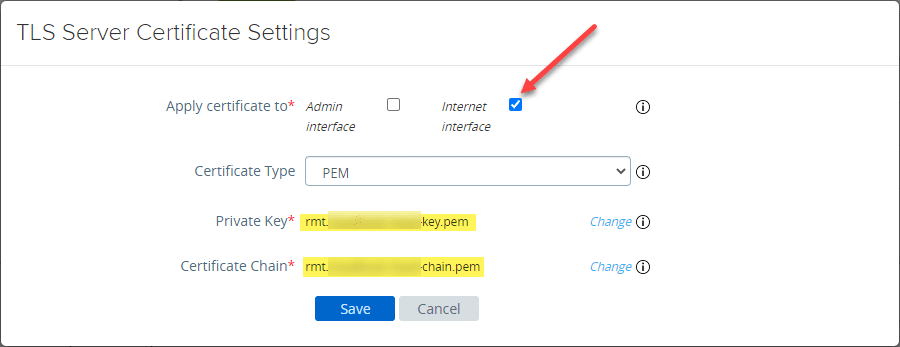 Choose the certificate files that you created with the Let’s Encrypt utility and upload to UAG
Once you save the new certificate, your browser will display the message similar to below. Depending on which options you select, the message will display what services the certificate is applied to.
 Save your certificate changes
Once you refresh your browser session, you can view the certificate that is presented and make sure it is the new certificate you have installed. You can verify this by the Issued to as well as the Valid from fields.
After installing on the UAG boxes, if you have a load balancer in your environment, you can also install your new cert there as well. I have a load balancer in front of my connection servers in the lab.
I can install the cert here as well. Then, using DNS, I can point clients to the proper name internally with the cert on the load balancer as well as have the cert on the UAG boxes for external access.
For a tutorial on standing up an easy Horizon load balancer, see here:
There is another step we need to take. The UAG box relies on the correct thumbprint on the cert to make a connection to the Horizon edge services. As you can see below, we now have an error on the Horizon Destination Server due to the cert thumbprint changing.
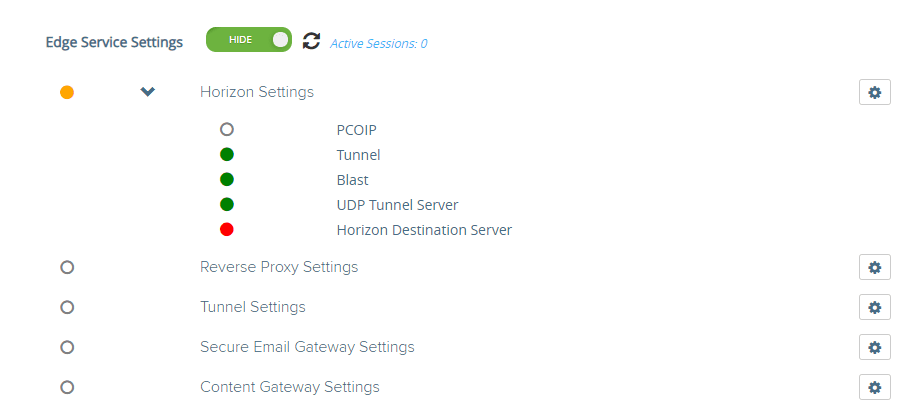 Horizon Connection server connection from UAG will be broken without the right thumbprint
Since I am pointing from the UAG box to my load balancer, I need to get the thumbprint from the new certificate that I now have installed on the load balancer. Open a browser, view your cert, and get the Thumbprint value.
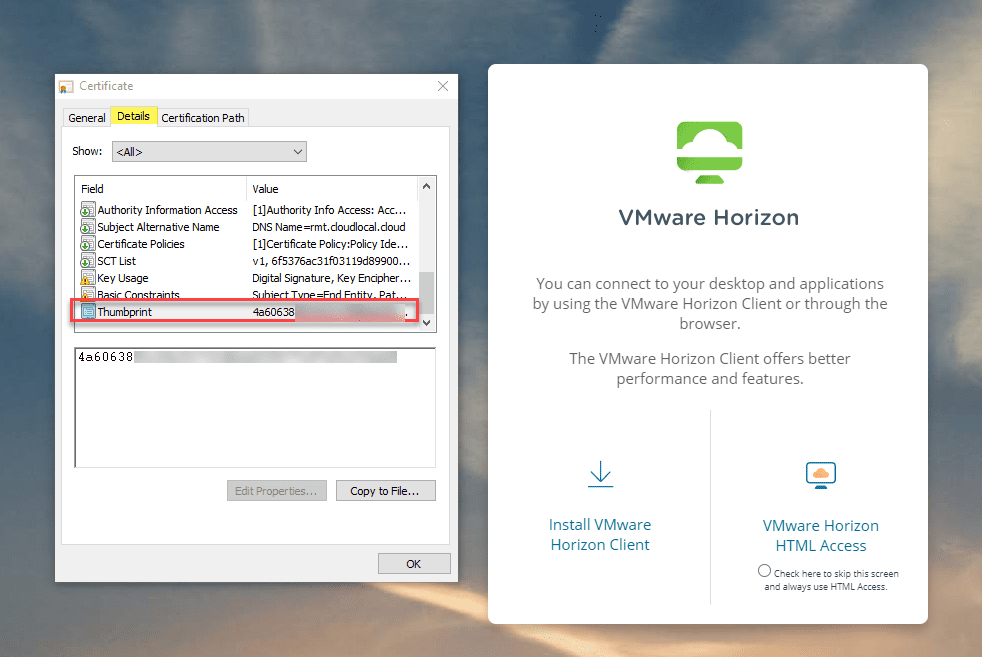 Get the thumbprint of the certificate to add to the UAG box
Go back to your UAG and under Horizon settings replace the Connection SErver URL Thumbprint with the new value. The format is to start the string with sha1= and then your thumbprint with a space in between every two characters.
After replacing the certificate thumbprint value and refreshing the services, we now have all green.
Wrapping Up
The process to Install VMware Horizon 7 Lets Encrypt SSL Certificate in your environment is pretty straightforward. Using the utility, you can easily spin up a new certificate in the correct PEM format to install on your UAG boxes.
As shown, a few other steps may be required if you are using a load balancer. Also, you will need to replace the thumbprint on your UAG box pointed to the connection server environment, whether this is the load balancer or a direct connection with your Horizon Connection Server. However, this is a standard step you have to perform regardless.
Источник


