- VMware View Client с поддержкой PCoIP и пробросом USB на Linux
- Is there a vSphere Client for Linux and Mac?
- Run a Windows VM in Player, Workstation or Fusion
- Access your VM-console from Linux or Mac OS X with a VMware Player-console
- Host management with SSH and vCLI
- blog.vmpress.org
- Страницы
- понедельник, 11 января 2016 г.
- Установка и настройка VMware Horizon Client for Linux для Ubuntu 14.04
- Установка клиента
- Настройка аутентификации по смарт-картам
- Смарт-карты Aladdin eToken
- Смарт-карты Aladdin JaCarta
- vSphere Client on the Linux Desktop
VMware View Client с поддержкой PCoIP и пробросом USB на Linux
Как вы уже догадались с темы поста речь сегодня пойдет о установке VMware View Client (не VMware View Open Client) с поддержкой PCoIP и поддержкой проброса USB на Linux. Сразу хотел бы предупредить, что данное решение не является официальным, мало того, мне неизвестно насколько оно легально, т.к. в нем используются бинарные пакеты от HP которые официально предназначены для тонких клиентов HP ThinPro. И так, всех, кого не смущает мое предупреждение, прошу под кат.
Итак, мы имеем установленный и настроенный vCenter, один или несколько ESXi серверов, сервер VMware View Connection Server (подробнее об этом можно прочитать здесь или здесь, ну или тут). В качестве клиентских рабочих станций у меня выступают несколько стареньких ПК (Celeron 1.7/128MB/20Gb/100Mbit) с ОС Debian 6.0.3 i386 (хотя можно использовать любой линукс, но предпочтительно использовать дебианоподобные дистрибутивы) в минимальной инсталяции. Я подозреваю что можно использовать и более старые ПК (запускал в виртуальной машине с лимитом частоты процессора в 400Mhz и 64Mb RAM, но производительность современного серверного железа с физическим 7-10 летней давности нельзя), а под рукой не оказалось таких для эксперимента.
Итак, приступим к настройке клиентской рабочей станции. Для начала устанавливаем Debian 6.0.3 в минимальной конфигурации на последнем этапе выбрав помимо стандартных системных утилит только ssh сервер (для удаленного управление рабочей станцией). Далее ставим «иксы» и дополнительные зависимости VMware View Client:
# aptitude install xinit libqtgui4 libcurl3 libpcsclite1 libsamplerate0 libasound2 libgtk2.0-0 sudo
А теперь приступаем к установке самого клиента. Скачиваем необходимые пакеты с ftp сервера HP:
# wget ftp.hp.com/pub/tcdebian/pool/thinpro33/non-free/hptc-manticore_3.2.1_i386.deb
root@viewclient:
# wget ftp.hp.com/pub/tcdebian/pool/thinpro32/main/hptc-rdesktop_1.6.0-1.35_i386.deb
root@viewclient:
# wget ftp.hp.com/pub/tcdebian/pool/thinpro33/non-free/hptc-sudo-edit_0.1_i386.deb
root@viewclient:
К сожалению на данный момент нет пакетов для 5-й версии, но клиент версии 4.6 может свободно работать с сервером 5-й версии, за исключением новых фич, которые доступны в VMware View Client 5.0. Я думаю вы заметили что пакет hptc-rdesktop скачивается не из то директории, в которой расположены остальные файлы, хоть он там и есть, да еще и более новой версии. Дело в том, что новая версия собрана с поддержкой библиотеки libao2, но в репозитарии Debian Squeezze имеется только libao4. libao2 доступен в Debian Lenny. Если в вашем дистрибутиве есть libao2 можно использовать более свежий пакет hptc-rdesktop.
Инсталлируем их в следующей последовательности:
# dpkg -i hptc-manticore_3.2.1_i386.deb
root@viewclient:
# dpkg -i hptc-rdesktop_1.6.0-1.35_i386.deb
root@viewclient:
# dpkg -i hptc-sudo-edit_0.1_i386.deb
root@viewclient:
# dpkg -i vmware-view-client_4.6.0-366101-2_i386.deb
Создаем симлинк, дял корректной работы проброса USB:
# ln -s /usr/lib/vmware/vmware-view-usb /etc/vmware/usb.link
И пробуем запустить клиент следующей командой:

Если запуск произошел без ошибок можно открыть первую бутылку пива.
Теперь необходимо привести все это добро в удобоваримый для конечного пользователя вид. В процессе установки ОС был создан пользователь view, под которым будет запускаться VMware View Client. Для начала настроим автоматический запуск «иксов» при загрузке системы под пользователем view. Для этого редактируем файл rc.local добавив перед заключительной строкой exit 0 следующую строчку:
su — view -c startx
Перезагружаемся что бы удостовериться что «иксы» стартовали успешно. Если все ок, последним этапом настраиваем автоматический старт VMware View Client при старте «иксов» и выключение ПК после его закрытия. Для этого в домашней директории пользователя создаем файл .xinitrc следующего содержания:
Создаем скрипт vmwareview.sh:
#!/bin/sh
/usr/bin/vmware-view && sudo /sbin/shutdown -hP now
И редактируем файл sudoers, разрешив пользователю view выключать ПК:
view ALL = NOPASSWD: /sbin/shutdown -hP now
Еще раз перегружаемся и убеждаемся что все работает как запланировано. Открываем вторую бутылку пива.
На этом пожалуй все. В данной статье я рассмотрел только базовую настройку ОС клиентского ПК для запуска VMware View Client под Linux, но ее достаточно для комфортной работы.
Источник
Is there a vSphere Client for Linux and Mac?
If you are using a Linux-based pc or Mac OS X and want to manage a vSphere-environment then you might ask yourself the question if there is a native OS-version of the vSphere Client available for your platform.
The short answer is: no.
The longer answer is: do you need one? And is there an alternative? For most day to day operations you should move to the vSphere Web Client. And you can access that from your Linux system and Mac OS X. The only problem with that is that it only works with vCenter. So what do you do when your vCenter server is down or what to do if you only have one ESXi server?
There are a few tools that you can use to make administration for your environment simpler. But you would always need the vSphere Client on Windows at least once after installation of ESXi to for example import the vCenter Virtual Appliance (explained here) Or to create a virtual machine.
 It is also possible to import the appliance from the command line with VMware’s OVF Tool, which is available for Linux and Windows. How to do this is explained in this article.
Run a Windows VM in Player, Workstation or Fusion
To work with the full vSphere Client on Windows you can run it in a Windows virtual machine or from a physical Windows computer to configure the ESXi-host and create virtual machines. I personally run openSUSE and work with Linux for the largest part of the day. But from time to time there are Windows-based applications for which there really is no alternative and for those cases I have a Windows VM on my laptop.
Access your VM-console from Linux or Mac OS X with a VMware Player-console
Once your ESXi-host is up and running and you have multiple virtual machines running and maybe also vCenter deployed as a virtual appliance then you can access the console of those virtual machines with VMware Player. This tool is available as a download for Windows and Linux (www.vmware.com/go/downloadplayer) and it’s included with Mac OS X.
With VMware Player installed you can run it from the command line and connect to an ESXi-host:
This will open a VMware Player window and requests login to the host. You can provide the host’s IP-address with the -h parameter but if you leave it out you can enter it with the user credentials.

Once you are logged in you will see a list of available virtual machine. If the VM is not powered on and you open a console to the VM it will be powered on. If it’s already running you can connect directly to the virtual machine. In the image below you see a VM running Windows. It also has the vSphere Client to allow you to manage the ESXi-host.

Host management with SSH and vCLI
You can also perform some management tasks from an SSH-connection to your host. You must enable your SSH-server on the ESXi-server before you can do this. You can enable this from the vSphere Client or from the Direct Console User Interface (DCUI) on the server’s console. Once you have access with SSH and you want to use the DCUI for configuration purposes you can type this command:
And it will open the menu-based console in your SSH-session. To close it press ctrl-c.
Источник
blog.vmpress.org
Страницы
понедельник, 11 января 2016 г.
Установка и настройка VMware Horizon Client for Linux для Ubuntu 14.04

Из функций, которые на текущий момент не поддерживаются в клиенте для Linux: MMR (Multimedia Redirection), проброс сканеров и serial портов, подключенных к клиентским устройствам.
В качестве примера рассмотрим установку клиента под 32-битной версией ОС Ubuntu 14.04.3 (64-битная версия Ubuntu 14.04 на текущий момент официально не поддерживается).
Установка клиента
Перед установкой клиента загрузите последние актуальные обновления для ОС:
Создайте символическую ссылку на библиотеку libudev (требуется для работы USB Redirection и RTAV):
В Ubuntu Software Center доступна устаревшая версия клиента VMware View Client 2.2, поэтому загрузите с сайта VMware последнюю версию VMware Horizon Client 3.5 и запустите процедуру установки:
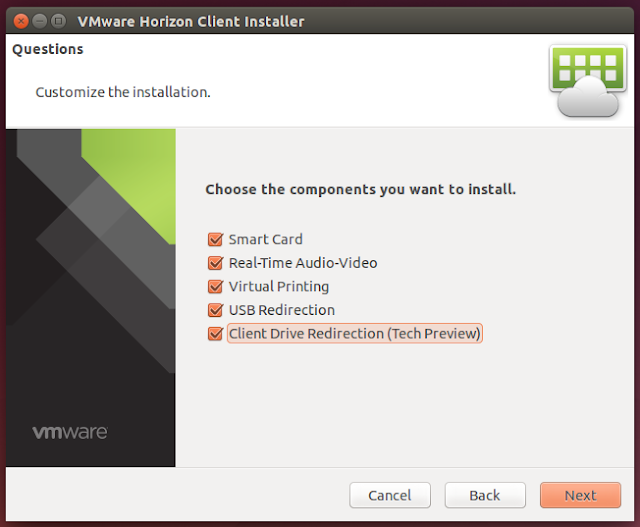
Примите лицензионное соглашение и выберите компоненты, которые требуется установить.
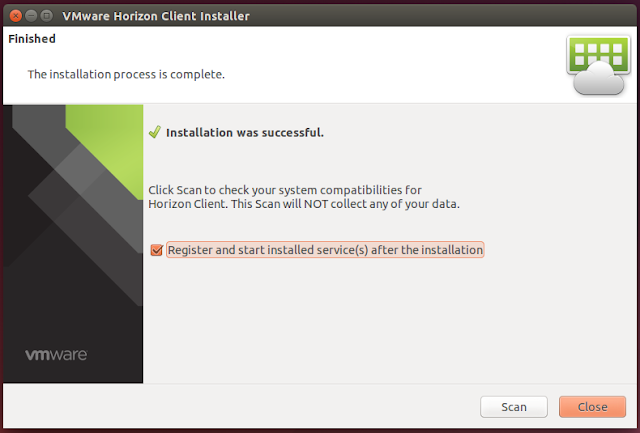
Клиент готов к работе и может быть запущен из консоли с помощью команды vmware-view, что довольно неудобно. В качестве альтернативного варианта можно создать ярлык и добавить его на панель Unity Launcher. Для этого создайте файл-описание:
Добавьте в него следующее содержимое:
Зарегистритуйте приложение, используя файл-описание:
Теперь приложение появится в списке доступных для запуска, и его можно будет вынести на панель launcher’а.

Настройка аутентификации по смарт-картам
Для аутентификации через клиент Horizon Client по смарт-картам требуется дополнительная настройка. В качестве примера приведено описание настройки для CCID карт-ридера и смарт-карт Aladdin eToken.
Для начала установите необходимые записимости:
Если вы используете CCID карт-ридер с драйвером libccid, то он автоматически определится ОС, для других моделей может потребоваться установка дополнительных драйверов (например, Athena ASEDrive IIIe). Список карт-ридеров и драйверов можно посмотреть на сайте wiki.debian.org/Smartcards.
Проверьте, что карт-ридер корректно работает, используя команду:

Смарт-карты Aladdin eToken
Для аутентификации с использованием eToken смарт-карт потребуется установить ПО SafeNet Authentication Client.
Перед установкой SAC загрузите и установите две библиотеки (libhal1 и libha1-storage1):
Загрузите дистрибутив SAC с сайта (для примера используется версия SAC 8.3). Установите ПО:
Запустите SafeNet Authentication Client Tools и проверьте, что ОС видит сертификаты на смарт-карте.

Создайте каталог и символическую ссылку на библиотеку eToken:
Теперь аутентификация по смарт-картам должна заработать.

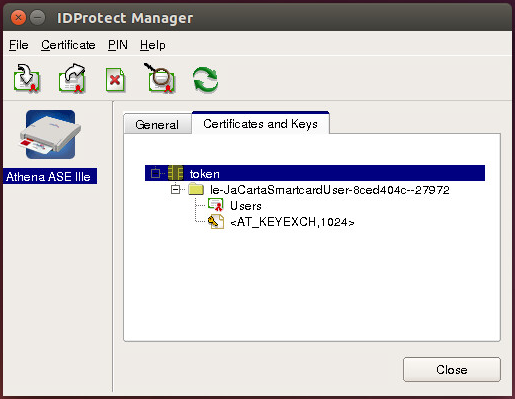
Смарт-карты Aladdin JaCarta
Для работы со смарт-картами Aladdin JaCarta вам потребуется загрузить ПО JaCarta PKI for Linux (http://www.aladdin-rd.ru/support/downloads/39875/).
После загрузки распакуйте архив и установите клиент JaCarta PKI:
При помощи утилиты IDProtect Manager проверьте, что смарт-карта видна в ОС.
Создайте каталог и символическую ссылку на библиотеку JaCarta:
Теперь аутентификация по смарт-картам должна заработать.
Источник
vSphere Client on the Linux Desktop
A lot of linux users are looking for a way to run .Net applications on their desktop, too. Since Wine does not provide the ability to do so and running an entire VM to use the complete Windows Desktop is an annoying option, these users are looking for a better solution. For Example the VMware vSphere Client, which requires .Net Framework and does not come as a Linux Version, forces Users and Admins to step back to Windows. But using Seamless RDP by Cendio, there is a way around this.
This Howto applies to Windows VMs running in background in any
virtualization product or physical systems alike. Also, this is of
course not limited to the VMware vSphere Client and can be used to run
any Windows application.
- On the Windows System (e.g. a VM or the VMware vCenter Server) download the GPL licensed SeamlessRDP Tool and extract it into a folder, e.g. C:\RDP
- Also, install the application you wish to use on your Linux Desktop
- Enable the Remote Desktop in System Settings — Remote tab — «Allow users to connect remotely to this computer.». You might want to create an extra user for the remote access and enable it to connect via RDP.
- Within the SemalessRDP folder, create a .bat file that runs your needed application, followed by the logoff command to make sure the session gets closed after usage. E.g: vsphere.bat:
«C:\Program Files\VMware\Infrastructure\Virtual Infrastructure Client\Launcher\VpxClient.exe»
logoff
- Install rdesktop on your Linux system, using the appropriate way for your distribution or sources from www.rdesktop.org. Make sure you are using at least rdesktop version 1.5.
- On your Linux Desktop, create a shourtcut for your Application, e.g. vSphere Client and call the following command from this shourtcut:
You can of course create an extra user for the remote access and need
to insert the appropriate IP Address and Batch file to call. In my
vSphere example this looks like:
rdesktop -A -s «C:\RDP\seamlessrdpshell.exe C:\RDP\sphere.bat» 192.168.1.23 -u remote -p remoteP@55
- On running the shourtcut from your Linux desktop, rdesktop will initialize a seamless session to the Windows system, start the batchfile to open the vSphere Client, and present only the application Window to our Linux Desktop.
So far this is probably the best solution we have to bring the VMware vSphere Client to the Linux Desktop. Enjoy.
Источник


