- How to expand disk capacity for vmware linux virtual machine
- Increase A VMware Disk Size (VMDK) Formatted As Linux LVM without rebooting
- 1) Checking if you can extend the current disk or need to add a new one
- 2) The “hardware” part, “physically” adding diskspace to your VM
- Partitioning the unallocated space
- 3) If you’ve increased the disk size
- 3) If you’ve added a new disk
- Create the new partition
- 3) Extend your Logical Volume with the new partition
- Artem Russakovskii’s programming and technology blog
- How To Resize/Grow VMware Linux Disks and Partitions
- How to rescan disk in Linux after extending VMware disk
- Step 1:
- Step 2:
- Step 3:
- Step 4:
How to expand disk capacity for vmware linux virtual machine
First, make a clone of the vmware linux virtual machine. So even if you make serious mistake during the process, you still have all your data.
By default installation, linux virtual machine (Fedora, RHEL or CentOS) has two partitions, one for swapping, and the other one is a lv partition. The lvm partition mount as /, and cannot be resized by partition tools such as partition magic or gparted.
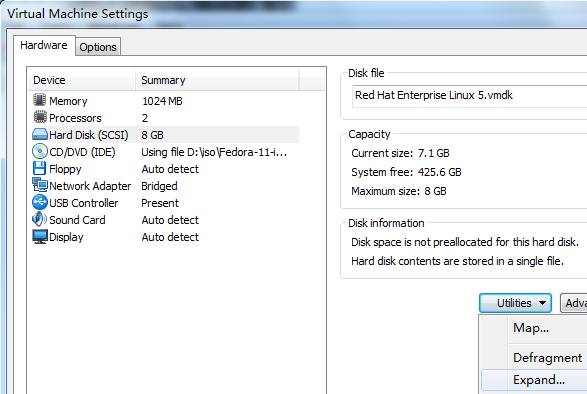
Before expansion, as shown below, we were almost run out of disk space:

The logical volume /dev/maper/VolGroup00 only has 16% free space.
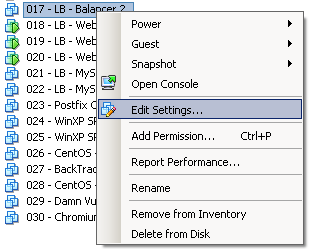
Open virtual machine’s settings, select hard disk and click «Utilities» button, and select «Expand»:
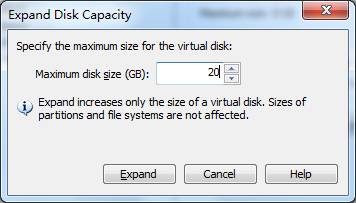
Expand the disk size to 20GB:
Boot up, open a terminal and run
Type «n» and hit enter. Then press «p» to create a primary partition. It asks you for a partition number, enter «3». Now you are asked which cylinder the partition should start at, the beginning of the drive is the default, so just hit Enter. Then you are asked for the last cylinder, the end of the drive is default so you can just press Enter again. Here are the commands and results inside fdisk:
After fdisk is done, reboot.
If system-config-lvm is not installed, use this command to install it first:
Launch system-config-lvm, as in the following image, select «Partition 3» under the «Uninitialized Entities», then press «Initialize Entity» button to initialize it.
After this partition being initialized, it appears under the «Unallocated Volumes» node:
Press the «Add to existing Volume Group» to get it to join the «VolGroup00».
After it is done, select the logVol00 under VolGroup00, then press «Edit Properties» button:
Press the «Use remaining» button to make it use all the capacity, and then press the «Ok» button:
Now we have resized the disk capacity. Run df command to verify it:

Please feel free to contact support@ireasoning.com if you have any questions.
Tags: LVM, VMWARE, RESIZE, FDISK
Источник
Increase A VMware Disk Size (VMDK) Formatted As Linux LVM without rebooting
Mattias Geniar, August 27, 2010
Follow me on Twitter as @mattiasgeniar
To increase the size of your VMware Virtual Machine, you need to do 2 major steps. First, you need to increase the disk’s size in your vSphere Client or through the CLI. This will increase the “hardware” disk that your Virtual Machine can see. Then, you need to utilize that extra space by partitioning it. If you’re interested in just resizing your Linux LVM, please proceed to step 2.
In this example, I’m increasing a 3GB disk to a 10GB disk (so you can follow using the examples).
I would advise you to read the excellent documention on Logical Volume Management on tldp.org.
Just a small note beforehand; if your server supports hot adding new disks, you can just as easily add a new Hard Disk to your Virtual Machine. You can increase the LVM volume without rebooting your Virtual Machine by rescanning the SCSI bus, more on that later in this article.
1) Checking if you can extend the current disk or need to add a new one
This is rather important step, because a disk that has been partitioned in 4 primary partitions already can not be extended any more. To check this, log into your server and run fdisk -l at the command line.
If it looks like that, with only 2 partitions, you can safely extend the current hard disk in the Virtual Machine.
However, if it looks like this:
It will show you that there are already 4 primary partitions on the system, and you need to add a new Virtual Disk to your Virtual Machine. You can still use that extra Virtual Disk to increase your LVM size, so don’t worry.
2) The “hardware” part, “physically” adding diskspace to your VM
Increasing the disk size can be done via the vSphere Client, by editing the settings of the VM (right click > Settings).
Now, depending on the first step, if there aren’t four primary partitions yet, you can increasing the privisioned disk space.
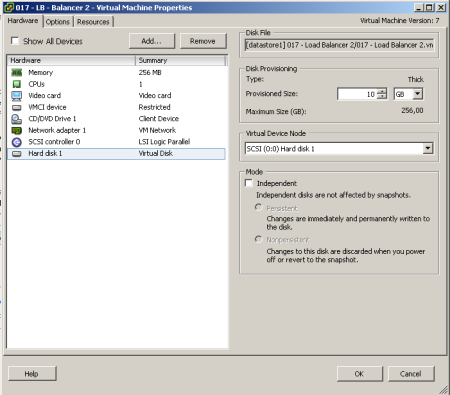
If the “Provisioned Size” area (top right corner) is greyed out, consider turning off the VM first (if it does not allow “hot adding” of disks/sizes), and check if you have any snapshots made of that VM. You can not increase the disk size, as long as there are available snapshots.
Alternatively, if you already have 4 primary paritions, you can also choose “Add…” to add new Hardware “Virtual Disk” to your VM, with the desired extra space.
Partitioning the unallocated space
There’s 2 ways you can do this.
3) If you’ve increased the disk size
Once you’ve changed the disk’s size in VMware, boot up your VM again if you had to shut it down to increase the disk size in vSphere. If you’ve rebooted the server, you won’t have to rescan your SCSI devices as that happens on boot. If you did not reboot your server, rescan your SCSI devices as such.
First, check the name(s) of your scsi devices.
Then rescan the scsi bus. Below you can replace the ‘0:0:0:0’ with the actual scsi bus name found with the previous command. Each colon is prefixed with a slash, which is what makes it look weird.
That will rescan the current scsi bus and the disk size that has changed will show up.
3) If you’ve added a new disk
If you’ve added a new disk on the server, the actions are similar to those described above. But instead of rescanning an already existing scsi bus like show earlier, you have to rescan the host to detect the new scsi bus as you’ve added a new disk.
Your host device is called ‘host0’, rescan it as such:
It won’t show any output, but running ‘fdisk -l’ will show the new disk.
Create the new partition
Once the rescan is done (should only take a few seconds), you can check if the extra space can be seen on the disk.
So the server can now see the 10GB hard disk. Let’s create a partition, by start fdisk for the /dev/sda device.
Now enter ‘n’, to create a new partition.
Now choose “p” to create a new primary partition. Please note, your system can only have 4 primary partitions on this disk! If you’ve already reached this limit, create an extended partition.
Choose your partition number. Since I already had /dev/sda1 and /dev/sda2, the logical number would be 3.
Note; the cylinder values will vary on your system. It should be safe to just hint enter, as fdisk will give you a default value for the first and last cylinder (and for this, it will use the newly added diskspace).
Now type t to change the partition type. When prompted, enter the number of the partition you’ve just created in the previous steps. When you’re asked to enter the “Hex code”, enter 8e, and confirm by hitting enter.
Once you get back to the main command within fdisk, type w to write your partitions to the disk. You’ll get a message about the kernel still using the old partition table, and to reboot to use the new table. The reboot is not needed as you can also rescan for those partitions using partprobe. Run the following to scan for the newly created partition.
If that does not work for you, you can try to use “partx” to rescan the device and add the new partitions. In the command below, change /dev/sda to the disk on which you’ve just added a new partition.
If that still does not show you the newly created partition for you to use, you have to reboot the server. Afterwards, you can see the newly created partition with fdisk.
3) Extend your Logical Volume with the new partition
Now, create the physical volume as a basis for your LVM. Please replace /dev/sda3 with the newly created partition.
Now find out how your Volume Group is called.
Let’s extend that Volume Group by adding the newly created physical volume to it.
With pvscan, we can see our newly added physical volume, and the usable space (7GB in this case).
Now we can extend Logical Volume (as opposed to the Physical Volume we added to the group earlier). The command is “lvextend /dev/VolGroupxx /dev/sdXX«.
If you’re running this on Ubuntu, use the following.
All that remains now, it to resize the file system to the volume group, so we can use the space. Replace the path to the correct /dev device if you’re on ubuntu/debian like systems.
If you got an error like this, it may mean your filesystem is XFS instead of standard ext2/ext3.
In that case, you’ll need to increase the XFS partition. Read here for more details: Increase/Expand an XFS Filesystem in RHEL 7 / CentOS 7.
Источник
Artem Russakovskii’s programming and technology blog
How To Resize/Grow VMware Linux Disks and Partitions
Updated: January 18th, 2009
In this article, I will show how to resize a VMware disk if you didn’t make it large enough when it was created. Furthermore, I will show how to resize partitions following the disk augmentation using OpenSUSE 10.2 as an example. You will even be able to resize the Linux root partition (/) that is mounted and is normally unmountable.
The story: this is simple – you made a VMware disk without thinking ahead and now it ran out of space. Here you have a few options, the most notable ones being create another disk and mount it or grow the existing disk and resize the existing partitions. The first option is trivial, so let’s explore the 2nd one.
1. Backup the existing VMware disk file by copying it somewhere safe.
2. Grow the VMware disk file (note that I’m using Windows in this step because my host system is Windows XP). In order to do this, use the ‘vmware-vdiskmanager.exe’ utility that comes bundled with VMware and most likely sits in C:\Program Files\VMware\VMware Workstation. If the target size of the new disk is 10GB, issue the following command:
vmware-vdiskmanager.exe -x 10Gb «YOUR_DISK.vmdk»
The disk will crunch for a bit and hopefully happiy finish with Grow: 100% done. Now the maximum disk space has been increased to 10GB. At this point, all partitions remain the same size, with a bunch of unpartitioned free space added at the end of the disk.
3. Now you can boot the guest OS (OpenSUSE 10.2 in my example) and use some magical utility to resize your partitions. In YaST, for instance, you would go to System->Partitioner. You can resize pretty much any partition that can be unmounted (unmount it beforehand and never try to repartition a mounted one). That represents a problem if you, like me, want to grow the root partition /. Still with me? Then let’s go to the next step.
a) In order to repartition or resize a root partition, I will use a LiveCD of another OS. Or even better, a LiveCD that lives and breathes resizing things left and right. I’m talking about the GParted Live CD from http://gparted.sourceforge.net/livecd.php. Since a LiveCD is an operating system on its own loaded into RAM, it won’t need to mount any of your existing partitions. There’s a bug with the latest version 0.3.4-8, which prevents GParted from seeing any partitions in VMware systems at all, but 0.3.4-5 works like a charm. Download the ISO image, right click on the CD/DVD icon in the lower right part of the VMware window and click Edit. Then change the Connection to «Use ISO image» and browse to the freshly downloaded GParted ISO. This will effectively mount the image without having to burn it onto a CD.
b) Reboot the guest OS. Quickly press F2 on the VMware preboot load screen to enter the virtual VMware BIOS. Go to the Boot tab and bring the CD-ROM drive to the top by scrolling to it and clicking + repeatedly. Now save and exit. The next time the OS tries to boot, it will first try to load the LiveCD, which is exactly what we want.
c) GParted should load after a few minutes where everything should be very straightforward. The screenshots here may help understand what I’m talking about. Fiddle with the settings, increase the root partition size, click Apply, and go have a few beers because this may take a while to finish. When it does, so are we, as we now have successfully grown the root partition.
d) Optionally revert the steps in part 4a and 4b.
5. Reboot into the guest OS again. Enjoy all the new extra space.
This concludes the article. Feel free to leave any questions or comments.
In the meantime, if you found this article useful, feel free to buy me a cup of coffee below.
Источник
How to rescan disk in Linux after extending VMware disk
Published: June 23, 2017 | Modified: June 24, 2020
Learn to rescan disk in Linux VM when its backed vdisk in VMware is extended. This method does not require downtime and no data loss.
Sometimes we get a disk utilization situations and needs to increase disk space. In the VMware environment, this can be done on the fly at VMware level. VM assigned disk can be increased in size without any downtime. But, you need to take care of increasing space at OS level within VM. In such a scenario we often think, how to increase disk size in Linux when VMware disk size is increased? or how to increase mount point size when vdisk size is increased? or steps for expanding LVM partitions in VMware Linux guest? or how to rescan disk when vdisk expanded? We are going to see steps to achieve this without any downtime.
In our example here, we have one disk /dev/sdd assigned to VM of 1GB. It is part of volume group vg01 and mount point /mydrive is carved out of it. Now, we will increase the size of the disk to 2GB at VMware level and then will add up this space in the mount point /mydrive .
If you re using the whole disk in LVM without any fdisk partitioning, then skip step 1 and step 3.
Step 1:
See below fdisk -l output snippet showing disk /dev/sdd of 1GB size. We have created a single primary partition on it /dev/sdd1 which in turn forms vg01 as stated earlier. Always make sure you have data backup in place of the disk you are working on.
Step 2:
Now, change disk size at VMware level. We are increasing it by 1 more GB so the final size is 2GB now. At this stage disk need to be re-scanned in Linux so that kernel identifies this size change. Re-scan disk using below command :
Make sure you use the correct disk name in command (before rescan). You can match your SCSI number (X:X:X:X) with VMware disk using this method.
Note : Sending “– – -” to /sys/class/scsi_host/hostX/scan is scanning SCSI host adapters for new disks on every channel (first -), every target (second -), and every device i.e. disk/lun (third -) i.e. CTD format. This will only help to scan when new devices are attached to the system. It will not help us to re-scan already identified devices.
That’s why we have to send “1” to /sys/class/block/XYZ/device/rescan to respective SCSI block device to refresh device information like the size. So this will be helpful here since our device is already identified by the kernel but we want the kernel to re-read its new size and update itself accordingly.
Now, kernel re-scan disk and fetch its new size. You can see new size is being shown in your fdisk -l output.
Step 3:
At this stage, our kernel know the new size of the disk but our partition ( /dev/sdd1 ) is still of old 1GB size. This left us no choice but to delete this partition and re-create it again with full size. Make a note here your data is safe and make sure your (old & new) partition is marked as Linux LVM using hex code 8e or else your will mess up the whole configuration.
Delete and re-create partition using fdisk console as below:
All fdisk prompt commands are highlighted in the above output. Now you can see the new partition /dev/sdd1 is of 2GB size. But this partition table is not yet written to disk. Use w command at fdisk prompt to write table.
You may see the warning and error like above. If yes, you can use partprobe -s and you should be good. If you still below error with partprobe then you need to reboot your system (which is sad ).
Step 4:
Now rest of the part should be tackled by LVM. You need to resize PV so that LVM identifies this new space. This can be done with pvresize command.
As new PV size is learned by LVM you should see free/extra space available in VG.
You can see our VG now have 2GB space! Now you can use this space to create new lvol in this VG or extend existing lvol using LVM commands. Further you can extend filesystem online which is sitting on logical volumes.
You can observe all lvol in this VG will be unaffected by this activity and data is still there as it was previously.
Источник


