- Migrate a windows vmware virtual machine to Linux KVM
- Convert the disk image
- merge the vmware disk images…
- convert the vmdk image to qcow2
- Import the disk image to KVM
- Available os options
- import
- Install the virtio drivers and QXL graphics drivers
- Get them…
- Type of virtio drivers
- ISO contents
- Download
- Installation
- mount the iso image
- Install
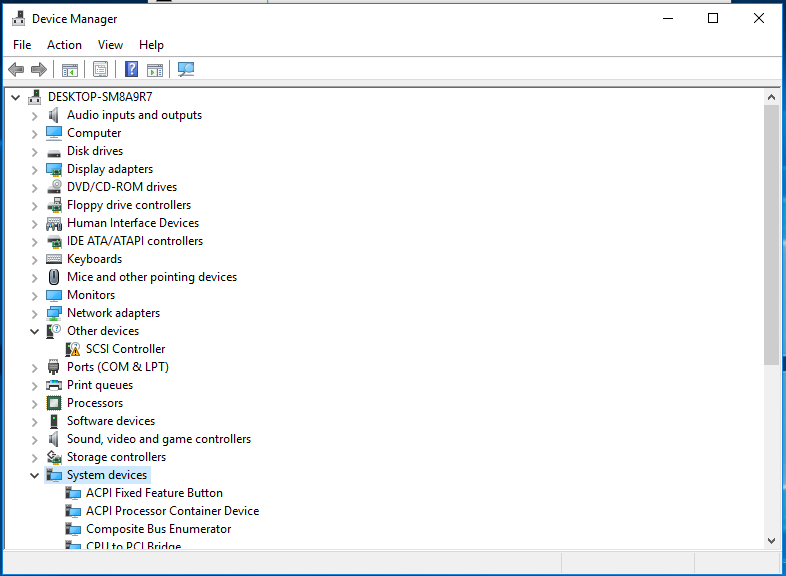
- Open Device Manager
- Update the drivers
- Links
- Share on
- Leave a comment
- You may also enjoy
- How to run a FreeBSD Virtual Machine on the RPI4 with QEMU. Part 2: Network, Install from cdrom, startup
- How to run a FreeBSD Virtual Machine on the RPI4 with QEMU. Part 1: QEMU setup
- OpenVAS on Kali GNU/Linux Part 2: First scan
- OpenVAS on Kali GNU/Linux Part 1: How to install OpenVAS
- Можно ли использовать виртуальную машину VMware в KVM?
- Vmware to kvm windows
Migrate a windows vmware virtual machine to Linux KVM
July 1, 2018 6 minute read
Linux KVM is getting more and more useable for desktop virtualization thanks to the the virtio and QXL/SPICE drivers.
Most Linux distributes have the virtio & QXL drivers you might need to install the spice-vdagent.
On Windows you can download and install the virtio and QXL drivers.
Using the virtio drivers will improve your guest system performance and your virtualization experience.
Convert the disk image
merge the vmware disk images…
If you use split disk images on vmware ( or vmware player ) migrate them to a single disk images with the vmware-vdiskmanager command.
convert the vmdk image to qcow2
Convert the VMDK disk image to qcow2
Import the disk image to KVM
We’ll inport the disk image with virt-install it’s also posible to import the images with virt-manager if you prefer a graphical interface or or just being lazy 🙂
Available os options
To list the supported operation system you can use the osinfo-query os command
import
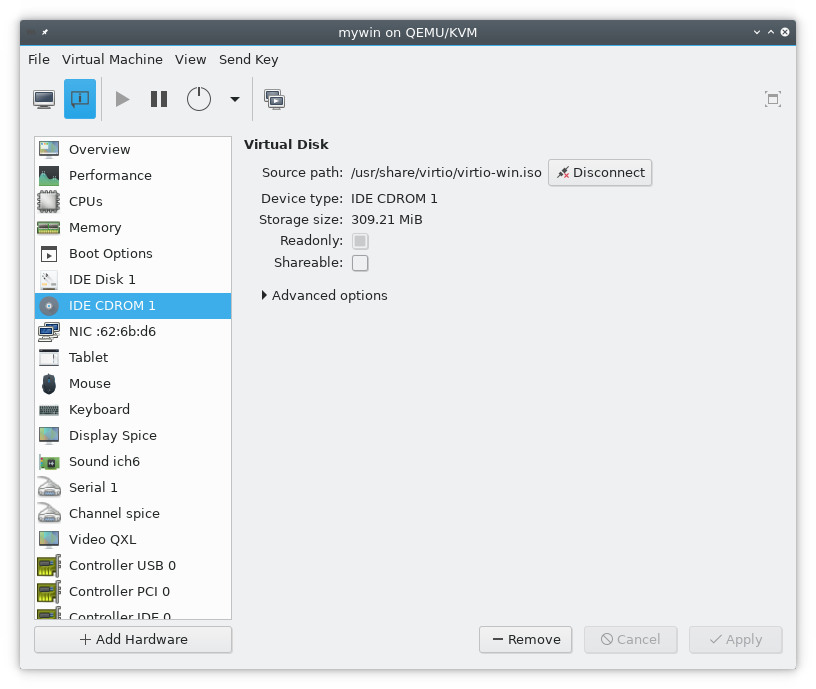
We need to import the disk image as IDE device since we don’t have the virtio driver in our windows disk image (yet).
Install the virtio drivers and QXL graphics drivers
Get them…
Type of virtio drivers
The following virtio windows drivers are available.
- block (disk drivers)
- network
- baloon ((dynamic memory management)
The fedoraproject provides pre compiled iso images containig all the virtio drivers and installation images for windows XP.
ISO contents
- NetKVM/ — Virtio network driver
- viostor/ — Virtio block driver
- vioscsi/ — Virtio Small Computer System Interface (SCSI) driver
- viorng/ — Virtio RNG driver
- vioser/ — Virtio serial driver
- Balloon/ — Virtio memory balloon driver
- qxl/ — QXL graphics driver for Windows 7 and earlier. (build virtio-win-0.1.103-1 and later)
- qxldod/ — QXL graphics driver for Windows 8 and later. (build virtio-win-0.1.103-2 and later)
- pvpanic/ — QEMU pvpanic device driver (build virtio-win-0.1.103-2 and later)
- guest-agent/ — QEMU Guest Agent 32bit and 64bit MSI installers
- qemupciserial/ — QEMU PCI serial device driver
- *.vfd VFD floppy images for using during install of Windows XP
Download
I use arch linux and download virtio-win AUR package with pacaur. You can download the images directly or use the installation packages for your Linux distribution.
This install virtio images to /usr/share/virtio/
virtio-win.iso is the ISO cdrom image containing all the drivers.
Installation
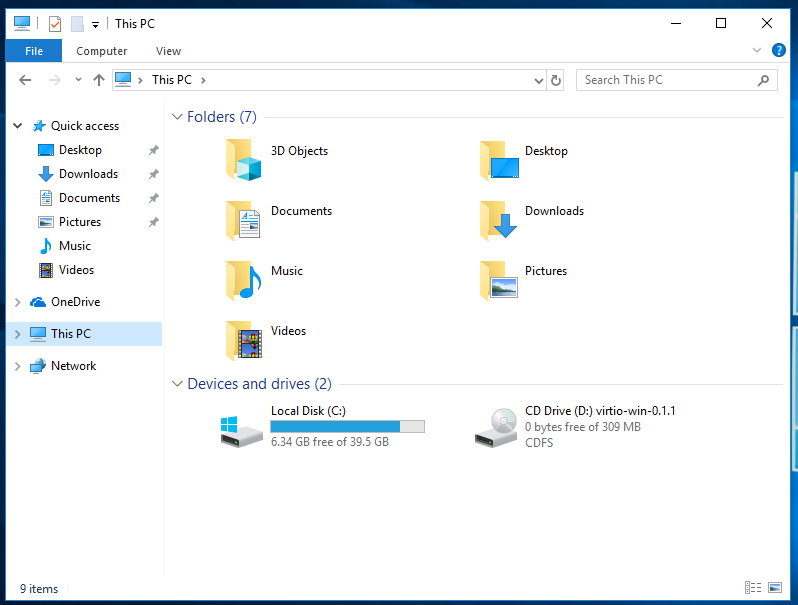
mount the iso image
Make sure that the cdrom is mounted in windows.
Install
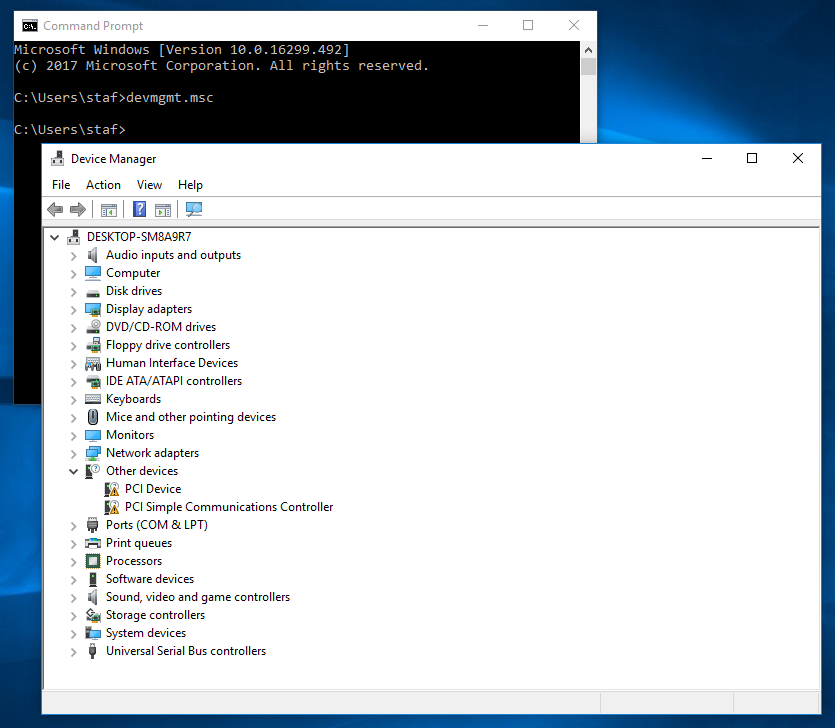
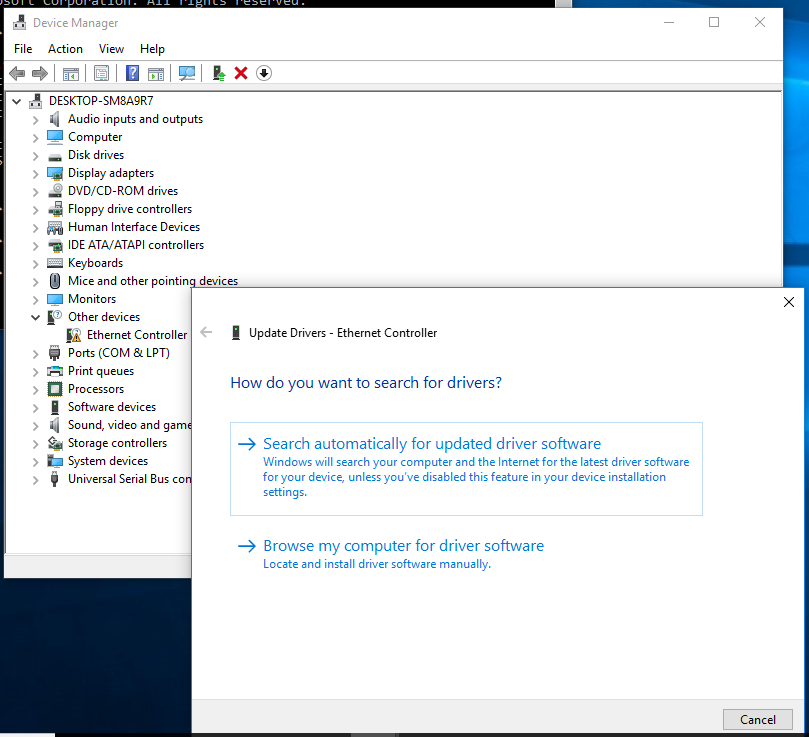
Open Device Manager
Open device Manager in the control panel or type devmgmt.msc on the command prompt.
Update the drivers
- balloon, the balloon driver affects the PCI device
- vioserial, affects the PCI simple communication controler
- NetKVM, the network driver affects the Network adapters.
- viostor, the block driver affects the Disk drives.
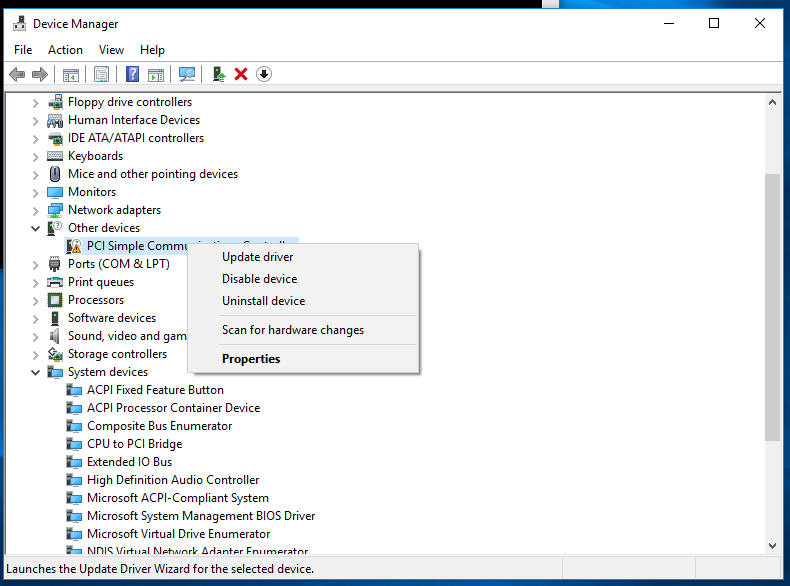
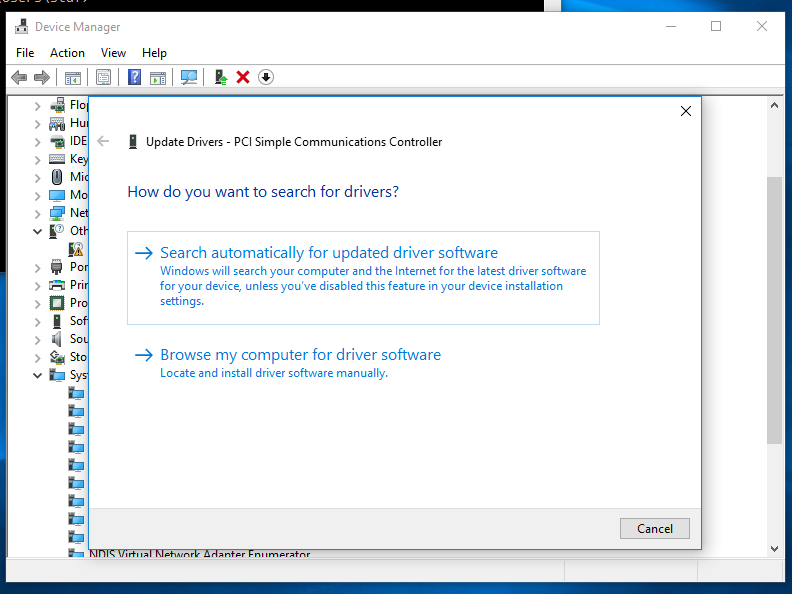
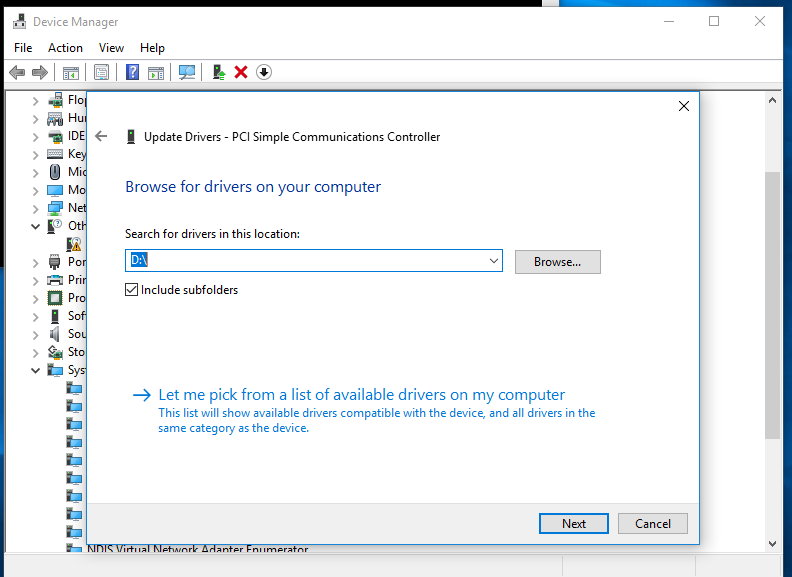
Update the PCI drivers
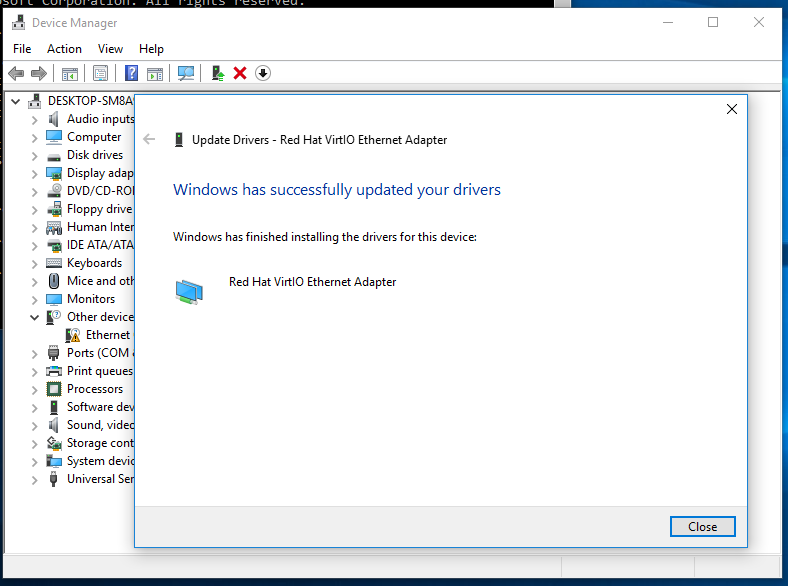
In windows 10 the PCI device and the PCI Simple Communications Controller have the missing driver icon. Right click on the PCI device and select update driver -> click on Browse my computer for driver software Specify the cdrom as the search location and click Next, this will install the Balloon driver.
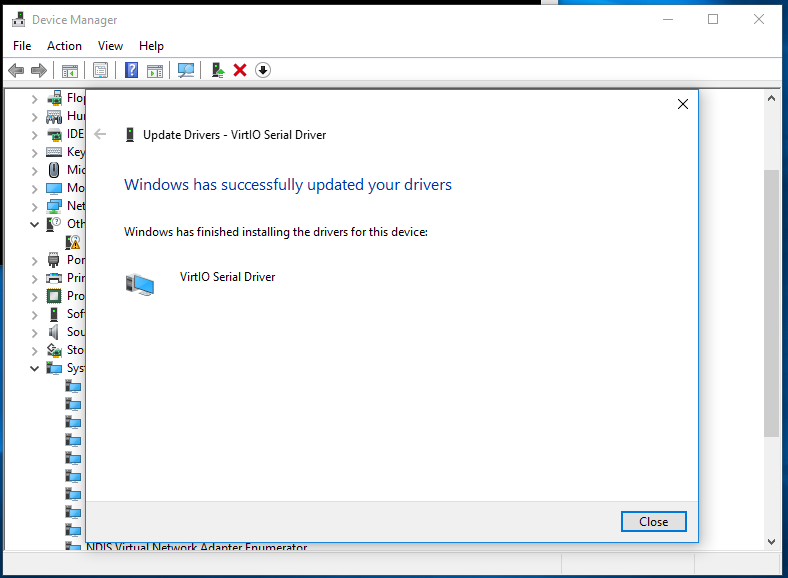
Do the same for the PCI Simple Communications Controller this will install the “VirtIO Serial Driver”
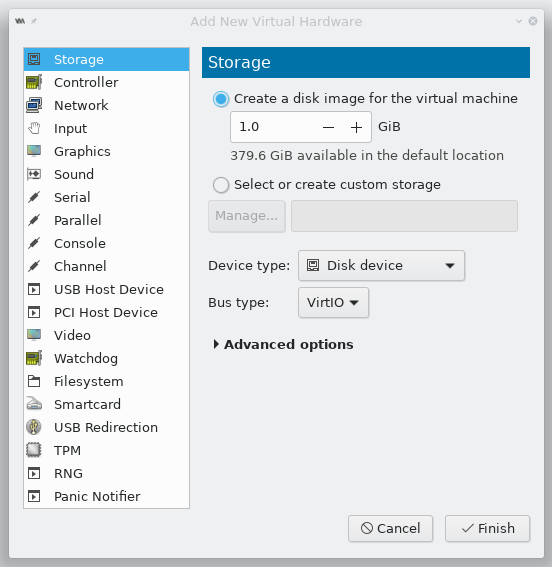
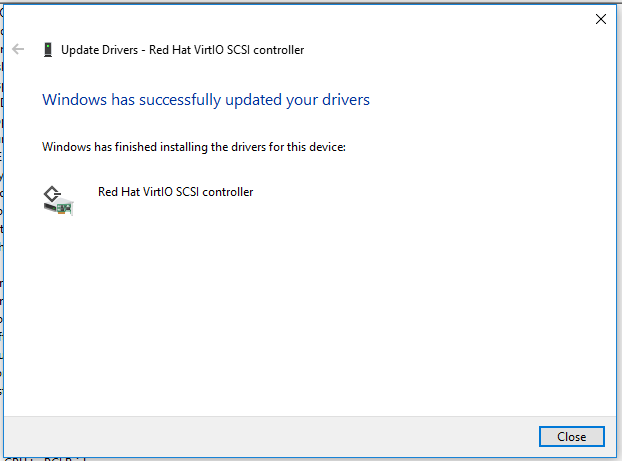
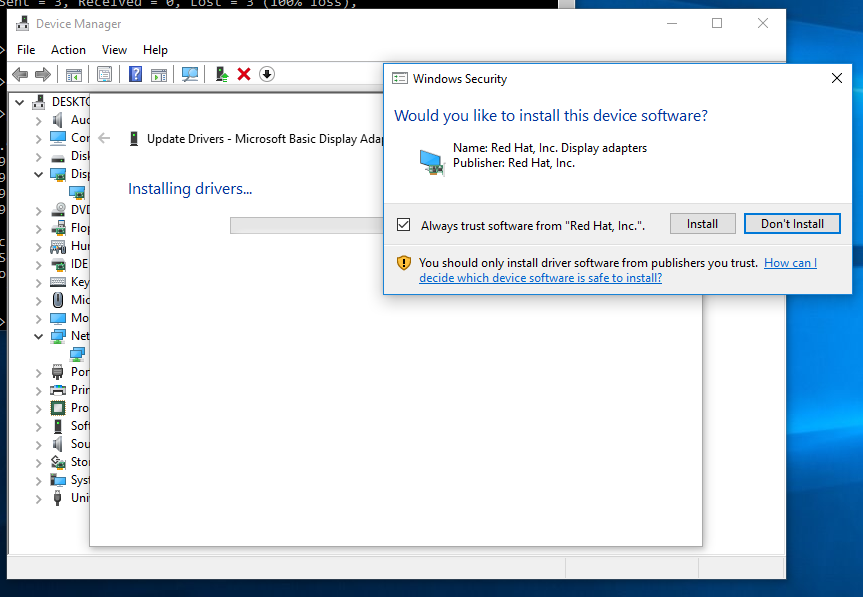
install the VioStor driver
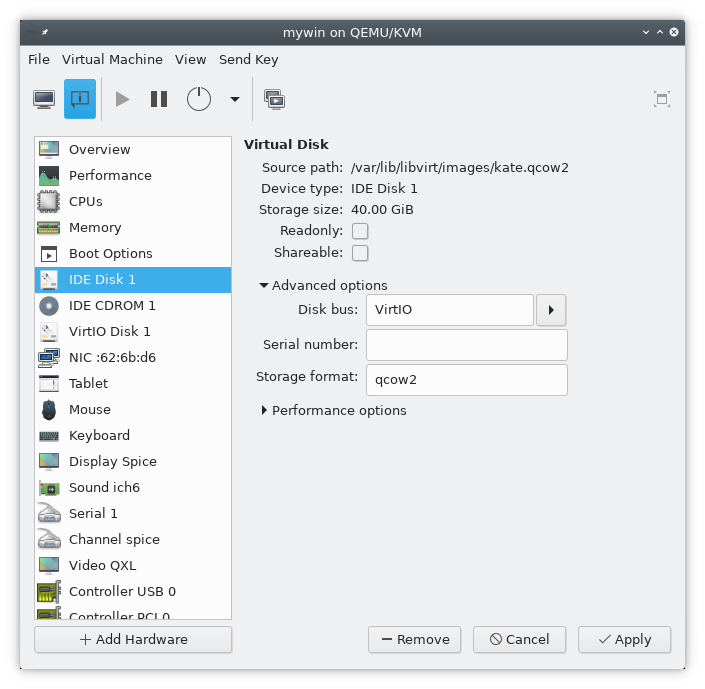
Add a temporary disk to the virtual machine and use VirtIO as the Bus Type In the Device Manager you’ll get a new device SCSI Controller right click it and update the driver. This will install the Red Hat VirtIO SCSI controller
Go to the device settings of your virtual machine and change the Disk bus to VirtIO and shutdown you virtual machine.
You can remove the temporary disk now or leave it if you can find some use for it…
Make sure that you disk is selected as the bootable device.
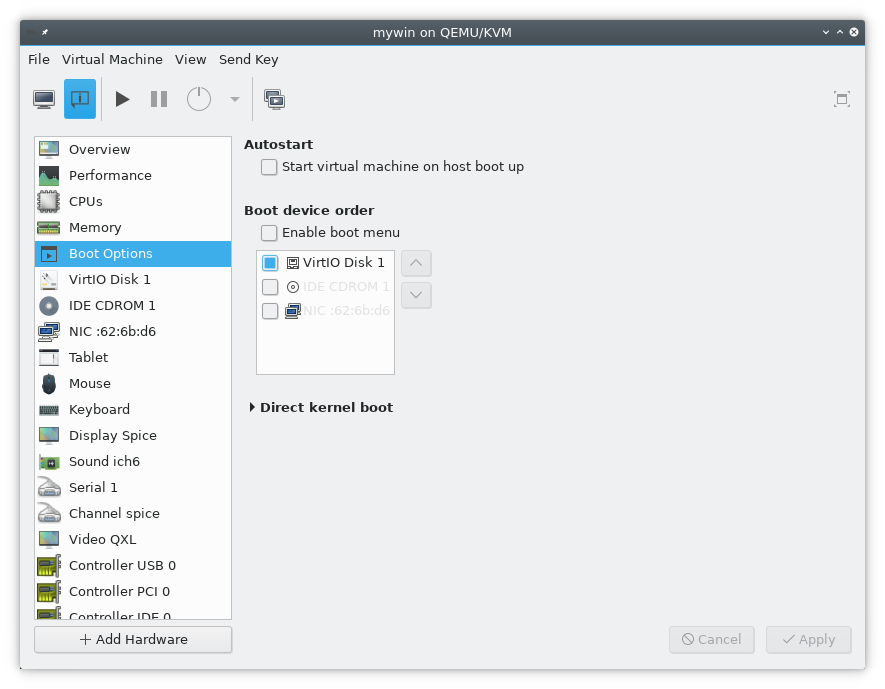
Start the virtual machine and make sure that the system is bootable.
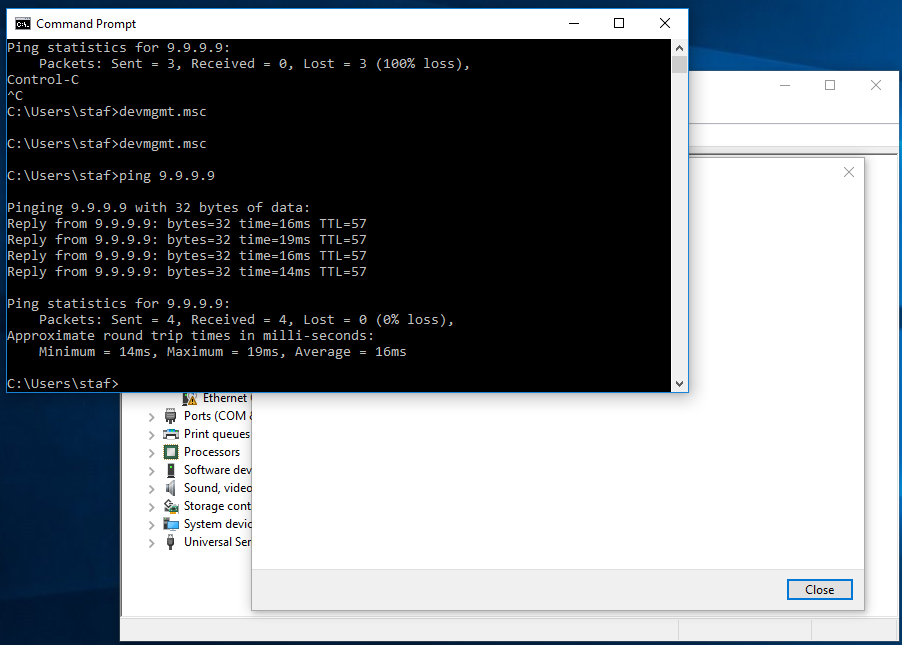
install the netKVM driver
Update the Device model to virtio.
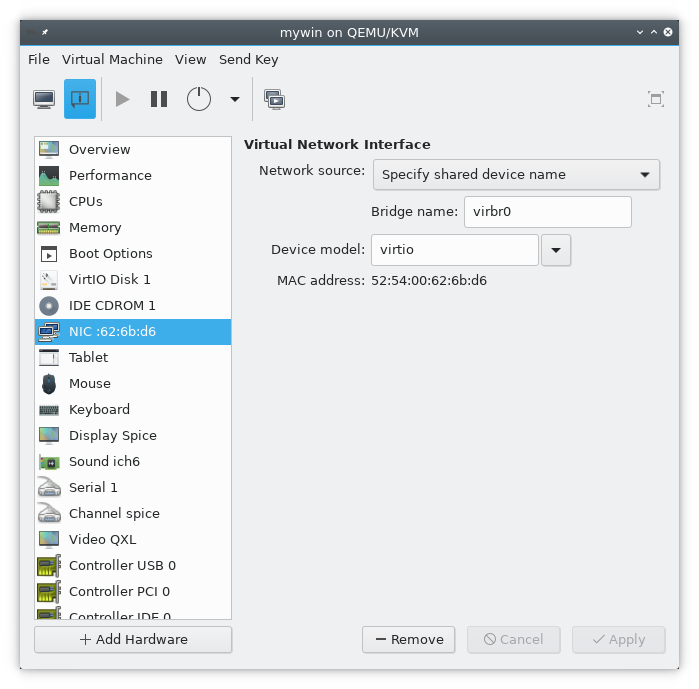
Start devmgmt.msc and update the driver as we did before….
And verify that you network card works correctly.
install the QXL graphical driver
Update the Microsoft Basic Display Adapter

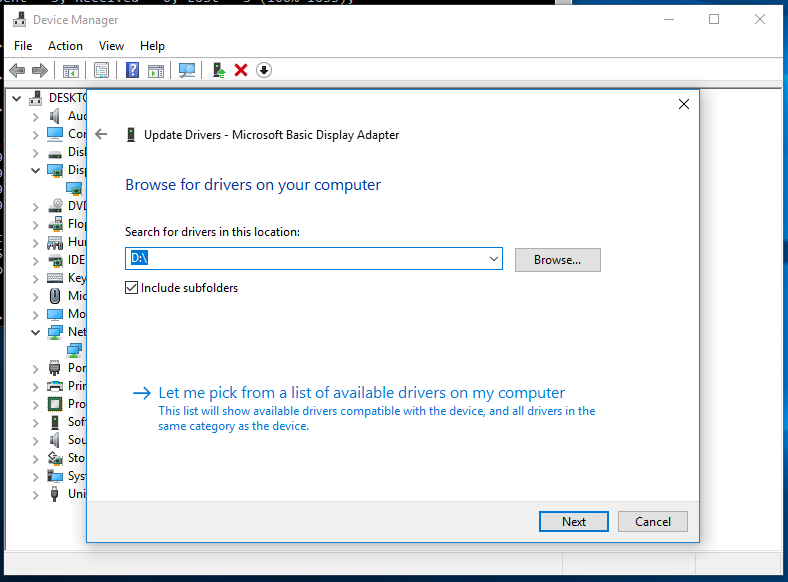
After the installation you can change the the display resolution.
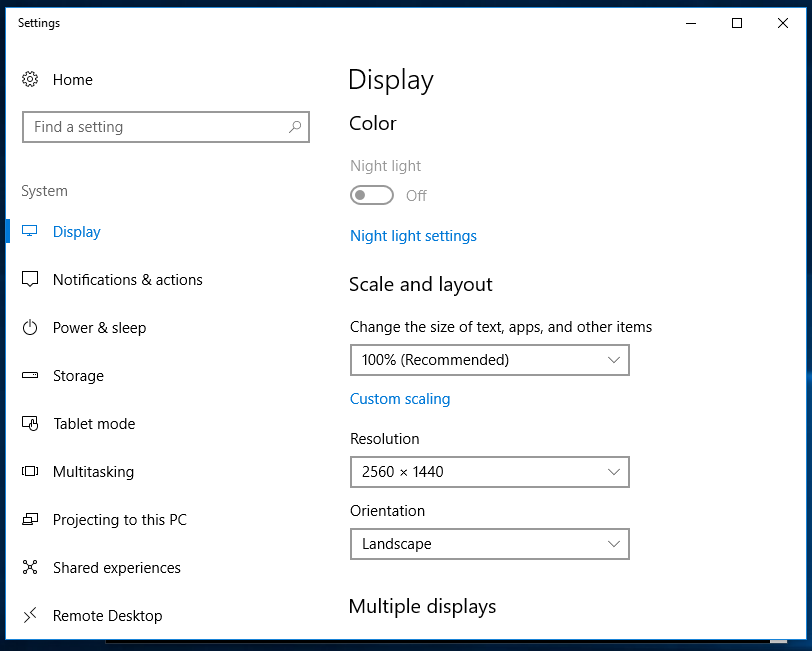
If you want to use higher screen resolutions you need to increase the video ram
Have fun!
Links
Updated: July 1, 2018
Share on
Leave a comment
You may also enjoy

How to run a FreeBSD Virtual Machine on the RPI4 with QEMU. Part 2: Network, Install from cdrom, startup
March 28, 2021 8 minute read
In my last blog post, we set up a FreeBSD virtual machine with QEMU. I switched from the EDK2 (UEFI) firmware to U-boot, the EDK2 firmware had issues with multiple CPU’s in the virtual machines.
In this blog post, we’ll continue with the Network setup, install the virtual machine from a CDROM image and how to start the virtual machine during the PI start-up.
How to run a FreeBSD Virtual Machine on the RPI4 with QEMU. Part 1: QEMU setup
March 14, 2021 2 minute read
I got a Raspberry PI 4 a couple of months back and started it use it to run virtual machines.
This works great for GNU/Linux distributions but FreeBSD as a virtual machine didn’t work for me. When I tried to install FreeBSD or import a virtual machine image, FreeBSD wasn’t able to mount the root filesystem and ended with an “error 19”.
On the FreeBSD wiki, there are a few articles on how to use ARM64 FreeBSD with QEMU directly.
You find my journey of getting a FreeBSD Virtual Machine below.
I use Manjaro on my Raspberry PI, but the same setup will work with other GNU/Linux distributions.
OpenVAS on Kali GNU/Linux Part 2: First scan
March 7, 2021 4 minute read
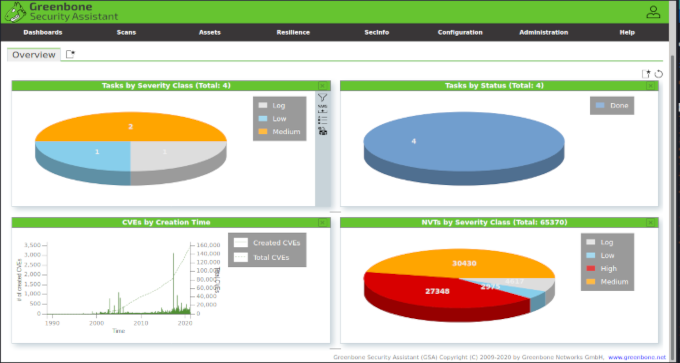
In my previous blog post, I described how to install OpenVAS, in this blog post we will configure and execute a security scan with OpenVAS.
OpenVAS documentation is available on the OpenVAS developer website Greenbone: https://docs.greenbone.net/
Logon to the Greenbone Manager assistend at https://127.0.0.1:9392.
OpenVAS on Kali GNU/Linux Part 1: How to install OpenVAS
February 28, 2021 6 minute read
OpenVAS is an opensource security scanner it started as a fork of Nessus which went from an opensource project to a closed source scanner.
I always prefer opensource software, for security tools, I even prefer it more… It nice to see/audit where the security data comes from, instead of the “magic” that is used by the close source software.
To scan for missing patches on your systems there are faster/better tools available that can be integrated into your build pipeline more easily. But OpenVAS is still a very nice network security scanner. Relying on one security tool is also not a “best security practice”.
Kali GNU/Linux has become the default Linux distribution for security auditing pen testing, it’s nice to have OpenVAS installed on your Kali GNU/Linux setup. If you just want to have OpenVAS available there is also a (virtual) appliance available from the OpenVAS developers ( Greenbone ).
You’ll find my journey to install OpenVAS on Kali GNU/Linux.
Можно ли использовать виртуальную машину VMware в KVM?
Главный претендент на замену коммерческой системы виртуализации VMware – это гипервизор KVM, который поддерживается современными ядрами Linux. Любой современный дистрибутив Linux в той или иной мере позволит воспользоваться системой виртуализации KVM. Передо мной как-то поставили задачу: можно ли запустить или конвертировать одну гостевую операционную систему из одной системы виртуализации в другую?
В KVM активно используется для построения виртуальной среды такой компонент как QEMU. QEMU умеет работать с файлами vmdk или конвертировать их в свой формат. Файлы vmdk представляют собой виртуальные жёсткие диски виртуальных машин VMware, которые можно напрямую использовать в QEMU НО:
- Поддерживаются только образы VMware 3, 4 и 6 версии.
- В VMware тип виртуального диска должен быть: 0 (single growable virtual disk) или 2 (preallocated virtual disk) или нужно получить из существующего виртуального диска требуемый с помощью vmware-vdiskmanager, что занимает определённое время, зависящее от размера виртуального диска.
- Конвертация конфигурации виртуализированного аппаратного обеспечения из одного формата (*.vmx) в другой в полностью автоматическом режиме невозможна. Требуется постоянный контроль человека и ручные правки.
- Для тех кто использует virt-manager для работы с KVM/QEMU есть инструмент vmware2libvirt, который обладает массой ограничений: находит только первый сетевой интерфейс, первый жёсткий диск, захардкорджено использование 1 CPU, нельзя использовать любые vmware-специфичные вещи для гостя.
Для перехода из одной системы виртуализации в другую настоятельно рекомендуется в гостевых виртуальных машинах с MS Windows Server провести мероприятия:
- Удалить установленные VMware Tools, которые оптимизируют работу виртуальной машины в среде VMware. Перезагрузиться.
- Из-за невозможности точь-в-точь воссоздать эмулируемое аппаратное обеспечение, системы MS Windows болезненно реагируют на смену аппаратуры и Plug-n-Play identifier (PnP-ID). Вполне ожидаемый результат будет Экран Смерти (Blue Screen of Death) с кодом ошибки 0x0000007B. Для избежания проблем рекомендуется для виртуальных машин с MS Windows перейти на использование интерфейса работы с дисками IDE через процедуру описанной на VMware to Proxmox VE (KVM). Перезагрузиться.
- Если переход с VMware на KVM удался, то можно оптимизировать работу MS Windows через установку драйверов virtio.
Вывод.
Все вышеперечисленные ограничения и возможные проблемы, дают право говорить, что полуавтоматическое использование существующих образов-дисков vmdk с установленной внутри MS Windows Server через гипервизор KVM возможен, но носит лабораторный и исследовательский характер. Использование такой гетерогенной системы из разных систем виртуализации на производстве будет очень проблематичным и без каких-либо гарантий в будущем.
Мы лишаемся какой-либо оптимизации и улучшения работы гостевых систем, так как под каждую систему виртуализации существуют свои программные решения, советы. Переход с одной системы на другую просто убивает все решения и советы на корню.
Что нового в бесплатной системе виртуализации Proxmox VE 4 на базе KVM/QEMU ?
Vmware to kvm windows
The vmware system consists of two disks in raw format: the old boot disk and the second one. It is Windows 2000 Server guest OS.
- Create empty new boot image (use dd).
- Boot stand alone OS from any other disk with old boot disk and new boot image connected (that is at least 3 disks).
- Sign up, make partition and format the new disk (do not make volume).
- xcopy /e /c /r /h /k /o /x /y old_boot_disk:\ new_boot_disk:\
- Copy boot.ini from new boot disk to the second one (that is not boot disk).
- Edit boot.ini on the second disk to boot from rdisk(1)
- Swap disks: new second.
- Boot setup from CD and go on Repair Procedure (after licence agreement) for the new boot disk.
- fdisk new boot image and toggle Boot flag.
- Swap disks back: second new.
- Boot from the new disk.
- Remove vmware tools and devices.
- Reboot and be happy.
P. S. To swap disks and edit boot.ini (items 5,6,7,10) should be excluded if the boot disk is named C:, that is right in most cases. Those items are for strange case, when boot disk is D: and second one is C:.
Starting at v0.12, Qemu-kvm has native support to VMware’s disk images v6 (seems to be compatible with v7, used by VMware Server). So VMware images can could be run with Qemu-kvm without any modification (make backups and do it at your own risks though !).
Look at your VMX configuration file:
- scsi0:0.fileName = «zimbra-000001.vmdk«
- uuid.bios = «56 4d 3f 3d 32 80 5b f2-94 31 21 c9 b2 c3 93 b9«
- ethernet0.generatedAddress = «00:0c:29:c3:93:b9«
And then build the command-line:
The UUID is optional, but might be useful for applications using it for validation (i.e. Windows), and the MAC address as well.
Second way could be to convert the disk image:


