- Vmware tools and kali linux
- Open-VM-Tools
- Adding Support for Shared Folders When Using OVT
- Vmware tools and kali linux
- Preparation
- Download
- Setup
- Troubleshooting
- libaio missing
- Missing Packages
- Too Newer Kernel
- vmware-host-modules + Kernel Updates
- Still can’t start up VMware? vmware-modconfi
- Can’t Power on a Virtual Machine
- Инструменты VMware в гостевой системе Kali (обновлённая инструкция для Kali Linux 1.1.0 и Kali Linux 2.0)
- Установка open-vm-tools
- Установка инструментов VMware в Kali
- One thought to “Инструменты VMware в гостевой системе Kali (обновлённая инструкция для Kali Linux 1.1.0 и Kali Linux 2.0)”
- VMware Arena
- Reserved Space for Virtualization
- Step by Step:How to Install VMware Tools on Kali Linux
- How to Install VMware Tools on Kali Linux
- How to Install Kali Linux on VMware VM
- Downloading the ISO Image
- Creating a New VMware VM
- Deploying Kali Linux on VMware VM
- Installing the Operating System
- Installing VMware Tools on Kali Linux VMware VM
- Configuring Screen Resolution
- How to Connect a WI-FI Adapter to a VMware VM to Be Used by Kali Linux?
- Conclusion
Vmware tools and kali linux
Installing “Guest Tools”, gives a better user experience with VMware VMs. This is why since Kali Linux 2019.3, during the setup process it should detect if Kali Linux is inside a VM. If it is, then automatically install any additional tools (in VMware case, open-vm-tools and open-vm-tools-desktop ). The Guest Tools are also pre-installed in the Live image since Kali Linux 2021.3.
As of September 2015, VMware recommends using the distribution-specific open-vm-tools (OVT) instead of the VMware Tools package for guest machines.
Open-VM-Tools
Should you decide to create your own VMware installation of Kali Linux (rather than using our pre-made VMware images), and you want to force a manual reinstall of open-vm-tools (as something has gone wrong), first make sure you are fully updated, then enter the following.
Adding Support for Shared Folders When Using OVT
Unfortunately, shared folders will not work out of the box, some additional scripts are needed. Those can be installed easily with kali-tweaks .
In the Kali Tweaks menu, select Virtualization, then Install additional packages and scripts for VMware. Congratulations, you now have two additional tools in your toolbox!
The first one is a little script to mount the VMware Shared Folders. Invoke it with:
And with a bit of luck, checking /mnt/hgfs/ you should see your shared folders.
The second script is a helper to restart the VM tools. Indeed, it’s not uncommon for OVT to stops functioning correctly (e.g. such as copy/paste between the host OS and guest VM stops working). In this case, running this script can help to fix the issues:
For older versions of Kali Linux, here is our previous guide.
Updated on: 2021-Sep-27
Author: g0tmi1k
Источник
Vmware tools and kali linux
You can install VMware workstation or player on Kali Linux, allowing you to use Virtual Machines (VMs) inside of Kali Linux. However if you wish to use Kali Linux as a virtual machine, you will want our Kali Linux Guest VMware guide.
VMs are great, as there are many reasons why to use them. One of the being, able to run multiple Operating Systems at the same time. You can have your host machine “untouched”, and then only interact with the guest VMs. Another is when something is going right, take a snapshot. When something goes wrong, revert back.
VMware Workstation & Fusion is a commercial software (there is VMware Player which is free but it is limited in features). There are various free or open source solution (such as VirtualBox, QEMU, KVM/Xen with virt-manager).
Preparation
Before trying to install VMware, please make sure your version of Kali Linux is up-to-date, and if required, reboot the machine.
Download
To start with, you will need to download VMware. You can do this by going to VMware’s download page. At the time of writing, the latest version is 15.5.1-15018445 .
Alternatively, you can do the following command line method.
When everything is up-to-date, and ready to go, make sure the file is executable and then call it.
We can see we have installed VMware Workstation 15.5.1. The version number may be needed later on.
After the installer is installed, you should be able to just run vmware to continue setup.
At this point, you should be be straight forward, often just clicking through.
Setup
The first part may be VMware Kernel Modules.
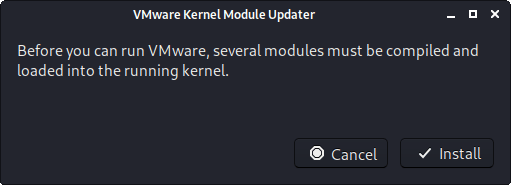
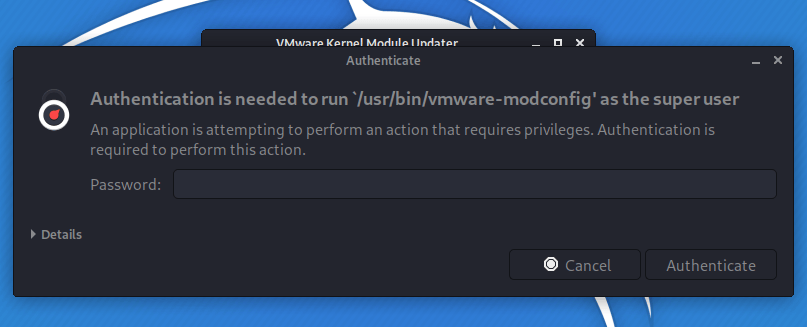
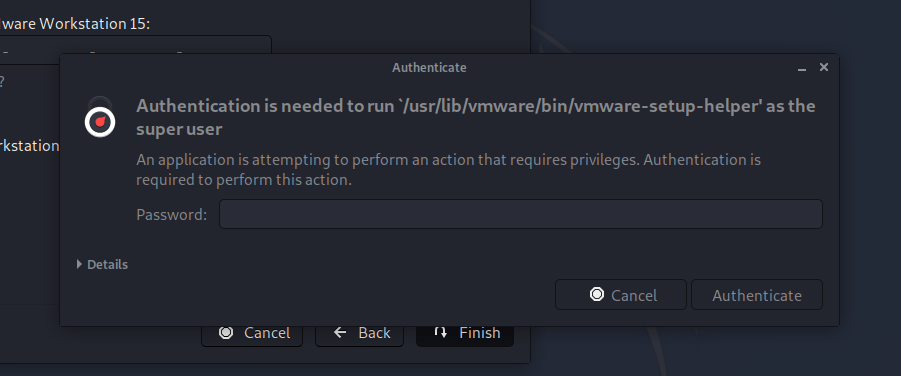
If vmware wasn’t called with superuser privileges, you may be prompted for a password.
At this point, it may not install correctly, and get the error message: Unable to install all modules. See log /tmp/vmware-kali/vmware-*.log for details. (Exit code 1) . This is often due to Kali’s kernel being newer than what VMware is expecting.
Looking at the log may help with troubleshooting the issue as well as the guide at the end of this post, vmware-host-modules .
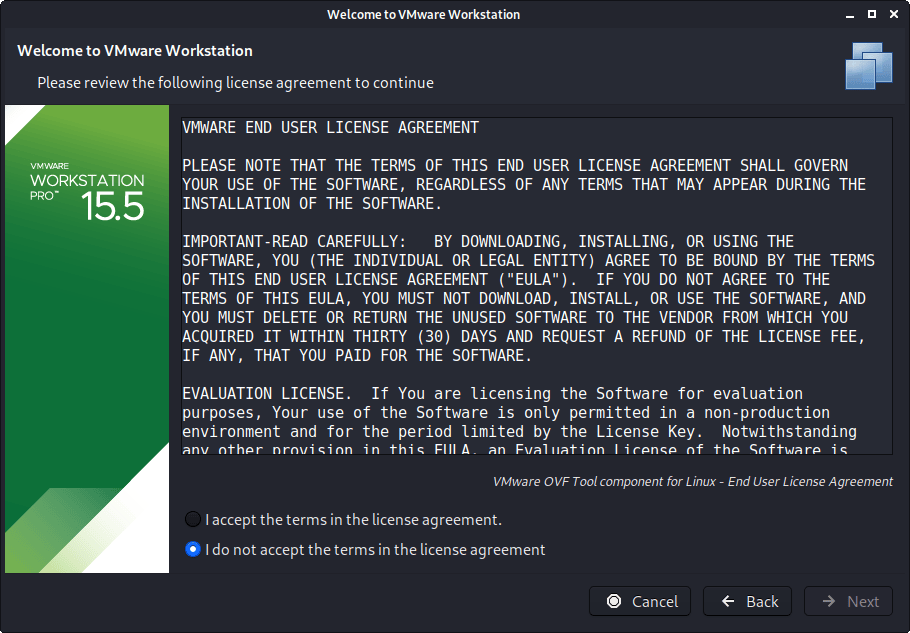
You will need to accept the legal agreement.
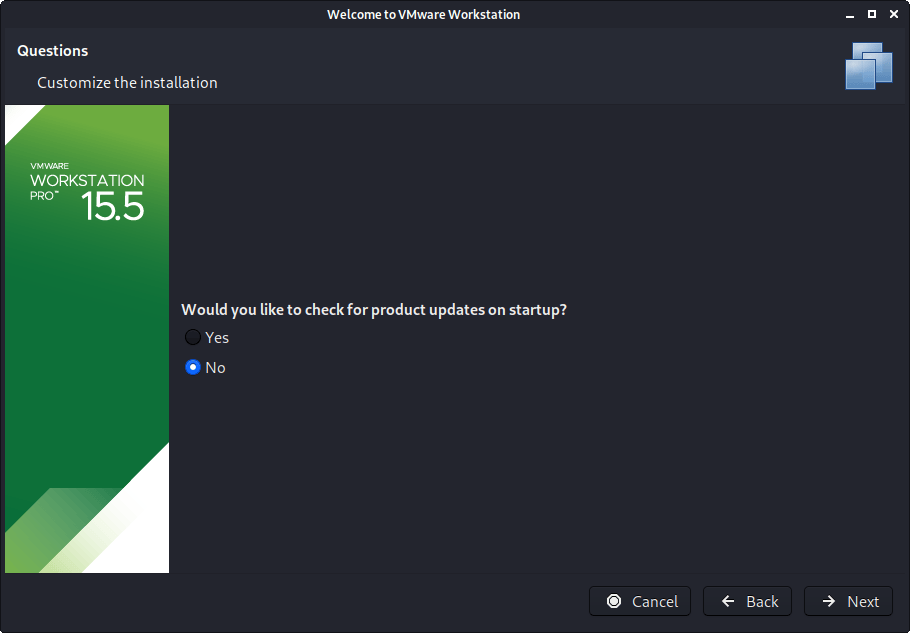
You may wish for it VMware to check for any updates.
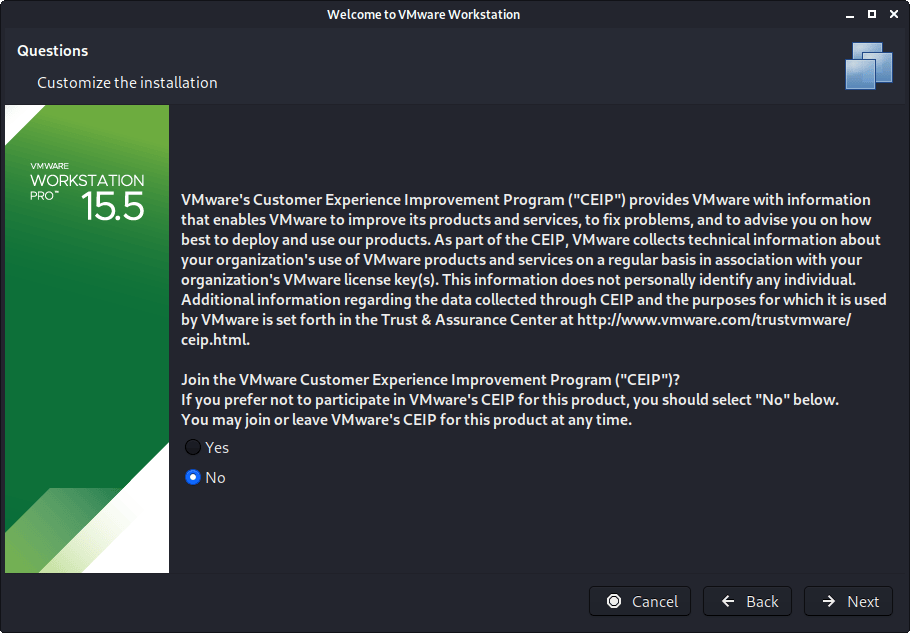
You may wish to join “VMware Customer Experience Improvement Program”.
Enter the current username.

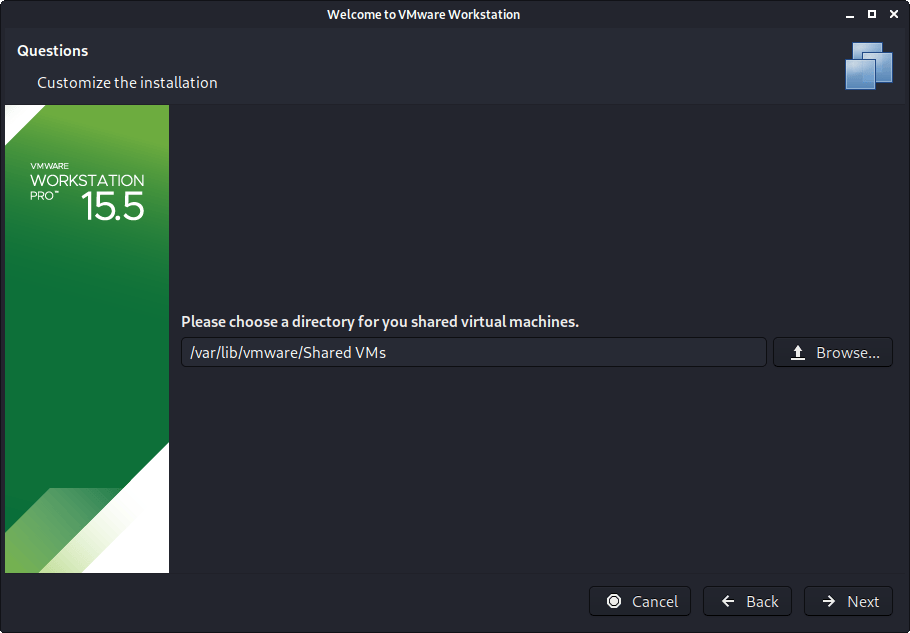
Enter a location for Shared VMs (this is different to each users own VMs).
Enter a port for HTTPS access

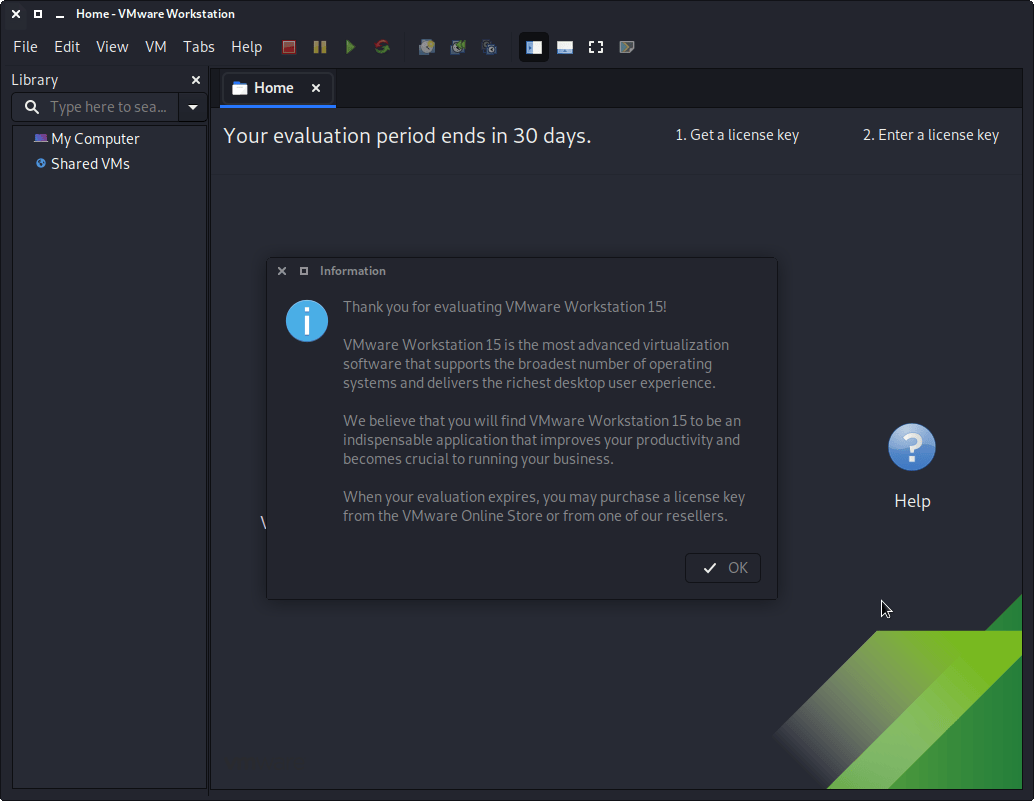
If you have a product key, you can enter it now, else it will be a trial for 30 days.

You may be once again prompt for superuser privileges if you didn’t execute the setup file with it.
The final screen should look like this.
If you now wish, you are able to install Kali Linux in a VMware VM (on Kali Linux).
Troubleshooting
libaio missing
If you see the following problem, upon trying to run vmware .
Try installing the libaio1 package.
Then the next time you start vmware , it should of gone away.
Missing Packages
From time to time, things may not go right. There could be a number of reasons why VMware may not install. The first thing to check would be you have all the necessary packages installed.
Try running vmware again, and see if now setup continues.
Too Newer Kernel
A common issue is because the setup file for VMware isn’t supporting the latest kernels, which could be an issue as Kali Linux is a rolling distribution and receives frequent updates. If this is the case, we can patch VMware modules to support this.
Try now to install VMware, by doing vmware.
If you are still having issues, you may need to restart your Kali Linux before trying one more final time.
vmware-host-modules + Kernel Updates
As VMware has various kernel modules, we need to make sure they are kept up-to-date and re-patched when Kali Linux’s kernel gets updated. This can be achieved by the steps in the following guide.
Still can’t start up VMware? vmware-modconfi
If VMware is unsuccessful, we can dig a little further by running the following.
Looking at the output, may either give us the exact issue, or at the very least something to search the Internet for.
Can’t Power on a Virtual Machine
You may also face the following issues, when trying to power on a VM.
- Failed to initialize monitor device
- Could not open /dev/vmmon: No such file or directory. Please make sure that kernel module ‘vmmon’ is loaded
- Unable to change virtual machine power state: Transport (VMDB) error -14: Pipe connection has been broken.
The quickest solution to fix these would be to reboot Kali Linux and try again.
Updated on: 2021-Sep-27
Author: g0tmi1k
Источник
Инструменты VMware в гостевой системе Kali (обновлённая инструкция для Kali Linux 1.1.0 и Kali Linux 2.0)
Если вы не захотите использовать наши предварительно созданные образы VMware, а решите создать вашу собственную установку VMware, то вам понадобиться нижеследующая инструкция для успешной установки инструментов VMware в вашу инсталяцию Kali. Вы можете воспользоваться opt для установки или open-vm-toolbox, или родных инструментов VMware.
Установка open-vm-tools
Это, пожалуй, самый простой способ получить функциональность инструментов VMware внутри гостевой машины Kali VMware.
Установка инструментов VMware в Kali
Последняя версия на эту дату vmware-tools компилируется на наше ядро, хотя и с несколькими предупреждениями. Мы используем набор патчей vmware-tool для облегчения установки.
Далее смонтируйте ISO с инструментами VMware, кликнув “Install VMware Tools” (установить инструменты VMware) из соответствующего меню. Как только ISO с инструментами VMware подсоединится к виртуальной машине, скопируйте установщик в директорию загрузки, а затем запустите установочный скрипт:
One thought to “Инструменты VMware в гостевой системе Kali (обновлённая инструкция для Kali Linux 1.1.0 и Kali Linux 2.0)”
Подскажите пожалуста как потключить общие папки на vmware для kali linux инструменты vmware-tools установлены в самой vmware папку указал а в Kali Linux 1.1.0 в разделе /mnt пусто
Источник
VMware Arena
Reserved Space for Virtualization
Step by Step:How to Install VMware Tools on Kali Linux

We have talked a lot about VMware Tools and benefits of running VMware tools in the VMware virtual machines. No matter, VM is running on ESXi or VMware Workstation. VMware tools are very important for VMware virtual Machine. VMware Tools Improves Video Resolution, Improves Color Depth, Improved Network adapter performance, Smooth Mouse Experience, Allow Copy and Paste, drag-and-drop the file and provides the ability to take quiesced snapshots of Guest OS. Take a look at my article to understand everything about VMware Tools version. In the previous article, We have discussed in detail about How to download and Install Kali Linux on VMware. Once Kali Linux is installed, it is very important to install VMware tools on Kali Linux. In this article, We will discuss in detail about the procedure to install VMware Tools on Kali Linux.
VMware Tools includes the below components:
1. VMware Device Drivers – Which provides the drivers for virtual hardware’s including Network adapters. Drivers provide smooth mouse operations, Improve sound, Graphic and performance of the virtual machine.
2. VMware User Process – Provides the ability to copy and paste text between VMware Remote console and Host Operating system. Improves Screen resolution.
3. VMware Services – Handles communication between the guest and host operating system.
How to Install VMware Tools on Kali Linux
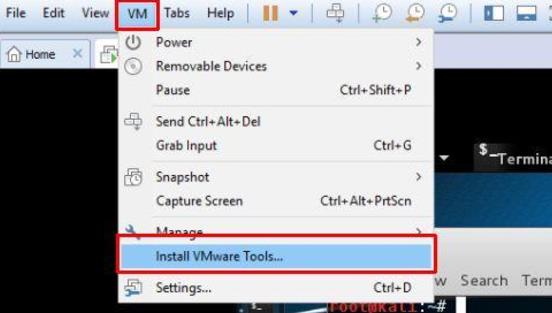
In VMware Workstation, Select the Kali Linux VM and Click on “Install VMware Tools” from the VM Menu.
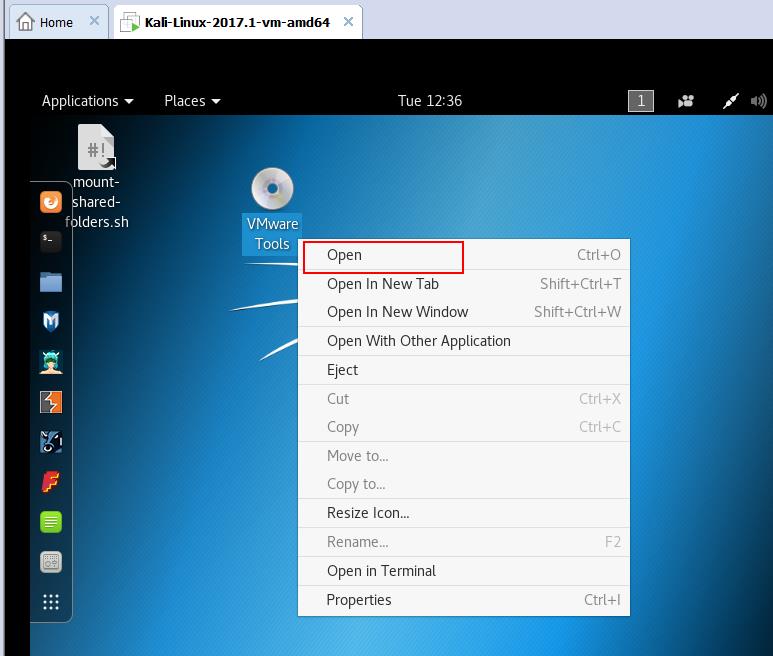
VMware tools ISO will be mounted to the VM and it will be displayed inside the VM. Right-click the “VMware Tools” CD image and click on Open.
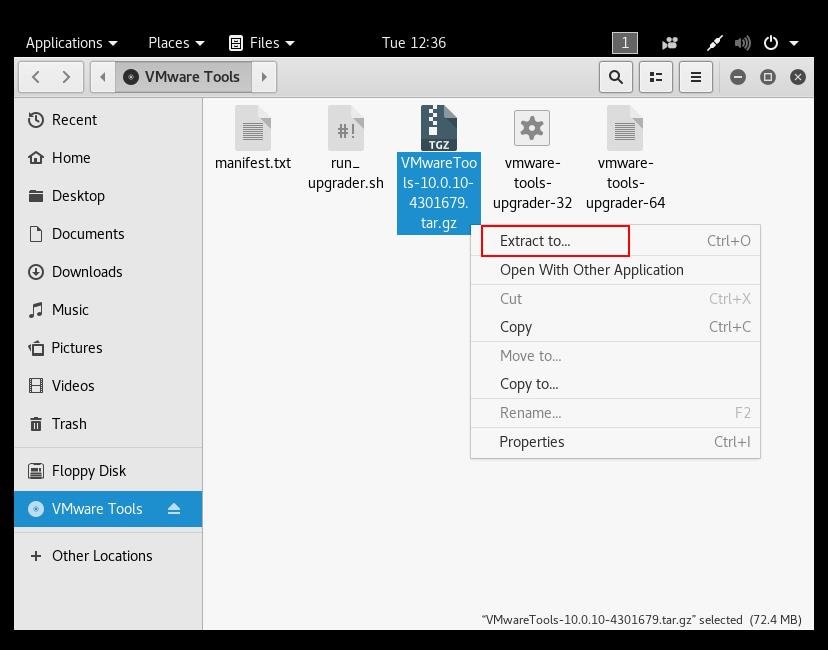
Right-click “VMwareTools-XXXX.tar.gz” and click on “Extract to”
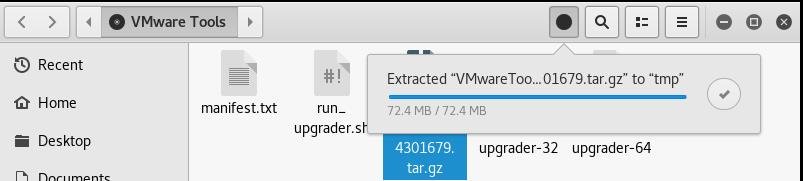
Select the Location to extract the VMware Tools ISO image and Click on Select. I have chosen /tmp directory to extract VMware tools files.
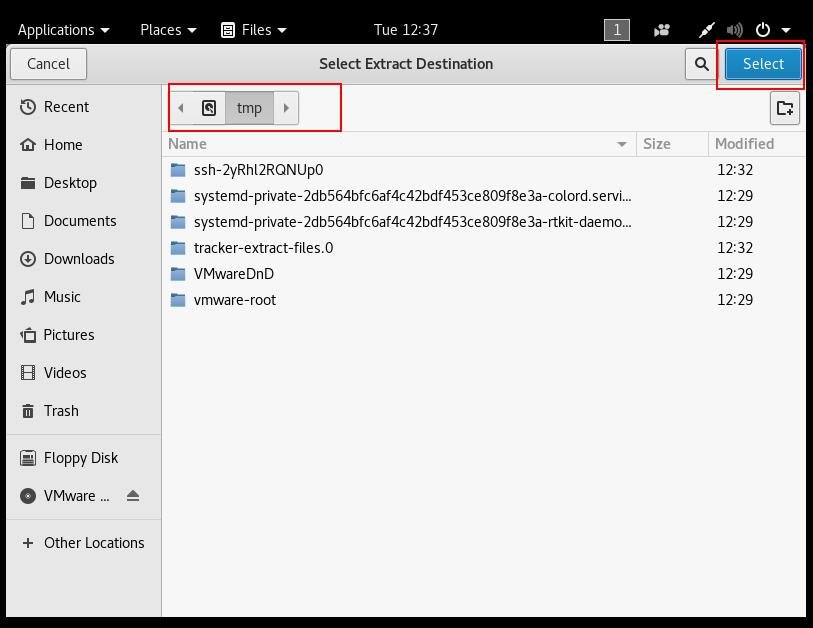
VMware tools ISO is extracted to /tmp directory
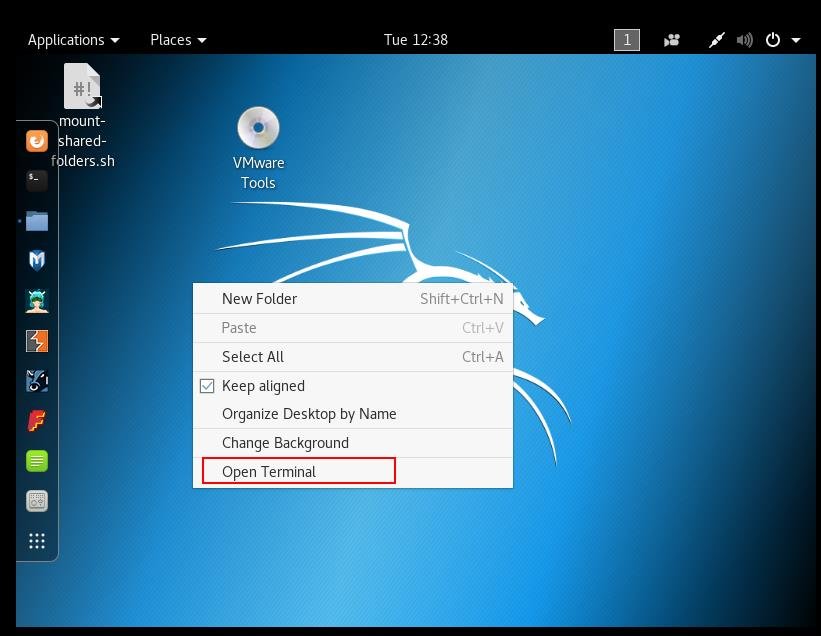
Right-click the Kali Linux desktop and Click on “Open Terminal”.
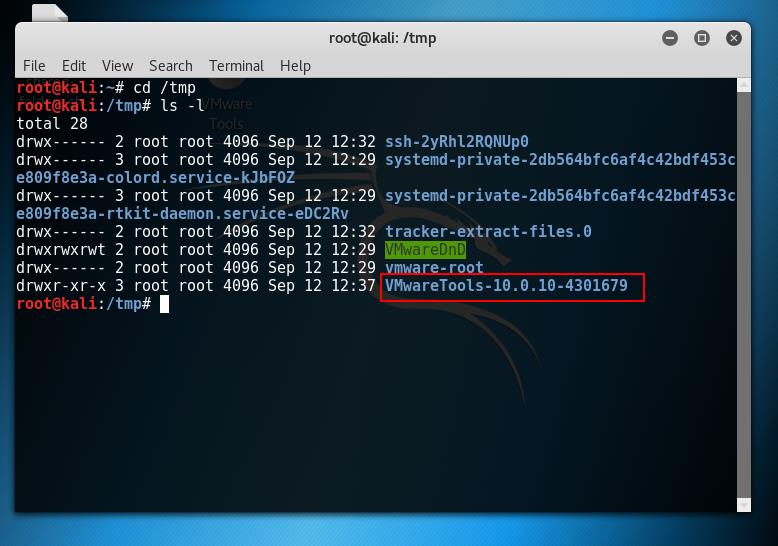
Browse towards the /tmp and CD to VMwareTools-XX.X.XX directory.
CD to the directory “vmware-tools-distrib”
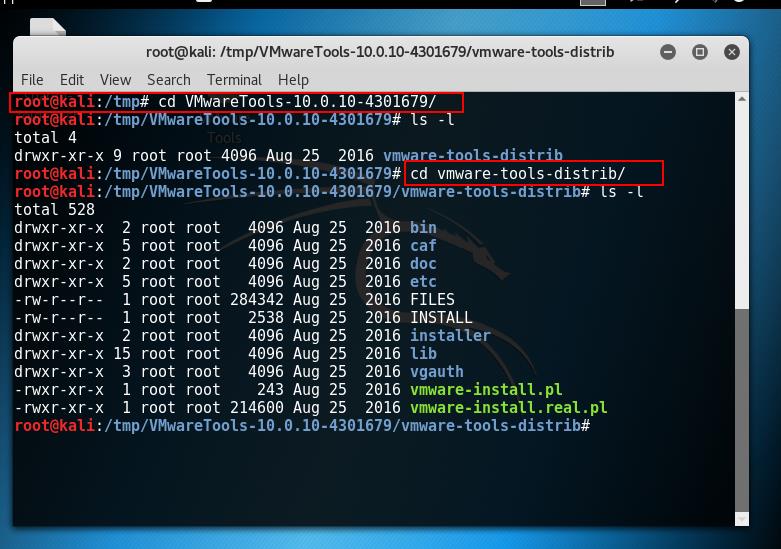
Install the VMware tools on Kali Linux using the below command

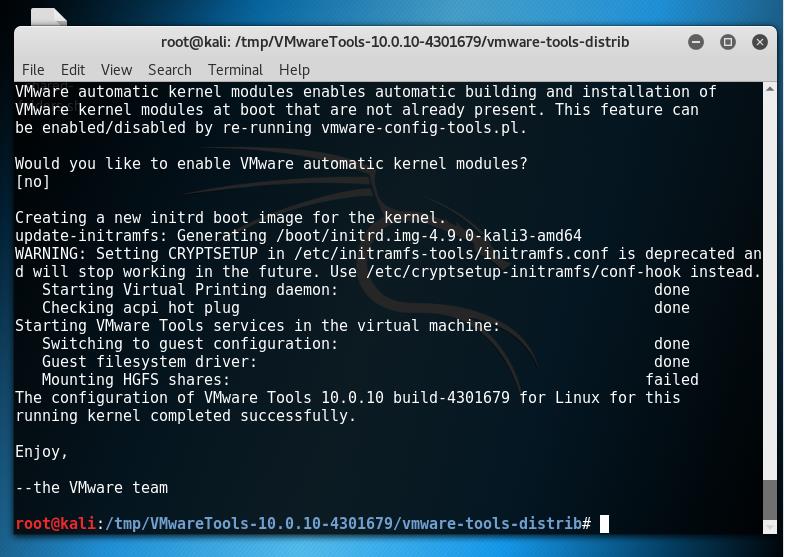
Installation of VMware tools on Kali Linux is completed successfully.
Type “Reboot” to reboot the Kali Linux for the changes to take effect.

That’s it. we are done with the install VMware tools on Kali Linux. I hope this is informative for you. Thanks for Reading. Be social and share it with social media, if you feel worth sharing it.
You may also interested in reading the below Articles:
Источник
How to Install Kali Linux on VMware VM
Kali is a free Debian-based Linux distribution intended for penetration testing. The first version of Kali Linux was released in 2013 as the rebuild of BackTrack Linux – a previous well-known distribution for security auditing and penetration testing. Some tools that were duplicated or provided similar functionality in BackTrack Linux were removed in Kali Linux. There are more than 600 penetration testing tools included in Kali Linux that can be run as Live DVD without installation as well as be installed on a computer as a desktop OS.
Sometimes you may not have the ability to dedicate the entire computer to running Kali Linux from neither Live DVD nor your internal hard disk as the installed OS. In this case, hardware virtualization technologies can help you – you can install Kali Linux on a VMware VM running on your desktop, laptop, or server. As a result, you can use your physical machine for the usual tasks while simultaneously running a virtual machine with Kali Linux for penetration testing and security auditing of your networks, software, etc. This blog post explores the installation process of Kali Linux on a VMware virtual machine and configuration of a Wi-Fi network adapter.
Thanks to its extensive feature set, NAKIVO Backup & Replication can provide comprehensive protection for your virtual, physical, and cloud environments. Right now you have the opportunity to download the full-featured free trial, test the solution’s capabilities, and receive an Amazon eGift card for your efforts!
Downloading the ISO Image
First, open the Kali download page in your browser and select the distribution that can best meet your needs. The installation images are provided in the ISO format for 32bit, 64bit and ARM architecture. You can also select the build with your favorite graphics desktop environment among Gnome, KDE, Xfce, Mate, etc. For the sake of simplicity and consistency in this blog post, let’s download Kali Linux Xfce 64 Bit via HTTP. When the ISO file is downloaded, check the sha256sum to verify the data integrity and ensure that the file is not corrupted.
Designed for businesses of all sizes, NAKIVO Backup & Replication offers complete data protection for all of your production workloads, including VMware vSphere Backup, Hyper-V Backup, Microsoft 365 Backup and more.
Creating a New VMware VM
Let’s explore how to install Kali Linux on a VM of the VMware Workstation format due to portability-related reasons – you can install VMware Workstation on a laptop, deploy a virtual machine with Kali Linux, and use this laptop for auditing wireless networks, for example. Kali Linux can also be installed on a VMware ESXi host if needed – the installation process is quite similar. In the current example, VMware Workstation 15 will be used to show the installation and configuration of Kali Linux.
Click File > New virtual machine to open the New Virtual Machine Wizard. Select Custom.
Choose the virtual machine hardware compatibility. If you are not planning to migrate a VM to older versions of VMware Workstation or ESXi servers, select the Workstation 15.x format. In this example the Workstation 14.x format should be selected for better compatibility in case of possible migration.
Select the installer disk image file for guest operating system installation. In this case the downloaded ISO image saved to D:\Install\ISO\kali-linux-xfce-2018.4-amd64.iso should be selected.
Select a guest operating system (OS). Linux Ubuntu 64-bit must be selected for our purposes.
Specify the VM name and location. In the current example, the VM name is Kali_x64 and the VM directory is D:\Virtual\Kali_x64.
Processor configuration. Specify the number of processors and the number of cores per processor for this virtual machine. Using 1 CPU is enough for Kali Linux.
Set memory for the virtual machine. Kali Linux is not a resource-hungry operating system. 2 GB of memory should be more than enough for this VM.
Configure a network type for the VM. Select the Use bridged networking option.
Select the SCSI controller that you will use for connecting a virtual disk to a VM. You can leave the default value as is and click Next to continue.
Select a disk type. You can leave the default recommended value (SCSI).
Select a disk. Click Create a new virtual disk and then click Next.
Specify disk capacity. 20 GB should be enough for the operating system. Select Store virtual disk as a single file if there are no limitations of your file system (such as 4 GB limit of file size for FAT32). Don’t check the box Allocate all disk space now if you don’t want the disk to consume all provisioned disk space now.
Specify where you want to store the virtual disk file. In this example, the file path is D:\Virtual\Kali_x64\Kali_x64.vmdk.
Now everything is ready to create a virtual machine. Check the VM settings, customize hardware if necessary, and click Finish to create a VM.
Deploying Kali Linux on VMware VM
Installing Kali Linux is not difficult, as all installation steps are supplied with useful tips and comments. Let’s review the installation process step by step:
Installing the Operating System
Once you have created a new VM, power on that VM and boot from the ISO image to start Kali installation. When a VM is loaded from the ISO image, you can see a boot menu that allows you to boot from the installation media in a live DVD mode, install the OS in a text mode (you get only a console interface without graphical user interface (GUI) after installation), and install the OS in graphical mode. Select Graphical install from the boot menu and press Enter.
The graphical installation mode looks like a wizard with multiple configuration screens.
Select a language.
Select your location.
Configure a keyboard.
Enter the hostname for this system, for example, k-linux.
Set the domain name, for example, domain.net.
Set up the password for root user. Note that in some distributions of Kali Linux «toor» is the default password for the root user.
Select the partitioning method for your disks. If you want to create a custom partitioning table, select Manual. Selecting Guided – use entire disk should be enough for the first time.
Select your virtual disk to be partitioned.
Select All files in one partition.
Select Finish partitioning and write changes to disk.
Click Yes to confirm creation of a new empty partition table on the virtual disk for writing changes to disk.
The installation process starts after disk partitioning. Wait until the system installation is finished.
Configure the package manager. Select Yes to use a network mirror.
If you don’t have an HTTP proxy to access the outside networks, leave the field empty and click Continue.
Install the GRUB boot loader on a hard disk – click Yes to do this.
Define the device for boot loader installation. We use /dev/sda.
Installation is complete. After rebooting your VM, enter root as the user name and enter the password you have specified during OS installation.
Installing VMware Tools on Kali Linux VMware VM
Now you have to install VMware Tools, i.e. a set of useful drivers and utilities that improves VM performance and interaction between host and guest (shared clipboard, drag & drop files, USB devices pass-through, etc.).
Make sure that Kali Linux VMware VM installed is running and click VM > Install VMware Tools in the menu bar or the VMware Workstation window. The ISO CD image is now inserted to the virtual CD/DVD drive of the VM. You can see the disc icon on the desktop of the guest OS. Open the terminal (Applications > Terminal Emulator).
Go to the directory of the inserted disc that contains VMware Tools by typing:
cd /media/cdrom
Create a directory on your desktop for extracting files from the archive to that directory.
Extract VMware Tools installation files from the archive by using the following command:
tar -xvzf VMwareTools-10.3.2-9925305.tar.gz -C
tar is the Linux archiver application; x – tells tar to extract files; v – allows the verbose mode to see the output in console; z – tells tar to decompress files from an archive using gzip; f – defines a location of the compressed archive, files from which must be extracted.
Go to the directory where the files have been extracted.
Run the installer of VMware Tools:
./vmware-install.pl
Answer the questions provided by the console installation wizard. Press Enter to use the default values that are shown in [brackets]. When the installation process of VMware Tools is finished, reboot the VM by typing init 6 in the terminal window.
Note: If you have an Internet connection, you can install VMware Tools with your apt-get Linux package manager by typing in the terminal the following command:
apt-get install open-vm-tools-desktop
Answer the questions provided by the installation wizard as mentioned before.
Configuring Screen Resolution
After installing VMware Tools on Kali Linux VMware VM, you can customize the screen resolution of the guest VM window.
Open the terminal.
Type xrandr to view available display modes. The current display mode is marked with the asterisk (*).
Set the custom resolution, for example, 1024×768, instead of the default resolution (800×600):
xrandr -s 1024×768
You can also use GUI. Right click the empty space on your VM desktop, go to Applications > Settings > Display. Change resolution in the drop-down menu, click Apply and Close.
You can also enter a full screen mode of your Kali Linux VMware VM by clicking the Full Screen button in the VMware Workstation interface.
How to Connect a WI-FI Adapter to a VMware VM to Be Used by Kali Linux?
If you want to test Wi-Fi networks, then you need a Wi-Fi network adapter connected to a machine on which Kali Linux is running. It is not possible to connect a built-in wireless network adapter (that is usually connected with a PCI Express interface) of a laptop directly to a virtual machine. In this case, you can only use a bridged network mode, but low level adapter features such as entering to a monitor mode will be disabled. If you use a built-in wireless network adapter in the bridged network mode, a guest OS (Kali Linux in our example) identifies the network adapter as an emulated Ethernet adapter.
As you recall, VMware Workstation and ESXi server provide you with the ability to connect USB devices to a VM in the pass-through mode. In this mode a USB device is attached to a VM similarly as it would be attached to a physical machine. When you attach a USB device to a VM, it is disconnected from a host machine. A USB Wi-Fi adapter is what you need in this situation.
Get the external USB Wi-Fi adapter and insert it into a USB port of your host machine (a machine on which VMware Workstation is installed). Make sure that your Kali VM is running. Don’t connect to any Wi-Fi networks on a host machine. In the VMware Workstation window go to VM > Removable devices > [Your USB Wi-Fi adapter name] > Connect (Disconnect from host).
Type ifconfig to check that your USB Wi-Fi adapter is detected by Kali Linux on VMware VM. In our example a wireless adapter is detected and its network interface is named wlan0.
Turn off the wireless network interface:
ifconfig wlan0 down
Change the MAC address of your wireless network adapter to a custom MAC address, for example, FC:FC:48:0A:0B:FF.
macchanger -m fc:fc:48:0a:0b:ff wlan0
Turn on your wireless network interface.
ifconfig wlan0 up
Check whether the MAC address of your Wi-Fi adapter has been changed by using one of the following commands:
macchanger -s wlan0
ifconfig wlan0
If the MAC address of your network adapter was not changed, check the sequence of commands you have run and try again. You can type macchanger —help to see a list of available options for using the macchanger tool.
After changing the MAC address, you can perform penetration testing and security auditing of Wi-Fi networks.
Switch the Wi-Fi network adapter into a monitor mode.
airmon-ng start wlan0
The airmon-ng utility notifies you if there are processes that could potentially cause trouble. It is recommended to kill such processes by typing the command:
airmon-ng check kill
You can additionally change the mac address of the wlan0mon interface.
ifconfig wlan0mon down
macchanger -m fc:fc:48:0a:0b:ff wlan0mon
ifconfig wlan0mon up
where wlan0mon is the name of the virtual monitoring network interface (formerly known as the mon0 interface in BackTrack Linux).
Now you are ready to run the airodump-ng utility.
airodump-ng wlan0mon
As you can see, the USB Wi-Fi adapter connected to the VM in the pass-through mode works fine. You can see access points and associated clients as well as capture wireless network packets for further analysis in the framework of network audit. Penetration testing and security audits are important but details of this process are out of the scope of this blog post. The emphasis of this article is that your Kali Linux deployed on an isolated VM can operate similarly as Kali Linux deployed on a physical machine.
Conclusion
Kali Linux is a great Debian-based Linux distribution full of useful tools for penetration testing. Above, we have explored how to install Kali Linux on VMware Workstation VM. Creating a VM and the installation process of the operating system is not difficult, and a GUI provides useful understandable tips and comments. The key requirement is to configure a USB wireless network adapter connected to a VM by using a pass-through mode. This enables all hardware-based adapter’s features from an isolated VM with Kali Linux for packet analyzing. Installing Kali Linux on an ESXi VM is similar to installing Kali on a VMware Workstation VM. You can also use VMware vCenter Converter to convert a VM of the Workstation format to a VM of the ESXi format.
Источник


