- Установка VMware Tools на Debian, Ubuntu и CentOS
- Монтируем диск с VMware Tools
- Установка VMware Tools в Debian
- Установка VMware Tools в Ubuntu
- Установка VMware Tools на CentOS
- Пошаговая инструкция по установке VMware Tools на Linux
- Установка
- Проверка
- Автозагрузка
- Удаление
- Не родная утилита (openvmtools)
- Команды VMware Tools
- Docs
- Prerequisites
- Procedure
- Results
- What to do next
- Docs
- Prerequisites
- Procedure
- Results
- What to do next
- VMware Workstation 4
Установка VMware Tools на Debian, Ubuntu и CentOS
Напомним, что полноценная работа любой гостевой системы на гипервизоре VMWare ESXi крайне затруднительна без установки специального набора приложения и драйверов, называемый VMware Tools. Напомним зачем, собственно, нужны VMware Tools. Это:
- Возможность корректного выключения/перезагрузки гостевой ОС (Windows,Linux, FreeBSD или Solaris ) из интерфейса клиента VMWare
- Отправка сигналов heartbeat-а на сервер VSphere
- Управление курсором и разрешением экрана при работе из консоли в системах Windows
- Синхронизация времени между гипервизором и гостевой ОС
- Включают наборы драйверов для SVGA , сетевого драйвер vmxnet, драйвера BusLogic SCSI, драйвера для мыши
- Возможность copy/past файлов и передача буфера обмена между гостевой и хостовой ОС
- Передача информации (такой как текущий ip адрес, тип гостевой ОС и т.д)
- и многое другое
И если установка VMware Tools в ОС Windows крайне проста, то на серверах с Linux, имеющих только голый CLI у начинающих администраторов она может вызвать затруднения. В этой статье мы познакомимся с процедурой установки VMware Tools на популярных ОС семейства Linux.
Монтируем диск с VMware Tools
На этом этапе, полностью одинаковым для любой ОС, мы должны подключить виртуальный диск с дистрибутивом VM Tools в гостевую ОС.
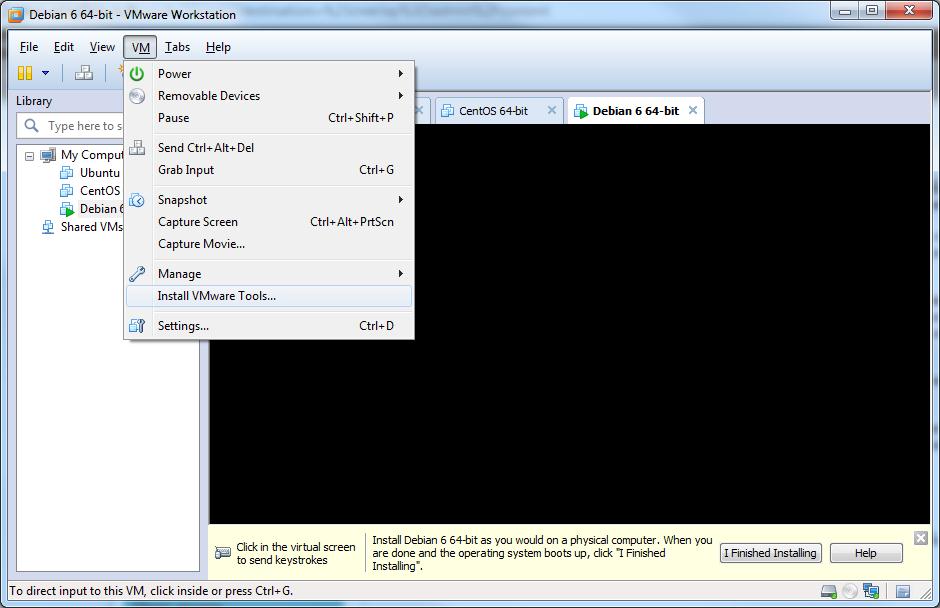
В VMware Workstation идем в меню VM > Install VMware Tools…
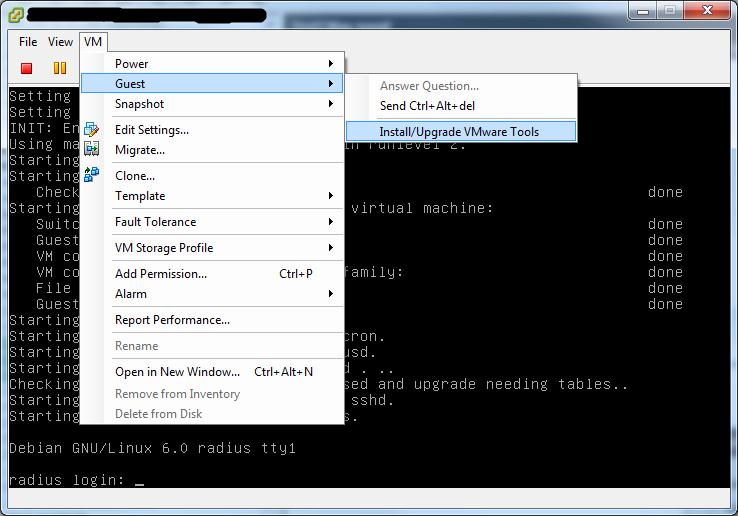
В VMware vSphere Hypervisor (ESXi) нажмите VM > Guest > Install/Upgrade VMware Tools
Установка VMware Tools в Debian
Зайдите в систему с правами root. Перед началом установки рекомендуется произвести полное обновление системы и перезагрузить сервер.
Установим пакет Linux Header с помощью команды:
Монтируем диск с VMware Tools и распаковываем файлы:
Запускаем установку VMTools командой:
В процессе установки на все вопросы оставляем стандартные значения нажатием Enter. После окончания установки вновь перезагрузите сервер.
Установка VMware Tools в Ubuntu
Заходим в систему с пользователем, имеющим привилегии sudo. Здесь также начнем с обновления всех компонентов системы и перезагрузки:
Устанавливаем Linux Header командой
Монтируем диск с VMTools и распаковываем архив
Установку VMware Tools запускаем командой:
Оставим все значения по0умолчанию, нажимая в процессе установки Enter. После установки vmTools перезагрузите систему:
Установка VMware Tools на CentOS
Заходим в систему с правами root и запускаем (крайне рекомендуется) полное обновление пакетов системы, после которого выполняем перезагрузку:
Устанавливаем компилятор Linux Header:
Монтируем диск с VMware Tools и распаковываем файлы:
Установку VMware Tools выполняем командой:
Соглашаемся со всеми параметрами и перезагружаем систему:
Как видите установка VMTools в ОС семейства Linux достаточно проста и удобна.
Источник
Пошаговая инструкция по установке VMware Tools на Linux
VMware Tools увеличивают функциональные возможности виртуальной машины. Можно установить как родные утилиты, так и open-vm-tools из репозитория Linux. Рассмотрим оба варианта.
Установка
Процесс установки во многом похож на установку VMware Tools во FreeBSD.
Открываем консоль управления виртуальными машинами. Находим ту, на которую будем устанавливать VMware Tools. Кликаем по ней правой кнопкой мыши — Guest — Install/Upgrade VMware Tools:

Подтверждаем, нажатием OK — будет выполнено монтирование установочного образа утилит к виртуальной машине.
Теперь подключается к Linux по SSH и монтируем образ к гостевой системе следующей командой:
mount /dev/cdrom /mnt
* в некоторых версиях Linux, устройство CD-ROM может называться cdrom1.
Распаковываем архив с установочными скриптами во временную директорию:
tar -zxvf /mnt/VMwareTools-* -C /tmp/
CD-ROM нам больше не нужен — отмонтируем его:
Запускаем скрипт установки VMware Tools:
Если видим, примерно, такое сообщение:
open-vm-tools are available from the OS vendor and VMware recommends using
open-vm-tools. See http://kb.vmware.com/kb/2073803 for more information.
Do you still want to proceed with this legacy installer? [no]
отвечаем yes.
На все остальные вопросы отвечаем по умолчанию, нажимая Enter.
В сообщении, на которое мы ответили yes говориться о том, что лучше устанавливать VMware Tools при помощи open-vm-tools. Однако после такой установки, консоль VMware в статусе утилит виртуальной машины ставит вопросительный знак и пишет 3rdParty. Дав свое согласие, мы продолжили установку старым проверенным методом.
Запуск установки в автоматическом режиме (без необходимости отвечать на вопросы) можно запустить командой:
Проверка
Версию установленного ПО можно посмотреть следующей командой:
Теперь открываем консоль управления VMware — устанавливаем курсор на виртуальную машину с установленными тулзами и переходим на вкладку Summary. В графе VMware Tools мы должны увидеть зеленую галочку и значение Running:

Автозагрузка
При установке VMware Tools добавляются в автозагрузку. Действий не требуется.
Если по каким-либо причинам, этого не произошло, добавить запуск скрипта при запуске системы можно командой:
systemctl enable vmware-tools
Или в ранних системах.
update-rc.d vmware-tools defaults
chkconfig vmware-tools on
Удаление
Для удаления используется скрипт vmware-uninstall-tools.pl:
Не родная утилита (openvmtools)
Выше мы рассмотрели наиболее предпочтительный вариант установки vmtools. Однако, если по каким-либо причинам, у нас нет возможности установить утилиту таким образом, мы можем воспользоваться репозиторием установленной системы (само собой, при наличии данной утилиты в нем).
Установка выполняется разными командами в зависимости от используемой системы.
а) Deb (Ubuntu, Debian):
apt-get install open-vm-tools
б) RPM (Red Hat, CentOS, Rocky Linux):
yum install open-vm-tools
Для разрешения автозапуска утилиты и ее старта вводим команду:
systemctl enable vmtoolsd —now
Команды VMware Tools
После установки vmtools нам будут доступны дополнительные команды. К сожалению, они плохо документированы, поэтому не удалось найти их адекватное описание:
| Команда | Примеры использования |
|---|---|
| vmware-namespace-cmd | vmware-namespace-cmd [OPTION?] [get-value | set-key | delete-key] [ ] |
| vmware-rpctool | rpctool as an RPC command. |
| vmtoolsd | vmtoolsd [OPTION] |
| vmware-toolbox-cmd | vmware-toolbox-cmd [options] [subcommand] |
| vmware-checkvm | vmware-checkvm (показывает версию VMware) |
| vmware-vgauth-cmd | vmware-vgauth-cmd [OPTION] [add | list | remove] |
| VGAuthService | VGAuthService [OPTION] |
| vmware-xferlogs | vmware-xferlogs |
| vmware-hgfsclient | vmware-hgfsclient |
| vmhgfs-fuse | vmhgfs-fuse sharedir mountpoint [options] |
По каждой команде можно вызвать небольшую справку командой:
Источник
Docs
—> share-line
—> —> —> —> plus
For Linux virtual machines, you manually install VMware Tools from the command line. For later Linux distributions, use the integrated open-vm-tools version.
Prerequisites
For more information on OS compatibility for open-vm-tools, see the VMware Compatibility Guide at https://www.vmware.com/resources/compatibility/search.php.
Power on the virtual machine.
Verify that the guest operating system is running.
Because the VMware Tools installer is written in Perl, verify that Perl is installed in the guest operating system.
Procedure
- On the host, from the Workstation Pro menu bar, select VM > Install VMware Tools .
If an earlier version of VMware Tools is installed, the menu item is Update VMware Tools .
If the CD-ROM device is mounted, the CD-ROM device and its mount point are listed in a manner similar to the following output:
Some Linux distributions use different mount point names. For example, on some distributions the mount point is /media/VMware Tools rather than /mnt/cdrom . Modify the command to reflect the conventions that your distribution uses.
Some Linux distributions use different device names or organize the /dev directory differently. If your CD-ROM drive is not /dev/cdrom or if the mount point for a CD-ROM is not /mnt/cdrom , modify the command to reflect the conventions that your distribution uses.
The location of this directory depends on where you placed it during the previous installation. Often this directory is placed in /tmp/vmware-tools-distrib .
The value x.x.x is the product version number, and yyyy is the build number of the product release.
If your Linux distribution automatically mounted the CD-ROM, you do not need to unmount the image.
Usually, the vmware-config-tools.pl configuration file runs after the installer file finishes running. If you attempt to install a tar installation over an RPM installation, or the reverse, the installer detects the previous installation and must convert the installer database format before continuing.
For newer Linux distributions, users are prompted to choose the integrated open-vm-tools.
Depending on the features you use, these instructions can include restarting the X session, restarting networking, logging in again, and starting the VMware User process. You can alternatively reboot the guest operating system to accomplish all these tasks.
Results
What to do next
If a new virtual hardware version is available for the virtual machine, upgrade the virtual hardware.
Источник
Docs
—> share-line
—> —> —> —> plus
For Linux virtual machines, you manually install or upgrade VMware Tools by using the command line.
Install the latest version of VMware Tools to enhance the performance of the virtual machine’s guest operating system and improve virtual machine management. When you power on a virtual machine, if a new version of VMware Tools is available, you see a notification in the status bar of the guest operating system.
Prerequisites
- Power on the virtual machine.
- Verify that the guest operating system is running.
- Because the VMware Tools installer is written in Perl, verify that Perl is installed in the guest operating system.
- For vSphere virtual machines, to determine whether you have the latest version of VMware Tools, in the vSphere Client inventory, select the virtual machine and click the Summary tab.
Procedure
- Select the menu command to mount the VMware Tools virtual disc on the guest operating system.
VMware Product Menu Command vSphere Client Inventory > Virtual Machine > Guest > Install/Upgrade VMware Tools vSphere Web Client Right-click the virtual machine and select All vCenter Actions > Guest OS > Install/Upgrade VMware Tools . - To locate a virtual machine, select a datacenter, folder, cluster, resource pool, host, or vApp.
- Click the Related Objects tab and click Virtual Machines .
Fusion Virtual Machine > Install (or Upgrade) VMware Tools Workstation VM > Install (or Upgrade) VMware Tools Player Player > Manage > Install (or Upgrade) VMware Tools - In the virtual machine, log in to the guest operating system as root and open a terminal window.
- Run the mount command with no arguments to determine whether your Linux distribution automatically mounted the VMware Tools virtual CD-ROM image.
Some Linux distributions use different device names or organize the /dev directory differently. If your CD-ROM drive is not /dev/cdrom or if the mount point for a CD-ROM is not /mnt/cdrom , modify the command to reflect the conventions that your distribution uses.
The value x.x.x is the product version number, and yyyy is the build number of the product release.
If your Linux distribution automatically mounted the CD-ROM, you do not need to unmount the image.
Usually, the vmware-config-tools.pl configuration file runs after the installer file finishes running.
Depending on the features you use, these instructions can include restarting the X session, restarting networking, logging in again, and starting the VMware User process. You can alternatively reboot the guest operating system to accomplish all these tasks.
Results
If you are using vCenter Server, the VMware Tools label on the Summary tab changes to OK .
What to do next
(Recommended) If you upgraded VMware Tools as part of a vSphere upgrade, next determine whether to upgrade the virtual machines in your environment. To review and compare the hardware available for different compatibility levels, see the vSphere Virtual Machine Administration documentation.
Источник
VMware Workstation 4
Installing VMware Tools
Installing VMware Tools
The following sections describe how to install VMware Tools:
Don’t Forget VMware Tools
It is very important that you install VMware Tools in the guest operating system.
With the VMware Tools SVGA driver installed, Workstation supports significantly faster graphics performance.
The VMware Tools package provides support required for shared folders and for drag and drop operations.
Other tools in the package support synchronization of time in the guest operating system with time on the host, automatic grabbing and releasing of the mouse cursor, copying and pasting between guest and host, and improved mouse performance in some guest operating systems.
The installers for VMware Tools for Windows, Linux, FreeBSD and NetWare guest operating systems are built into VMware Workstation as ISO image files. (An ISO image file looks like a CD-ROM to your guest operating system and even appears as a CD-ROM in Windows Explorer. You do not use an actual CD-ROM to install VMware Tools, nor do you need to download the CD-ROM image or burn a physical CD-ROM of this image file.)
VMware Tools for Windows supports Windows 95, Windows 98, Windows Me, Windows NT 4.0, Windows 2000, Windows XP and Windows Server 2003 guest operating systems.
When you choose File > Install VMware Tools from the VMware Workstation menu, VMware Workstation temporarily connects the virtual machine’s first virtual CD-ROM drive to the ISO image file that contains the VMware Tools installer for your guest operating system and begins the installation process.
VMware Tools for Windows Guests
VMware Tools for Windows Guests
The detailed steps for installing VMware Tools depend on the version of Windows you are running. The steps that follow show how to install VMware Tools in a Windows XP guest. Some steps that are automated in newer versions of Windows must be performed manually in Windows 9x and Windows NT.
Note: If you are running VMware Workstation on a Windows host, and your virtual machine has only one CD-ROM drive, the CD-ROM drive must be configured as an IDE or SCSI CD-ROM drive. It cannot be configured as a generic SCSI device.
Installing VMware Tools in a Windows Guest Operating System
Installing VMware Tools in a Windows Guest Operating System
- Power on the virtual machine.
- When the guest operating system starts, prepare your virtual machine to install VMware Tools.
Choose File > Install VMware Tools.
The remaining steps take place inside the virtual machine.
- If you have autorun enabled in your guest operating system (the default setting for Windows operating systems), a dialog box appears after a few seconds. It asks if you want to install VMware Tools. Click Yes to launch the InstallShield wizard.
If autorun is not enabled, the dialog box does not appear automatically. If it doesn’t appear, run the VMware Tools installer. Click Start > Run and enter D:\setup\setup.exe where D: is your first virtual CD-ROM drive.
Note: You do not use an actual CD-ROM to install VMware Tools, nor do you need to download the CD-ROM image or burn a physical CD-ROM of this image file. The VMware Workstation software contains an ISO image that looks like a CD-ROM to your guest operating system and even appears as a CD-ROM in Windows Explorer. This image contains all the files needed to install VMware Tools in your guest operating system. When you finish installing VMware Tools, this image file no longer appears in your CD-ROM drive.

- Follow the on-screen instructions.
- On Windows Server 2003 , Windows Me, Windows 98 SE and Windows 98 guests, the SVGA driver is installed automatically and the guest operating system uses it after it reboots. With Windows 2000 and Windows XP guests, you do not have to reboot to use the new driver.

Additional Steps for Some Versions of Windows When Migrating from Old Disk Versions
Additional Steps for Some Versions of Windows When Migrating from Old Disk Versions
If you are migrating a VMware Workstation 2 disk to VMware Workstation 4 and your guest operating system is Windows NT, Windows Me, Windows 98 or Windows 95, you need to configure the video driver by hand. Instructions open automatically in Notepad at the end of the installation process. If the Notepad window is hidden, bring it to the front by clicking the Notepad button on the Windows taskbar.
For details, see the steps below that correspond to your guest operating system.
- After installing VMware Tools, click Finish. The Display Properties dialog box appears.
- Click the Display Type button. The Display Type dialog box appears.
- Click the Change button. The Change Display dialog box appears.
- Select VMware, Inc. from the Manufacturer list.
- Select VMware SVGA as the display adapter and click OK.
- Click Yes in response to the on-screen question about third-party drivers to install the driver, then click OK to confirm the drivers were installed.
- Click Close from the Display Type dialog box, then click Close from the Display Properties dialog box.
- Click Yes to restart Windows NT and start using the new video driver.
- The VMware Tools background application is launched automatically when you reboot your virtual machine.
Windows Me
- After installing VMware Tools, click Finish. The Display Settings dialog box appears.
- Click the Advanced button.
- Click the Adapter tab.
- Click the Change button. This starts the Update Device Driver Wizard.
- The wizard now presents two options. Choose the second option to Specify the location of the driver.
Check the Specify a location checkbox. Enter the following path:
D: is the drive letter for the first virtual CD-ROM drive in your virtual machine.
If you are upgrading a virtual machine created under VMware Workstation 2, you may see a dialog box that warns, «The driver you are installing is not specifically designed for the hardware you have. Do you wish to continue?» Click Yes.
After the driver is installed, click Finish.
Windows 98
- After installing VMware Tools, click Finish. The Display Settings dialog box appears.
- Click the Advanced button. The Standard Display Adapter (VGA) Properties dialog box appears. If you are upgrading from a previous version of the VMware drivers, this dialog box is titled VMware SVGA Properties.
- Click the Adapter tab.
- Click the Change button. This starts the Update Device Driver Wizard. Click Next.
- The wizard presents two options. Choose the option to Display a list of all drivers in a specific location. Click Next.
- Select Have Disk. The Install From Disk dialog box appears.
- Enter the following path:
D: is the drive letter for the first virtual CD-ROM drive in your virtual machine.
Windows 95
- After installing VMware Tools, click Finish. The Display Settings dialog box appears.
- Click the Advanced Properties button. The Advanced Display Properties dialog box appears.
- Click the Change button. The Select Device dialog box appears.
- Select Have Disk.
- Enter the following path:
D: is the drive letter for the first virtual CD-ROM drive in your virtual machine.
VMware Tools for Linux Guests
VMware Tools for Linux Guests
- Power on the virtual machine.
- After the guest operating system has started, prepare your virtual machine to install VMware Tools.
Choose File > Install VMware Tools.
The remaining steps take place inside the virtual machine.
- Be sure the guest operating system is running in text mode. You cannot install VMware Tools while X is running.
- As root (su -), mount the VMware Tools virtual CD-ROM image, change to a working directory (for example, /tmp), uncompress the installer, then unmount the CD-ROM image.
Note: You do not use an actual CD-ROM to install VMware Tools, nor do you need to download the CD-ROM image or burn a physical CD-ROM of this image file. The VMware Workstation software contains an ISO image that looks like a CD-ROM to your guest operating system. This image contains all the files needed to install VMware Tools in your guest operating system.
Note: Some Linux distributions use different device names or organize the /dev directory differently. If your CD-ROM drive is not /dev/cdrom, modify the following commands to reflect the conventions used by your distribution.
mount /dev/cdrom /mnt
cd /tmp
tar zxf /mnt/vmware-linux-tools.tar.gz
umount /mnt
Run the VMware Tools installer.
Log out of the root account.
Note: You may run VMware Tools as root or as a normal user. To shrink virtual disks, you must run VMware Tools as root (su -).
Starting VMware Tools Automatically
Starting VMware Tools Automatically
You may find it helpful to configure your guest operating system so VMware Tools starts when you start your X server. The steps for doing so vary depending on your Linux distribution and your desktop environment. Check your operating system documentation for the appropriate steps to take.
For example, in a Red Hat Linux 7.1 guest using GNOME, follow these steps.
- Open the Startup Programs panel in the GNOME Control Center.
Main Menu (click the foot icon in the lower left corner of the screen) > Programs > Settings > Session > Startup Programs
The next time you start X, VMware Tools starts automatically.
Uninstalling VMware Tools
Uninstalling VMware Tools
If you need to remove VMware Tools from your Linux guest operating system, log on as root (su -) and run the following command:
VMware Tools for FreeBSD Guests
VMware Tools for FreeBSD Guests
- Power on the virtual machine.
- Prepare your virtual machine to install VMware Tools.
Choose File > Install VMware Tools.
The remaining steps take place inside the virtual machine, not on the host computer.
- Be sure the guest operating system is running in text mode. You cannot install VMware Tools while X is running.
- As root (su -), mount the VMware Tools virtual CD-ROM image, change to a working directory (for example, /tmp), uncompress the installer, then unmount the CD-ROM image.
Note: You do not use an actual CD-ROM to install VMware Tools, nor do you need to download the CD-ROM image or burn a physical CD-ROM of this image file. The VMware Workstation software contains an ISO image that looks like a CD-ROM to your guest operating system. This image contains all the files needed to install VMware Tools in your guest operating system.
mount /cdrom
cd /tmp
tar zxf /cdrom/vmware-freebsd-tools.tar.gz
umount /cdrom
Run the VMware Tools installer.
Log out of the root account.
Note: You may run VMware Tools as root or as a normal user. To shrink virtual disks, you must run VMware Tools as root (su -).
Note: In a FreeBSD 4.5 guest operating system, sometimes VMware Tools does not start after you install VMware Tools, reboot the guest operating system or start VMware Tools on the command line in the guest. An error message appears:
Shared object 'libc.so.3' not found.
The required library was not installed. This does not happen with full installations of FreeBSD 4.5, but does occur for minimal installations. To fix the problem of the missing library, take the following steps:
- Insert and mount the FreeBSD 4.5 installation CD or access the ISO image file.
- Change directories and run the installation script.
Installing VMware Tools in a NetWare Virtual Machine
Installing VMware Tools in a NetWare Virtual Machine
- Power on the virtual machine.
- Prepare your virtual machine to install VMware Tools.
Choose File > Install VMware Tools.
The remaining steps take place inside the virtual machine.
Load the CD9660.NSS driver so the CD-ROM device mounts the ISO image as a volume. In the system console, type
When the driver finishes loading, you can begin installing VMware Tools. In the system console, type
Restart the guest operating system. In the system console, type
Источник


