- MacOS X best VNC Client
- Best VNC Client for MacOS X … or how to remote control a computer!
- A little VNC background info
- Microsoft RDP is not VNC …
- VNC Server or Enabling Screen Sharing
- Using a regular VNC Client …
- VNC Client
- Option 1: Use Safari
- Option 2: Use the Screen Sharing App directly
- Location of Screen Sharing.app changed as of Mojave
- Remote Control through the Internet
- Support Us .
- iЯблочный Блог
- Тонкая настройка Mac OS
- Использование VNC в Mac OS
- Через терминал
- Через Finder.
- Через Safari.
- Через ярлык
- Через ярлык 2
- VNC Viewer for Mac
MacOS X best VNC Client
Best VNC Client for MacOS X … or how to remote control a computer!
VNC, a tool that allows you to remotely access the desktop of a computer, has a long history and has been available in many shapes and forms. Not entirely surprising, plenty of free VNC Servers and VNC Clients are available for Windows and Linux, but the selection for MacOS X appears rather limited.
Sure, there are a lot of VNC clients for MacOS X … but hardly any of them are free,… but why install yet another application when you already have a VNC Client and Server installed?
In this article, we will use the build in VNC Server and VNC Client … it comes with your Mac … for free!
Please consider disabling your ad blocker for our website.
We rely on these ads to be able to run our website.
You can of course support us in other ways (see Support Us on the left ).
A little VNC background info
VNC, or Virtual Network Computing, was originally developed by the Olivetti & Oracle Research Lab (doesn’t exist anymore) which later spun off an organization called RealVNC in an attempt to keep VNC available.
VNC is a graphical desktop sharing system that allows a user to remotely control another computer, by seeing the screen of that computer on their own computer and using their own keyboard and mouse to control the other computer. For remote display, simply put, VNC keeps sending screenshots to the VNC client as JPEG pictures by means of the so called RFB protocol. The JPEG compression can be changed based on the available bandwidth – sometimes resulting in very poor image quality when bandwidth availability is very limited.
Microsoft RDP is not VNC …
Personally I prefer RDP, Microsofts’ Remote Desktop Protocol, but MacOS X does not support RDP as a server protocol.
RDP seems more robust and the graphical display or the remote computer’s screen typically are much better. The better image quality is because RDP is “semantic”, meaning: it’s aware of controls, fonts, etc. which means that these controls will be drawn by the client application thus sending much less data to the client application and a much cleaner display of the screen of the controlled computer.
Note : You can get a free RDP Client from Microsoft so you can remotely control Windows PC’s.
For VNC to work you will need a VNC Server and VNC Client.
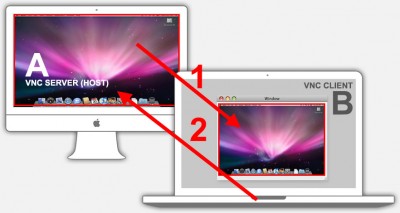
How VNC works (simplified)
In the illustration above:
A is the HOST computer, which is running a VNC Server application. This will be the computer that will be remotely controlled.
B is the CLIENT computer, which is running a VNC Client application. This is the computer that will control the other computer remotely.
1 is the stream of screenshots of the desktop of the computer that is going to be remotely controlled. The screenshots are send over a network connection so that the VNC Client software can display the desktop pictures.
2 is the stream of mouse moves and key strokes from the Client, send over a netwokr connection as well, so that the server can actually execute the,
Please consider disabling your ad blocker for our website.
We rely on these ads to be able to run our website.
You can of course support us in other ways (see Support Us on the left ).
VNC Server or Enabling Screen Sharing
The VNC Server is the application running on the computer, or device, which screen is being shared. This can be your Mac, a Windows or Linux PC, or even an Android tablet, or iPhone (jailbreak needed to run Veency, the VNC server for iOS).
The main purpose, besides login and other security gimmicks, is to provide access to the computer that is running VNC server by sending “screenshots” to the client, and to translate incoming mouse movements or keyboard strokes.
MacOS X has a VNC server build in … which can be ENABLED or DISABLED in the “System Preferences”.
Click the icon in the upper left corner and from the menu that opens, choose “ System Preferences… “. In the System Preferences click “ Sharing “.
You’ll see a list of services you can enable. The one to enable the VNC Server is called “ ScreenSharing “, Apple’s lingo for “VNC”, which can be referred to as “Apple Remote Desktop” as well.
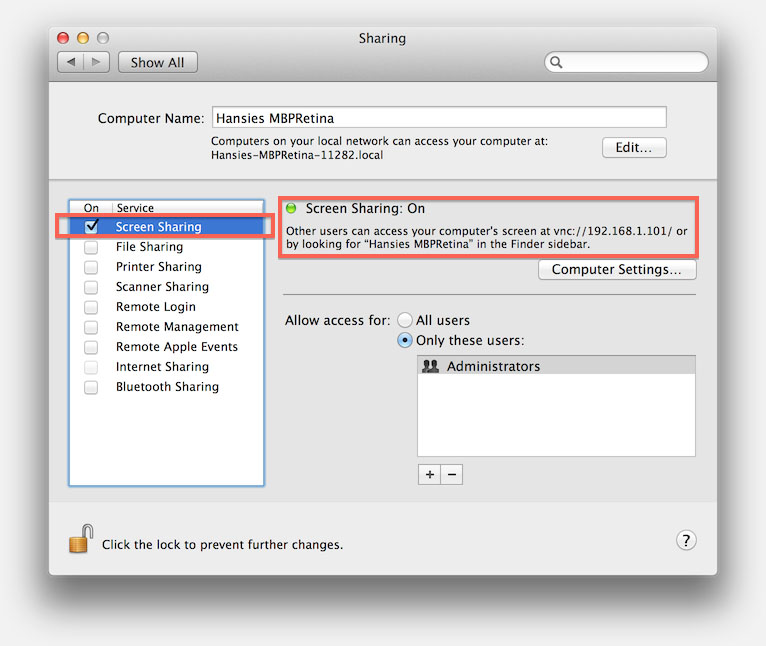
MacOS X – Enable build in VNC Server
Once you check the box in front of “Screen Sharing”, the little light on the right will go from gray to green and the text will state that Screen Sharing is switched on (see picture below) – Your VNC Server is running and this computer can now, optionally, be controlled by another computer.
To access the your computer, from another computer, simply enter the indicated IP Address (see also: Home Network Basics) in your VNC Client of choice. In the illustration above the IP Address is 192.168.1.101 (in your setup this IP Address is very likely different).
Using a regular VNC Client …
When you’re planning on accessing your Mac using a regular VNC Client like ThightVNC or RealVNC (so, not the provided Screen Sharing tool from Apple), then:
1) make sure to click the “Computer Settings…” button and
2) in the dialog check the “VNC viewers may control screen with password” option and enter a password.
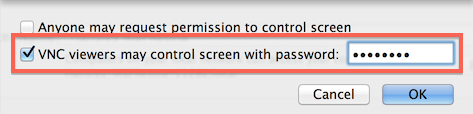
Screen Sharing for regular VNC clients
VNC Client
A VNC Client is the otherside of the story. It is the program on the computer that is controlling the other computer. It’s main purpose is to display the “screenshots” of the controlled computer, as send by the VNC Server, and to send mouse moves and keyboard strokes to the VNC Server on the computer that is being controlled.
There are lots of VNC Clients out there, and strangely enough … they charge money for something you already have on your computer.
Note : RealVNC is free and has a very suitable VNC Client, but why install more software if you don’t really need to?
MacOS X, if I’m not mistaken since 10.4, has a VNC Client installed already. It’s tucked away pretty good though – not sure why Apple did that.
Option 1: Use Safari
This is probably the easiest way to open the VNC Client called Screen Sharing. This only works with Safari.
Simply open Safari and enter “vnc://” followed by the IP Address of the VNC Server, for example: “vnc://192.168.1.109”.
Press ENTER when done and the Screen Sharing app opens.
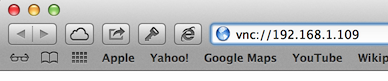
MacOS X – Open VNC Client through Safari
Option 2: Use the Screen Sharing App directly
The Screen Sharing app is hidden in the folder “/System/Library/CoreServices/” or “/System/Library/CoreServices/Applications” and to get there you can use Finder. From the Finder menu choose “ Go ” “ Go to Folder… ” and enter “ /System/Library/CoreServices/ ” (without the quotes) in the dialog that opens. Finally click the “ Go ” button, and in the file list you’ll find “ Screen Sharing ” (or “Screen Sharing.app”). Double click the app and a window will open, asking for an IP Address:
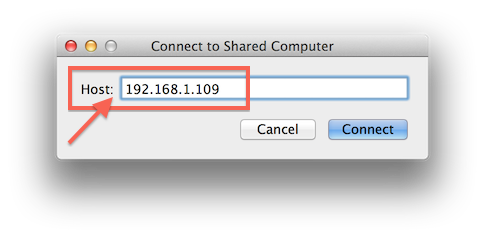
Screen Sharing app asking for an IP Address
Enter the IP Address of the VNC Server and click Connect and the screen of the remote computer will be shown and can be controlled right from your desktop. When connecting to another Mac, you will most likely be asked for a password.
Tip : You could of course make an alias of the “Screen Sharing” app and copy the alias into your utilities folder (“ Applications ” “ Utilities “).
Location of Screen Sharing.app changed as of Mojave
Thanks to Alan: The location of the Screen Sharing app seems to have changed as of MacOS X Mojave to the following locations (still valid under Catalina!):
/ System / Library / CoreServices / Applications
Please consider disabling your ad blocker for our website.
We rely on these ads to be able to run our website.
You can of course support us in other ways (see Support Us on the left ).
Remote Control through the Internet
It is possible to use VNC remotely – meaning for example while traveling control your computer at home, or control the computer of your mom helping her with her computer. Like I said: it is possible … but I wouldn’t recommend going through the hassle when you can use easier, free and much more secure services like LogMeIn and Team Viewer. No need for Port Forwading or putzing with your firewalls.
Personally I prefer LogMeIn, as it seems less complicated to get started. But once you’re familiar with it, Team Viewer offers a very good service as well. I would recommend Team Viewer for those of you who use remote control to assist others frequently. LogMeIn however, I would recommend if you more often remotely control your own computers.
Both LogMeIn and Team Viewer have clients for mobile devices as well, like for the iPhone, iPad and Android devices – allowing you to remotely control your home computer from your phone or tablet. Obviously this is great when traveling. Controlling your remote computer takes a little getting used to, but it most certainly works.
Support Us .
Your support is very much appreciated, and can be as easy as sharing a link to my website with others, or on social media.
Support can also be done by sponsoring me, and even that can be free (e.g. shop at Amazon).
Any funds received from your support will be used for web-hosting expenses, project hardware and software, coffee, etc.
Thank you very much for those that have shown support already!
It’s truly amazing to see that folks like my articles and small applications.
Please note that clicking affiliate links, like the ones from Amazon, may result in a small commission for us — which we highly appreciate as well.
- Amazon — Anything you buy at Amazon will sponsor us! — You will not pay anything extra. — Keep shopping at Amazon and support us!» target=»_blank»>Do your shopping at Amazon Use PayPal to give me a cup of coffee (select: I like Coffee — Use PayPal to give me a cup of coffee ($5).» target=»_blank»>$5, I like Coffee — Use PayPal to give me two cups of coffee ($10).» target=»_blank»>$10, I like Coffee — Use PayPal to give me four cup of coffee ($20).» target=»_blank»>$20, or I like Coffee — Use PayPal to give me a custom amount of coffee.» target=»_blank»>custom amount)
Become a Patreon — Support us by becoming a Patreon!» target=»_blank»>Become a Patreon Support us by signing up with DropBox — We use DropBox for our website backup, extra space is always welcome. — By signing up we get an extra 500 Mb of storage space.» target=»_blank»>Sign up with DropBox BitCoin — We do accept donations in BitCoin (BTC) — Any amount is very welcome and much appreciated! — It will support webhosting and keep us motivated!» target=»_blank»>Donate in BitCoin (BTC) ( 16Ja1xaaFxVE4FkRfkH9fP2nuyPA1Hk7kR )
BitCoinCash (BCH) — We do accept donations in BitCoinCash — Any amount is very welcome and much appreciated! — It will support webhosting and keep us motivated!» target=»_blank»>Donate in BitCoin Cash (BCH) ( qzf4qwap44z88jkdassythjcnm54upacmvmvnzgddg )
Please consider disabling your ad blocker for our website.
We rely on these ads to be able to run our website.
You can of course support us in other ways (see Support Us on the left ).
Источник
iЯблочный Блог
Тонкая настройка Mac OS
Использование VNC в Mac OS
Поделиться «Использование VNC в Mac OS»
Клиент VNC в Mac OS носит название Screen Sharing. Эта программа позволит вам подключиться к удаленным компьютерам UNIX, Mac, Linux, Windows и т.д. Она хорошо интегрирована в систему и у нее есть несколько способов использования:
Через терминал
Если используется нестандартный порт, то его надо указывать через двоеточие вконце команды. Если доступ к какому-то конкретному компьютеру используется чаще чем обычно, то можно создать alias в профиле shell, что избавит от надобности вводить адрес каждый раз.
Через Finder.
Меню Go -> Connect to Server… (или комбинация клавиш Command ⌘ + K). В поле ввода написать vnc://servername . Там же можно нажать значек «+» тем самым поставив закладку.
Через Safari.
В адресной строке пишем vnc://servername и лицезрим запуск того же Screen Sharing.
Через ярлык
Переместить файл /System/Library/CoreServices/Screen Sharing в Dock или создать ссылку в Applications.
Через ярлык 2
При успешном подключении к удаленному компьютеру любым из вышеописанных способов, Screen Sharing создает файлы .vncloc для каждого успешного подключения. Кликнув по ним можно сразу же воссоздать сессию. Эти файлы находятся в папке
/Library/Application Support/Screen Sharing и если ее переместить в Dock, то это тоже может быть удобным способом.
Если данная статья была хоть немного Вам полезна — нажмите «g+», «Нравится» или «Мне нравится» чуть ниже. Спасибо)
Источник
VNC Viewer for Mac
VNC Viewer 6.20.113 LATEST
Mac OS X 10.10 or later
VNC Viewer for Mac 2021 full offline installer setup for Mac
VNC Viewer for Mac (formerly RealVNC) enables you to remotely access and control your computers from another computer or mobile device, wherever you are in the world. It is used by individuals and by organizations across every industry sector for a range of different use cases, including providing IT desktop support to colleagues and friends and accessing systems and services on the move. The latest version includes both the VNC Server and Viewer. Choose the VNC Connect subscription that meets your business needs. Home > Easy-to-use remote access for friends and family. Professional > Feature-rich and secure remote access for departments and small businesses. Enterprise > Powerful, flexible and ultra-secure remote access for the enterprise. Check out VNC Viewer for macOS today!
VNC Viewer turns your Mac into remote desktop software, giving you instant access to your Mac, Windows and Linux computers from anywhere in the world. You can view your computer’s desktop remotely, and control its mouse and keyboard as though you were sitting down in front of it.
Then sign in to VNCViewer on your device using your RealVNC account credentials. Your remote computers automatically appear; simply tap one to screen share. Alternatively, you can connect directly to VNC Connect with an Enterprise subscription or VNC-compatible software from third parties by entering the remote computer’s IP address. Note that you may need to configure firewalls and port forward routers.
VNC Connect password-protects each remote computer out-of-the-box (you may need to enter the same user name and password you use to log in to your computer). All sessions are then encrypted end-to-end.
During a session, your device’s touch screen serves as a trackpad to give you precise control of the remote desktop. Drag your finger to move the remote mouse cursor and tap anywhere to left-click (other gestures such as right-click and scroll are explained in-app).
Saving you time, money and much more:
Reduce cost
Decrease support call repeat rates, call handling time and on-site travel costs.
Save time
Reduce the need for specialized training and documentation for remote support.
Improve quality
Provide engaging, real-time service that improves employee and customer satisfaction.
Mitigate risk
Anticipate and prevent system failures and the risk associated with on-site service.
Increase uptime
Avoid downtime with faster problem identification and resolution.
Meet goals
Support business and compliance objectives with audit and security functionality.
Источник


