- Voicemeeter banana mac os
- Introduction
- Install VoiceMeeter Banana
- Warning
- Set the default playback device to VoiceMeeter Banana
- Hearing audio again
- Using the Virtual Output in Streamlabs OBS
- Routing Audio to Stream or Streamer
- Routing example
- Аналоги Voicemeeter Banana для Mac OS
- Альтернативы для Voicemeeter Banana для Mac OS
- Что в этом списке?
- Voicemeeter banana mac os
Voicemeeter banana mac os
Split Audio using VoiceMeeter Banana
February 27, 2020
IntroductionThis guide will walk you through a basic set up using VoiceMeeter Banana with optionally one or more VACs so you can decide which audio.

Introduction
This guide will walk you through a basic set up using VoiceMeeter Banana with optionally one or more VACs so you can decide which audio you or the stream can hear. This will be similar to Split Audio with a Single VAC but by using VoiceMeeter Banana you will have some more control over the audio routing and volumes!
Install VoiceMeeter Banana
If you do not have VoiceMeeter Banana installed, you can download this here. After installing make sure you have rebooted your computer, as this is important! Optionally you can also install one or multiple VACs which can be used to further split the audio, you can get the first one for free here (more available on a donation) and this guide will use or highlight the use of additional VACs with Banana as well.
Warning
Digital audio mixing requires CPU cycles to mix, apply digital audio conversion and optionally audio effects. Be warned that using Voicemeeter on a heavy loaded system that Voicmeeter might be desynced or doesn’t get enough time to properly handle audio and “digital crackling” or “robotic audio” can occur. When this happens, you can Restart Audio Engine from the Menu of Voicemeeter, completely restart Voicemeeter or restart your computer.
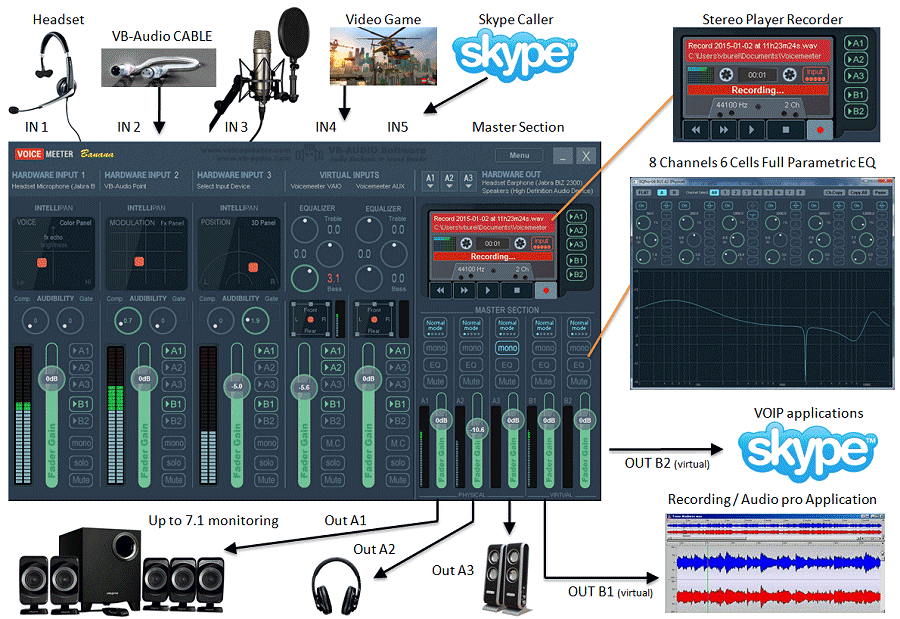
Once you setup your audio routing schematic with Voicemeeter in the center, you want to keep Voicemeeter always running, even if you are not streaming and all your volume control henceforth will be done in Voicemeeter, once everything is properly setup. Else you will be changing settings back and forth between streaming sessions and normal computer sessions. Luckily you can set Voicemeeter to run at startup via the Menu.
 The menu of VoiceMeeter Banana showing how to run at start up and restart the audio engine.
Set the default playback device to VoiceMeeter Banana
After installing VoiceMeeter Banana and having your computer restarted, start VoiceMeeter Banana and make sure you check the option System Tray (Run at Startup) option via the Menu first. Open up the Windows Sound settings, either by searching “Sound Settings” or right-clicking the  -icon in the system tray and selecting Open Sound Settings. In the Windows Sound settings, select VoiceMeeter Input (VB-Audio VoiceMeeter VAIO as the default output (playback) device. Make sure that the volume is set to 100% as you would contole the volumes with VoiceMeeter Banana after this.
 Set VoiceMeeter Banana as the default output (playback) device in Windows Sound settings.
Hearing audio again
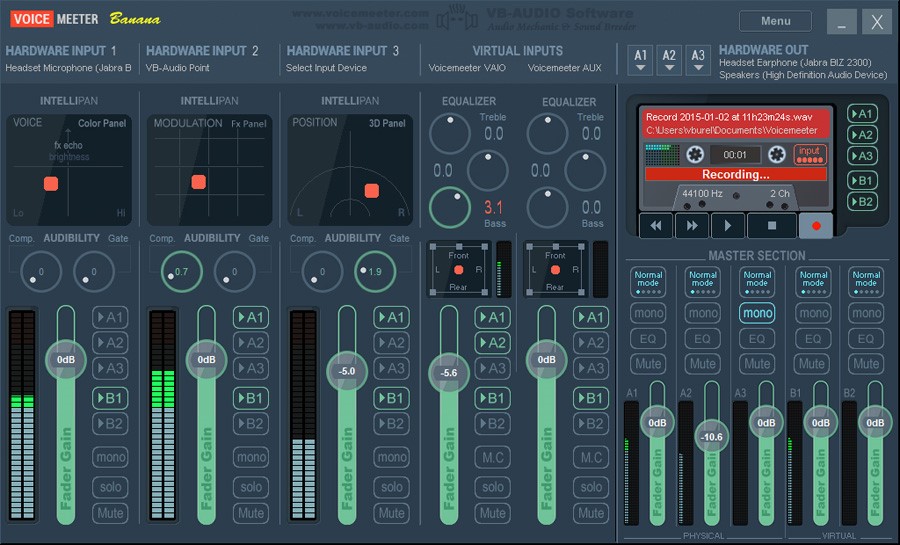
Now if you were playing any audio you will not hear it anymore, as the audio is now received by Voicemeeter Banana. In order to resolve this open Voicemeeter Banana and set the hardware output A1, by clicking A1▼ found in the upper right of Voicemeeter, to your headset or speakers whatever you normally use as default output device (usually KS > WDM > MMS, pick which wich works).
Now you will need to “patch” the received desktop audio to this hardware output by simply highlighting ▶A1 under the Voicemeeter VAIO virtual input strip. You are able to hear desktop audio again like normal and the volume control for your headset or speakers will be under the A1 output strip.
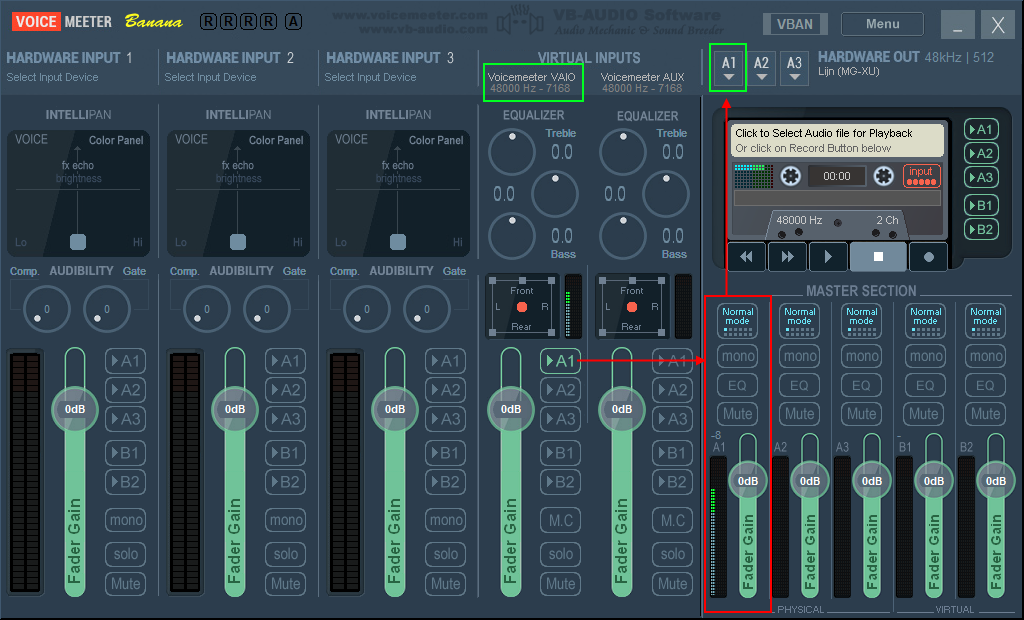 VoiceMeeter Banana initial setup patching audio to a headset or speakers.
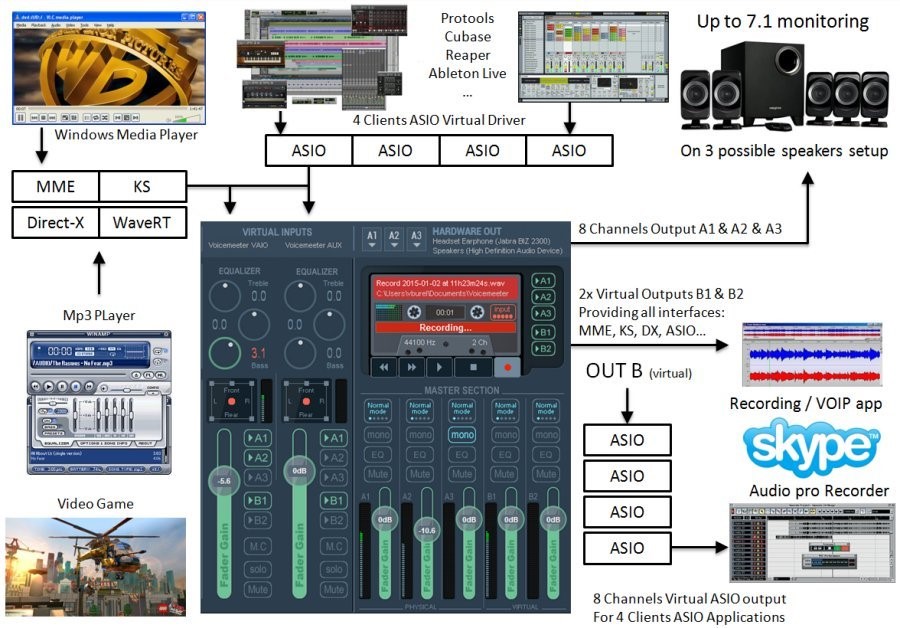
Using the Virtual Output in Streamlabs OBS
VoiceMeeter Banana comes by default with 2 virtual audio outputs that you can use in other applications and for this you will be using one in Streamlabs OBS to “patch” audio to the streaming software, separating the audio from your headset or speakers. You can also use a VAC as one of the hardware outputs, expanding the number of virtual outputs!
In Streamlabs OBS disable all “Desktop Audio Device” captures in the Audio Settings and instread you will use the “recording” end of the virtual output as a Mic/Auxiliary Device. Select VoiceMeeter Output (VB-Audio VoiceMeeter VAIO) as the Mic/Auxiliary Device 1.
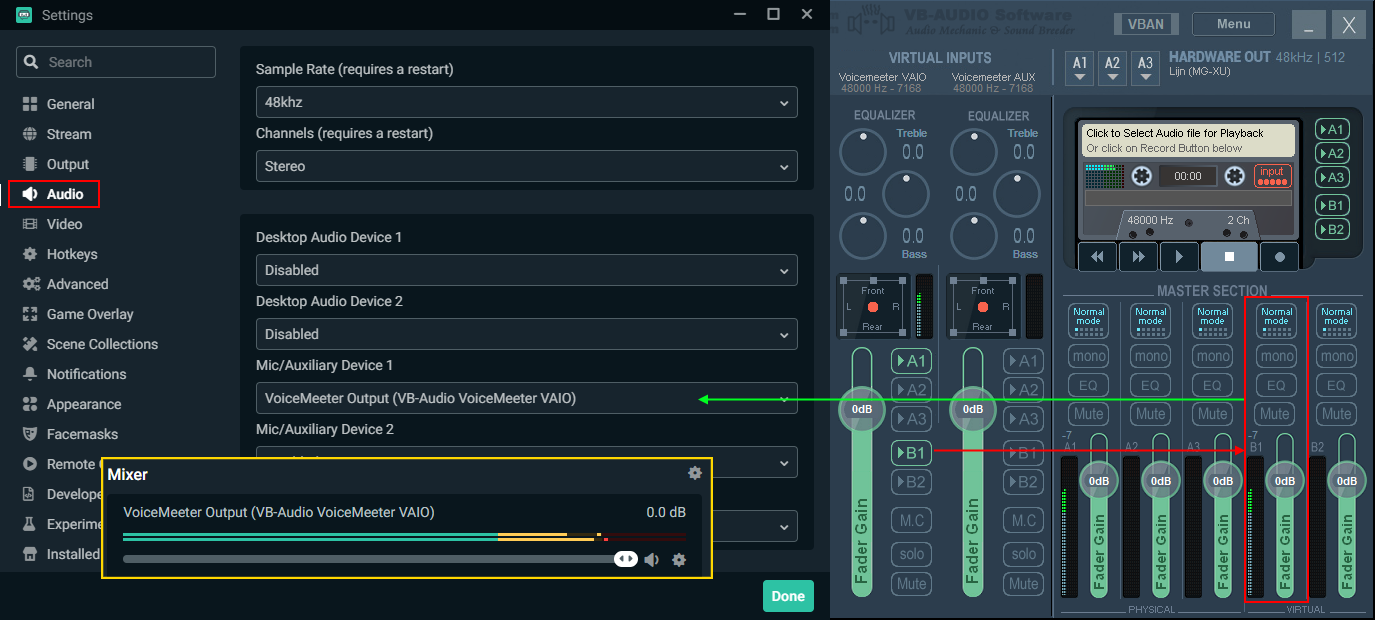 Using one of the virtual outputs of VoiceMeeter Banana in Streamlabs OBS to capture.
Routing Audio to Stream or Streamer
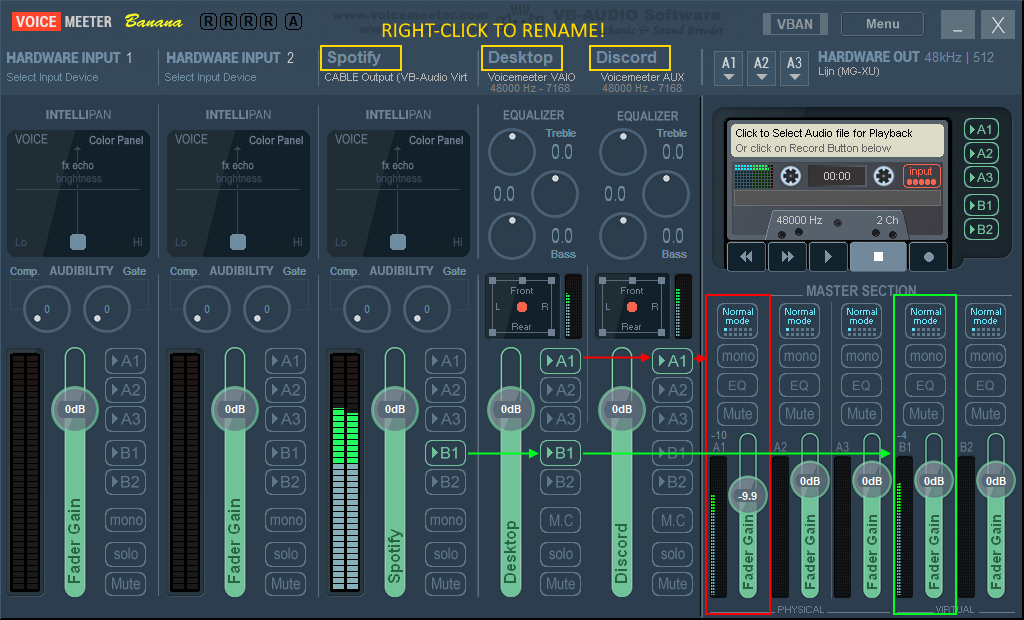
Now once you have this basic set up, you can control exactly if the audio, from either one of the hardware inputs or the virtual inputs, go to your headset, the stream, or both. Any input strip with ▶A1 highlighted will go to your headset while any input strip with ▶B1 will go to the stream.
As you might have noticed, VoiceMeeter Banana has one additional virtual input that you can use. In addition, if you have a VAC installed, you can set this as one of the hardware inputs to also use this to receive audio in VoiceMeeter Banana!
Routing example
This example uses the second virtual input and an additional VAC to split Game/Alert, Discord, and Spotify audio and route them differently; Game/Alert audio to both stream and headset, Spotify to the stream only, and Discord to the headset only.
For Discord, you can set the output device in the settings, selecting VoiceMeeter Aux Input (VB-Audio VoiceMeeter AUX VAIO), note the AUX notation. Spotify does not have the option to select the output device, but you can force this to an output device, a VAC in this case.
 VoiceMeeter Banana audio routing example, splitting audio to headset and stream.
Источник
Аналоги Voicemeeter Banana для Mac OS
Voicemeeter Banana может микшировать звук с аудиоустройств, а также с аудио приложений в виде виртуальной звуковой карты. Это расширенная версия Voicemeeter.
Voicemeeter Banana также может маршрутизировать аудио по сети, используя VBAN. Сетевой аудио протокол, используемый в программном обеспечении VB-Audio.
VoiceMeeter Banana — продвинутый виртуальный микшер от V.Burel
Альтернативы для Voicemeeter Banana для Mac OS
Android iOS (iPhone / iPad)
JACK — профессиональный звуковой сервер-демон, который обеспечивает соединения в реальном времени с малой задержкой.
- Бесплатная Windows Mac OS

JACK — это профессиональный звуковой сервер-демон, который обеспечивает соединения в реальном времени с малой задержкой для аудио и MIDI-данных между приложениями, реализующий его API.
Soundflower — это расширение системы Mac OS X, которое позволяет приложениям передавать звук другим .
Soundflower — это расширение системы Mac OS X, которое позволяет приложениям передавать звук в другие приложения. Soundflower прост в использовании, он представляет собой аудио-устройство, позволяя любому приложению со звуками отправлять и получать аудио без какой-либо другой поддержки. Приложение является бесплатным, с открытым исходным кодом и работает на компьютерах Mac Intel и PPC.
Что в этом списке?
В списке находится программы которые можно использовать для замены Voicemeeter Banana на платформе Mac OS.
Это аналоги похожие по функционалу на Voicemeeter Banana, которые заменяют программу частично или полностью. Этот список содержит 2 замены.
С помощью пользователей мы собираем каталог похожих друг на друга программ, чтобы вы могли подобрать альтернативу и скачать их. На сайте можно скачать популярные программы для Windows, Mac Os, Android и iPhone
Источник
Voicemeeter banana mac os
For first use, it’s highly recommended to follow user manual step by step, especially step ZERO of the documentation.
Voicemeeter 2.0.5.8 (ZIP Package)
Standalone Application and Virtual Audio Device supporting MME, DX, KS, WDM, ASIO interfaces (XP to WIN10 32/64 bits) 
VoicemeeterSetup_v2058.zip (20.7 MB — MAR 2021)
Voicemeeter 2.0.5.8 (EXE file)
Install Voicemeeter Banana on your Windows PC. 
VoicemeeterProSetup exe (21.1 MB — MAR 2021)
INSTALLATION: Run Setup program in administrative mode / Reboot after installation (and Reboot after de-installation). This Package installs both programs: Voicemeeter & Voicemeeter Banana. See User Manual and Video Tutorials
Voicemeeter Banana is distributed as Donationware!
For END USER, Voicemeeter Banana is free to use! You pay what you want when you want if you find it useful. Thanks for your participation!
For any professional use, you may pay the recommended license price on the webshop. For volume licensing / commercial distribution, you may contact us to get quotation / agreement. Get more info.


| |  |  |
Thanks to all to talk about our applications, feel free to contact us to let us know about your last video, review, use case.
Voicemeeter Banana Advanced Audio Mixer Universal Virtual Audio Device to connect everything together |

 |
 |
| SPECIFICATIONS | |
| Device Type: | PC-Core Virtual Audio Mixing Console |
| Compatibility: | Windows XP, VISTA, WIN7, WIN8, WIN8.1, WIN10 (32 / 64 bits) |
| PC Configuration: | Min: Celeron / Duo Core 1.8 GHz — 512 MB RAM — Disk |
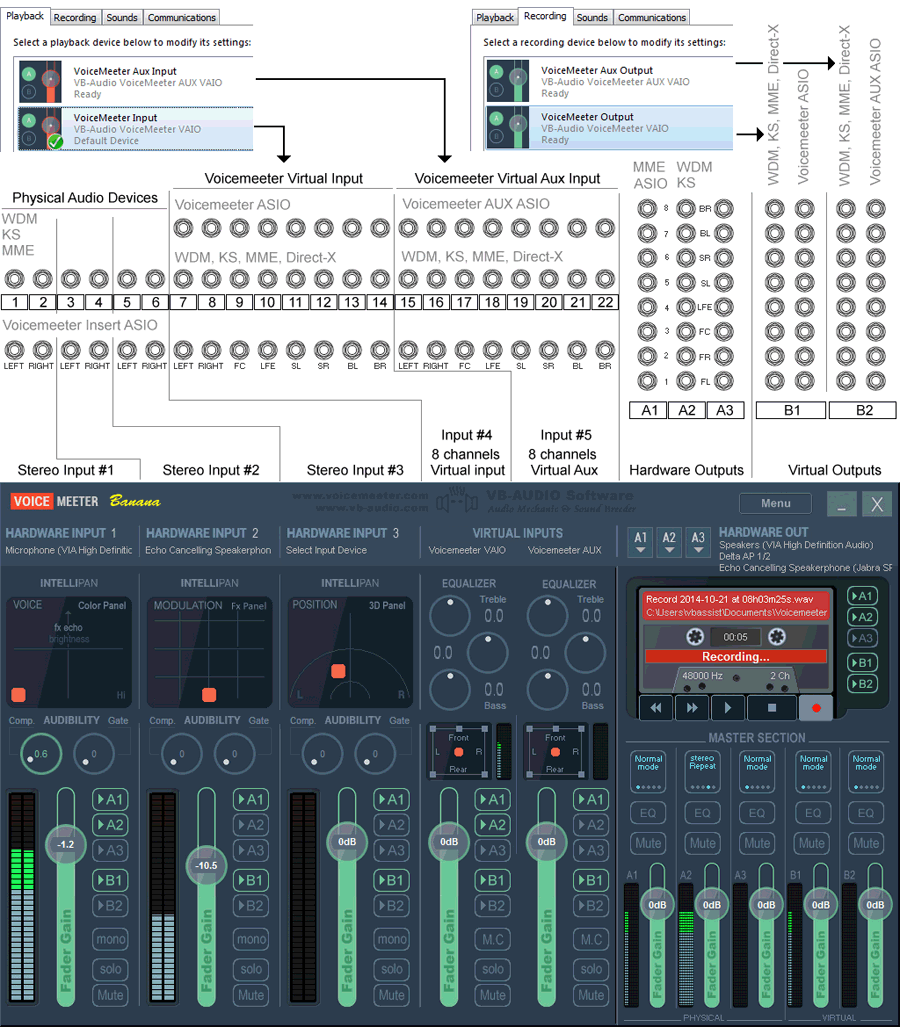
Number of Audio Device I/O: | 5 Inputs (3 physicals / 2 Virtual). 5 Outputs (3 physicals / 2 Virtual) |
| BUS / Layer: | 5x BUS (A1,A2,A3 and B1, B2) / Single Layer |
| Audio Engine Capabilities: | 32, 44.1, 48, 88.2, 96, 176.4 or 192 kHz DSP Processing (defined by Output A1 configuration) |
| Output A1 (Main): | WDM, KS, MME, ASIO (32 kHz to 192 kHz) — 1 to 8 channels |
| Output A2: | WDM, KS, MME (8 kHz to 192 kHz) — 1 to 8 channels |
| Output A3: | WDM, KS, MME (8 kHz to 192 kHz) — 1 to 8 channels |
| 3x Physical Inputs: | WDM, KS, MME (8 kHz to 192 kHz) — mono or stereo. |
2x Virtual I/O: | WDM, KS, MME, DirectX, WaveRT (8 kHz to 192 kHz) 1 to 8 channels 8 channels on virtual input, 2 on virtual outputs. |
| 2x Virtual ASIO I/O: | ASIO (32 kHz to 192 kHz) 8 Channels (in and out) / 4x Client Applications. Virtual ASIO configuration is given by Main Output A1 (SR and Buffering) |
| 1x Virtual Insert ASIO I/O: | ASIO (32 kHz to 192 kHz) 22 Channels (in and out) / Single Client Application. Virtual ASIO configuration is given by Main Output A1 (SR and Buffering) |
M.I.D.I. Implementation (remoting): | Gain faders, Mute, Solo, M.C. (Configuration by Learn process). |
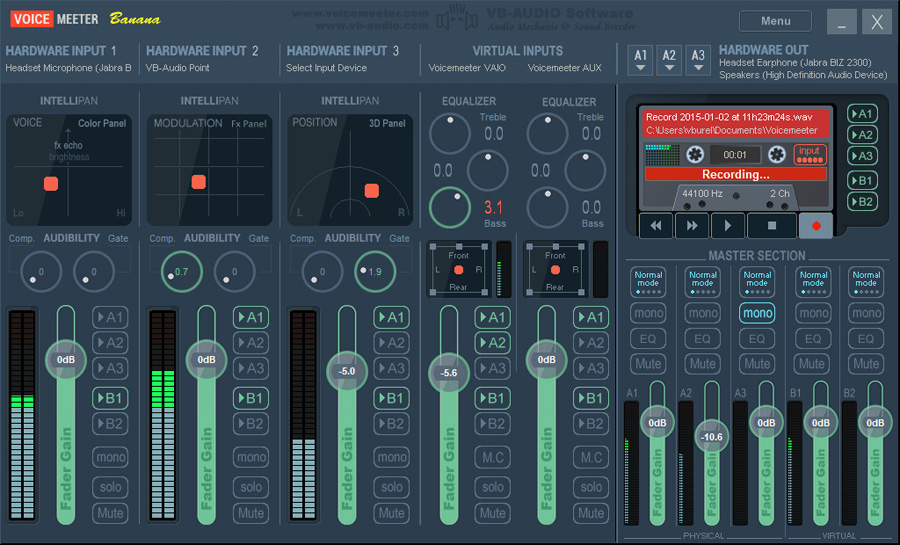
| Strip Processing: | — «Color Panel» Control (Equalization). — «Modulation» Control (Chorus). — 3D Panoramic Control (source positioning by binaural effect). — Audibility Knob Compressor. — Audibility Knob Gate effect). — 3 Bands Graphic Equalizer (on Virtual Input). — Strip Limiter (-40dB to +12dB). — Mute / Solo. |
| BUS Processing: | — Integrated Limiter and Peak Remover. — Mix Down to convert 5.1 or 7.1 to Stereo. — Stereo Repeat (Stereo signal copied on channel 3,4 / 5,6 / 7,8) — Master Full Parametric EQ (6 Cells / 8 channels). — Mute / Mono |
| Others: | — Physical Output Synchronization Delay in system settings dialog box. |
For new Voicemeeter users, it’s recommended to read the Voicemeeter User Manual first to understand basics.
Video & Tutorials
They use Voicemeeter and they make Video, Thanks to all!
Источник


