- Red Hat Customer Portal
- Log in to Your Red Hat Account
- Red Hat Account
- Customer Portal
- Select Your Language
- Red Hat Training
- Chapter 4. Configuring LVM logical volumes
- 4.1. Using CLI commands
- Specifying units in a command line argument
- Specifying volume groups and logical volumes
- Increasing output verbosity
- Displaying help for LVM CLI commands
- 4.2. Creating an LVM logical volume on three disks
- 4.3. Creating a RAID0 (striped) logical volume
- 4.4. Renaming LVM logical volumes
- 4.5. Removing a disk from a logical volume
- 4.5.1. Moving extents to existing physical volumes
- 4.5.2. Moving Extents to a New Disk
- 4.6. Configuring persistent device numbers
- 4.7. Specifying LVM extent size
- 4.8. Managing LVM logical volumes using RHEL System Roles
- 4.8.1. Example Ansible playbook to manage logical volumes
- 4.8.2. Additional resources
- 4.9. Removing LVM logical volumes
- Red Hat Customer Portal
- Log in to Your Red Hat Account
- Red Hat Account
- Customer Portal
- Select Your Language
- Red Hat Training
- 8.14. Installation Destination
- 8.14.1. Boot Loader Installation
- 8.14.1.1. MBR and GPT Considerations
- 8.14.2. Encrypt Partitions
- 8.14.3. Reclaim Disk Space
- 8.14.4. Manual Partitioning
- 8.14.4.1. Adding File Systems and Configuring Partitions
- 8.14.4.2. Create Software RAID
- 8.14.4.3. Create LVM Logical Volume
- 8.14.4.4. Recommended Partitioning Scheme
Red Hat Customer Portal
Log in to Your Red Hat Account
Your Red Hat account gives you access to your profile, preferences, and services, depending on your status.
If you are a new customer, register now for access to product evaluations and purchasing capabilities.
Need access to an account?
If your company has an existing Red Hat account, your organization administrator can grant you access.
Red Hat Account
Customer Portal
For your security, if you’re on a public computer and have finished using your Red Hat services, please be sure to log out.
Select Your Language
Red Hat Training
A Red Hat training course is available for RHEL 8
Chapter 4. Configuring LVM logical volumes
The following procedures provide examples of basic LVM administration tasks.
4.1. Using CLI commands
The following sections describe some general operational features of LVM CLI commands.
Specifying units in a command line argument
When sizes are required in a command line argument, units can always be specified explicitly. If you do not specify a unit, then a default is assumed, usually KB or MB. LVM CLI commands do not accept fractions.
When specifying units in a command line argument, LVM is case-insensitive; specifying M or m is equivalent, for example, and powers of 2 (multiples of 1024) are used. However, when specifying the —units argument in a command, lower-case indicates that units are in multiples of 1024 while upper-case indicates that units are in multiples of 1000.
Specifying volume groups and logical volumes
Note the following when specifying volume groups or logical volumes in an LVM CLI command.
- Where commands take volume group or logical volume names as arguments, the full path name is optional. A logical volume called lvol0 in a volume group called vg0 can be specified as vg0/lvol0 .
- Where a list of volume groups is required but is left empty, a list of all volume groups will be substituted.
- Where a list of logical volumes is required but a volume group is given, a list of all the logical volumes in that volume group will be substituted. For example, the lvdisplay vg0 command will display all the logical volumes in volume group vg0 .
Increasing output verbosity
All LVM commands accept a -v argument, which can be entered multiple times to increase the output verbosity. The following examples shows the default output of the lvcreate command.
The following command shows the output of the lvcreate command with the -v argument.
The -vv , -vvv and the -vvvv arguments display increasingly more details about the command execution. The -vvvv argument provides the maximum amount of information at this time. The following example shows the first few lines of output for the lvcreate command with the -vvvv argument specified.
Displaying help for LVM CLI commands
You can display help for any of the LVM CLI commands with the —help argument of the command.
To display the man page for a command, execute the man command:
The man lvm command provides general online information about LVM.
4.2. Creating an LVM logical volume on three disks
This example procedure creates an LVM logical volume called mylv that consists of the disks at /dev/sda1 , /dev/sdb1 , and /dev/sdc1 .
To use disks in a volume group, label them as LVM physical volumes with the pvcreate command.
This command destroys any data on /dev/sda1 , /dev/sdb1 , and /dev/sdc1 .
Create the a volume group that consists of the LVM physical volumes you have created. The following command creates the volume group myvg .
You can use the vgs command to display the attributes of the new volume group.
Create the logical volume from the volume group you have created. The following command creates the logical volume mylv from the volume group myvg . This example creates a logical volume that uses 2 gigabytes of the volume group.
Create a file system on the logical volume. The following command creates an ext4 file system on the logical volume.
The following commands mount the logical volume and report the file system disk space usage.
4.3. Creating a RAID0 (striped) logical volume
A RAID0 logical volume spreads logical volume data across multiple data subvolumes in units of stripe size.
The format for the command to create a RAID0 volume is as follows.
Table 4.1. RAID0 Command Creation parameters
Specifying raid0 creates a RAID0 volume without metadata volumes. Specifying raid0_meta creates a RAID0 volume with metadata volumes. Because RAID0 is non-resilient, it does not have to store any mirrored data blocks as RAID1/10 or calculate and store any parity blocks as RAID4/5/6 do. Hence, it does not need metadata volumes to keep state about resynchronization progress of mirrored or parity blocks. Metadata volumes become mandatory on a conversion from RAID0 to RAID4/5/6/10, however, and specifying raid0_meta preallocates those metadata volumes to prevent a respective allocation failure.
Specifies the number of devices to spread the logical volume across.
Specifies the size of each stripe in kilobytes. This is the amount of data that is written to one device before moving to the next device.
Specifies the volume group to use.
Specifies the devices to use. If this is not specified, LVM will choose the number of devices specified by the Stripes option, one for each stripe.
This example procedure creates an LVM RAID0 logical volume called mylv that stripes data across the disks at /dev/sda1 , /dev/sdb1 , and /dev/sdc1 .
Label the disks you will use in the volume group as LVM physical volumes with the pvcreate command.
This command destroys any data on /dev/sda1 , /dev/sdb1 , and /dev/sdc1 .
Create the volume group myvg . The following command creates the volume group myvg .
You can use the vgs command to display the attributes of the new volume group.
Create a RAID0 logical volume from the volume group you have created. The following command creates the RAID0 volume mylv from the volume group myvg . This example creates a logical volume that is 2 gigabytes in size, with three stripes and a stripe size of 4 kilobytes.
Create a file system on the RAID0 logical volume. The following command creates an ext4 file system on the logical volume.
The following commands mount the logical volume and report the file system disk space usage.
4.4. Renaming LVM logical volumes
This procedure renames an existing logical volume using the command-line LVM interface.
Procedure
- If the logical volume is currently mounted, unmount the volume.
If the logical volume exists in a clustered environment, deactivate the logical volume on all nodes where it is active. Use the following command on each such node:
Use the lvrename utility to rename an existing logical volume:
Optionally, you can specify the full paths to the devices:
Additional resources
4.5. Removing a disk from a logical volume
These example procedures show how you can remove a disk from an existing logical volume, either to replace the disk or to use the disk as part of a different volume. In order to remove a disk, you must first move the extents on the LVM physical volume to a different disk or set of disks.
4.5.1. Moving extents to existing physical volumes
In this example, the logical volume is distributed across four physical volumes in the volume group myvg .
This examples moves the extents off of /dev/sdb1 so that it can be removed from the volume group.
If there are enough free extents on the other physical volumes in the volume group, you can execute the pvmove command on the device you want to remove with no other options and the extents will be distributed to the other devices.
In a cluster, the pvmove command can move only logical volume that are active exclusively on a single node.
After the pvmove command has finished executing, the distribution of extents is as follows:
Use the vgreduce command to remove the physical volume /dev/sdb1 from the volume group.
The disk can now be physically removed or allocated to other users.
4.5.2. Moving Extents to a New Disk
In this example, the logical volume is distributed across three physical volumes in the volume group myvg as follows:
This example procedure moves the extents of /dev/sdb1 to a new device, /dev/sdd1 .
Create a new physical volume from /dev/sdd1 .
Add the new physical volume /dev/sdd1 to the existing volume group myvg .
Use the pvmove command to move the data from /dev/sdb1 to /dev/sdd1 .
After you have moved the data off /dev/sdb1 , you can remove it from the volume group.
You can now reallocate the disk to another volume group or remove the disk from the system.
4.6. Configuring persistent device numbers
Major and minor device numbers are allocated dynamically at module load. Some applications work best if the block device is always activated with the same device (major and minor) number. You can specify these with the lvcreate and the lvchange commands by using the following arguments:
Use a large minor number to be sure that it has not already been allocated to another device dynamically.
If you are exporting a file system using NFS, specifying the fsid parameter in the exports file may avoid the need to set a persistent device number within LVM.
4.7. Specifying LVM extent size
When physical volumes are used to create a volume group, its disk space is divided into 4MB extents, by default. This extent is the minimum amount by which the logical volume may be increased or decreased in size. Large numbers of extents will have no impact on I/O performance of the logical volume.
You can specify the extent size with the -s option to the vgcreate command if the default extent size is not suitable. You can put limits on the number of physical or logical volumes the volume group can have by using the -p and -l arguments of the vgcreate command.
4.8. Managing LVM logical volumes using RHEL System Roles
This section describes how to apply the storage role to perform the following tasks:
- Create an LVM logical volume in a volume group consisting of multiple disks.
- Create an ext4 file system with a given label on the logical volume.
- Persistently mount the ext4 file system.
Prerequisites
- An Ansible playbook including the storage role
For information on how to apply an Ansible playbook, see Applying a role.
4.8.1. Example Ansible playbook to manage logical volumes
This section provides an example Ansible playbook. This playbook applies the storage role to create an LVM logical volume in a volume group.
Example 4.1. A playbook that creates a mylv logical volume in the myvg volume group
The myvg volume group consists of the following disks:
Additional resources
- The /usr/share/ansible/roles/rhel-system-roles.storage/README.md file.
4.8.2. Additional resources
- For more information about the storage role, see Managing local storage using RHEL System Roles.
4.9. Removing LVM logical volumes
This procedure removes an existing logical volume using the command-line LVM interface.
The following commands remove the logical volume /dev/ vg-name / lv-name from the volume group vg-name .
Procedure
- If the logical volume is currently mounted, unmount the volume.
If the logical volume exists in a clustered environment, deactivate the logical volume on all nodes where it is active. Use the following command on each such node:
Remove the logical volume using the lvremove utility:
In this case, the logical volume has not been deactivated. If you explicitly deactivated the logical volume before removing it, you would not see the prompt verifying whether you want to remove an active logical volume.
Источник
Red Hat Customer Portal
Log in to Your Red Hat Account
Your Red Hat account gives you access to your profile, preferences, and services, depending on your status.
If you are a new customer, register now for access to product evaluations and purchasing capabilities.
Need access to an account?
If your company has an existing Red Hat account, your organization administrator can grant you access.
Red Hat Account
Customer Portal
For your security, if you’re on a public computer and have finished using your Red Hat services, please be sure to log out.
Select Your Language
Red Hat Training
A Red Hat training course is available for Red Hat Enterprise Linux
8.14. Installation Destination
Warning
Important
Important
Special cases
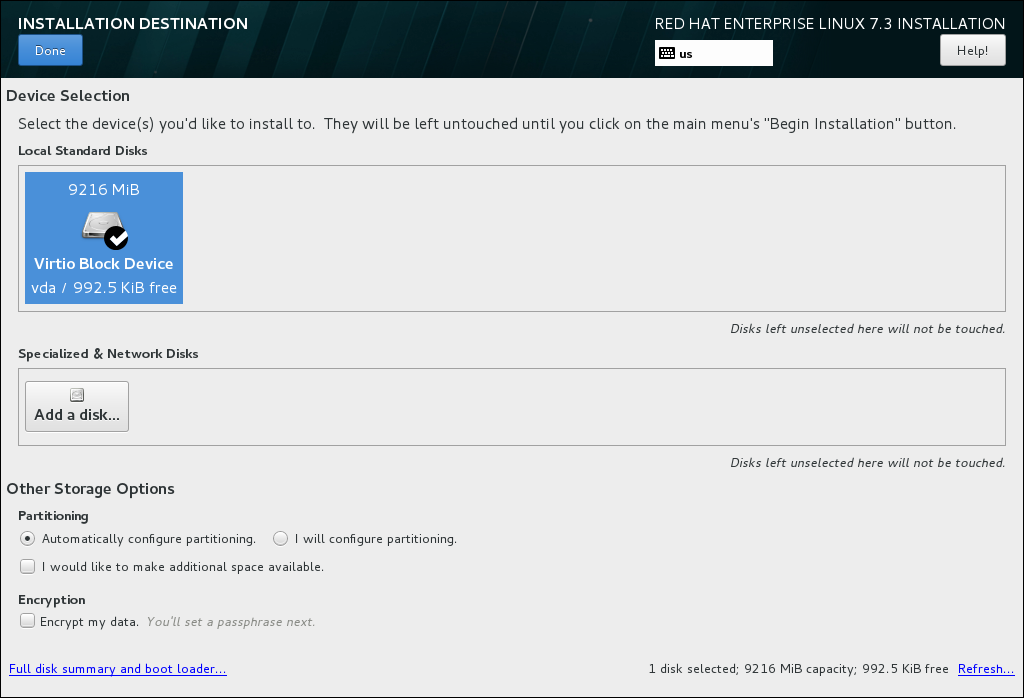
Figure 8.17. Storage Space Overview

Figure 8.18. Installation Options Dialog with Option to Reclaim Space
8.14.1. Boot Loader Installation
Warning
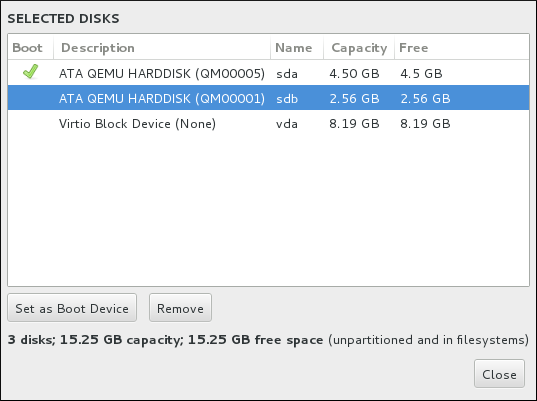
Figure 8.19. Summary of Selected Disks
Warning
8.14.1.1. MBR and GPT Considerations
Note
Note
8.14.2. Encrypt Partitions
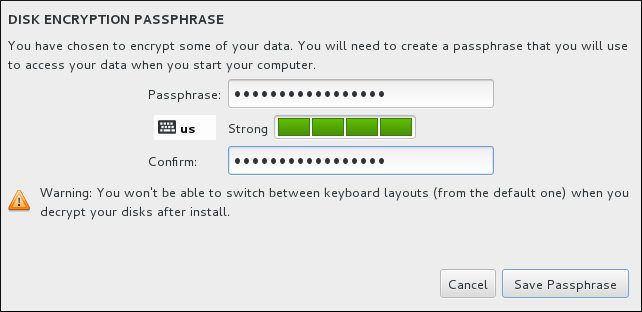
Figure 8.20. Enter Passphrase for an Encrypted Partition
Warning
8.14.3. Reclaim Disk Space
Warning
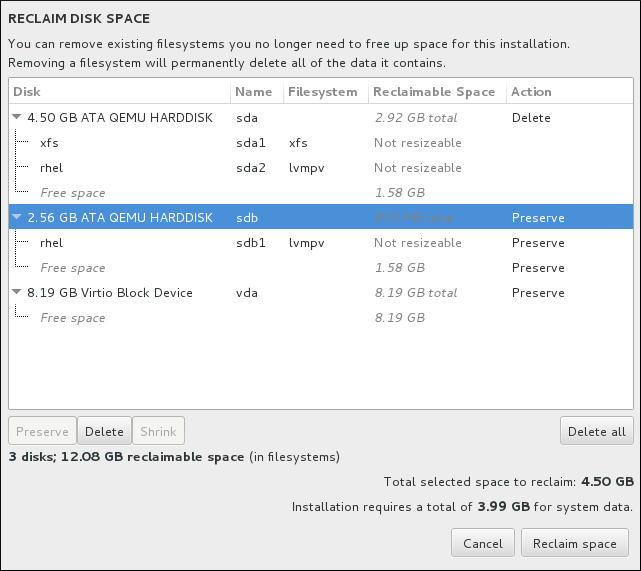
Figure 8.21. Reclaim Disk Space from Existing File Systems
8.14.4. Manual Partitioning
Warning
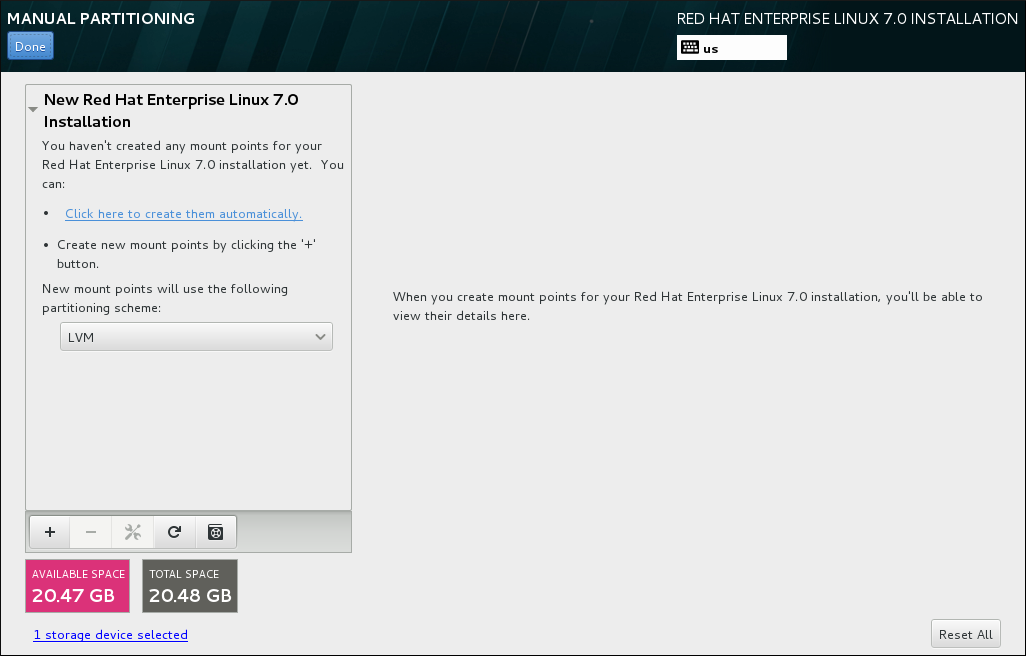
Figure 8.22. The Manual Partitioning Screen
Note
8.14.4.1. Adding File Systems and Configuring Partitions
Note
Note
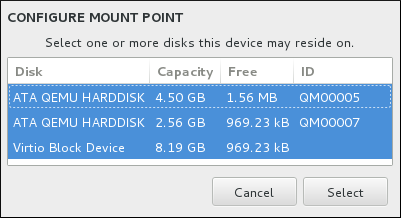
Figure 8.23. Configuring Mount Points
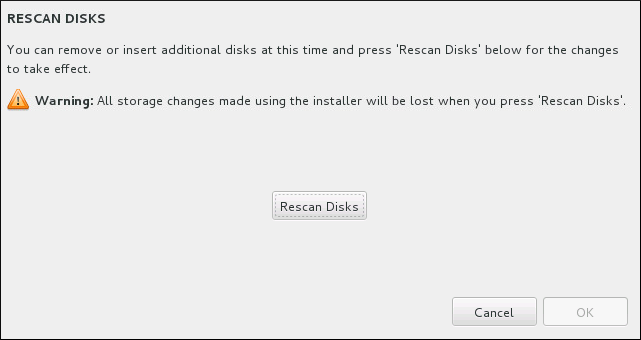
Figure 8.24. Rescanning Disks
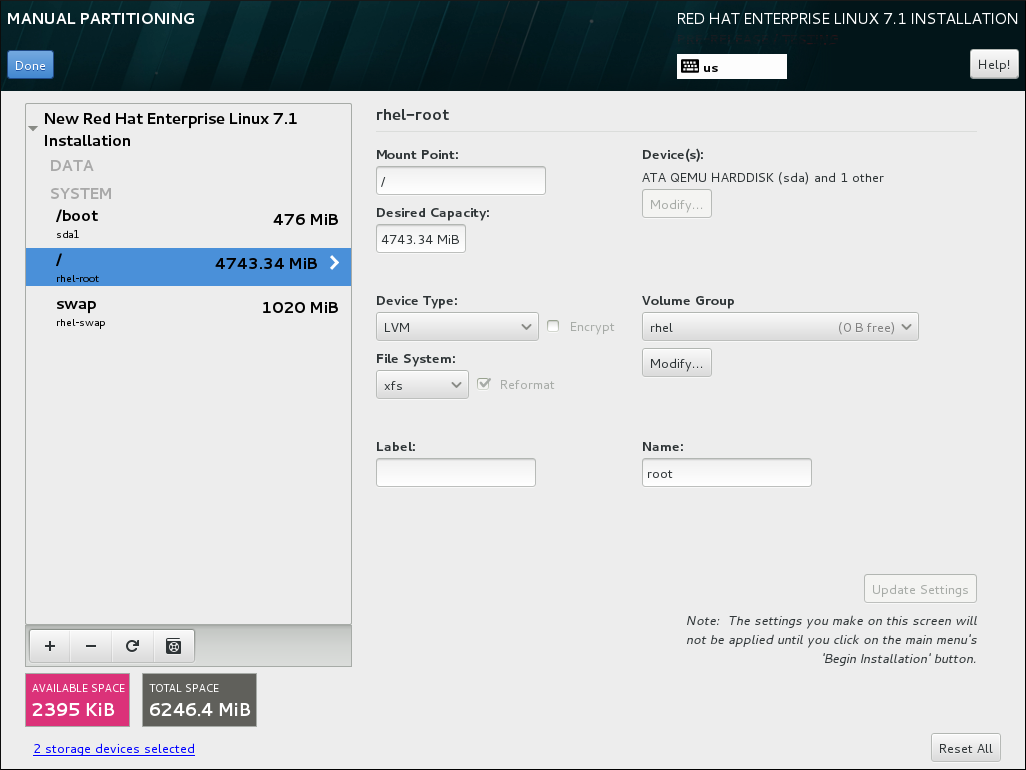
Figure 8.25. Customizing Partitions
Important
8.14.4.1.1. File System Types
Device Types
Warning
Note
File Systems
8.14.4.2. Create Software RAID
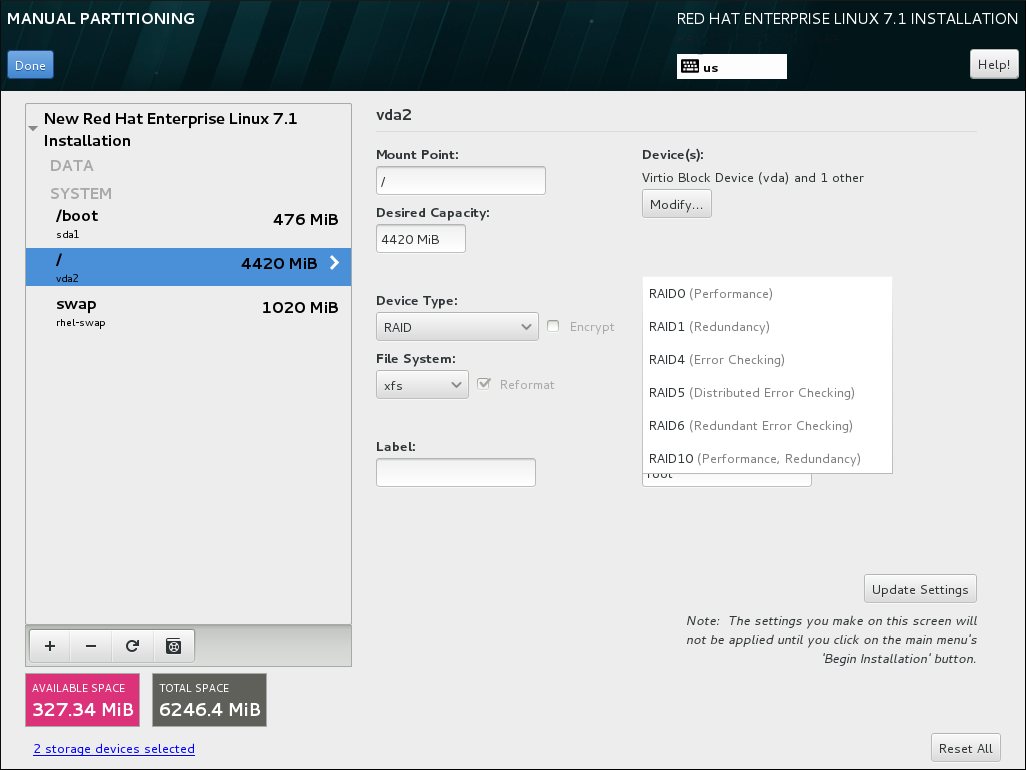
Figure 8.26. Creating a Software RAID Partition — the Device Type Menu Expanded
8.14.4.3. Create LVM Logical Volume
Important
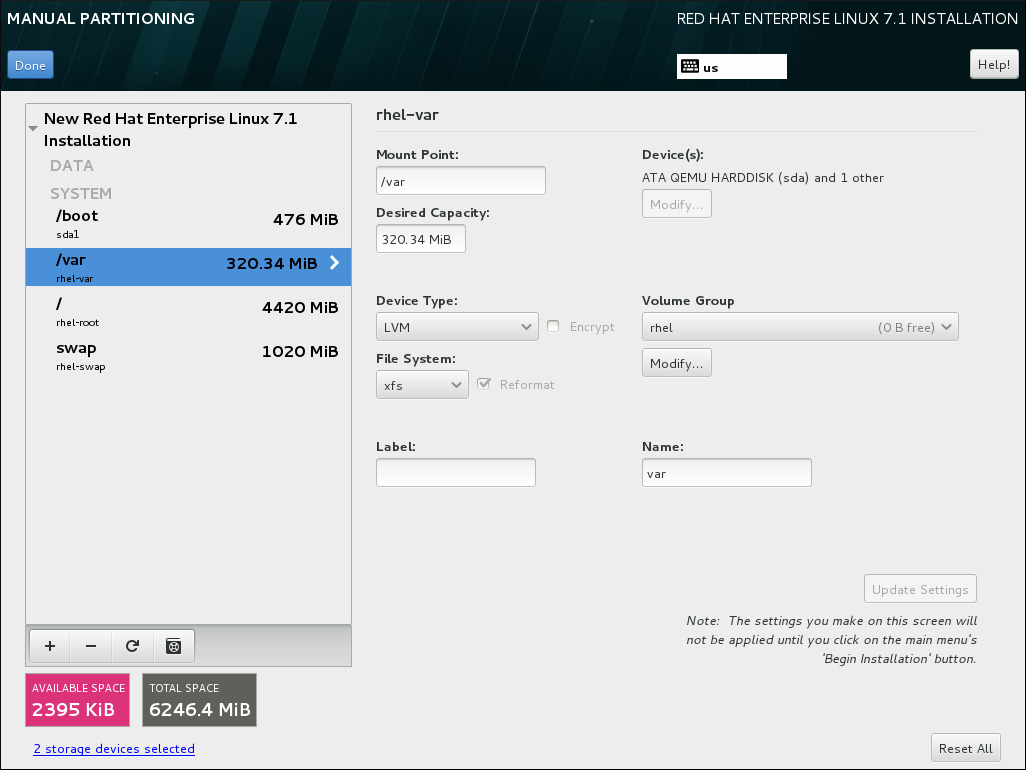
Figure 8.27. Configuring a Logical Volume
Note
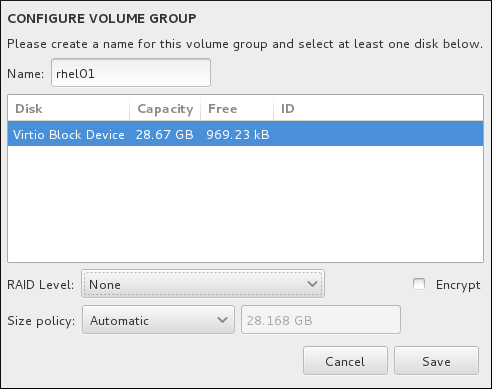
Figure 8.28. Customizing an LVM Volume Group
Warning
8.14.4.4. Recommended Partitioning Scheme
Warning
Note
Important
Table 8.3. Recommended System Swap Space
Источник


