- Автоматически инициируемые параметры профиля VPN VPN auto-triggered profile options
- Триггер приложений App trigger
- Триггер на основе имени Name-based trigger
- Режим «Всегда включен» Always On
- Сохранение пользователя Всегда на предпочтении Preserving user Always On preference
- Обнаружение доверенной сети Trusted network detection
- Настройка VPN-подключения, инициируемого приложением Configure app-triggered VPN
- Как настроить и использовать AutoVPN в Windows 10 для удаленного подключения
- AutoVPN в Windows 10
- How to make Windows 10 automatically connect to VPN
- 5 Best VPNs we recommend
- How do I make Windows 10 automatically connect to VPN?
- Create a VPN connection
- Create a BAT file
- Add the BAT file to Windows 10 autostart
- How do I make Windows 10 automatically connect to a VPN client?
- How do I stop my VPN from automatically connecting?
- Why use Private Internet Access
- Private Internet Access
Автоматически инициируемые параметры профиля VPN VPN auto-triggered profile options
Относится к: Applies to
- Windows 10 Windows 10
- Windows 10 Mobile Windows 10 Mobile
В Windows 10 были добавлены ряд функций для автоматической активации VPN, чтобы пользователям не приходилось вручную подключаться, если для доступа к необходимым ресурсам требуется VPN. In Windows 10, a number of features were added to auto-trigger VPN so users won’t have to manually connect when VPN is needed to access necessary resources. Существует три типа правил автоматически инициируемых правил. There are three different types of auto-trigger rules:
- Триггер приложений App trigger
- Триггер на основе имени Name-based trigger
- Режим «Всегда включен» Always On
Триггер приложений App trigger
Можно настроить автоматическое подключение профилей VPN в Windows 10 при запуске указанного набора приложений. VPN profiles in Windows 10 can be configured to connect automatically on the launch of a specified set of applications. Вы можете настроить классические приложения и приложения универсальной платформы Windows (UWP) для активации VPN-подключения. You can configure desktop or Universal Windows Platform (UWP) apps to trigger a VPN connection. Можно также настроить VPN для отдельного приложения и указать правила трафика для каждого приложения. You can also configure per-app VPN and specify traffic rules for each app. Дополнительные сведения см. в разделе Фильтры трафика. See Traffic filters for more details.
Идентификатор классического приложения — это путь к файлу. The app identifier for a desktop app is a file path. Идентификатор приложения UWP — это имя семейства пакетов. The app identifier for a UWP app is a package family name.
Триггер на основе имени Name-based trigger
Вы можете настроить правило на основе имени домена, чтобы определенное имя домена активировало VPN-подключение. You can configure a domain name-based rule so that a specific domain name triggers the VPN connection.
Автоматический триггер на основе имени можно настроить с помощью параметра VPNv2/имя_профиля/DomainNameInformationList/dniRowId/AutoTrigger в разделе Поставщик службы конфигурации (CSP) VPNv2. Name-based auto-trigger can be configured using the VPNv2/ProfileName/DomainNameInformationList/dniRowId/AutoTrigger setting in the VPNv2 Configuration Service Provider (CSP).
Существует четыре типа триггеров на основе имени. There are four types of name-based triggers:
- Короткое имя: например, если HRweb настроен как триггер и стек видит запрос на разрешение DNS для HRweb, активируется VPN-подключение. Short name: for example, if HRweb is configured as a trigger and the stack sees a DNS resolution request for HRweb, the VPN will be triggered.
- Полное доменное имя (FQDN): например, если HRweb.corp.contoso.com настроен как триггер и стек видит запрос на разрешение DNS для HRweb.corp.contoso.com, активируется VPN-подключение. Fully-qualified domain name (FQDN): for example, if HRweb.corp.contoso.com is configured as a trigger and the stack sees a DNS resolution request for HRweb.corp.contoso.com, the VPN will be triggered.
- Суффикс: например, если суффикс . corp.contoso.com настроен как триггер и стек видит запрос на разрешение DNS с соответствующим суффиксом (например, HRweb.corp.contoso.com), активируется VPN-подключение. Suffix: for example, if .corp.contoso.com is configured as a trigger and the stack sees a DNS resolution request with a matching suffix (such as HRweb.corp.contoso.com), the VPN will be triggered. VPN активируется для любого сопоставления короткого имени, а у DNS-сервера запрашивается короткое_имя.corp.contoso.com. For any short name resolution, VPN will be triggered and the DNS server will be queried for the ShortName.corp.contoso.com.
- Все: если используется, любое разрешение DNS активирует VPN. All: if used, all DNS resolution should trigger VPN.
Режим «Всегда включен» Always On
Режим «Всегда включен» — это функция Windows 10, которая позволяет активному профилю VPN автоматически подключаться в следующих случаях (триггеры). Always On is a feature in Windows 10 which enables the active VPN profile to connect automatically on the following triggers:
- Вход пользователя в систему. User sign-in
- Изменение в сети. Network change
- Включение экрана устройства. Device screen on
При активации триггер выполняется попытка подключения к VPN. When the trigger occurs, VPN tries to connect. Если возникает ошибка или требуется ввод пользователя, отображается всплывающее уведомление. If an error occurs or any user input is needed, the user is shown a toast notification for additional interaction.
Если на устройстве несколько профилей с триггерами «Всегда включен», пользователь может задать активный профиль в разделе Параметры > Сеть и Интернет > VPN > Профиль VPN, установив флажок Разрешить приложениям автоматически использовать это VPN-подключение. When a device has multiple profiles with Always On triggers, the user can specify the active profile in Settings > Network & Internet > VPN > VPN profile by selecting the Let apps automatically use this VPN connection checkbox. По умолчанию первый профиль, настроенный в MDM, отмечен как активный. By default, the first MDM-configured profile is marked as Active. Устройства с несколькими пользователями имеют одно и то же ограничение: только один профиль и, следовательно, только один пользователь сможет использовать триггеры Always On. Devices with multiple users have the same restriction: only one profile and therefore only one user will be able to use the Always On triggers.
Сохранение пользователя Всегда на предпочтении Preserving user Always On preference
Windows имеет функцию для сохранения предпочтений пользователя AlwaysOn. Windows has a feature to preserve a user’s AlwaysOn preference. В случае, если пользователь вручную отключает контрольный ящик «Подключение автоматически», Windows запомнит это предпочтение пользователя для этого имени профиля, добавив имя профиля к значению AutoTriggerDisabledProfilesList. In the event that a user manually unchecks the “Connect automatically” checkbox, Windows will remember this user preference for this profile name by adding the profile name to the value AutoTriggerDisabledProfilesList.
Если средство управления удаляет или добавляет одно и то же имя профиля и задает Значение AlwaysOn значение true, Windows не будет проверять поле, существует ли имя профиля в следующем значении реестра, чтобы сохранить предпочтения пользователей. Should a management tool remove or add the same profile name back and set AlwaysOn to true, Windows will not check the box if the profile name exists in the following registry value in order to preserve user preference.
Клавиша: HKEY_LOCAL_MACHINE\SYSTEM\CurrentControlSet\Services\RasMan\Config Key: HKEY_LOCAL_MACHINE\SYSTEM\CurrentControlSet\Services\RasMan\Config
Значение: AutoTriggerDisabledProfilesList Value: AutoTriggerDisabledProfilesList
Тип: REG_MULTI_SZ Type: REG_MULTI_SZ
Обнаружение доверенной сети Trusted network detection
Эта функция настраивает VPN таким образом, чтобы подключение не активировалось, если пользователь находится в доверенной корпоративной сети. This feature configures the VPN such that it would not get triggered if a user is on a trusted corporate network. Значение этого параметра — список суффиксов DNS. The value of this setting is a list of DNS suffices. Стек VPN изучает DNS-суффикс на физическом интерфейсе и, если он соответствует любому из настроенных в списке, и сеть является частной или настроена MDM, VPN не активируется. The VPN stack will look at the DNS suffix on the physical interface and if it matches any in the configured list and the network is private or provisioned by MDM, then VPN will not get triggered.
Обнаружение доверенной сети можно настроить с помощью параметра VPNv2/имя_профиля/TrustedNetworkDetection в разделе VPNv2 CSP. Trusted network detection can be configured using the VPNv2/ProfileName/TrustedNetworkDetection setting in the VPNv2 CSP.
Настройка VPN-подключения, инициируемого приложением Configure app-triggered VPN
Сведения о настройке XML см. в разделе Параметры профиля VPN и VPNv2 CSP. See VPN profile options and VPNv2 CSP for XML configuration.
На следующем рисунке показано связывание приложения с VPN-подключением в политике конфигурации VPN-профиля с помощью Microsoft Intune. The following image shows associating an app to a VPN connection in a VPN Profile configuration policy using Microsoft Intune.
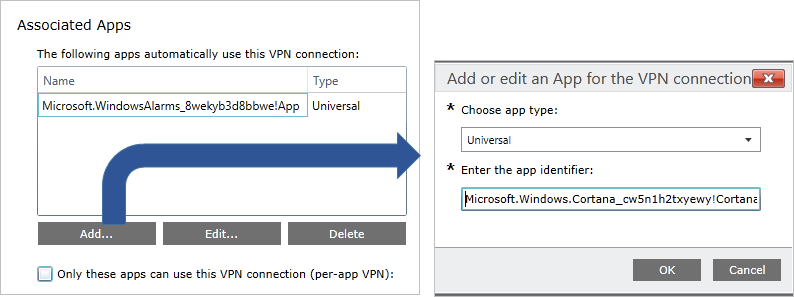
Если после добавления связанного приложения установить флажок Только эти приложения могут использовать это VPN-подключение (VPN для отдельных приложений), приложение станет доступным в корпоративных границах, где можно настроить правила для приложения. After you add an associated app, if you select the Only these apps can use this VPN connection (per-app VPN) checkbox, the app becomes available in Corporate Boundaries, where you can configure rules for the app. Дополнительные сведения см. в разделе Фильтры трафика. See Traffic filters for more details.
Как настроить и использовать AutoVPN в Windows 10 для удаленного подключения
Функция Windows 10 AutoVPN позволяет пользователям безопасно подключать две системы, создавая виртуальное соединение «точка-точка» с помощью метода Туннелирование . Это помогает в легком и быстром доступе к файлам и папкам. Как только соединение установлено, компьютер пользователя или мобильное устройство может быть подключено к Интернету, как обычно, через защищенные VPN-серверы. Затем связь становится безопасной, поскольку весь трафик шифруется и надежно маршрутизируется. Маршрут провайдера полностью обойден.
AutoVPN удобен и прост в использовании, поскольку позволяет получать доступ к рабочим ресурсам с рабочего стола Windows 10, даже если вы находитесь вне офиса. Он предоставляет профиль VPN, который содержит информацию о вашем корпоративном методе аутентификации и сервере. Настройка AutoVPN в Windows 10 проста, и большая часть настройки происходит автоматически. Если вам интересно узнать, как настроить и использовать AutoVPN в Windows 10 для удаленного подключения, уделите несколько минут и прочтите это.
AutoVPN в Windows 10
Перед началом работы необходимо выполнить определенные условия. К ним относится установка Windows 10 Anniversary Update v1607 или более поздней версии. Вы можете проверить доступность опции VPN, нажав на значок сети и выбрав опцию VPN.
При использовании AutoVPN пользователю будет предложено включить аутентификацию. Для этого доступно 2 метода:
- Windows Hello
- Многофакторная аутентификация
В некоторой степени оба метода упрощают процесс соединения двух систем, одна из которых находится вне офиса, и помогают обеспечить безопасность данных.
Как только вы продолжите в правильной последовательности, как описано выше, и все будет в порядке, профиль для AutoVPN будет автоматически доставлен на ваше устройство.
Он будет содержать всю необходимую информацию, необходимую для подключения к корпоративной сети, то есть поддерживаемый метод аутентификации и сервер, который подключается к вашему устройству.
По умолчанию AutoVPN выберет лучшую точку входа в зависимости от вашего географического положения, поэтому вам не нужно менять сайт подключения.
Однако, если вы хотите отменить это или переопределить местоположение подключения, выполните следующие действия:
Выберите значок настроек Сеть , расположенный на панели задач. Затем выберите AutoVPN в списке параметров в верхней части.

Теперь в окне «Сеть и Интернет» выберите «AutoVPN». По завершении перейдите на вкладку «Дополнительные параметры».
Затем выберите опцию «Изменить», отображаемую в окне AutoVPN, и выберите имя или адрес сервера в окне «Редактировать VPN-подключение», чтобы изменить настройку с «Автоматически» на предпочитаемое имя или адрес сервера.
Чтобы отключить автоматическое подключение, снимите флажок Разрешить приложениям автоматически использовать это VPN-подключение .
Для получения дополнительной информации ознакомьтесь с этим документом Microsoft.
Теперь читайте : всегда включен VPN для клиентских компьютеров с Windows 10.
How to make Windows 10 automatically connect to VPN

- If you’re a privacy-concerned user, you can make Windows 10 automatically connect to a VPN as soon as you turn on your PC. It’s also ideal for quickly connecting to your workplace through VPN.
- Although the Windows 10 built-in provider doesn’t have an option to auto-connect on system boot, you can make this happen by adding a BAT file to the Windows 10 startup folder. Find out how.
- Visit our Windows 10 area to learn how to fully take advantage of Microsoft’s operating system.
- If you’re having any VPN problems, bookmark our VPN Troubleshooting Hub .

If you’re wondering how to make Windows 10 automatically connect to VPN, we’ve got you covered. You just have to create a simple BAT file with your VPN connection details and add it to the Windows autostart sequence.
This way, the VPN connection you created using the Windows 10 built-in VPN provider will autostart every time you switch on your computer, just like Skype, Steam, or an antivirus.
However, if you have a VPN desktop client installed, things become significantly easier since you just have to find and activate the autostart and auto-connect options in the UI.
Follow our easy instructions below to find out how to make Windows 10 automatically connect to VPN using a manual VPN connection as well as a VPN desktop client.
We’re also showing you how to stop your VPN from auto-connecting if you need to turn off this feature temporarily or permanently.
5 Best VPNs we recommend
| 79% Off + 2 free Months |  Check offer! Check offer! | |
| 83% Off (2.25$/Month) + 3 free Months | Check offer! | |
| 68% Off + 1, 12 or 24 free Months (random prize) | Check offer! | |
| 83% Off (2.21$/Month) + 3 free Months | Check offer! | |
| 76% (2.83$) on 2 Years plan | Check offer! |
How do I make Windows 10 automatically connect to VPN?
Create a VPN connection
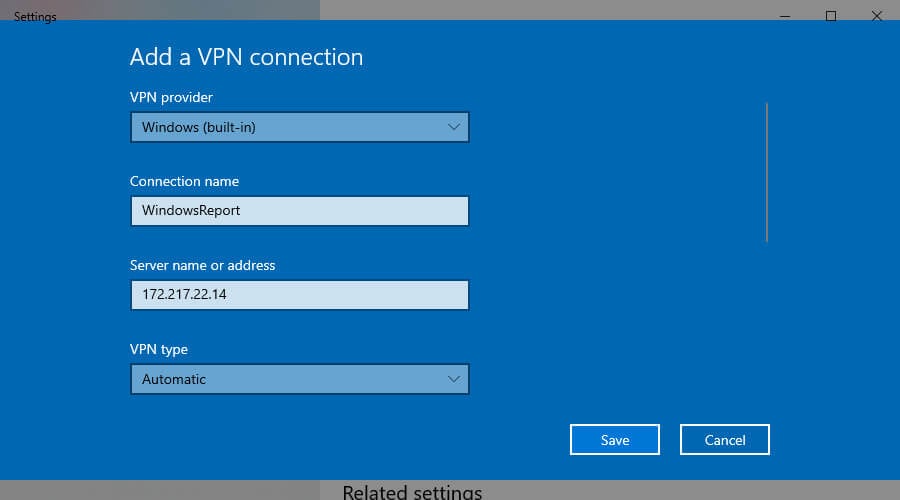
- Right-click the Start button and go to Network Connections.
- Select VPN and press Add a VPN connection.
- Add the required VPN connection details.
- Copy the Connection name, User name, and Password.
- Click Save.
Create a BAT file

- Open the Windows 10 Notepad (press Ctrl + R, type notepad, press Enter).
- Paste the following code: c:windowssystem32rasdial.exe YourConnectionName YourUsername YourPassword
- Replace the connection details with what you copied in the previous stage.
- Save the Notepad file and exit.
- Change the file extension of the Notepad file from TXT to BAT.
If you can’t see the format of your files, find out how to show file extensions in Windows 10.
Add the BAT file to Windows 10 autostart
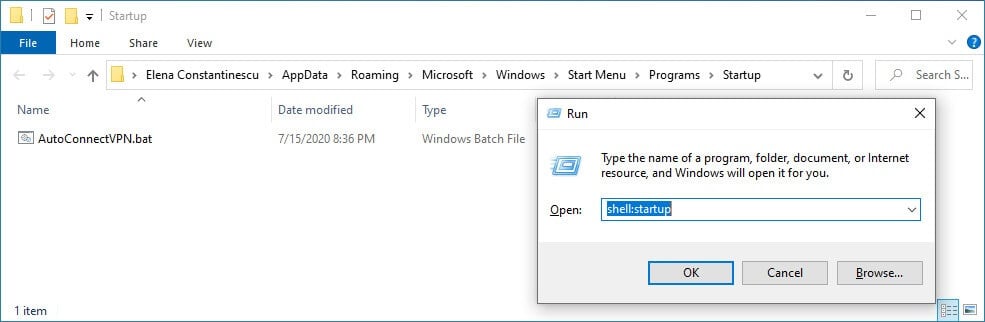
- Press Ctrl + R, type shell:startup, and press Enter.
- Copy the BAT file to this location.
- Restart your PC.
From this point on, Windows 10 will automatically connect to the VPN at every system startup. Command Prompt briefly opens a console window and shows how it verifies the username and password, registers your PC over the network, and connects to the VPN.
If you need to switch VPN servers, you only have to edit the VPN connection details in Windows 10. The changes will get automatically picked up by the BAT file.
However, if you also modify the VPN connection name, username, or password, then you will need to manually update the BAT file, too. Otherwise, Windows 10 won’t be able to automatically connect to the VPN.
How do I make Windows 10 automatically connect to a VPN client?

- Sign up for a Private Internet Access subscription.
- Download and install PIA on your PC.
- In the systray, click the PIA icon.
- Open Settings and go to the General tab.
- Enable Launch on System Startup and Connect on Launch.
- Restart your PC.
After making these changes, PIA will auto-launch every time you turn your PC and connect to the last used VPN server. As you can see, it’s a more convenient option than having to create a BAT file and add it to the Windows 10 startup.
Furthermore, it’s easier to change VPN servers in PIA in order for Windows 10 to automatically connect to the new VPN server, instead of editing the VPN connection info in the OS and manually updating the BAT file every time you do this.
How do I stop my VPN from automatically connecting?
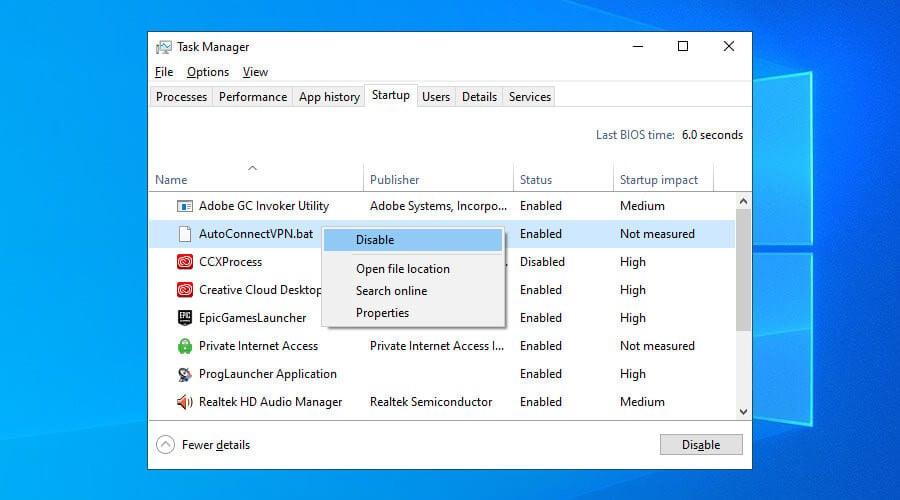
- Right-click the Windows taskbar and go to Task Manager.
- Go to the Startup tab.
- Right-click the VPN connection’s BAT file and click Disable.
If you change your mind and want to re-enable Windows 10 to automatically connect to the VPN, follow the same steps as above and click Enable on the disabled entry. To make a permanent change, head over to the startup folder using Ctrl+R and shell:startup to delete the BAT file.
If you used a VPN desktop client like PIA, simply find and disable the autostart and auto-connect options in the user interface. You can also use Task Manager to prevent PIA from autostarting at every Windows startup (same steps as disabling the BAT file).
Why use Private Internet Access

Developed by Kape Technologies, Private Internet Access (PIA) is the best VPN for Windows 10, thanks to high-speed VPN servers, military-grade encryption, and its user-friendly interface. It’s the reason why we used it in our example above.
Windows 10 has limited native support for VPN protocols, some of which are considered obsolete (PPTP, L2TP). On the other hand, PIA supports OpenVPN and WireGuard, which are safer and more versatile protocols.
Moreover, PIA comes with a bunch of security features that Windows 10 lacks, including a kill switch that cuts off Internet access in case the VPN connection drops, to protect you from IP leaks.
What else you should know about PIA:
- Quickly connect to more than 3,300 VPN servers in 48 countries
- Increase your security using private DNS
- Protects up to 10 devices at the same time
- No traffic logs, no IP or DNS leaks
- 24/7 live chat support
- 30-days money-back guarantee (no free trial)

Private Internet Access
Make Windows 10 automatically connect to PIA’s VPN servers fast and easy.
In conclusion, it’s a good idea to make Windows 10 automatically connect to a VPN as soon as you turn on your PC. This way, you can immediately connect to another computer over the Internet, like accessing your work PC from home.
However, using a premium VPN solution like PIA is significantly easier and unlocks more possibilities. For example, you can use PIA to access blocked websites, defeat government censorship, host game servers for you and your friends, and unlock Netflix catalogs.


