- Запуск VPN соединения до входа в систему Windows
- Vpn before windows logon
- Asked by:
- Question
- Vpn before windows logon
- Asked by:
- Question
- Configure Always On VPN before Windows Logon
- Understanding Always On VPN before Windows Logon
- Configure Always On VPN before Windows Logon by using an advanced policy
- Prerequisite
- To configure the functionality using the GUI
- Client certificate based authentication
- Client side configuration
Запуск VPN соединения до входа в систему Windows
Возможно ли в Windows 7 организовать прозрачную работу удалённых пользователей с центральным доменом Active Directory посредством VPN соединения так, чтобы пользователь работал и подключался под собственной учетной записью в домене, а на его мобильный компьютер действовали все доменные политики и ограничения? Мы уже рассматривали способы автоматического запуска VPN клиента в Windows, однако все указанные способы имеют один существенный недостаток – VPN соединение инициируется после входа пользователя в систему. Ведь обычно при VPN подключении пользователь обычно сначала входит в систему, а лишь потом запускает VPN клиент. Получается, что до установки VPN туннеля компьютер просто не может видеть контроллер домена, и, соответственно, не может авторизоваться на нем под своей доменной учетной записью. Конечно, пользователь может войти в систему и работать под локальной учетной записью, но это во-первых неудобно (для доступа корпоративным ресурсам необходимо постоянно указывать пароль), а во-вторых не всегда применимо с точки зрения корпоративной политики безопасности.
Для реализации описанной схемы работы необходимо воспользоваться сторонним VPN клиентом, позволяющим устанавливать vpn соединение до входа пользователя в систему (работает как служба), создать отдельную службу на базе rasphone/rasdial или же воспользоваться возможностями технологии SSO (Single Sign-On) в Windows 7. Нас, естественно, интересует последний вариант.
Итак, возможность установить VPN подключения к корпоративной сети до момента интерактивного входа пользователя (логона) в компьютер, появилась еще в Windows Vista. Данный функционал основан на технологии SSO (технологии единого входа) и работает также в последующих версиях Windows.
В этой статье мы рассмотрим процедуру организации прозрачной работы удаленных пользователей с центральной сетью предприятий и доменом Active Directory посредством «родного» нативного клиента VPN в Windows 7.
Требования для реализации возможности осуществления VPN подключения до входа в систему в Windows
- Для VPN подключения используется родной Windows VPN клиент
- Компьютер пользователя должен работать под управлением корпоративных (старших редакций) ОС Windows 7 (Professional, Enterprise или Ultimate редакции).
- Компьютер должен быть включен в домен Active Directory
Итак, у нас имеется компьютер с Windows 7 Ultimate. На данном этапе в состав домена Windows он не включен.
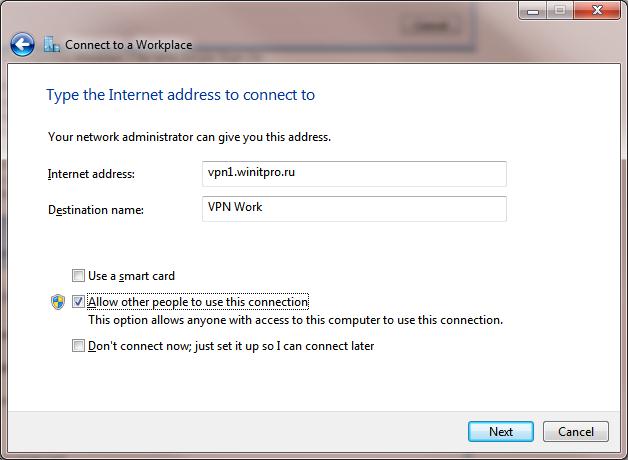
Начнем с настройки обычно VPN подключения. Мы не будет подробно описывать процесс создания VPN подключения, т.к. он предельно прост (пример настройки vpn соединения в Windows 8). Главный нюанс – в процессе настройки VPN подключения разрешить другим пользователям использовать данное подключение (чекбокс «Allow other people to use this connection»). Только при наличии данной галочки пользователь сможет выбрать данное vpn подключение и запустить его прямо на экране входа в систему (VPN SSO).
На следующем шаге необходимо указать имя пользователя, пароль и домена Active Directory, с которым будет устанавливаться связь.

Далее необходимо установить VPN соединение с доменом Windows и включить данный ПК в его состав (подобно о том, как включить ПК в состав домена описано тут). Затем компьютер нужно перезагрузить.

При следующей загрузке компьютера на экране входа в систему необходимо нажать кнопку Switch User, и найти дополнительную синюю кнопку в нижнем правом углу экрана (кнопка Network Logon) .
Нажав данную кнопку, экран входа поменяет вид и отобразит название созданного ранее VPN подключения (My VPN Connection). Здесь необходимо указать учетную запись и пароль пользователя с правами удаленного подключения к домену. Нажав кнопку входа, система инициирует VPN подключение, и одновременно с помощью этих же учетных данных авторизует пользователя на локальном компьютере.
После входа в систему и применения политик безопасности домена, пользователь сможет пользоваться всеми корпоративными ресурсами точно также, как будто он работает за стационарным компьютером в центральном офисе.
В этой статье мы показали каким образом мобильные пользователи Windows 7 могут использовать свои доменные учетные записи для инициализации vpn подключения (до момента входа в Windows) и одновременного интерактивного входа на локальный компьютер.
Vpn before windows logon
This forum has migrated to Microsoft Q&A. Visit Microsoft Q&A to post new questions.
Asked by:
![]()
Question
![]()
![]()
I’m having some problems with Windows 10 Pro, and one of them is configuring VPN so it gives me the option to connect to vpn before I login into Windows.
To make it clear, I want to have the option to connect to vpn. I do not want to connect to VPN every time my Notebook starts.
I have no problems with setting up the VPN connection(Windows Application and Dell SonicWall NetExtender) and I can connect to my destination network.
I want to be able to connect to the VPN before I log on the laptop, which should be possible. On Windows 7 and 8.1 it was easy to configure and there are a lot of guides on how to do it, but I did not found any for Windows 10.
In the logon screen, there is a icon for the Networks, where you can connect to WiFi etc.
I had the option to connect to VPN in previous versions, but now its missing, even after I tried the solutions which Iam used to use for Windows 7 and 8.1 to make this option appear.
I have removed and configured the VPN connection a number of times now, and still it’s not on the logon screen. It appears when I’m on the desktop but not before I’m logged on.
Is there a option that I’m missing, which allows the VPN connection to be visible at the logon screen??
In older Windows version I could choose the option «allow all user on this pc to use vpn» but since Windows 10, this option is gone.
Configure Always On VPN before Windows Logon
Always On VPN before Windows Logon provides the following capabilities.
- Administrator provides a one-time password to the first time users working remotely using which users can connect to the domain controller to change their password.
- Administrator remotely manages/enforces AD policies to the device even before the user logs in.
- Administrator provides a granular level of control to users based on the user group after the user logs on. For example, using a user-level tunnel, you can restrict or provide access for a resource to a particular user group.
- The user tunnel can be configured for MFA as per user requirements.
- Multiple users can use the same machine. Access to selective resources are provided based on the user profile. For example multiple users can use a machine in a kiosk without hassle.
- Users working remotely connect to the domain controller to change their password.
Understanding Always On VPN before Windows Logon
The following is the flow of events for the Always On VPN before Windows Logon functionality.
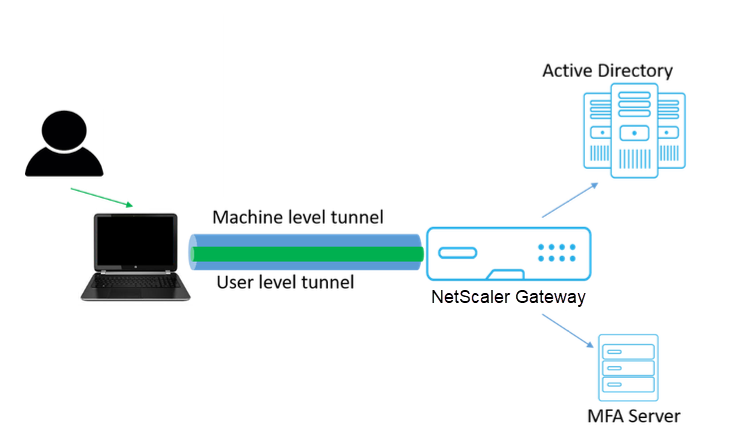
- User turns on the laptop, the machine-level tunnel is established towards Citrix Gateway using the device certificate as identity.
- User logs in to the laptop with AD credentials.
- Post login, user is challenged with MFA.
- Upon a successful authentication, the machine-level tunnel is replaced with the user-level tunnel.
- Once the user logs out, the user-level tunnel is replaced with the machine-level tunnel.
Configure Always On VPN before Windows Logon by using an advanced policy
Prerequisite
- Citrix Gateway and VPN plug-in must be version 13.0.41.20 and later.
- Citrix ADC Advanced Edition and higher is required for the solution to work.
- You can configure the functionality only by using advanced policies.
The configuration involves the following high-level steps:
- Create an authentication profile
- Create an authentication virtual server
- Create authentication policies
- Bind the policies to the authentication profile
To configure the functionality using the GUI
Client certificate based authentication
- On the Configuration tab, navigate to Citrix Gateway > Virtual Servers.
- On the Citrix Gateway Virtual Servers page, select an existing virtual server and click Edit.
- On the VPN Virtual Server page, click the edit icon.
Click Add next to the CA for Device Certificate section and click OK.

Note: Do not select the Enable Device Certificate check box.
For binding a CA certificate to the virtual server, click CA certificate under Certificate section. Click Add Binding under the SSL Virtual Server CA Certificate Binding page.
Note: All CA certificates (Root and Intermediate) that can potentially sign the Device Certificate issued to clients must be bound under the CA for Device Certificate section and also the CA Certificate binding section for virtual server in Steps 4 and 5. For more information on linking CA certificate with intermediate / subordinate, see Install, link, and update certificates.
Click Click to select to select the required certificate.

Select the required CA certificate.

Click Bind.


- Enter a name for the advance authentication policy.
- Select EPA from the Action Type list.
- Click Add next to Action.


- Enter a name for the EPA action to be created.
- Enter sys.client_expr(“device-cert_0_0”) in the Expression field.
- Click Create.

- Enter a name for the authentication policy.
- Enter is_aoservice in the Expression field.
- Click Create.

On the Policy Binding page, enter 100 in Priority and click Bind.

The machine-level tunnel configuration is now complete. You can skip steps 18–25 and proceed with the client side configuration, if you do not want the user-level tunnel after the Windows Logon.
To replace a machine-level tunnel with a user-level tunnel after Windows logon, continue with the following configuration.
Change the Goto Expression to Next instead of End for the policy bound in step 17.


- Enter a name for the “no authentication” policy to be created.
- Select action type as No_AUTHN.
- Enter is_aoservice.not in the Expression field.
- Click Create.
The expression is_aoservice.not is valid from Citrix Gateway version 13.0 build 41.20 and later.

On the Policy Binding page, enter 110 in Priority, click Add next to Select Next Factor.
You can select an existing LDAP policy or create a policy. For details on creating an LDAP authentication policy, see To configure LDAP authentication by using the configuration utility.
Client side configuration
AlwaysOn, locationDetection, and suffixList registries are optional and only required if the location detection functionality is needed.
To access registry key entries, navigate to the following path: Computer>HKEY_LOCAL_MACHINE>SOFTWARE>Citrix>Secure Access Client
| Registry key | Registry type | Values and description |
|---|---|---|
| AlwaysOnService | REG_DWORD | 1 => Establish machine level tunnel but not user level tunnel; 2 => Establish machine level tunnel and user level tunnel |
| AlwaysOnURL | REG SZ | URL of the Citrix Gateway virtual server the user wants to connect to. Example: https://xyz.companyDomain.com Important: Only one URL is responsible for machine level tunnel and user-level tunnel. The AlwaysOnURL registry helps both the service and user-level component to work and connect separate tunnel, that is, machine-level tunnel and user-level tunnel based on the design |
| AlwaysOn | REG_DWORD | 1 => Allow network access on VPN failure; 2=> Block network access on VPN failure |
| AlwaysOnWhiteList | REG_SZ | Semi-colon separated list of IP addresses or FQDNs which must be whitelisted while the machine is running under the strict mode. Example: 8.8.8.8;linkedin.com |
| UserCertCAList | REG_SZ | Comma or semi-colon separated list of root CA names, that is the issuer name of the certificate. Used in the context of an Always On service where a customer can specify the list of CAs to choose the client certificate from. Example: cgwsanity.net;xyz.gov.in |
| locationDetection | REG_DWORD | 1 => To enable location detection; 0 => To disable location detection |
| suffixList | REG SZ | Comma separated list of domains and is responsible for checking if the machine is in intranet or not at any given time when location-detection is enabled. Example: citrite.net,cgwsanity.net |
For more information about these registry entries, see Always On.


