- Connect to a VPN in Windows 10
- Create a VPN profile
- Connect to a VPN
- Подключение к сети VPN в Windows 10
- Создание профиля VPN
- Подключение к сети VPN
- Рубрика: VPN для Windows 10
- On windows 10, how do I setup a VPN client so that all users can use it (i.e. available before login)
- 2 Answers 2
- Step 6. Configure Windows 10 client Always On VPN connections
- ProfileXML overview
- Manually create a template connection profile
- Record NPS certificate settings
- Configure the template VPN profile on a domain-joined client computer
- Create the ProfileXML configuration files
- Listing 1. Understanding MakeProfile.ps1
- Prepare and create the profile XML
- Create the profile XML
- Output VPN_Profile.xml for Intune
- Output VPN_Profile.ps1 for the desktop and Configuration Manager
- Define key VPN profile parameters
- Escape special characters in the profile
- Define WMI-to-CSP Bridge properties
- Determine user SID for VPN profile:
- Define WMI session:
- Detect and delete previous VPN profile:
- Create the VPN profile:
- Save the profile XML file
- MakeProfile.ps1 Full Script
- Configure the VPN client by using Windows PowerShell
- Configure the VPN client by using Configuration Manager
- Create a user group
- Create a package containing the ProfileXML configuration script
- Deploy the ProfileXML configuration script
- Verify the configuration of the VPN client
- Configure the VPN client by using Intune
- Create the Always On VPN configuration policy
- Sync the Always On VPN configuration policy with Intune
- Next steps
Connect to a VPN in Windows 10
Whether it’s for work or personal use, you can connect to a virtual private network (VPN) on your Windows 10 PC. A VPN connection can help provide a more secure connection and access to your company’s network and the internet, for example, when you’re working from a coffee shop or similar public place.
Create a VPN profile
Before you can connect to a VPN, you must have a VPN profile on your PC. You can either create a VPN profile on your own or set up a work account to get a VPN profile from your company.
Before you start:
If it’s for work, look for VPN settings or a VPN app on your company’s intranet site while you’re at work, or contact your company’s support person.
If it’s for a VPN service you subscribe to for personal use, visit the Microsoft Store to see if there’s an app for that service, then go to the VPN service’s website to see if the VPN connection settings to use are listed there.
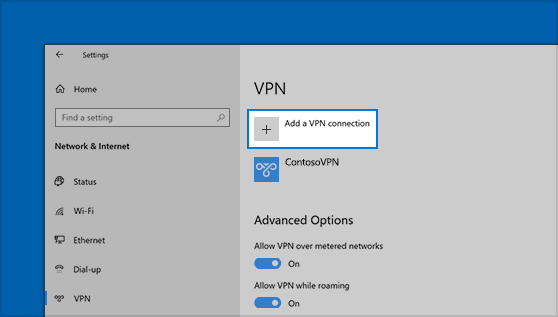
Select the Start button, then select Settings > Network & Internet > VPN > Add a VPN connection.
In Add a VPN connection, do the following:
For VPN provider, choose Windows (built-in).
In the Connection name box, enter a name you’ll recognize (for example, My Personal VPN). This is the VPN connection name you’ll look for when connecting.
In the Server name or address box, enter the address for the VPN server.
For VPN type, choose the type of VPN connection you want to create. You’ll need to know which kind of VPN connection your company or VPN service uses.
For Type of sign-in info, choose the type of sign-in info (or credentials) to use. This might be a username and password, one-time password, certificate, or a smart card if you’re connecting to a VPN for work. Enter your username and password in the respective boxes (if required).
If you need to edit the VPN connection info or specify additional settings, such as proxy settings, choose the VPN connection and then select Advanced options.
Connect to a VPN
When you have a VPN profile, you’re ready to connect.
On the far right of the taskbar, select the Network icon (either or ).
Select the VPN connection you want to use, then do either of the following depending on what happens when you select the VPN connection:
If the Connect button displays under the VPN connection, select Connect.
If the VPN section in Settings opens, select the VPN connection there, then select Connect.
If you’re prompted, enter your username and password or other sign-in info.
When connected, the VPN connection name will display Connected underneath it. To see if you’re connected to the VPN while you’re doing things on your PC, select the Network icon (either or ) on the far right of the taskbar, then see if the VPN connection says Connected.
Подключение к сети VPN в Windows 10
Вы можете подключаться к виртуальной частной сети (VPN) на компьютере с Windows 10 как для работы, так и в личных целях. VPN-подключение может обеспечить более безопасное соединение и доступ к корпоративной сети и Интернету, например, если вы работаете из кафе или похожего общественного места.
Создание профиля VPN
Перед подключением к сети VPN вам необходимо настроить профиль VPN на своем компьютере. Чтобы получить профиль VPN от вашей компании, вы можете либо создать профиль VPN самостоятельно или настроить рабочую учетную запись.
Прежде чем начать, выполните указанные ниже действия.
Если VPN-подключение будет использоваться для работы, проверьте наличие параметров и/или приложения VPN на сайте интрасети вашей компании во время работы или обратитесь к специалисту службы поддержки вашей компании.
Если вы подписываетесь на службу VPN в личных целях, посетите Microsoft Store , чтобы проверить наличие приложения для этой службы, а затем перейдите на веб-сайт службы VPN, где могут быть указаны необходимые параметры VPN-подключения.
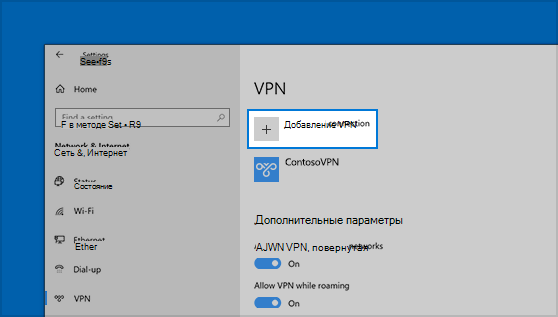
Нажмите Start кнопку «Пуск», а затем выберите Параметры > сеть & Интернет > VPN > Добавить VPN-подключение.
В разделе Добавление VPN-подключения сделайте следующее:
В поле Поставщик услуг VPN выберите Windows (встроенный).
В поле Имя подключения введите понятное вам имя (например, «Мой личный VPN»). Это имя подключения VPN, которое будет нужно искать для подключения.
В поле Имя или адрес сервера введите адрес для сервера VPN.
Выберите Тип VPN-подключения, которое вы хотите создать. Вы должны знать, какой тип VPN-подключения или служба VPN используется в вашей организации.
В поле Тип данных для входа выберите тип данных для входа (или учетные данные), которые следует использовать. Это могут быть имя пользователя и пароль, одноразовый пароль, сертификат или смарт-карта, если вы подключаетесь к сети VPN для работы. Введите свое имя пользователя и пароль в соответствующие поля (при необходимости).
Нажмите кнопку Сохранить.
Если вам требуется изменить сведения о VPN-подключении или указать дополнительные параметры, например параметры прокси-сервера, выберите соответствующее VPN-подключение и нажмите Дополнительные параметры.
Подключение к сети VPN
Если у вас есть профиль VPN, вы можете подключаться к нему.
Выберите значок сети ( или ) в дальнем правом углу панели задач.
Выберите VPN-подключение, которое вы хотите использовать, а затем выполните одно из следующих действий в зависимости от того, что происходит при выборе VPN-подключения:
Если под VPN-подключением отображается кнопка «Подключить», выберите Подключить.
Если в «Параметрах» открывается раздел «VPN», выберите это VPN-подключение, затем выберите Подключить.
При появлении запроса введите имя пользователя и пароль или другие данные для входа.
После подключения имя VPN-подключения будет отображаться под ним. Чтобы проверить наличие подключения к сети VPN во время работы за компьютером, нажмите значок Сеть ( или ) в крайнем правом углу панели задач и убедитесь, что под VPN-подключением есть надпись Подключено.
Рубрика: VPN для Windows 10
При использовании специальных VPN-клиентов для Windows 10 вы сохраните анонимность данных. ВПН клиенты – популярная категория программ среди пользователей Интернет. Скачать бесплатно VPN-клиенты для Windows 10 вы можете на нашем сайте.
Предлагаем подборку VPN утилит и программ для анонимного доступа к сети, разблокировке заблокированных сайтов, доступа к недоступному контенту, ограниченного по каким-либо условиям.

О программе Cisco VPN Client – утилита, предназначенная для организации и последующего обеспечения безопасности IPSec-туннеля. Компания «Cisco», являющаяся крупнейшим в мире производителем промышленного сетевого оборудования, […]

О программе Last Password Manager – плагин для управления паролями в наиболее распространенных интернет-браузерах (Opera, Google Chrome, Safari, Internet Explorer и т.д.). Он запоминает регистрационные […]

О программе Browsec VPN – известное расширение для таких браузеров, как Яндекс, Firefox, Opera, Google Chrome, предназначенное для обеспечения анонимного и безопасного серфинга в сети […]

О программе SafeIP – программа, позволяющая поддерживать базовую анонимность в сети Интернет. Анонимность в сети с каждым днём становится всё более проблематичным занятием. Отслеживается всё […]

О программе Утилита Hamachi часто используется для формирования частной домашней сети VPN. Она позволяет организовать в единую сеть, сравнимую с физической локальной, ряд подключенных к […]

О программе Betternet – VPN-программа, позволяющая обходить блокировку сайтов и оставаться анонимным пользователем сети. Подключение осуществляется при помощи анонимных прокси-серверов. VPN-туннель активируется в пару кликов. […]

О программе anonymoX – самый известный плагин для браузеров Mozilla Firefox и Google Chrome, позволяющий пользоваться интернетом, не беспокоясь о собственной безопасности. Если вопрос конфиденциальности в […]

О программе Touch VPN – плагин для браузеров Google Chrome и Mozilla Firefox, позволяющий добиться анонимности во время серфинга по интернету буквально в несколько кликов. […]

О программе OpenVPN – бесплатная программа для Windows с полнофункциональной реализацией VPN. Отличается открытым исходным кодом, поддержкой SSL-соединения и продвинутыми настройками для опытных пользователей. С […]

О программе ZenMate VPN – надёжный помощник, делающий интернет пространство более безопасным для пользователей. За считанные секунды устанавливает соединение с любыми прокси-серверами, предлагает выбор из […]

О программе friGate – удобное дополнение для наиболее популярных браузеров, позволяющее посещать заблокированные ресурсы и оставаться анонимным при использовании интернета. Наличие анонимности подразумевает и присутствие безопасного […]

О программе TunnelBear VPN – сервис, позволяющий создать надёжную точку доступа для безопасного и анонимного посещения веб-сайтов. Пользовательские данные остаются конфиденциальными, так как IP-адрес и […]

О программе Hotspot Shield – программное обеспечение, направленное на создание анонимного и безопасного Интернет-соединения. Под неё разработали особую технологию VPN, защищающую не только весь исходящий […]

О программе Hoxx VPN Proxy – дополнение, подтверждающее тот факт, что немцы знают толк в безопасности и анонимности в Сети. Процесс серфинга в интернете станет значительно […]

О программе Windscribe VPN – полноценный ВПН-клиент, позволяющий анонимно и безопасно посещать веб-сайты. Никакие пользовательские данные не станут известны злоумышленникам при использовании данного приложения. Также […]

О программе Lantern VPN – программа, позволяющая свободно посещать заблокированные в регионе веб-страницы, сайты. Преимущество заключается в использовании собственных и достаточно быстрых веб-прокси, работающих только […]

О программе Avira Phantom VPN – приложение, обеспечивающее полную анонимность в Сети. Удобное, комфортное, простое в использовании с достаточно широким функционалом. Позволяет пользоваться заблокированными провайдером […]

О программе Hola VPN – сервис, обеспечивающий высокую скорость подключения при использовании бесплатной версии. Имеется приложение под ОС Windows различных версий. Настройка соединения производится через […]

О программе Avast SecureLine VPN – программа, позволяющая забыть о боязни кражи данных при использовании общедоступных Wi-Fi сетей, заблокированных провайдерами ресурсах и ряде других ограничений. […]

О программе CyberGhost VPN – программа, способная обеспечить высокий уровень безопасности в Сети. Полная анонимность, защита от хакеров, разблокировка стриминговых сервисов, социальных сетей и прочих […]
On windows 10, how do I setup a VPN client so that all users can use it (i.e. available before login)
On Windows XP, 7, 8, 8.1 you could tick a box that says ‘Allow other users to use this VPN’ when you initially connected the VPN.
This option is no longer available — how do I set the VPN to be available for connection on the Login screen?
2 Answers 2
Old question but for anyone trying to find an answer there is a better solution via elevated powershell:
CrayFishUK, my experience for all Windows XP/Vista/7/2008/8/2012/10 This will connect VPN as a SYSTEM user when system starts.
- You will need to create a VPN connection
- Save or not save credential it is not important.
- Find a rasphone.pbk in %APPDATA%\Microsoft\Network\Connections\Pbk_hiddenPbk
- More nice if you will copy it to C:\ProgramData\Microsoft\Network\Connections\Pbk\rasphone.pbk or attach to exist rasphone.pbk (it is text files)
- Now you need to create scheduler task.
Scheduler task:
- Start after boot
- Program to start has credential to connect VPN
- You will need change the creator user to the SYSTEM user
I have add at the end:
for exampe, how to auto add route when sucsesful connect VPN
If you will need to reconnect VPN when it fails ask a new question and I will help.
By default VPN send all traffic through VPN, if you want to use routes You will need to turn off this future.
Step 6. Configure Windows 10 client Always On VPN connections
Applies to: Windows Server (Semi-Annual Channel), Windows Server 2016, Windows Server 2012 R2, Windows 10
In this step, you’ll learn about the ProfileXML options and schema, and configure the Windows 10 client computers to communicate with that infrastructure with a VPN connection.
You can configure the Always On VPN client through PowerShell, Microsoft Endpoint Configuration Manager, or Intune. All three require an XML VPN profile to configure the appropriate VPN settings. Automating PowerShell enrollment for organizations without Configuration Manager or Intune is possible.
Group Policy does not include administrative templates to configure the WindowsВ 10 Remote Access Always On VPN client. However, you can use logon scripts.
ProfileXML overview
ProfileXML is a URI node within the VPNv2 CSP. Rather than configuring each VPNv2 CSP node individually—such as triggers, route lists, and authentication protocols—use this node to configure a Windows 10 VPN client by delivering all the settings as a single XML block to a single CSP node. The ProfileXML schema matches the schema of the VPNv2 CSP nodes almost identically, but some terms are slightly different.
You use ProfileXML in all the delivery methods this deployment describes, including Windows PowerShell, Microsoft Endpoint Configuration Manager, and Intune. There are two ways to configure the ProfileXML VPNv2 CSP node in this deployment:
OMA-DM. One way is to use an MDM provider using OMA-DM, as discussed earlier in the section VPNv2 CSP nodes. Using this method, you can easily insert the VPN profile configuration XML markup into the ProfileXML CSP node when using Intune.
Windows Management Instrumentation (WMI)-to-CSP bridge. The second method of configuring the ProfileXML CSP node is to use the WMI-to-CSP bridge—a WMI class called MDM_VPNv2_01—that can access the VPNv2 CSP and the ProfileXML node. When you create a new instance of that WMI class, WMI uses the CSP to create the VPN profile when using Windows PowerShell and Configuration Manager.
Even though these configuration methods differ, both require a properly formatted XML VPN profile. To use the ProfileXML VPNv2 CSP setting, you construct XML by using the ProfileXML schema to configure the tags necessary for the simple deployment scenario. For more information, see ProfileXML XSD.
Below you find each of the required settings and its corresponding ProfileXML tag. You configure each setting in a specific tag within the ProfileXML schema, and not all of them are found under the native profile. For additional tag placement, see the ProfileXML schema.
Any other combination of upper or lower case for ‘true’ in the following tags results in a partial configuration of the VPN profile:
Connection type: Native IKEv2
Routing: Split tunneling
Name resolution: Domain Name Information List and DNS suffix
Triggering: Always On and Trusted Network Detection
Authentication: PEAP-TLS with TPM-protected user certificates
You can use simple tags to configure some VPN authentication mechanisms. However, EAP and PEAP are more involved. The easiest way to create the XML markup is to configure a VPN client with its EAP settings, and then export that configuration to XML.
For more information about EAP settings, see EAP configuration.
Manually create a template connection profile
In this step, you use Protected Extensible Authentication Protocol (PEAP) to secure communication between the client and the server. Unlike a simple user name and password, this connection requires a unique EAPConfiguration section in the VPN profile to work.
Instead of describing how to create the XML markup from scratch, you use Settings in Windows to create a template VPN profile. After creating the template VPN profile, you use Windows PowerShell to consume the EAPConfiguration portion from that template to create the final ProfileXML that you deploy later in the deployment.
Record NPS certificate settings
Before creating the template, take note the hostname or fully qualified domain name (FQDN) of the NPS server from the server’s certificate and the name of the CA that issued the certificate.
Procedure:
On your NPS server, open Network Policy Server.
In the NPS console, under Policies, click Network Policies.
Right-click Virtual Private Network (VPN) Connections, and click Properties.
Click the Constraints tab, and click Authentication Methods.
In EAP Types, click Microsoft: Protected EAP (PEAP), and click Edit.
Record the values for Certificate issued to and Issuer.
You use these values in the upcoming VPN template configuration. For example, if the server’s FQDN is nps01.corp.contoso.com and the hostname is NPS01, the certificate name is based upon the FQDN or DNS name of the server—for example, nps01.corp.contoso.com.
Cancel the Edit Protected EAP Properties dialog box.
Cancel the Virtual Private Network (VPN) Connections Properties dialog box.
Close Network Policy Server.
If you have multiple NPS servers, complete these steps on each one so that the VPN profile can verify each of them should they be used.
Configure the template VPN profile on a domain-joined client computer
Now that you have the necessary information configure the template VPN profile on a domain-joined client computer. The type of user account you use (that is, standard user or administrator) for this part of the process does not matter.
However, if you haven’t restarted the computer since configuring certificate autoenrollment, do so before configuring the template VPN connection to ensure you have a usable certificate enrolled on it.
There is no way to manually add any advanced properties of VPN, such as NRPT rules, Always On, Trusted network detection, etc. In the next step, you create a test VPN connection to verify the configuration of the VPN server and that you can establish a VPN connection to the server.
Manually create a single test VPN connection
Sign in to a domain-joined client computer as a member of the VPN Users group.
On the Start menu, type VPN, and press Enter.
In the details pane, click Add a VPN connection.
In the VPN Provider list, click Windows (built-in).
In Connection Name, type Template.
In Server name or address, type the external FQDN of your VPN server (for example,В vpn.contoso.com).
Click Save.
Under Related Settings, click Change adapter options.
Right-click Template, and click Properties.
On the Security tab, in Type of VPN, click IKEv2.
In Data encryption, click Maximum strength encryption.
Click Use Extensible Authentication Protocol (EAP); then, in Use Extensible Authentication Protocol (EAP), click Microsoft: Protected EAP (PEAP) (encryption enabled).
Click Properties to open the Protected EAP Properties dialog box, and complete the following steps:
a. In the Connect to these servers box, type the name of the NPS server that you retrieved from the NPS server authentication settings earlier in this section (for example, NPS01).
The server name you type must match the name in the certificate. You recovered this name earlier in this section. If the name does not match, the connection will fail, stating that «The connection was prevented because of a policy configured on your RAS/VPN server.»
b. Under Trusted Root Certification Authorities, select the root CA that issued the NPS server’s certificate (for example, contoso-CA).
c. In Notifications before connecting, click Don’t ask user to authorize new servers or trusted CAs.
d. In Select Authentication Method, click Smart Card or other certificate, and click Configure. The Smart Card or other Certificate Properties dialog opens.
e. Click Use a certificate on this computer.
f. In the Connect to these servers box, enter the name of the NPS server you retrieved from the NPS server authentication settings in the previous steps.
g. Under Trusted Root Certification Authorities, select the root CA that issued the NPS server’s certificate.
h. Select the Don’t prompt user to authorize new servers or trusted certification authorities check box.
i. Click OK to close the Smart Card or other Certificate Properties dialog box.
j. Click OK to close the Protected EAP Properties dialog box.
Click OK to close the Template Properties dialog box.
Close the Network Connections window.
In Settings, test the VPN by clicking Template, and clicking Connect.
Make sure that the template VPN connection to your VPN server is successful. Doing so ensures that the EAP settings are correct before you use them in the next example. You must connect at least once before continuing; otherwise, the profile will not contain all the information necessary to connect to the VPN.
Create the ProfileXML configuration files
Before completing this section, make sure you have created and tested the template VPN connection that the section Manually create a template connection profile describes. Testing the VPN connection is necessary to ensure that the profile contains all the information required to connect to the VPN.
The Windows PowerShell script in Listing 1 creates two files on the desktop, both of which contain EAPConfiguration tags based on the template connection profile you created previously:
VPN_Profile.xml. This file contains the XML markup required to configure the ProfileXML node in the VPNv2 CSP. Use this file with OMA-DM–compatible MDM services, such as Intune.
VPN_Profile.ps1. This file is a Windows PowerShell script that you can run on client computers to configure the ProfileXML node in the VPNv2 CSP. You can also configure the CSP by deploying this script through Configuration Manager. You cannot run this script in a Remote Desktop session, including a Hyper-V enhanced session.
The example commands below require Windows 10 Build 1607 or later.
Create VPN_Profile.xml and VPN_Proflie.ps1
Sign in to the domain-joined client computer containing the template VPN profile with the same user account that the section Manually create a template connection profile described.
Paste Listing 1 into Windows PowerShell integrated scripting environment (ISE), and customize the parameters described in the comments. These are $Template, $ProfileName, $Servers, $DnsSuffix, $DomainName, $TrustedNetwork, and $DNSServers. A full description of each setting is in the comments.
Run the script to generate VPN_Profile.xml and VPN_Profile.ps1 on the desktop.
Listing 1. Understanding MakeProfile.ps1
This section explains the example code that you can use to gain an understanding of how to create a VPN Profile, specifically for configuring ProfileXML in the VPNv2 CSP.
After you assemble a script from this example code and run the script, the script generates two files: VPN_Profile.xml and VPN_Profile.ps1. Use VPN_Profile.xml to configure ProfileXML in OMA-DM compliant MDM services, such as Microsoft Intune.
Use the VPN_Profile.ps1 script in Windows PowerShell or Microsoft Endpoint Configuration Manager to configure ProfileXML on the Windows 10 desktop.
To view the full example script, see the section MakeProfile.ps1 Full Script.
Parameters
Configure the following parameters:
$Template. The name of the template from which to retrieve the EAP configuration.
$ProfileName. Unique alphanumeric identifier for the profile. The profile name must not include a forward slash (/). If the profile name has a space or other non-alphanumeric character, it must be properly escaped according to the URL encoding standard.
$Servers. Public or routable IP address or DNS name for the VPN gateway. It can point to the external IP of a gateway or a virtual IP for a server farm. Examples, 208.147.66.130 or vpn.contoso.com.
$DnsSuffix. Specifies one or more commas separated DNS suffixes. The first in the list is also used as the primary connection-specific DNS suffix for the VPN Interface. The entire list will also be added into the SuffixSearchList.
$DomainName. Used to indicate the namespace to which the policy applies. When a Name query is issued, the DNS client compares the name in the query to all of the namespaces under DomainNameInformationList to find a match. This parameter can be one of the following types:
- FQDN — Fully qualified domain name
- Suffix — A domain suffix that will be appended to the shortname query for DNS resolution. To specify a suffix, prepend a period (.) to the DNS suffix.
$DNSServers. List of comma-separated DNS Server IP addresses to use for the namespace.
$TrustedNetwork. Comma-separated string to identify the trusted network. VPN does not connect automatically when the user is on their corporate wireless network where protected resources are directly accessible to the device.
The following are example values for parameters used in the commands below. Ensure that you change these values for your environment.
Prepare and create the profile XML
The following example commands get EAP settings from the template profile:
Create the profile XML
Any other combination of upper or lower case for ‘true’ in the following tags results in a partial configuration of the VPN profile:
Output VPN_Profile.xml for Intune
You can use the following example command to save the profile XML file:
Output VPN_Profile.ps1 for the desktop and Configuration Manager
The following example code configures an AlwaysOn IKEv2 VPN Connection by using the ProfileXML node in the VPNv2 CSP.
You can use this script on the Windows 10 desktop or in Configuration Manager.
Define key VPN profile parameters
Escape special characters in the profile
Define WMI-to-CSP Bridge properties
Determine user SID for VPN profile:
Define WMI session:
Detect and delete previous VPN profile:
Create the VPN profile:
Save the profile XML file
MakeProfile.ps1 Full Script
Most examples use the Set-WmiInstance Windows PowerShell cmdlet to insert ProfileXML into a new instance of the MDM_VPNv2_01 WMI class.
However, this does not work in Configuration Manager because you cannot run the package in the end users’ context. Therefore, this script uses the Common Information Model to create a WMI session in the user’s context, and then it creates a new instance of the MDM_VPNv2_01 WMI class in that session. This WMI class uses the WMI-to-CSP bridge to configure the VPNv2 CSP. Therefore, by adding the class instance, you configure the CSP.
WMI-to-CSP bridge requires local admin rights, by design. To deploy per user VPN profiles you should be using Configuration Manager or MDM.
The script VPN_Profile.ps1 uses the current user’s SID to identify the user’s context. Because no SID is available in a Remote Desktop session, the script does not work in a Remote Desktop session. Likewise, it does not work in a Hyper-V enhanced session. If you’re testing a Remote Access Always On VPN in virtual machines, disable enhanced session on your client VMs before running this script.
The following example script includes all of the code examples from previous sections. Ensure that you change example values to values that are appropriate for your environment.
Configure the VPN client by using Windows PowerShell
To configure the VPNv2 CSP on a Windows 10 client computer, run the VPN_Profile.ps1 Windows PowerShell script that you created in the Create the profile XML section. Open Windows PowerShell as an Administrator; otherwise, you’ll receive an error saying, Access denied.
After running VPN_Profile.ps1 to configure the VPN profile, you can verify at any time that it was successful by running the following command in the Windows PowerShell ISE:
Successful results from the Get-WmiObject cmdlet
The ProfileXML configuration must be correct in structure, spelling, configuration, and sometimes letter case. If you see something different in structure to Listing 1, the ProfileXML markup likely contains an error.
If you need to troubleshoot the markup, it is easier to put it in an XML editor than to troubleshoot it in the Windows PowerShell ISE. In either case, start with the simplest version of the profile, and add components back one at a time until the issue occurs again.
Configure the VPN client by using Configuration Manager
In Configuration Manager, you can deploy VPN profiles by using the ProfileXML CSP node, just like you did in Windows PowerShell. Here, you use the VPN_Profile.ps1 Windows PowerShell script that you created in the section Create the ProfileXML configuration files.
To use Configuration Manager to deploy a Remote Access Always On VPN profile to Windows 10 client computers, you must start by creating a group of machines or users to whom you deploy the profile. In this scenario, create a user group to deploy the configuration script.
Create a user group
In the Configuration Manager console, open Assets and Compliance\User Collections.
On the Home ribbon, in the Create group, click Create User Collection.
On the General page, complete the following steps:
a. In Name, type VPN Users.
b. Click Browse, click All Users and click OK.
c. Click Next.
On the Membership Rules page, complete the following steps:
a. In Membership rules, click Add Rule, and click Direct Rule. In this example, you’re adding individual users to the user collection. However, you might use a query rule to add users to this collection dynamically for a larger-scale deployment.
b. On the Welcome page, click Next.
c. On the Search for Resources page, in Value, type the name of the user you want to add. The resource name includes the user’s domain. To include results based on a partial match, insert the % character at either end of your search criterion. For example, to find all users containing the string «lori,» type %lori%. Click Next.
d. On the Select Resources page, select the users you want to add to the group, and click Next.
e. On the Summary page, click Next.
f. On the Completion page, click Close.
Back on the Membership Rules page of the Create User Collection Wizard, click Next.
On the Summary page, click Next.
On the Completion page, click Close.
After you create the user group to receive the VPN profile, you can create a package and program to deploy the Windows PowerShell configuration script that you created in the section Create the ProfileXML configuration files.
Create a package containing the ProfileXML configuration script
Host the script VPN_Profile.ps1 on a network share that the site server computer account can access.
In the Configuration Manager console, open Software Library\Application Management\Packages.
On the Home ribbon, in the Create group, click Create Package to start the Create Package and Program Wizard.
On the Package page, complete the following steps:
a. In Name, type Windows 10 Always On VPN Profile.
b. Select the This package contains source files check box, and click Browse.
c. In the Set Source Folder dialog box, click Browse, select the file share containing VPN_Profile.ps1, and click OK. Make sure you select a network path, not a local path. In other words, the path should be something like \fileserver\vpnscript, not c:\vpnscript.
Click Next.
On the Program Type page, click Next.
On the Standard Program page, complete the following steps:
a. In Name, type VPN Profile Script.
b. In Command line, type PowerShell.exe -ExecutionPolicy Bypass -File «VPN_Profile.ps1».
c. In Run mode, click Run with administrative rights.
d. Click Next.
On the Requirements page, complete the following steps:
a. Select This program can run only on specified platforms.
b. Select the All Windows 10 (32-bit) and All Windows 10 (64-bit) check boxes.
c. In Estimated disk space, type 1.
d. In Maximum allowed run time (minutes), type 15.
e. Click Next.
On the Summary page, click Next.
On the Completion page, click Close.
With the package and program created, you need to deploy it to the VPN Users group.
Deploy the ProfileXML configuration script
In the Configuration Manager console, open Software Library\Application Management\Packages.
In Packages, click Windows 10 Always On VPN Profile.
On the Programs tab, at the bottom of the details pane, right-click VPN Profile Script, click Properties, and complete the following steps:
a. On the Advanced tab, in When this program is assigned to a computer, click Once for every user who logs on.
b. Click OK.
Right-click VPN Profile Script and click Deploy to start the Deploy Software Wizard.
On the General page, complete the following steps:
a. Beside Collection, click Browse.
b. In the Collection Types list (top left), click User Collections.
c. Click VPN Users, and click OK.
d. Click Next.
On the Content page, complete the following steps:
a. Click Add, and click Distribution Point.
b. In Available distribution points, select the distribution points to which you want to distribute the ProfileXML configuration script, and click OK.
c. Click Next.
On the Deployment settings page, click Next.
On the Scheduling page, complete the following steps:
a. Click New to open the Assignment Schedule dialog box.
b. Click Assign immediately after this event, and click OK.
c. Click Next.
On the User Experience page, complete the following steps:
Select the Software Installation check box.
Click Summary.
On the Summary page, click Next.
On the Completion page, click Close.
With the ProfileXML configuration script deployed, sign in to a Windows 10 client computer with the user account you selected when you built the user collection. Verify the configuration of the VPN client.
The script VPN_Profile.ps1 does not work in a Remote Desktop session. Likewise, it does not work in a Hyper-V enhanced session. If you’re testing a Remote Access Always On VPN in virtual machines, disable enhanced session on your client VMs before continuing.
Verify the configuration of the VPN client
In Control Panel, under System\Security, click Configuration Manager.
In the Configuration Manager Properties dialog, on the Actions tab, complete the following steps:
a. Click Machine Policy Retrieval & Evaluation Cycle, click Run Now, and click OK.
b. Click User Policy Retrieval & Evaluation Cycle, click Run Now, and click OK.
c. Click OK.
Close the Control Panel.
You should see the new VPN profile shortly.
Configure the VPN client by using Intune
To use Intune to deploy Windows 10 Remote Access Always On VPN profiles, you can configure the ProfileXML CSP node by using the VPN profile you created in the section Create the ProfileXML configuration files, or you can use the base EAP XML sample provided below.
Intune now uses Azure AD groups. If Azure AD Connect synced the VPN Users group from on-premises to Azure AD, and users are assigned to the VPN Users group, you are ready to proceed.
Create the VPN device configuration policy to configure the Windows 10 client computers for all users added to the group. Since the Intune template provides VPN parameters, only copy the portion of the VPN_ProfileXML file.
Create the Always On VPN configuration policy
Go to Intune > Device Configuration > Profiles.
Click Create Profile to start the Create profile Wizard.
Enter a Name for the VPN profile and (optionally) a description.
Under Platform, select Windows 10 or later, and choose VPN from the Profile type drop-down.
If you are creating a custom VPN profileXML, see Apply ProfileXML using Intune for the instructions.
Under the Base VPN tab, verify or set the following settings:
Connection name: Enter the name of the VPN connection as it appears on the client computer in the VPN tab under Settings, for example, Contoso AutoVPN.
Servers: Add one or more VPN servers by clicking Add.
Description and IP Address or FQDN: Enter the description and IP Address or FQDN of the VPN server. These values must align with the Subject Name in the VPN server’s authentication certificate.
Default server: If this is the default VPN server, set to True. Doing this enables this server as the default server that devices use to establish the connection.
Connection type: Set to IKEv2.
Always On: Set to Enable to connect to the VPN automatically at the sign-in and stay connected until the user manually disconnects.
Remember credentials at each logon: Boolean value (true or false) for caching credentials. If set to true, credentials are cached whenever possible.
Copy the following XML string to a text editor:
Any other combination of upper or lower case for ‘true’ in the following tags results in a partial configuration of the VPN profile:
Replace the
Do not use the sample thumbprint in the section below. The TrustedRootCA must be the certificate thumbprint of the on-premises root certificate authority that issued the server-authentication certificate for RRAS and NPS servers. This must not be the cloud root certificate, nor the intermediate issuing CA certificate thumbprint.
Replace the NPS.contoso.com in the sample XML with the FQDN of the domain-joined NPS where authentication takes place.
Copy the revised XML string and paste into the EAP Xml box under the Base VPN tab and click OK. An Always On VPN Device Configuration policy using EAP is created in Intune.
Sync the Always On VPN configuration policy with Intune
To test the configuration policy, sign in to a WindowsВ 10 client computer as the user you added to the Always On VPN Users group, and then sync with Intune.
On the Start menu, click Settings.
In Settings, click Accounts, and click Access work or school.
Click the MDM profile, and click Info.
Click Sync to force an Intune policy evaluation and retrieval.
Close Settings. After synchronization, you see the VPN profile available on the computer.
Next steps
You are done deploying Always On VPN. For other features you can configure, see the table below:


