- IPSec VPN для OS X и iOS. Без боли
- Настройка подключения VPN на Mac
- Импорт файла настроек VPN
- Введите настройки VPN автоматически
- An easy-to-use VPN app for Mac
- An easy-to-use VPN app for Mac
- Download ProtonVPN for your device
- How to use the ProtonVPN macOS app
- Open the app and log in
- Click the Quick Connect button
- Your connection is now protected by ProtonVPN
- Security made easy
- Secure Core VPN
- Kill switch
- Adblocker (NetShield)
- Why use ProtonVPN?
- No logs VPN
- DNS and IPv6 leak protection
- Open source
- P2P support
- VPN Accelerator
- Strong encryption
- Swiss based
- Secure streaming
- No logs VPN
- DNS and IPv6 leak protection
- Open source
- P2P support
- VPN Accelerator
- Strong encryption
- Swiss based
- Secure streaming
- Secure your internet
- Why choose the ProtonVPN application for macOS
- What our users are saying about us
- Download a macOS VPN you can trust
- Frequently Asked Questions
IPSec VPN для OS X и iOS. Без боли
VPN (англ. Virtual Private Network — виртуальная частная сеть) — обобщённое название технологий, позволяющих обеспечить одно или несколько сетевых соединений (логическую сеть) поверх другой сети (например, Интернет).
© Wikipedia
VPN используется для удаленного подключения к рабочему месту, для защиты данных, для обхода фильтров и блокировок, для выдачи себя за гражданина другой страны и вообще — штука незаменимая. Практически повсеместно в качестве простого средства для организации пользовательского VPN используется всем известный OpenVPN, который использовал и я. Ровно до тех пор, пока у меня не появился Macbook и OS X в придачу. Из-за того, что подход Apple к конфигурации DNS сильно отличается от подхода других *nix-систем, проброс DNS через VPN нормально не работал.
После некоторых исследований у меня получилось два варианта:
— Использование DNS «мимо» VPN, что сильно небезопасно, но решает проблему.
— Использование нативных для OS X VPN-протоколов: PPTP и семейства IPSec.
Разумеется, я выбрал второе и разумеется — IPSec, а не устаревший PPTP.
Настройка Linux ( в моем случае — Arch Linux )
- Открыть Настройки → Сеть
- Нажать (+) и выбрать VPN/Cisco IPSec
- Заполнить основную информацию ( адрес, имя пользователя и пароль )
- Выбрать «Настройки аутентификации» и указать группу и PSK ( из файла /etc/racoon/psk.key )
- Подключиться
OS X и IPSec
IPSec это не один протокол, а набор протоколов и стандартов, каждый из которых имеет кучу вариантов и опций. OS X поддерживает три вида IPSec VPN:
— IPSec/L2TP
— IKEv2
— Cisco VPN
Первый вариант избыточен — какой смысл пробрасывать ethernet-пакеты для пользовательского VPN?
Второй — требует сертификатов и сильно сложной настройки на стороне клиента, что тоже нехорошо.
Остается третий, который называется «Cisco», а на самом деле — XAuth+PSK. Его и будем использовать.
Препарация OS X
После некоторых неудачных попыток настроить VPN на OS X, я полез изучать систему на предмет того, как же именно там работает VPN.
Недолгий поиск дал мне файлик /private/etc/racoon/racoon.conf, в котором была строчка include «/var/run/racoon/*.conf»;.
После этого все стало понятно: при нажатии кнопки OS X генерирует конфиг для racoon и кладет его в /var/run/racoon/, после окончания соединения — удаляет. Осталось только получить конфиг, что я и сделал, запустив скрипт перед соединением.
Внутри я нашел именно ту информацию, которой мне не хватало для настройки сервера: IPSec proposals. Это списки поддерживаемых клиентом ( и сервером ) режимов аутентификации, шифрования и подписи, при несовпадении которых соединение не может быть установлено.
Итоговый proposal для OS X 10.11 и iOS 9.3 получился таким:
encryption_algorithm aes 256;
hash_algorithm sha256;
authentication_method xauth_psk_server;
dh_group 14;
Выбор VDS и настройка VPN
Для VPN-сервера я выбрал VDS от OVH, поскольку они дают полноценную виртуализацию с возможностью ставить любое ядро с любыми модулями. Это очень важно, поскольку ipsec работает на уровне ядра, а не пользователя, как OpenVPN.
Режим «Cisco VPN» (XAuth + PSK) предполагает двухэтапную аутентификацию:
— Используя имя группы и PSK для нее ( этап 1 )
— Используя имя пользователя и пароль ( этап 2 )
Настройка racoon
racoon — демон, который занимается управлением ключами ( IKE ). Именно он дает ядру разрешение на провешивание туннеля после того, как аутентифицирует клиента и согласует все детали протокола ( aka proposal ). racoon входит в стандартный пакет ipsec-tools и есть практически в любом дистрибутиве Linux «из коробки».
Используя случайные 64 бита группы и 512 бит ключа, я получаю достаточно вариантов, чтоб сделать перебор бессмысленным.
Настройка Linux
— Необходимо разрешить маршрутизацию: sysctl net.ipv4.ip_forward=1
— Необходимо разрешить протокол ESP и входящие соединения на порты 500/udp и 4500/udp: iptables -t filter -I INPUT -p esp -j ACCEPT; iptables -t filter -I INPUT -p udp —dport 500 -j ACCEPT; iptables -t filter -I INPUT -p udp —dport 4500 -j ACCEPT
— Необходимо включить NAT для нашей сети: iptables -t nat -A POSTROUTING -s 192.168.100.0/24 -j MASQUERADE
— Необходимо создать группу и создать/добавить туда пользователей: groupadd vpn и useradd -G vpn vpn_user
— Необходимо запустить racoon: racoon -vF
Настройка OS X
Настройки → Сеть 
Выбрать (+) → VPN → Cisco IPSec → придумать название
Выбрать соединение → ввести адрес сервера, имя пользователя и пароль
Выбрать «Настройки аутентификации» → ввести имя группы и ключ ( именно в таком порядке )
Настройка iOS
Настройки → Основные → VPN → Добавить конфигурацию VPN.
Заполнить форму по аналогии, подключиться. 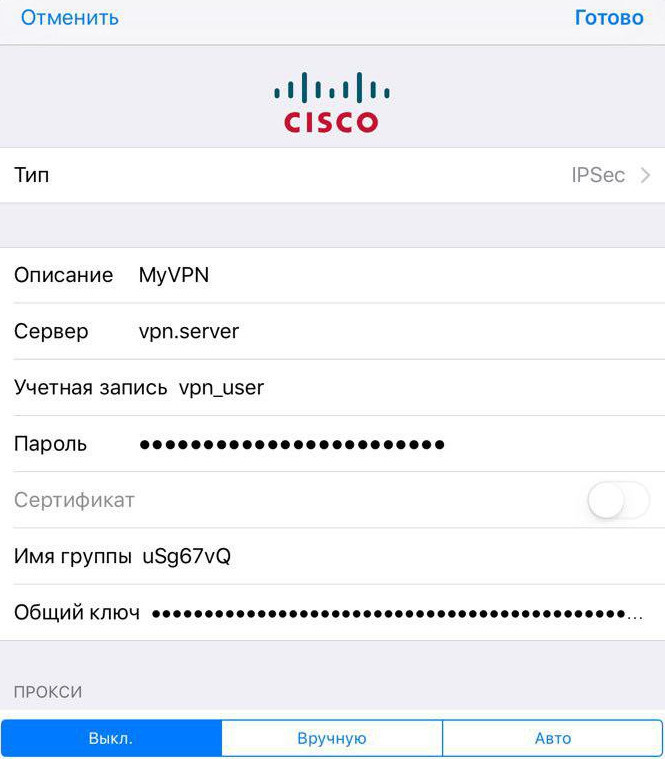
Источник
Настройка подключения VPN на Mac
Чтобы подключиться к сети VPN, необходимо ввести настройки конфигурации на панели «Сеть». Эти настройки включают адрес сервера VPN, имя учетной записи и другие параметры идентификации, такие как пароль или сертификат, полученные от сетевого администратора.
Если Вы получили файл настроек VPN от администратора сети, можно импортировать его для настройки подключения. Если нет, то настройки можно ввести вручную.
Импорт файла настроек VPN
На Mac выполните одно из следующих действий.
Дважды нажмите на файл, чтобы открыть настройки сети и автоматически импортировать настройки.
Выберите пункт меню «Apple»

> «Системные настройки», нажмите «Сеть», нажмите раскрывающееся меню «Действия»  , затем выберите «Импортировать конфигурации». Выберите файл, затем нажмите «Импортировать».
Введите настройки VPN автоматически
На Mac выберите меню Apple
> «Системные настройки», затем нажмите «Сеть».
Нажмите кнопку «Добавить»  в списке слева, нажмите всплывающее меню «Интерфейс», затем выберите «VPN».
Нажмите всплывающее меню «Тип VPN», затем выберите тип VPN-подключения, который Вы хотите настроить, в зависимости от сети, к которой Вы подключаете компьютер. Присвойте имя службе VPN, затем нажмите «Создать».
Протокол L2TP — это расширенная версия протокола PPTP, который используется интернет-провайдерами для поддержки VPN через Интернет.
Протокол IPSec (Internet Protocol Security) является набором протоколов безопасности.
IKEv2 — это протокол, который настраивает сопоставление безопасности в IPSec.
Введите адрес сервера и имя учетной записи для VPN-подключения.
Нажмите «Настройки аутентификации», затем введите информацию, полученную от администратора сети.
Если Вы получили соответствующие указания от администратора сети, нажмите «Дополнительно» и введите дополнительную информацию, такую как параметры сеанса, настройки TCP/IP, DNS-серверы и прокси.
Дополнительная информация, которую Вы можете ввести, зависит от типа настраиваемого VPN-подключения.
Нажмите «Применить», затем нажмите «ОК».
Выберите «Показывать статус VPN в строке меню», чтобы использовать значок статуса VPN для подключения к сети и переключения между службами VPN.
Для удаления конфигурации VPN выберите службу VPN в списке сетевых служб и нажмите кнопку «Удалить»  .
.
Источник
An easy-to-use VPN app for Mac

An easy-to-use VPN app for Mac
Download the ProtonVPN app for macOS for a secure and private internet. The app is open source and has been audited by trusted third-party experts. It also offers several useful security features.
Download and install the macOS app, then log in with your Proton account. If you don’t have an account, sign up here.
Download ProtonVPN for your device
How to use the ProtonVPN macOS app
Open the app and log in
Once the app is installed, open it and log in with your ProtonVPN username and password. If you are a ProtonMail user, you can access the ProtonVPN Free plan by logging in with your ProtonMail username and password. To get a ProtonVPN account, sign up here.
Click the Quick Connect button
Click the Quick Connect button to automatically connect to the fastest VPN server for your location. You can also choose to connect to any specific server that is available on your plan.
Use the following labels to select the right server for you.
— Plus plan servers

— P2P file sharing

— Access to Tor network
Your connection is now protected by ProtonVPN
You can now securely and privately browse the internet. The data traveling between your device and the VPN server is encrypted, meaning:
- Your internet service provider cannot monitor your activity
- Websites see the IP address of the VPN server you are using
You can confirm your VPN server’s IP address here.
For step-by-step installation instructions, read our ProtonVPN for macOS guide.
Security made easy
Our macOS app offers advanced features carefully designed to improve your online security.

Secure Core VPN
Secure Core protects your connection by routing your traffic through multiple servers before it leaves our network, defending you against advanced, network-based attacks.
Secure Core servers are located in hardened data centers in Switzerland, Iceland, and Sweden, protected by strong privacy laws, and operated on Proton’s dedicated networks.
Kill switch
A VPN kill switch keeps your IP address safe if something goes wrong with your VPN connection. If your VPN connection fails, the kill switch will prevent your device from connecting to the internet until your device reconnects to a VPN server.


Adblocker (NetShield)
NetShield speeds up your connection and protects you from malware by filtering out images, scripts, and other resources that are from domains known to host malware. Available for Plus and Visionary users, NetShield can also block online trackers and ads.
Why use ProtonVPN?

No logs VPN
We do not keep any logs that can identify what you do online

DNS and IPv6 leak protection
Our macOS app will never accidentally expose your real IP address

Open source
Anyone can review and verify our apps’ code

P2P support
Share and download files using BitTorrent and other P2P protocols

VPN Accelerator
VPN Accelerator is a set of technologies unique to ProtonVPN that can increase your VPN speed by over 400%

Strong encryption
We only use secure VPN protocols and advanced encryption

Swiss based
Switzerland has some of the world’s strongest data privacy laws

Secure streaming
Unblock popular streaming services and watch your favorite shows
No logs VPN
We do not keep any logs that can identify what you do online
DNS and IPv6 leak protection
Our macOS app will never accidentally expose your real IP address
Open source
Anyone can review and verify our apps’ code
P2P support
Share and download files using BitTorrent and other P2P protocols
VPN Accelerator
VPN Accelerator is a set of technologies unique to ProtonVPN that can increase your VPN speed by over 400%
Strong encryption
We only use secure VPN protocols and advanced encryption
Swiss based
Switzerland has some of the world’s strongest data privacy laws
Secure streaming
Unblock popular streaming services and watch your favorite shows
Secure your internet

Strict no-logs policy
All apps are open source and audited
High-speed connections (up to 10 Gbps)
Based in Switzerland
30-day money-back guarantee
Why choose the ProtonVPN application for macOS
ProtonVPN is brought to you by the team behind ProtonMail, the world’s largest end-to-end encrypted email service. Millions of journalists, activists, and citizens worldwide rely on ProtonVPN to stay safe. Our VPN app for macOS:


Protects your privacy by encrypting your internet connection
Enables you to bypass censorship and access the truth
Keeps no logs of user activity
Lets you unblock and watch popular streaming services (Only for users with Plus and Visionary plans)
Is open source and fully audited by third-party professionals
ProtonVPN is a community driven service with a mission to create a more free and open internet. Download our macOS VPN app to join our community.
What our users are saying about us
![]()
@ProtonVPN Wanted to thank you for the outstanding service your company offers — I have used vpn service over the years, and seen many. The speed and reliability of your client software surprised me, instantly — it’s World Class, and better.


I highly recommend @ProtonVPN for an extremely secure VPN with a great reputation. And you can bundle it with @ProtonMail to make your email private instead of having google or yahoo, etc from scraping your inbox and selling your data
![]()
@ProtonVPN Wanted to thank you for the outstanding service your company offers — I have used vpn service over the years, and seen many. The speed and reliability of your client software surprised me, instantly — it’s World Class, and better.
I highly recommend @ProtonVPN for an extremely secure VPN with a great reputation. And you can bundle it with @ProtonMail to make your email private instead of having google or yahoo, etc from scraping your inbox and selling your data
Download a macOS VPN you can trust
Kill switch keeps your IP address safe at all times
NetShield blocks malware, ads, and online trackers
Tor-enabled servers allow one-click access to the Tor network
Frequently Asked Questions
The ProtonVPN app for macOS has been specifically engineered to be secure, fast, and easy to use. You can use ProtonVPN to stream your favorite shows, share files over BitTorrent, access censored content and protect your privacy.
ProtonVPN is a community-supported VPN service and our mission is to create an internet where privacy is the default. Founded by CERN scientists to ensure everyone can protect their right to privacy, ProtonVPN offers one of the only free VPN services with no data limits, no logs, and no privacy-invading ads.
Sign up for ProtonVPN and download our app for macOS. Double-click the downloaded DMG file to mount it, then drag the ProtonVPN icon to your macOS Applications folder. Double-click the app in your Applications folder or select it in Launchpad to run.
If you sign in to the app and click Quick Connect, ProtonVPN will automatically connect you to the fastest server depending on your location. It’s that easy. You can also manually connect to a server in a particular country or a specialized server (for example, a Tor-enabled server).
You can use the ProtonVPN macOS app to access content blocked by your internet service provider, government, workplace, or college. Simply connect to a VPN server in an area where that content is not censored to access it. If you have a Plus or Visionary account, you can also access popular streaming services by connecting to a Plus server. These are marked with a P in the app.
ProtonVPN operates over 1,000 servers in over 50 countries around the world, so there will always be a VPN server nearby to provide you with a secure, fast connection. Users with a Plus or Visionary plan can access our large and expanding network of high-speed 10 Gbps Plus servers.
The Quick Connect feature in our macOS app automatically chooses the fastest server available for your location. You can also use the server load information shown next to each server’s name to help you manually select the fastest server for your needs.
Источник


