Настройка l2tp linux mint 18

| #1 — 10 сентября 2016 в 21:54 |
Linux Mint Cinnamon 18 x64
Прошу помощи новичку, необходимо настроить vpn l2tp ipsec до рабочей станции (есть адрес сервера, sharedkey и логин, пароль).
После установки дистрибутива минт по умолчанию в networkmanager есть только vpn pptp и OpenVPN. В менеджере пакетов не смог найти что либо подобное networkmanager-l2tp-gnome или l2tp-ipsec-vpn. Смог найти только xl2tpd но как им пользоваться пока не разобрался. Подскажите существует ли плагин l2tp для networkmanager? Или пакеты с помощью которых можно поднять впн. Буду благодарен за любую информацию.
| #2 — 11 сентября 2016 в 00:11 |
| #3 — 7 октября 2016 в 12:56 |
| #4 — 7 октября 2016 в 21:09 |
| #5 — 8 ноября 2016 в 11:55 |
| #6 — 8 ноября 2016 в 12:31 |
| #7 — 8 ноября 2016 в 15:09 |
| #8 — 8 ноября 2016 в 16:13 |
Ужас какой-то, целый день убил на поиск рабочего решения. Словами можно, конечно, передать то, что под конец дня я чувствую, но в рамках данного форума это неприемлимо.
Источник: http://www.cyberforum.ru/ubuntu-linux/thread1774361.html
Скопирую сюда на всякий случай.
1) sudo su
2) apt install intltool libtool network-manager-dev libnm-util-dev libnm-glib-dev libnm-glib-vpn-dev libnm-gtk-dev libnm-dev libnma-dev ppp-dev strongswan libdbus-glib-1-dev libsecret-1-dev libgtk-3-dev libglib2.0-dev xl2tpd&&git clone https://github.com/nm-l2tp/network-manager-l2tp.git&&cd network-manager-l2tp&&autoreconf -fi&&intltoolize&&./configure —disable-static —prefix=/usr —sysconfdir=/etc —libdir=/usr/lib/x86_64-linux-gnu —libexecdir=/usr/lib/NetworkManager —localstatedir=/var —with-pppd-plugin-dir=/usr/lib/pppd/2.4.7&&make&&make install&&apparmor_parser -R /etc/apparmor.d/usr.lib.ipsec.charon&&apparmor_parser -R /etc/apparmor.d/usr.lib.ipsec.stroke&&apt remove xl2tpd&&apt install libpcap0.8-dev&&wget https://github.com/xelerance/xl2tpd/archive/v1.3.6/xl2tpd-1.3.6.tar.gz&&tar xvzf xl2tpd-1.3.6.tar.gz&&cd xl2tpd-1.3.6&&make&&make install&&echo «END. «
 | 20161108231203_9ogm9.png | 57,43 Кб | Скачали: 1600 |
| #9 — 30 декабря 2016 в 19:39 |
Давайте лучше так оставим для новичков?
Устанавливаем необходимые пакеты
sudo apt install intltool libtool network-manager-dev libnm-util-dev libnm-glib-dev\
libnm-glib-vpn-dev libnm-gtk-dev libnm-dev libnma-dev ppp-dev strongswan\
libdbus-glib-1-dev libsecret-1-dev libgtk-3-dev libglib2.0-dev xl2tpd
Переустанавливаем Network Manager
./configure —disable-static —prefix=/usr —sysconfdir=/etc —libdir=/usr/lib/x86_64-linux-gnu\
—libexecdir=/usr/lib/NetworkManager —localstatedir=/var\
—with-pppd-plugin-dir=/usr/lib/pppd/2.4.7
make
sudo make install
Удаляем настройки AppArmor касающиеся IPSEC
sudo apparmor_parser -R /etc/apparmor.d/usr.lib.ipsec.charon
sudo apparmor_parser -R /etc/apparmor.d/usr.lib.ipsec.stroke
Заменяем x2ltpd на libpcap
sudo apt remove xl2tpd
sudo apt install libpcap0.8-dev
| #10 — 7 августа 2017 в 18:38 |
| #11 — 19 февраля 2018 в 01:06 |
| #12 — 11 июня 2018 в 00:17 |
| Владимир измайлов: |
| какой гемор ппц, минт 18.3 все работает с этой статьи) за 3 минуты, до этого я се сеть упорол канешь. и 4 часа времени убил) https://www.techrepublic.com/article/how-to-add-the-l2tp-vpn-option-to-network-manager-in-linux/ |
Спасибо тебе, добрый человек. Реально, пара минут и все работает.
| #13 — 23 сентября 2018 в 18:40 |
Помогите разобраться уже голову сломал
на 32 битной системе все работает норм на релизе 13 а на 18 64 битной вот что пишет внизу
sudo /usr/lib/NetworkManager/nm-l2tp-service —debug
[sudo] пароль для ux:
nm-l2tp[1915] nm-l2tp-service (version 1.2.8) starting.
nm-l2tp[1915] uses default —bus-name «org.freedesktop.NetworkManager.l2tp»
nm-l2tp[1915] ipsec enable flag: yes
** Message: Check port 1701
** Message: Can’t bind to port 1701
nm-l2tp[1915] L2TP port 1701 is busy, using ephemeral.
connection
id : «121121» (s)
uuid : «472df4a5-d0a4-4bec-bf93-7388c924b85b» (s)
interface-name : NULL (sd)
type : «vpn» (s)
permissions : [«user:ux:»] (s)
autoconnect : FALSE (s)
autoconnect-priority : 0 (sd)
timestamp : 0 (sd)
read-only : FALSE (sd)
zone : NULL (sd)
master : NULL (sd)
slave-type : NULL (sd)
autoconnect-slaves : ((NMSettingConnectionAutoconnectSlaves) NM_SETTING_CONNECTION_AUTOCONNECT_SLAVES_DEFAULT) (sd)
secondaries : [] (s)
gateway-ping-timeout : 0 (sd)
metered : ((NMMetered) NM_METERED_UNKNOWN) (sd)
lldp : -1 (sd)
ipv6
method : «auto» (s)
dns : [] (s)
dns-search : [] (s)
dns-options : NULL (sd)
addresses : ((GPtrArray*) 0x1981b60) (s)
gateway : NULL (sd)
routes : ((GPtrArray*) 0x1981c20) (s)
route-metric : -1 (sd)
ignore-auto-routes : FALSE (sd)
ignore-auto-dns : FALSE (sd)
dhcp-hostname : NULL (sd)
dhcp-send-hostname : TRUE (sd)
never-default : FALSE (sd)
may-fail : TRUE (sd)
dad-timeout : -1 (sd)
dhcp-timeout : 0 (sd)
ip6-privacy : ((NMSettingIP6ConfigPrivacy) NM_SETTING_IP6_CONFIG_PRIVACY_UNKNOWN) (sd)
addr-gen-mode : 1 (sd)
ipv4
method : «auto» (s)
dns : [] (s)
dns-search : [] (s)
dns-options : NULL (sd)
addresses : ((GPtrArray*) 0x1981ce0) (s)
gateway : NULL (sd)
routes : ((GPtrArray*) 0x7f67c0001260) (s)
route-metric : -1 (sd)
ignore-auto-routes : FALSE (sd)
ignore-auto-dns : FALSE (sd)
dhcp-hostname : NULL (sd)
dhcp-send-hostname : TRUE (sd)
never-default : FALSE (sd)
may-fail : TRUE (sd)
dad-timeout : -1 (sd)
dhcp-timeout : 0 (sd)
dhcp-client-id : NULL (sd)
dhcp-fqdn : NULL (sd)
vpn
service-type : «org.freedesktop.NetworkManager.l2tp» (s)
user-name : «ux» (s)
persistent : FALSE (sd)
data : ((GHashTable*) 0x1978b60) (s)
secrets : ((GHashTable*) 0x19789e0) (s)
timeout : 0 (sd)
nm-l2tp[1915] starting ipsec
Stopping strongSwan IPsec failed: starter is not running
Starting strongSwan 5.3.5 IPsec [starter].
Loading config setup
Loading conn ‘472df4a5-d0a4-4bec-bf93-7388c924b85b’
found netkey IPsec stack
nm-l2tp[1915] Spawned ipsec up script with PID 1982.
initiating Main Mode IKE_SA 472df4a5-d0a4-4bec-bf93-7388c924b85b[1] to 78.36.18.47
generating ID_PROT request 0 [ SA V V V V ]
sending packet: from 10.0.2.15[500] to 78.36.18.47[500] (224 bytes)
sending retransmit 1 of request message ID 0, seq 1
sending packet: from 10.0.2.15[500] to 78.36.18.47[500] (224 bytes)
nm-l2tp[1915] Timeout trying to establish IPsec connection
nm-l2tp[1915] Terminating ipsec script with PID 1982.
Stopping strongSwan IPsec.
destroying IKE_SA in state CONNECTING without notification
nm-l2tp[1915] Could not establish IPsec tunnel.
(nm-l2tp-service:1915): GLib-GIO-CRITICAL **: g_dbus_method_invocation_take_error: assertion ‘error != NULL’ faile
| #14 — 29 марта 2020 в 12:27 |
Guys you need to google this , huge news for Corona -> «COVID20CB»
Источник
How to Setup an L2TP/IPsec VPN Client on Linux
L2TP (which stands for Layer 2 Tunneling Protocol) is a tunneling protocol designed to support virtual private networks (VPN connections) over the internet. It is implemented in most if not all modern operating systems including Linux and VPN-capable devices.
The L2TP does not provide any authentication or encryption mechanisms directly to traffic that passes through it, it is usually implemented with the IPsec authentication suite (L2TP/IPsec) to provide encryption within the L2TP tunnel.
In this article, we will show how to set up an L2TP/IPSec VPN connection in Ubuntu and its derivatives and Fedora Linux.
This guide assumes that the L2TP/IPsec VPN server has been set up and that you have received the following VPN connection details from your organization’s or company’s system administrator.
How to Setup L2TP VPN Connection in Linux
To add an L2TP/IPsec option to the NetworkManager, you need to install the NetworkManager-l2tp VPN plugin which supports NetworkManager 1.8 and later. It provides support for L2TP and L2TP/IPsec.
To install the L2TP module on Ubuntu and Ubuntu-based Linux distributions, use the following PPA.
On RHEL/CentOS and Fedora Linux, use the following dnf command to install L2TP module.
Once the package installation is complete, click on your Network Manager icon, then go to Network Settings.
![]() Access Network Settings
Access Network Settings
Next, add a new VPN connection by clicking on the (+) sign.
![]() Add New VPN Connection
Add New VPN Connection
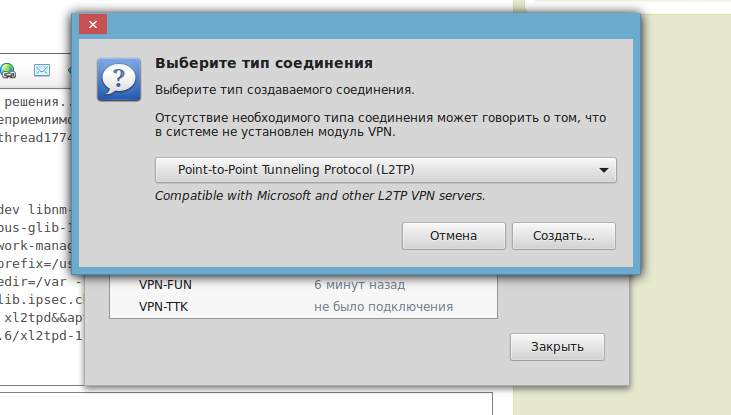
Then select Layer 2 Tunneling Protocol (L2TP) option from the pop-up window.
![]() Select Layer 2 Tunneling Protocol
Select Layer 2 Tunneling Protocol
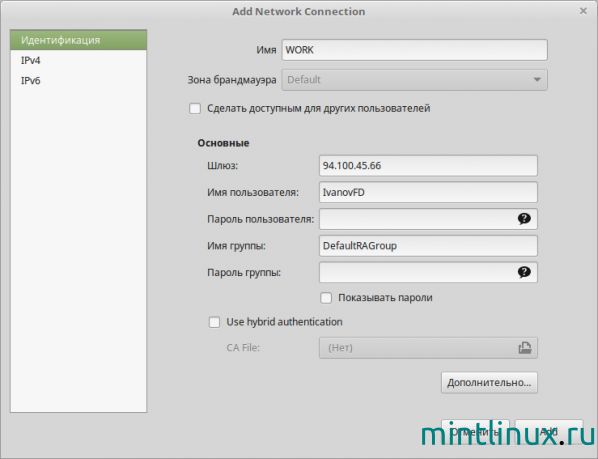
Next, enter the VPN connection details (gateway IP address or hostname, username and password) you received from the system administrator, in the following window.
![]() Add VPN Details
Add VPN Details
Next, click IPsec Settings to enter the pre-shared key for the connection. Then enable IPsec tunnel to L2TP host, enter (or copy and paste the) the Pre-shared key and click Ok.
![]() Add Pre-shared Key
Add Pre-shared Key
After that, click Add. Now your new VPN connection should be added.
![]() VPN Connection Created
VPN Connection Created
Next, turn on the VPN connection to start using it. If the connection details are correct, the connection should be established successfully.
![]() Enable VPN Connection
Enable VPN Connection ![]() Enabled VPN Connection
Enabled VPN Connection
Last but not least, test if the VPN is working fine. You can check your computer’s public IP address to confirm this from a web browser: it should now point to the IP of the gateway.
![]() Confirm Your VPN Connection
Confirm Your VPN Connection
That’s the end of this article. If you have any queries or thoughts to share, reach us via the feedback form below.
If You Appreciate What We Do Here On TecMint, You Should Consider:
TecMint is the fastest growing and most trusted community site for any kind of Linux Articles, Guides and Books on the web. Millions of people visit TecMint! to search or browse the thousands of published articles available FREELY to all.
If you like what you are reading, please consider buying us a coffee ( or 2 ) as a token of appreciation.

We are thankful for your never ending support.
Источник


