- Configure AnyConnect Secure Mobility Client for Linux using Client Certificate Authentication on an ASA
- Available Languages
- Download Options
- Contents
- Introduction
- Prerequisites
- Requirements
- Components Used
- Backgound Information
- Configure
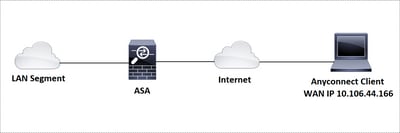
- Network Diagram
- Configurations
- Verify
- Troubleshoot
- Настройка VPN на Cisco ASA
- Шаг 0
- Шаг 1. Проверка настройки интерфейсов
- Шаг 2. Настройка параметров шифрования
- Шаг 3. Определение трафика, подлежащего шифрованию
- Шаг 4. Создание политики шифрования
- Шаг 5. Маршрутизация
- Шаг 6. Предотвращение ненужной трансляции адресов (NO-NAT)
- Шаг 7. Проверка работы VPN тоннеля
- Важно!
Configure AnyConnect Secure Mobility Client for Linux using Client Certificate Authentication on an ASA
Available Languages
Download Options
Contents
Introduction
This document describes a configuration example for Adaptive Security Appliance (ASA) Cisco AnyConnect Secure Mobility Client access that uses client certificate for authentication for a Linux Operative System (OS) for an AnyConnect user to connect successfully to an ASA Headend.
Contributed by Dinesh Moudgil, Cisco HTTS Engineer.
Prerequisites
Requirements
This document assumes that the ASA is fully operational and configured to allow the Cisco Adaptive Security Device Manager (ASDM) or Command Line Interface (CLI) to make configuration changes.
Cisco recommends that you have knowledge of these topics:
Basic knowledge of ASA’s CLI and ASDM
SSLVPN configuration on the Cisco ASA Head End
Fundamental knowledge of PKI
Familiarity with Linux OS
Components Used
The information in this document is based on these software and hardware versions:
Cisco Adaptive Security Appliance ASA5585-SSP-20
Cisco Adaptive Security Appliance Software Version 9.9(2)36
Adaptive Security Device Manager Version 7.9(1)
AnyConnect Version 4.6.03049
Ubuntu OS 16.04.1 LTS
Note: Download the AnyConnect VPN Client package (anyconnect-linux*.pkg) from the Cisco Software Download (registered customers only) site. Copy the AnyConnect VPN client to the ASA’s flash memory, which is then downloaded to the remote user computers in order to establish the SSL VPN connection with the ASA.
The information in this document was created from the devices in a specific lab environment. All of the devices used in this document started with a cleared (default) configuration. If your network is live, make sure that you understand the potential impact of any command.
Backgound Information
For a successful client certificate authentication on Linux devices, AnyConnect secure mobility client supports the following certificate stores:
1. Linux OS (PEM) certificate store
2. Firefox (NSS) certificate store
This document is based on client certificate authentication using a Linux OS (PEM) certificate store.
1. To use Linux OS certificate store, PEM file-based certificates are placed in these directories.
| Entity | Path | Example |
| Certificate authority (CA) certificate | /opt/.cisco/certificates/ca | tactest: $ ls /opt/.cisco/certificates/ca |
| User certificate | /home/tactest/.cisco/certificates/client | tactest: $ ls /home/tactest/.cisco/certificates/client |
| User private key [Initially used to create CSR] : | /home/tactest/.cisco/certificates/client/private | tactest: $ ls /home/tactest/.cisco/certificates/client/private |
Note: By default, the path for installing client certificate and the private key is not present so it needs to be manually created using this command.
mkdir -p .cisco/certificates/client/private/
If you are using a Windows Certificate Authority,
1. Download the CA Certificate (Base64 encoded) with extension .cer
2. Download the User Identity Certificate (Base64 encoded) with extension .cer
3. Change the extension of certificates from .cer to .pem extension
2. To use Firefox (NSS) certificate store, user can import their certificate via Firefox.
The CA certificate for the ASA can be imported into NSS certificate store by AnyConnect client automatically if the user clicks “Always Connect” button on the certificate security warning dialog when browsing to ASA via HTTPS.
AnyConnect Linux uses Firefox certificate store (NSS) as default, if it fails then it would turn to use Linux OS certificate store.
Note: Currently, AnyConnect on a Linux OS doesn’t support GNOME Keyring so AnyConnect won’t able to use the certificate imported to the GNOME Keyring.
Please make sure there are no related certificates in Linux OS certificate store and Firefox (NSS) certificate store before importing a new user certificate.
Ensure that your files meet the following requirements:
- All certificate files must end with the extension .pem.
- All private key files must end with the extension .key.
- A client certificate and its corresponding private key must have the same filename. For example: client.pem and client.key.
For a clean start, please consider the following approach:
- Linux OS (PEM) certificate store:
A. Remove unnecessary PEM files under “/opt/.cisco/certificates”, but keep the “/opt/.cisco/certificates/ca/VeriSignClass3PublicPrimaryCertificationAuthority-G5.pem” certificate intact. This is the CA certificate AnyConnect relies on to perform the code signing verification.
B. Remove the user certificates that are not required from the path
Use firefox settings to inspect and delete related certificates imported by user or AnyConnect itself.
Configure
Network Diagram
Configurations
Linux Client Setup
Step 1. Download the Anyconnect package, extract the contents and install the Anyconnect application on the Linux client.
Step 2. Create a certificate signing request for the identity certificate on Linux client using OpenSSL.
Step 3. The CSR generated above can be used to request CA to issue a user identity certificate.
Step 4. Once the certificate is issued by CA, copy the certificate to the Linux client.
ASA CLI Configuration
This section provides the CLI configuration for the Cisco AnyConnect Secure Mobility Client for reference purposes.
Verify
Use this section in order to confirm that your configuration works properly.
Note: The Output Interpreter Tool (registered customers only) supports certain show commands. Use the Output Interpreter Tool in order to view an analysis of show command output.
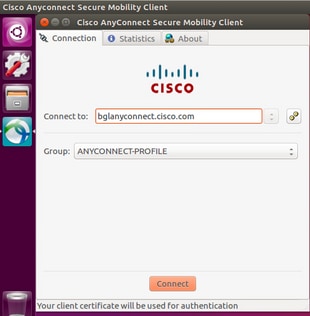
- On an Ubuntu OS 16.04.1 LTS, connect Anyconnect via GUI
If you wish to connect Anyconnect via command line on a Linux client, navigate to the following path:
Verify the Anyconnect client is able to establish connection:
Note: If Anyconnect GUI client is already opened and you try to connect Anyconnect via CLI, you get this error.
In this case, close the Anyconnect GUI client and then connect via Anyconnect CLI.
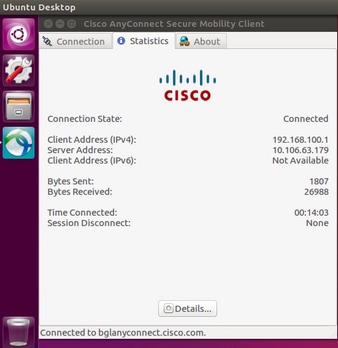
Once successfully connected, Anyconnect client details can be verified by navigating to Statistics tab in the Anyconnect GUI client
This command is used to confirm the CA and Identity certificates present on the Adaptive Security Appliance (ASA).
These show commands can be executed to confirm the status of AnyConnect client and its statistics.
In order to confirm if the Linux client has the certificate in the correct format (Base64 encoding with .pem extension), browse to the given path and use the following command:
If you get the following error it means that you are trying to view a DER-encoded certificate and it is not a PEM encoded certificate
Troubleshoot
This section provides the information you can use in order to troubleshoot your configuration.
Note: Refer to Important Information on Debug Commands before you use debug commands.
Caution: On the ASA, you can set various debug levels; by default, level 1 is used. If you change the debug level, the verbosity of the debugs might increase. Do this with caution, especially in production environments.
To troubleshoot an incoming AnyConnect client connection from Linux OS client, you can use the following:
- For AnyConnect process on an ASA
debug webvpn anyconnect 255
Here is a sample debug taken on an ASA from a working scenario:
- For client certificate authentication on an ASA
debug crypto ca 255
debug crypto ca messages 255
debug crypto ca transactions 255
Here is a sample debug taken for a successful client certificate authentication on an ASA:
- For the AnyConnect process on a Linux client
On a Linux device, Anyconnect logs can be found in the file named «syslog» at path:/var/log/
Here is a sample of working logs taken from a Linux client. The below command can be run to gather live logs for an Anyconnect client connection.
- DART(Diagnostic and Reporting Tool) on Linux Client
Similar to Windows and MAC, Linux client also has DART functionality. This can be used either using GUI and CLI.
Please note that DART needs to be run as an admin user in order to collect complete logs on a Linux client.
Step 1. DART can be executed from the command line by navigating to the following path:
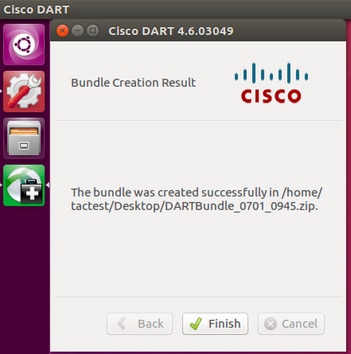
Step 2. To execute DART from GUI, search for «anyconnect» on Linux GUI and click on Cisco DART and follow the instructions. The collected DART bundle is stored on the desktop.
Step 3. To copy dart bundle from the Linux client to your workstation, use the command
scp username@10.106.44.166:/home/ /Desktop/DARTBundle_0701_0945.zip /Users/dmoudgil/Desktop/Ubuntu/
Here is a document for reference to DART on different OS: https://community.cisco.com/t5/security-documents/how-to-collect-the-dart-bundle-for-anyconnect/ta-p/3156025
Источник
Настройка VPN на Cisco ASA
Read the article CONFIGURING VPN ON CISCO ASA in  English
Эта статья является логическим продолжением инструкции по настройке VPN между двумя маршрутизаторами Cisco, однако выделена в отдельный материал, так как в центре внимание здесь – настройка межсетевого экрана Cisco ASA.
По условию необходимо связать с помощью VPN соединения сети двух офисов – главного и дополнительного. Однако сейчас в головном офисе, вместо маршрутизатора Cisco 2800 будет использоваться межсетевой экран Cisco ASA 5510.
В распоряжении имеются:
Межсетевой экран Cisco ASA 5510 в главном офисе
- Пользователи расположены в сети 192.168.10.0 /24
- Внешний статический адрес 1.1.1.2 /30
- Шлюз провайдера 1.1.1.1 /30
Маршрутизатор Cisco 881 в дополнительном офисе.
- Пользователи расположены в сети 192.168.20.0 /24
- Внешний статический адрес 2.2.2.2 /30
- Шлюз провайдера 2.2.2.1 /30

Команды для маршрутизатора Cisco 881 рассмотрены в описании второго «универсального» способа настройки VPN тоннелей в статье «Настройка VPN между маршрутизаторами Cisco», поэтому здесь будет рассмотрена только конфигурацию Cisco ASA. На межсетевом экране уже будут выполнены предварительные настройки из статьи «Cisco ASA. Основы»: организовано удаленное управление и обеспечен доступ в Интернет из локальной сети офиса.

Шаг 0
Если версия операционной системы IOS старше, чем 8.3 (посмотреть текущую версию можно командой sh ver), то для упрощения конфигурации убираем настройку nat-control
FW-DELTACONFIG-1(config)#
no nat-control
Шаг 1. Проверка настройки интерфейсов
Проверяем, что на межсетевом экране корректно сконфигурированы внешний (outside) и внутренний (inside) интерфейсы. Из-за того, что в этой статье расссматривается модель Cisco ASA 5510 (вместо 5505) настройки чуть отличаются от тех, что приведены в упомянутой статье: ip адреса и иные параметры вместо виртуальных интерфейсов Vlan задаются сразу на физических интерфейсах Ethernet 0 и Ethernet 1.
Внешний интерфейс outside
FW-DELTACONFIG (config)#
interface Ethernet 0
nameif outside
security-level 0
ip address 1.1.1.2 255.255.255.252
no shut
Внутренний интерфейс inside для локальной сети.
FW-DELTACONFIG (config)#
interface Ethernet 1
nameif inside
security-level 100
ip address 192.168.10.1 255.255.255.0
no shut
Шаг 2. Настройка параметров шифрования
Вводим параметры для шифрования трафика межу головным и дополнительным офисами и включаем шифрование на внешнем интерфейсе outside. Они идентичны тем, которые используются на маршрутизаторе Cisco 881 в удаленном офисе.
Для версий IOS до 9.0
FW-DELTACONFIG-1(config)#
crypto ipsec transform-set ESP-3DES-SHA esp-3des esp-sha-hmac
crypto isakmp policy 1
authentication pre-share
encryption 3des
hash sha
group 2
lifetime 86400
crypto isakmp enable outside
Для версий IOS после 9.0
FW-DELTACONFIG-1(config)#
crypto ipsec ikev1 transform-set ESP-3DES-SHA esp-3des esp-sha-hmac
crypto ikev1 policy 1
authentication pre-share
encryption 3des
hash sha
group 2
lifetime 86400
crypto ikev1 enable outside
Шаг 3. Определение трафика, подлежащего шифрованию
Создаем список доступа ACL_CRYPTO_DO, в котором указываем трафик, подлежащий шифрованию. Остальные пакеты не будут отправляться в VPN тоннель.
FW-DELTACONFIG-1(config)#
access-list ACL_CRYPTO_DO extended permit ip 192.168.10.0 255.255.255.0 192.168.20.0 255.255.255.0
Шаг 4. Создание политики шифрования
Создаем политику шифрования (crypto map), в которой даем ссылки на все правила и параметры шифрования, которые были созданы в шаге 2 и 3.
Для версии IOS до 9.0
FW-DELTACONFIG-1(config)#
crypto map SECMAP 1 match address ACL_CRYPTO_DO
crypto map SECMAP 1 set peer 2.2.2.2
crypto map SECMAP 1 set transform-set ESP-3DES-SHA
Привязываем ее к внешнему интерфейсу outside.
FW-DELTACONFIG-1(config)#
crypto map SECMAP interface outside
Задаем ключ шифрования
FW-DELTACONFIG-1(config)#
tunnel-group 2.2.2.2 type ipsec-l2l
tunnel-group 2.2.2.2 ipsec-attributes
pre-shared-key XXXXX
Вместо XXXXX указываем сам ключ для VPN с удаленной площадкой. Он будет одинаковым и на Cisco ASA в головном офисе и на Cisco 881 на удаленной площадке. Рекомендую сделать его не менее 50 символов так, чтобы в него входили цифры, буквы и специальные символы.
Все то же самое для версии IOS после 9.0
FW-DELTACONFIG-1(config)#
crypto map SECMAP 1 match address ACL_CRYPTO_DO
crypto map SECMAP 1 set peer 2.2.2.2
crypto map SECMAP 1 set ikev1 transform-set ESP-3DES-SHA
crypto map SECMAP interface outside
tunnel-group 2.2.2.2 type ipsec-l2l
tunnel-group 2.2.2.2 ipsec-attributes
ikev1 pre-shared-key XXXXX
Шаг 5. Маршрутизация
Явно задаем маршрут до сети удаленного офиса через внешний интерфейс (outside) и шлюз провайдера Интернет (1.1.1.1)
FW-DELTACONFIG-1(config)#
route outside 192.168.20.0 255.255.255.0 1.1.1.1
Шаг 6. Предотвращение ненужной трансляции адресов (NO-NAT)
Если помимо VPN подключения Cisco ASA используется для доступа пользователей в сеть Интернет (настроен динамический NAT для трансляции внутренних адресов во внешний), то добавьте эти строки, чтобы не транслировать трафик, предназначенный для всех внутренних сетей с частными ip адресами.
Команды для новых версий IOS, начиная с 8.3
object-group network NET_PRIVATE_IP
network-object 10.0.0.0 255.0.0.0
network-object 172.16.0.0 255.240.0.0
network-object 192.168.0.0 255.255.0.0
nat ( any,any ) source static any any destination static NET_PRIVATE_IP NET_PRIVATE_IP no-proxy-arp description NO-NAT
Команды для старых версий IOS ниже 8.3
access-list NO-NAT extended permit ip any 10.0.0.0 255.0.0.0
access-list NO-NAT extended permit ip any 192.168.0.0 255.255.0.0
access-list NO-NAT extended permit ip any 172.16.0.0 255.240.0.0
nat ( inside ) 0 access-list NO-NAT
Если этого не сделать, то тоннель установится, но пакеты по нему передаваться не будут.
Шаг 7. Проверка работы VPN тоннеля
После выполнения настроек на маршрутизаторе Cisco 881 в дополнительном офисе проверяем работу VPN подключения, запустив ping с одного из хостов локальной сети головного офиса до одного из хостов дополнительного.
Проверить состояние тоннеля можно следующими командами:
- Просмотр активных тоннелей командой show crypto isakmp sa
FW-DELTACONFIG-1# sh cry isa sa
Active SA: 1
Rekey SA: 0 (A tunnel will report 1 Active and 1 Rekey SA during rekey)
Total IKE SA: 1
1 IKE Peer: 2.2.2.2
Type : L2L Role : responder
Rekey : no State : MM_ACTIVE
Любое значение кроме(!) MM_ACTIVE означает, что тоннель не работает. Если он не устанавливается в течение минуты, следует проверить все введенные параметры и их полное соответствие на обоих устройствах, участвующих в шифровании.
Полное отсутствие информации при выводе этой команды скорее всего означает, что где-то пропущена какая-то строчка, например привязка crypto map ко внешнему интерфейсу.
Важно!
Обратите внимание, что построение VPN тоннеля начинается только после появления трафика, подлежащего шифрованию, между внутренними сетями.
- Команда show crypto ipsec sa показывает количество переданных и полученных пакетов внутри VPN тоннеля. Незаменима во время отладки подключения. Информация доступна только(!) в случае, когда тоннель установлен. Если тоннеля нет, то вывод будет пустым.
FW-DELTACONFIG-1# sh cry ips sa
interface: outside
/. вырезано . /
local ident (addr/mask/prot/port): (192.168.10.0/255.255.255.255/0/0)
remote ident (addr/mask/prot/port): (192.168.20.0/255.255.255.255/0/0)
current_peer: 2.2.2.2
#pkts encaps: 4748, #pkts encrypt: 4748, #pkts digest: 4748
#pkts decaps: 4432, #pkts decrypt: 4432, #pkts verify: 4432
#pkts compressed: 0, #pkts decompressed: 0
#pkts not compressed: 4748, #pkts comp failed: 0, #pkts decomp failed: 0
#pre-frag successes: 0, #pre-frag failures: 0, #fragments created: 0
#PMTUs sent: 0, #PMTUs rcvd: 0, #decapsulated frgs needing reassembly: 0
#send errors: 0, #recv errors: 0
/. вырезано . /
Строчка с pkts encaps отображает количество пакетов, которые были зашифрованы и отправлены в сторону соседнего офиса
Строчка с pkts decaps отображает количество пакетов, которые пришли с другой стороны тоннеля и были расшифрованы.
- Команда clear crypto isakmp sa позволяет сбросить текущие vpn тоннели для их повторной инициализации. А команда clear crypto ipsec sa peer 2.2.2.2 сбросит счетчики входящих и исходящих пакетов.
Не стесняйтесь написать мне, если у Вас возникли вопросы или возникают трудности с настройкой подобных подключений. Буду рад помочь.
Важно!
Не забудьте сохранить конфигурацию на всех устройствах командой write или copy run start. Иначе после перезагрузки все изменения будут потеряны.
FW-DELTACONFIG-1# write
Building configuration.
[OK]
Источник


