- HowTo: Подключение к Cisco VPN с использованием Aladdin eToken в Linux (Ubuntu)
- Набор программ
- Установка клиента eToken
- Установка и настройка GnuTLS
- Чтение данных токена
- Наконец-то OpenConnect
- Послесловие
- Installing and Using AnyConnect on Ubuntu Desktop
- Available Languages
- Download Options
- Objective
- Introduction
- AnyConnect Software Version
- Table of Contents
- Installing AnyConnect Secure Mobility Client v4.9.x
- Prerequisites
- Check these other articles out!
- Applicable Devices | Software Version
- Licensing Information
- Step 1
- Step 2
- Step 3
- Step 4
- Step 5
- Step 6
- Step 7
- Step 8
- Step 9
- Using AnyConnect Secure Mobility Client v4.9.x
- Step 1
- Step 2
- Step 3
- Step 4
- Uninstalling AnyConnect Secure Mobility Client v4.9.x
- Step 1
- Step 2
- Step 3
- Conclusion
- AnyConnect App
HowTo: Подключение к Cisco VPN с использованием Aladdin eToken в Linux (Ubuntu)
Сравнительно недавно я решил перевести домашний компьютер с Windows на Linux. То есть идея такая бродила уже некоторое время, подогреваемая новостями с фронтов борьбы с добровольно-принудительной установкой Windows 10 и размышлениями о неизбежном устаревании «семерки» следом за XP, а вот поводом взяться за дело стал выход очередного LTS-релиза Ubuntu. При этом основным мотивом такого перехода я назову простое любопытство: домашний компьютер используется в основном для развлечений, ну а знакомство с новой ОС — развлечение не хуже прочих. Причем развлечение, как мне кажется, полезное в плане расширения кругозора. Дистрибутив же от Canonical был выбран просто как наиболее популярный: считаю при первом знакомстве с системой это немаловажным подспорьем.
Довольно быстро я на собственном опыте убедился, что для котиков и кино Ubuntu вполне подходит. Но, поскольку компьютер используется еще и для удаленной работы, для отказа от Windows не хватало настроенного подключения к Cisco VPN c авторизацией по eToken.
Набор программ
Было ясно, что для подключения понадобятся по меньшей мере драйвер токена и некий VPN-клиент. В результате поисков в сети получился такой список:
- OpenConnect — VPN-клиент, «совершенно случайно» совместимый с серверами Cisco «AnyConnect»
- GnuTLS — свободная реализация протоколов TLS и SSL. Что важно, в состав этой библиотеки входит утилита p11tool для работы со смарт-картами
- SafeNet Authentication Client — набор драйверов и дополнительных утилит, обеспечивающий работу с электронными ключами eToken
Поскольку для установки соединения OpenConnect-у требуется URL сертификата клиента, который можно узнать с помощью утилиты p11tool, и обеим программам требуется драйвер для работы со смарт-картой — с установки этого драйвера и начнем.
Установка клиента eToken
Как резонно замечено в статье про настройку eToken в Ubuntu 12.04, ссылка на SafeNet Authentication Client почти секретная. Но в то же время на просторах интернета нашлась более свежая заметка про аналогичные танцы с бубном уже в 14.04, причем с живой ссылкой на дистрибутив где-то в бразильском филиале SafeNet. Что еще интереснее, на том же сервере есть файл с актуальной версией клиента — 9.1, которая, ура-ура, не требует устаревших библиотек. Правильный же способ получения клиента — конечно обратиться к поставщику вашего ключа.
На текущий момент пакет SafenetAuthenticationClient-9.1.7-0_amd64.deb ( или SafenetAuthenticationClient-9.1.7-0_i386.deb для 32-битных систем ) элементарно ставится двойным щелчком по нему в файловом менеджере. Но во время начала работы над этим материалом еще не была исправлена ошибка в Ubuntu Software, из-за которой не работала установка сторонних пакетов. Поэтому была написана
При успешной установке в меню Applications появляется приложение SafeNet Authentication Client Tools.
Установка и настройка GnuTLS
Дело в том, что в определенный момент я совершенно застрял, не понимая, почему токен из родного клиента виден, а через p11tool — нет. И именно отсюда я понял, где же лежит собственно драйвер. Зная путь к драйверу, ставим и настраиваем GnuTLS по инструкции.
Теперь с токеном смогут работать любые приложения, использующие GnuTLS. А мы сможем воспользоваться утилитой p11tool для выяснения URL-а нашего сертификата.
Чтение данных токена
Вывести список имеющихся в токене сертификатов можно следующей командой:
Вывод p11tool выглядит примерно так:
Object 0:
URL: pkcs11:model=eToken;manufacturer=SafeNet%2c%20Inc.;serial=99999999;token=Username;id=%XX%XX;object=%7bXXXXXXXX-XXXX-XXXX-XXXX-XXXXXXXXXXXX%7d;type=cert
Type: X.509 Certificate
Label:
ID: XX:XX
Object 1:…
Сертификатов может быть несколько, а для подключения требуется один конкретный. В инструкции по p11tool от OpenConnect в такой ситуации предлагают попробовать каждый. Я же для сопоставления сертификата с его URL составил небольшой скрипт, который выводит как URL, так и текстовые данные каждого сертификата:
Здесь в цикле по URL-ам объектов p11tool —info выводит данные сертификата в своем представлении, а p11tool —export передает сертификат в формате pem-файла на вход openssl, который и выводит текстовое представление. Для передачи в OpenConnect нам нужен тот, где найдется строка Client Authentication — запоминаем его URL. Кроме того, если сервер использует самоподписанный сертификат, запоминаем еще и URL объекта с флагом CKA_CERTIFICATE_CATEGORY=CA.
Экспортируем сертификат удостоверяющего центра в файл (весь URL не обязателен — лишь бы он однозначно определял объект):
Наконец-то OpenConnect
Минимальный набор аргументов для подключения приведен в следующей команде:
Если сервер использует самоподписанный сертификат, при запуске в таком виде OpenConnect уточнит, доверяем ли мы серверу, и к тому же будет занято окно терминала. Поэтому слегка расширим команду:
С помощью cafile мы указали сертификат удостоверяющего центра — теперь не будет вопроса относительно доверия серверу. Опция background говорит сама за себя, а pid-file позволяет указать имя файла, в котором сохранится идентификатор фонового процесса. Кроме того, пароль токена может быть указан прямо в URL с помощью атрибута pin-value. Но это несколько… небезопасно.
Останавливать фоновый процесс правильно следующей командой:
По сообщению SIGINT OpenConnect корректно завершает соединение, а если разорвать соединение «жестко», могут быть проблемы при следующем подключении. Хотя у меня не было.
Послесловие
Задача решена, и я радостно пользуюсь для удаленного доступа приложением Remmina, которое запускаю сразу при подключении к vpn, добавив в скрипт запуска OpenConnect команду:
Правда, пришлось отключить синхронизацию буфера обмена: иначе на удаленной машине он в некоторых приложениях не работает; и включить настройку «Disable tray icon»: в противном случае при каждом подключении в трей добавляется новая иконка. Опять же, переход в домашнюю директорию перед вызовом Remmina неспроста: приложение почету-то не видит путь , а задавать полный путь с именем пользователя мне кажется неправильным.
Выводов относительно применимости Linux дома делать не буду — мне пока хватает, а статья задумана именно как HowTo.
P.S.: На окончательный выбор версии Ubuntu повлияло именно решение данной задачи: в пятой, включенной в Ubuntu 14.04, версии OpenConnect обнаружилась ошибка, мешавшая установке соединения. Вот ради лишенной той ошибки седьмой версии OpenConnect я и поставил возможно еще сырую 16.04.
EDIT: в Ubuntu 19.04 обновилась версия libcrypto и даже драйвер, поставляемый с 10 версией SafeNet, не находит данную библиотеку. Спасаемся симлинком
sudo ln -s /usr/lib/x86_64-linux-gnu/libcrypto.so.1.1 /usr/lib/libcrypto.so
Еще раз ссылки на использованные материалы:
Источник
Installing and Using AnyConnect on Ubuntu Desktop
Available Languages
Download Options
Objective
The objective of this article is to guide you through installing, using, and the option of uninstalling AnyConnect VPN Client v4.9.x on Ubuntu Desktop.
This article is only applicable to the RV34x series routers, not Enterprise products.
Introduction
AnyConnect Secure Mobility Client is a modular endpoint software product. It not only provides Virtual Private Network (VPN) access through Secure Sockets Layer (SSL) and Internet Protocol Security (IPsec) Internet Key Exchange version2 (IKEv2) but also offers enhanced security through various built-in modules.
Follow the steps in this article to install the Cisco AnyConnect VPN Mobility Client on a Ubuntu Desktop. In this article, Ubuntu version 20.04 is used.
AnyConnect Software Version
Table of Contents
Installing AnyConnect Secure Mobility Client v4.9.x
This toggled section provides details and tips for beginners.
Prerequisites
- You need to purchase client license(s) from a partner like CDW or through your company’s device procurement. There are options for 1 user (L-AC-PLS-3Y-S5) or packets of licenses including one year for 25 users (AC-PLS-P-25-S). Other license options available as well, including perpetual licenses. For more details on licensing, check out the links in the Licensing Information section below.
- Download the latest version of firmware available for your router.
Check these other articles out!
Applicable Devices | Software Version
- RV340 | 1.0.03.21 (Download latest)
- RV340W | 1.0.03.21 (Download latest)
- RV345 | 1.0.03.21 (Download latest)
- RV345P | 1.0.03.21 (Download latest)
Licensing Information
AnyConnect client licenses allow the use of the AnyConnect desktop clients as well as any of the AnyConnect mobile clients that are available. You will need a client license to download and use the Cisco AnyConnect Secure Mobility Client. A client license enables the VPN functionality and are sold in packs of 25 from partners like CDW or through your company’s device procurement.
Want to know more about AnyConnect licensing? Here are some resources:
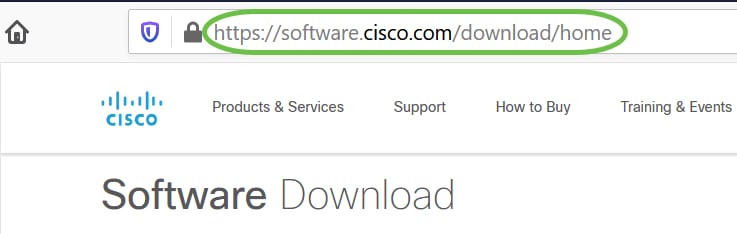
Step 1
Open a web browser and navigate to the Cisco Software Downloads webpage.
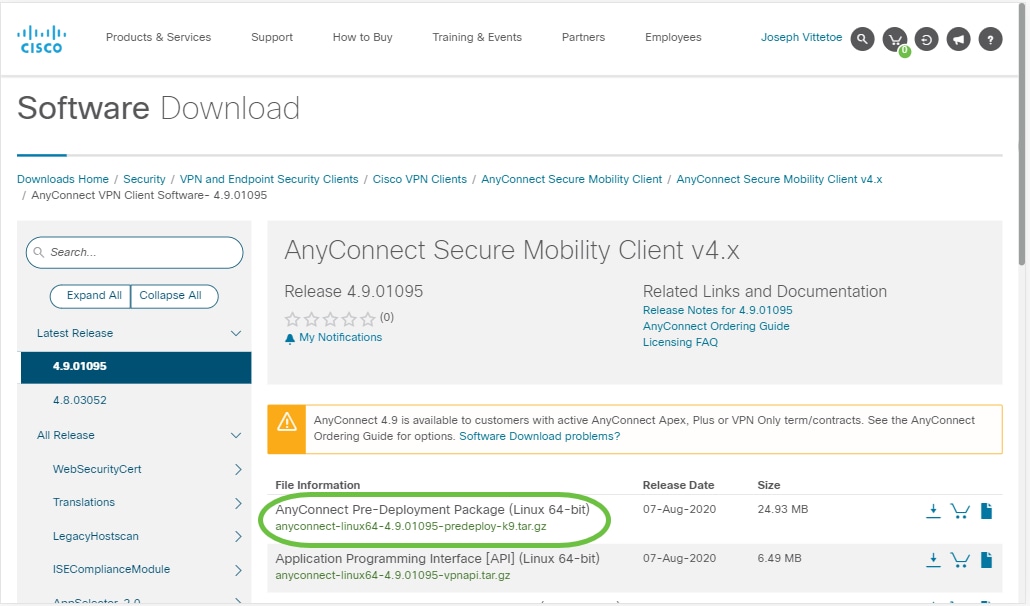
Step 2
In the search bar, start typing ‘Anyconnect’ and the options will appear. Select AnyConnect Secure Mobility Client v4.x.
Step 3
Download the Cisco AnyConnect VPN Client. Most users will select the AnyConnect Pre-Deployment Package (Linux 64-bit) option.
The images in this article are for AnyConnect v4.9.x, which was latest version at the time of writing this document.
If you purchased a license and you are unable to download AnyConnect, call +1 919-993-2724. Select option 2. You will need to know your Cisco ID (the one you use to log into Cisco.com) and the sales order number when you call. They will get that situation all straightened out.
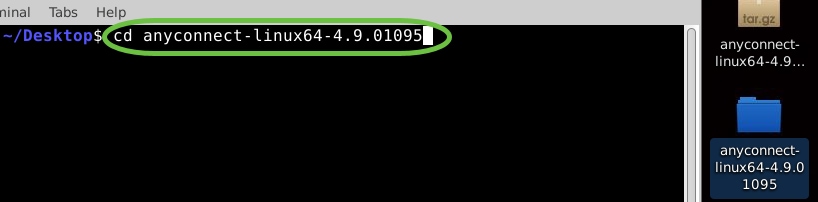
Step 4
Open the Terminal by pressing Ctrl+Alt+T on your keyboard. To navigate to the folder where you have downloaded the AnyConnect Client Package, use the command, ‘cd directory name’. For more information on the ‘cd’ command, click here.
cd [Directory Name]
In this example, the file is placed on the Desktop.
The directory may be different based on the location of the AnyConnect file download. For long filenames or paths, start typing some characters and press the tab key on your keyboard. The filename will auto-populate. If it doesn’t even after you press tab twice, it indicates that you need to type more number of unique characters. Alternately, you can use the ‘ls’ command to list the files in your current directory.

Step 5
The initial download is a tarball archive (several files packed into one), which must be extracted. The command ‘tar xvf filename’ will extract the contents to the same directory in which the initial file is located.
tar xvf [Filename]
For more information on the ‘tar’ command, click here.

Step 6
Once the folder is extracted, use the ‘cd directory name’ command again to navigate into the folder.
cd [Directory Name]
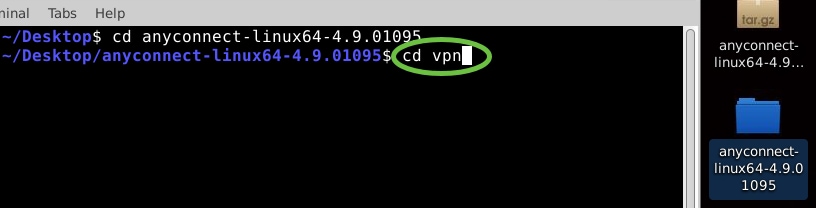
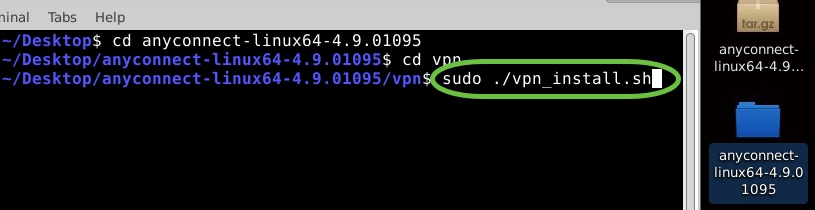
Step 7
After navigating into the main folder, ‘cd’ into the vpn sub-folder.
Step 8
To run the AnyConnect install script, type ‘sudo ./vpn_install.sh’. This will begin the installation process using superuser permissions.
For more details on the ‘sudo’ command, click here.
Step 9
Accept the terms in the license agreement to complete the installation by typing ‘y’.
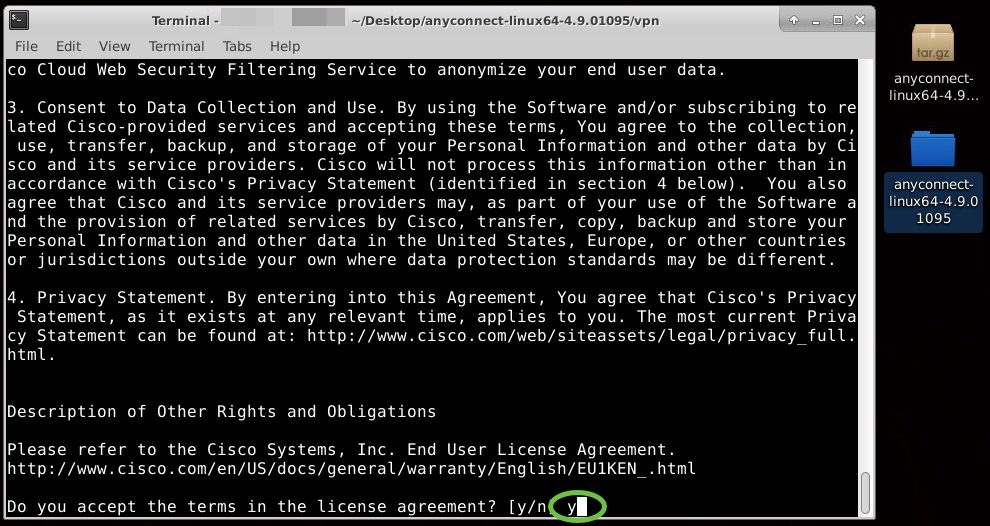
The AnyConnect installation should complete, and the Terminal window can be closed.
Using AnyConnect Secure Mobility Client v4.9.x
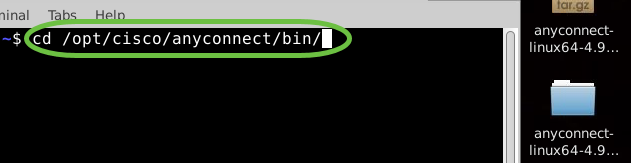
Step 1
To access the Anyconnect app, open the Terminal by pressing Ctrl+Alt+T on your keyboard. Use the command, ‘/opt/cisco/anyconnect/bin/vpnui’.
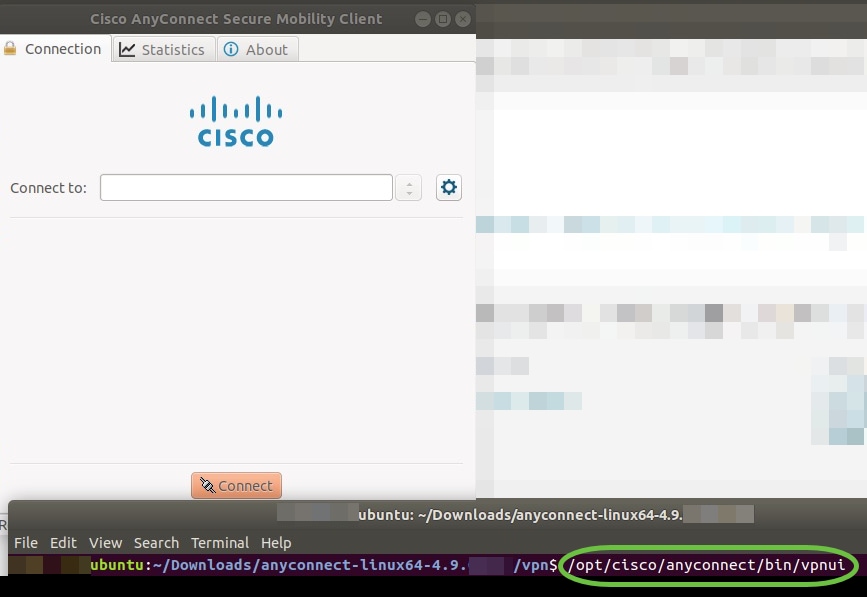
If you encounter any errors through the Terminal, you can access the app from the applications menu as shown below.
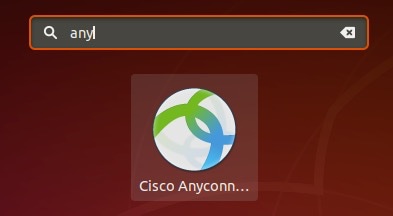
To access the applications menu using the User Interface (UI), click on the start icon (appears as nine dots on the lower left corner). Choose the Anyconnect app.
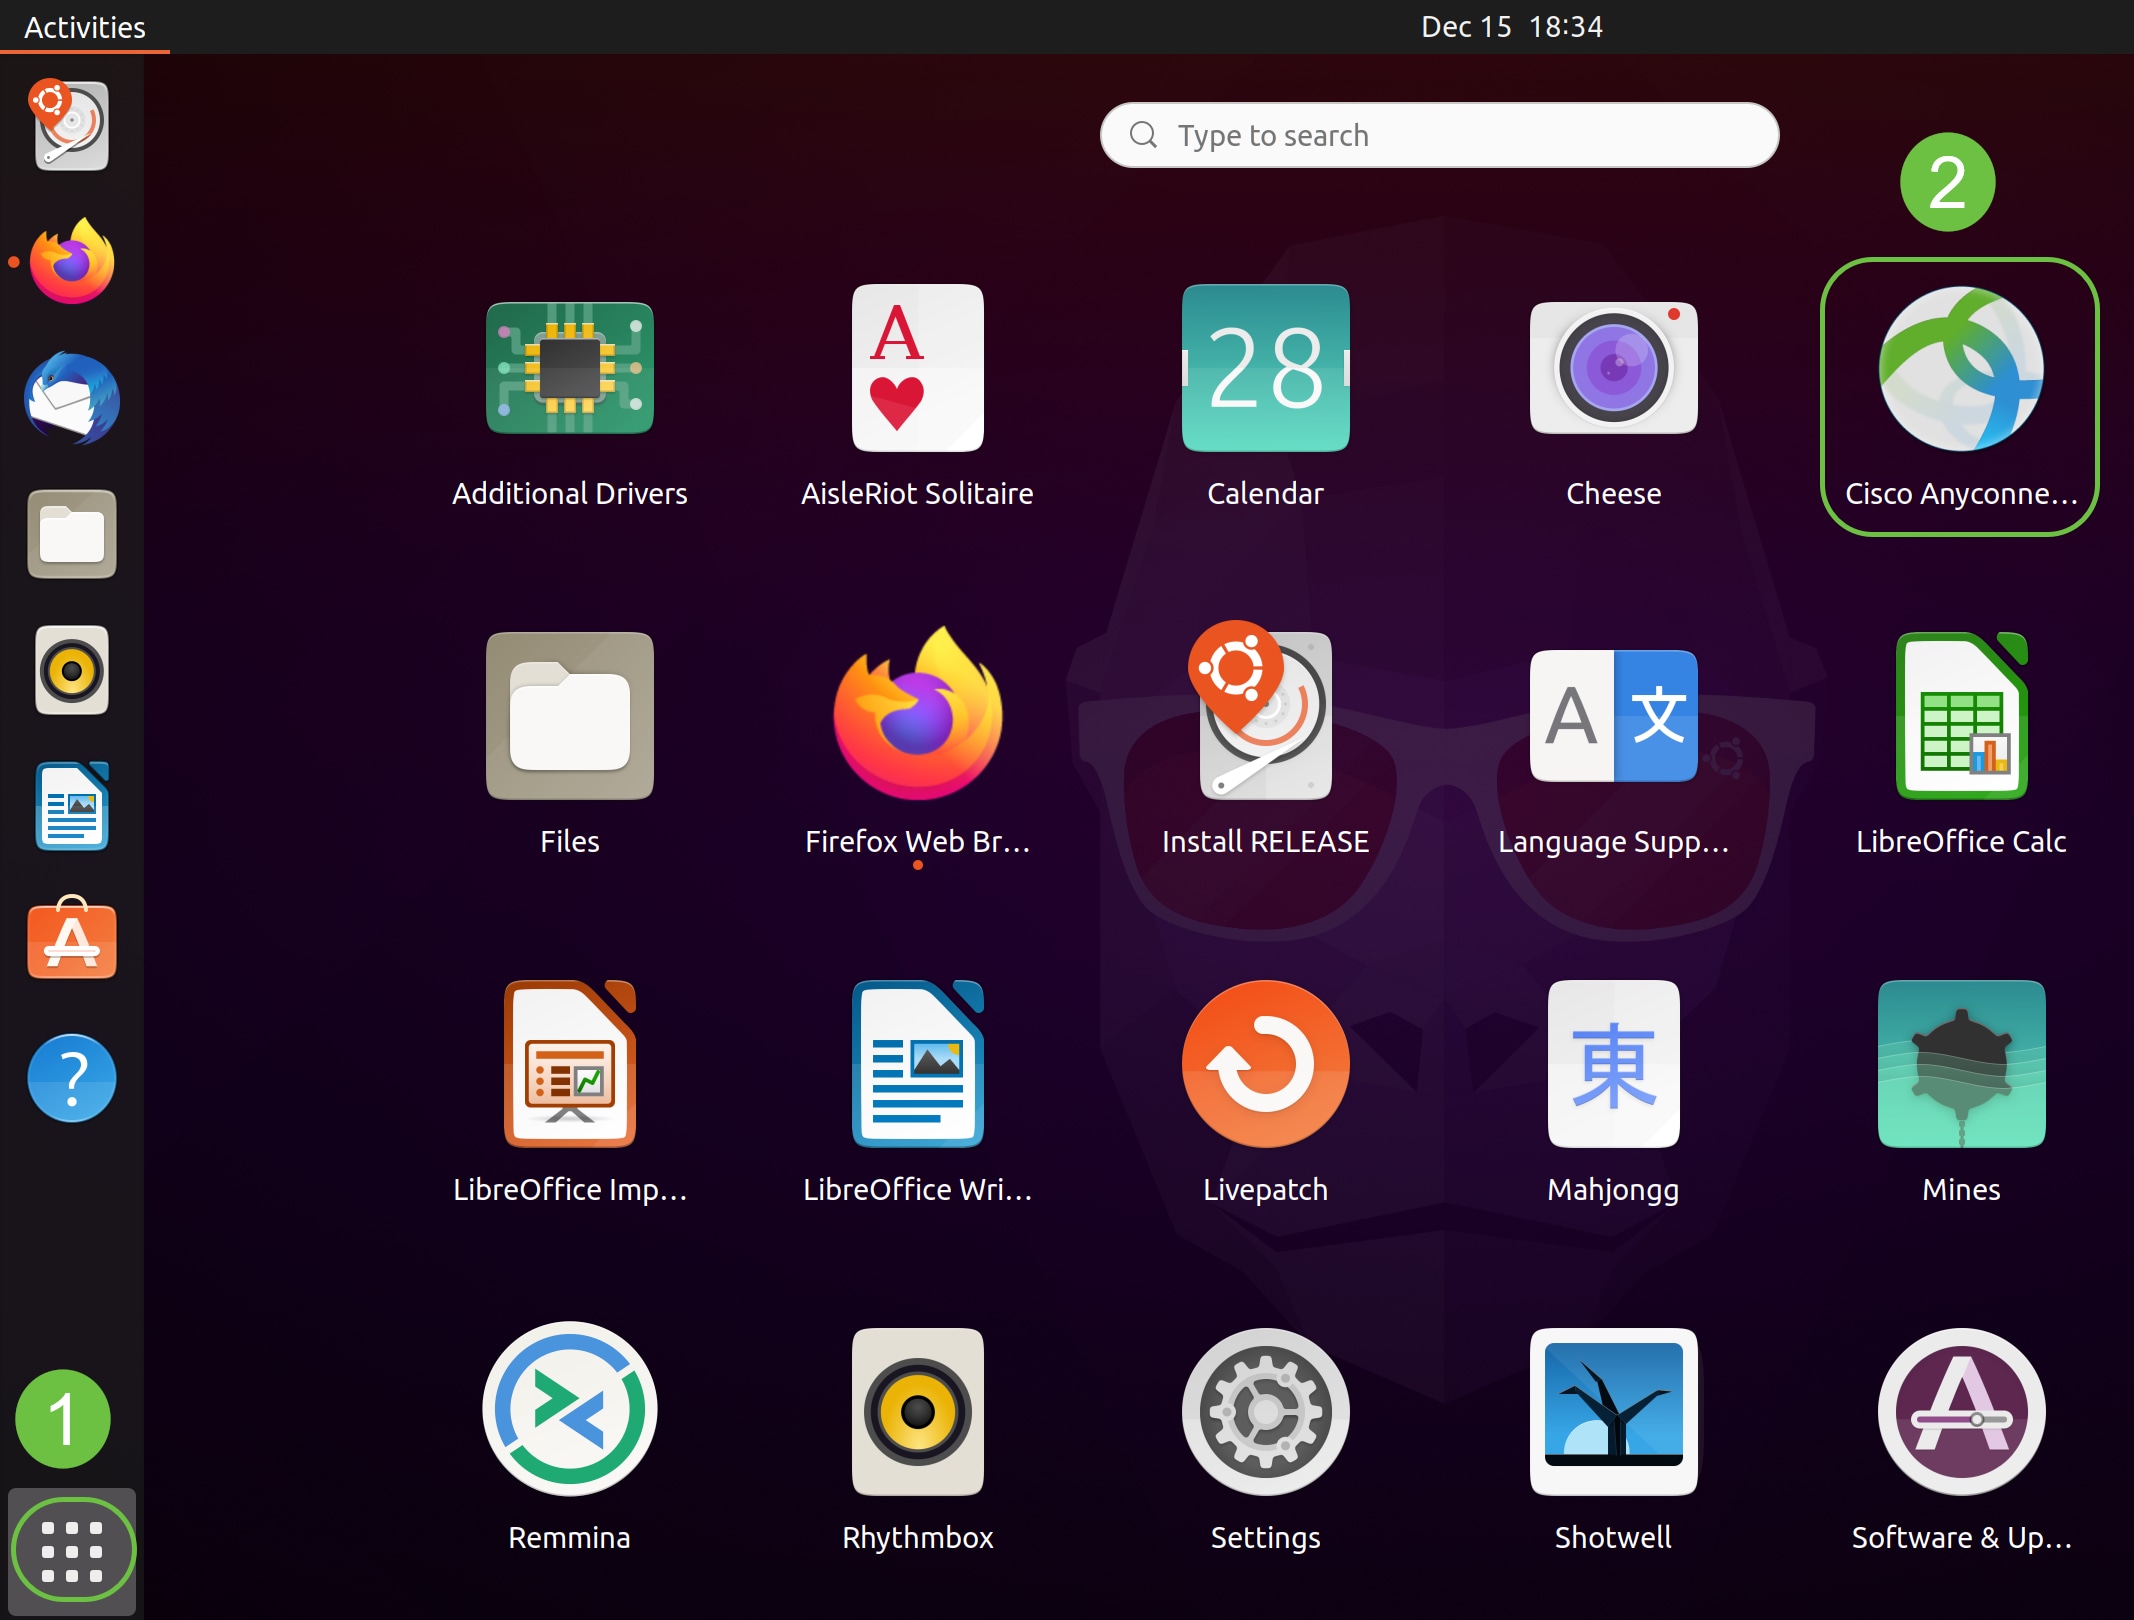
Alternatively, press Super+A (Super key is the windows icon key) on your keyboard to bring up the search bar. Start typing ‘Anyconnect’ and the app will appear.
Step 2
Click on the Anyconnect app.

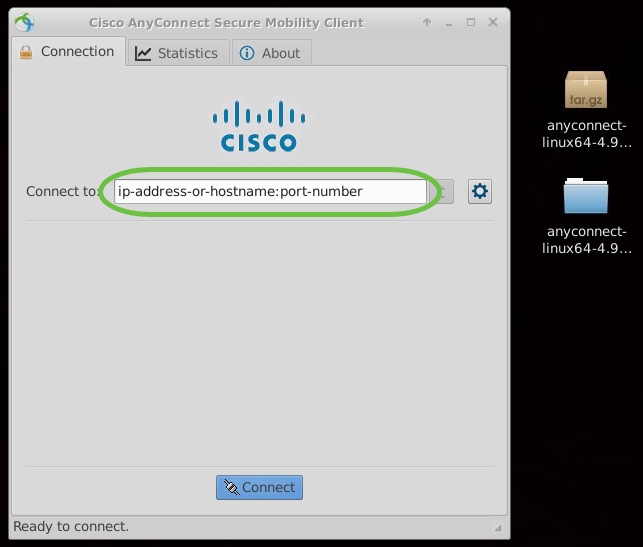
Step 3
Enter the IP Address or Hostname of your desired server followed by the port number.
For RV340 family, the default port number is 8443.
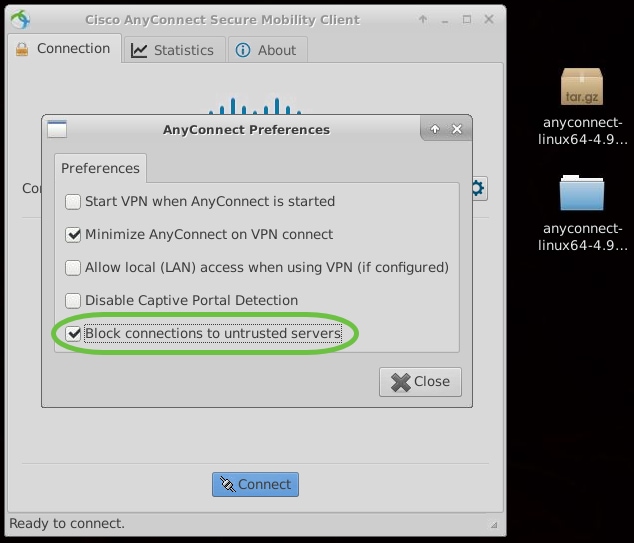
Step 4
Some connections may not be secure using a trusted SSL certificate. By default, AnyConnect Client will block connection attempts to these servers.
Uncheck Block connections to untrusted servers to connect to these servers.
Uninstalling AnyConnect Secure Mobility Client v4.9.x
Step 1
Using Terminal, navigate to the folder that contains the uninstall shell script using the ‘cd’ command.
In a default installation, these files will be located in /opt/cisco/anyconnect/bin/.
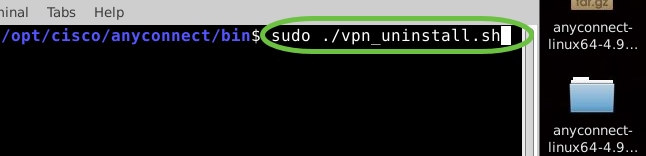
Step 2
To run the Anyconnect uninstall script, enter ‘sudo ./vpn_uninstall.sh’
This will begin the uninstall process using superuser permissions. For more information on the ‘sudo’ command, click here.
Step 3
At the prompt, enter the sudo password and the client software will complete uninstallation.

Conclusion
There you have it! You have now successfully learned the steps to install, use, and uninstall the Cisco AnyConnect Secure Mobility Client v4.9.x on Ubuntu Desktop.
For community discussions on Site-to-Site VPN, go to the Cisco Small Business Support Community page and do a search for Site-to-Site VPN.
We want the best for our customers, so if you have any comments or suggestions regarding this topic, please send us an email to the Cisco Content Team.
AnyConnect App
The Anyconnect App can be downloaded from the Google Play store or the Apple store.
Источник


