- How to set up a Linux VPN server (Beginner’s Guide)
- Requirements
- Install and Configure VPN
- Server computer
- Client computer
- Connect to a VPN
- Command line
- Graphical connection in Network Manager
- Troubleshooting
- Add more VPN users
- Лучшие VPN сервисы для Linux
- 1. PIA — Private Internet Access
- 2. ExpressVPN
- 3. AirVPN
- 4. NordVPN
- 5. Mullvad
- 6. ProtonVPN
- 7. SecurityKISS
- 8. VPNBook
- 9. Свой VPN сервер
- Выводы
How to set up a Linux VPN server (Beginner’s Guide)
A VPN, or Virtual Private Network, creates an encrypted tunnel between your computer and a remote server. This has two major advantages. First, you mask your real location because you will have the IP address of the VPN server. Second, all the traffic between your computer and the server is encrypted. So, if you connect to a public WiFi, your data remains safe even if it intercepted by someone. Similarly, your Internet Service provider cannot read your data.
There are three ways to get a VPN service.
- You can get a free VPN. This is obviously the worst option because there is nothing free and most likely such VPN providers sell your data to the third parties. Free VPN is also usually very slow.
- You can sign up for a VPN service for a monthly fee. This is the most popular option. It is more reliable than a free VPN but you have to trust your VPN provider.
- You can get a personal VPN on your own server. This is the most secure option because you have maximum control over your traffic.
This post is about the third option.
Requirements
To get your own personal VPN, you need two computers:
A client computer, most likely it is your home computer or a laptop. You use it to connect to a VPN.
A private server, this where you install a VPN and use it as a VPN provider. This can be your own physical server or a virtual server.
There are several programs you can use to configure personal VPN. I will use OpenVPN. It is open-source, it is available in all Linux distro and I believe it is one of the most popular VPN programs.
Install and Configure VPN
Server computer
You need to install OpenVPN and cURL programs:
cURL is needed to download the VPN installation script openvpn-install.sh. This script makes the installation very easy and error save. You can, of course, install everything manually, and there are good instructions on how to do that on Debian Wiki or Arch Linux Wiki. But I believe most of my readers prefer the simplest ways. This VPN installation script is a result of the work of 36 contributors, you can check what it does, and I personally trust it.
So, you need to download the script and make it executable:
Then run this script as a superuser to install and configure OpenVPN on your server:
You need to follow the assistant and answer a few questions. You can keep everything by default, just press Enter for every question. Only give a name to your VPN configuration and I also recommend to encrypt the configuration with a password:
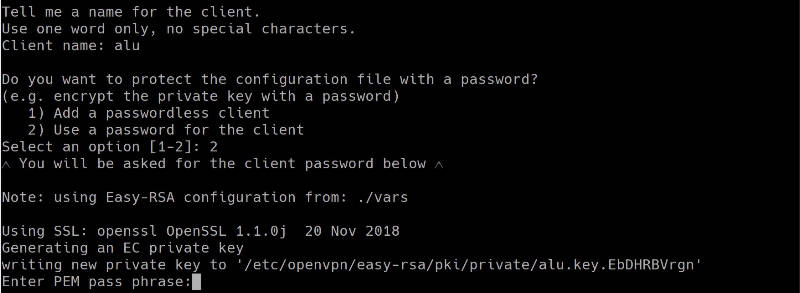
When everything is done. You should see a file that ends with .ovpn . This is a configuration file you will need to configure the client computer.

Client computer
On a client computer, also install OpenVPN and OpenVPN extension for your network manager:
I install networkmanager-openvpn for Plasma 5 on Arch Linux. Search for these two packages in your distro. Their names may differ slightly. If you use Ubuntu GNOME, for example, you need to install networkmanager-openvpn-gnome :
Next, download the VPN configuration file from your server:
The file will be downloaded to your local Downloads folder.
You can also use FileZilla if you prefer graphical programs. I explained how to use FileZilla and scp command in my previous post.
Connect to a VPN
First, I will show you the command line way to connect to a VPN. This way is more reliable and you make sure that your VPN works. Next, configure your graphical network manager.
Command line
So, copy the downloaded *.ovpn configuration file to the client folder of your OpenVPN:
Test the connection:
You may need to enter the password if you set one and then you will see something like this:

If you do not see any error, your VPN works fine. To test it, open your internet browser and visit any website. You can also check your public IP address and it should be your server address.

Graphical connection in Network Manager
Although I like the command line, it is much nice to be able to connect to the VPN with just with one click from your system tray:

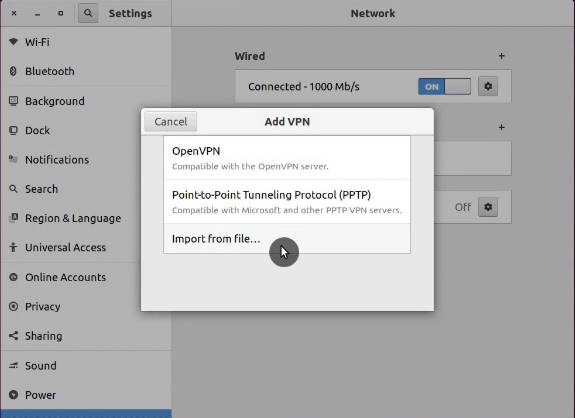
So, to add your VPN configuration to the Network Manager, open the Network Manager settings. Click on Add new connection, and import the configuration file you have downloaded from the server:
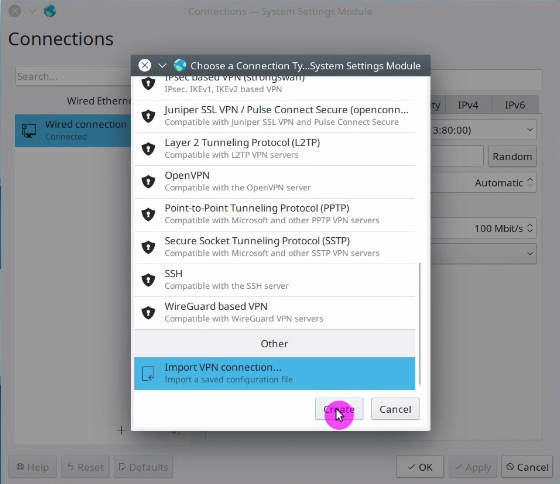
Above screenshots are from Plasma 5 Network Manager. It is almost the same in GNOME and other desktops. Just find an option to import the connection.
After that, you should see a new connection in your connection list. Try to enable it. If you see that your Network Manager icon changed, this means your VPN works. You can go to your web browser and test it.
Troubleshooting
When you start your OpenVPN connection from the command line, you will see errors right on the screen if somethings does not work. Try to understand what it says. If you do not how to fix it, google that error message.
However, when you configure the graphical interface of the Network Manager, you do not see detailed error information if it happens. You need to check the errors in your logs with this command:
For example, I did not succeed to connect to my VPN in Plasma 5 the first time. I imported the configuration and I saw that the system tried to connect, but failed after some time:

Checking the log files revealed that TLS certificate was missing:

My Network Manager imported all certificated except the TLS one. From my experience, importing the connection configuration works flawlessly in the GNOME Network Manager. But other network managers may not recognize all settings during the importing. Probably, this is because the script is optimized for GNOME. So, you may need to correct some importing errors manually.
Open the configuration file *.ovpn with a text editor and make sure you have the corresponding settings in your Network Manager.
If some certificates are missing in your Network Manager, copy it from the configuration file and save as a *.crt file on your computer. Usually, all the Network Manager certificates are stored in

You can see the screenshots of my configuration after I corrected all errors:
You may also need to change the permissions of all the certificates.
This is how I was able to troubleshoot my Plasma 5 VPN connection. Obviously, I cannot guess all the possible problems that can arise during your installation and configuration of a personal VPN service.
Add more VPN users
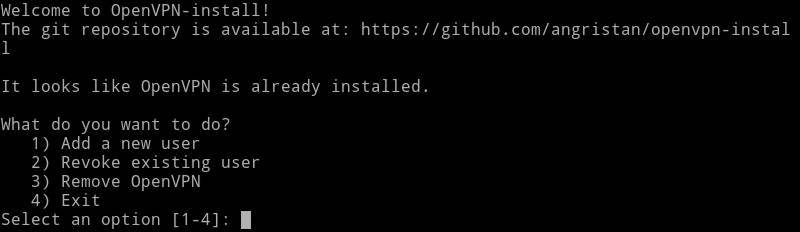
When you run the scrip openvpn-install.sh the first time, it creates a connection for one uses. However, if you run it again it, will offer you an option to add more users:
Select option 1. Add a new user and follow the instructions. The instructions are the same as above. Just provide a different Client name and you will see newuser.ovpn configuration file. Use it to connect a new user to this VPN server.
As you can see from the screenshot, running openvpn-install.sh again also gives you options to revoke a user, and remove OpenVPN from the server.
So, if you have ever thought about setting up a personal VPN, now you know how to do that. A personal VPN server is not only more secure in terms of privacy but it can also be cheaper. For example, if you connect your whole family to one VPN server, this option will be cheaper than subscribing your whole family to several VPN accounts by subscription.
Источник
Лучшие VPN сервисы для Linux
После шумихи вокруг Windows 10 пользователи начали понимать, что эта система небезопасна и может распространять личную информацию. Все больше и больше новых пользователей начинают искать альтернативы среди открытых систем. Пользователям нужна система, которая не шпионит за их данными, и обеспечивает максимальную безопасность и конфиденциальность. Для обеспечения большей анонимности в интернете можно использовать VPN сервисы.
Но когда в Ubuntu, Fedora, OpenSUSE или других дистрибутивах Linux доходит дело до VPN, у пользователей могут возникнуть проблемы. Для разработчиков важнее пользователи Windows, а Linux до сих пор еще не в приоритете. В этой статье мы рассмотрим лучшие VPN для Linux, которые вам обязательно будут полезными. В списке будут как платные так и бесплатные сервисы.
Обычно, для подключения VPN в Linux используются такие технологии, как OpenVPN или OpenConnect. Но будет намного лучше, если VPN провайдер выпускает свой клиент для Linux. Его намного проще настроить, и здесь есть намного больше функций. Большинство VPN в этом списке имеют свой клиент для операционной системы Linux.
1. PIA — Private Internet Access

Провайдер Private Internet Access — это один из лучших и самых распространенных VPN на сегодняшний день. Он доступный, позволяет подключить сразу несколько устройств, предлагает приемлемую скорость работы сети, а также полностью безопасен. В том числе, это один из самых популярных VPN сервисов для Linux. Это вполне заслужено. Здесь используется OpenVPN с шифрованием с помощью 256 битного AES ключа. У сервиса есть свой клиент как для Debian, так и для Red Hat систем. Причём с графическим интерфейсом. Но учитывая все преимущества сервиса, стоит он не дешево — 3,33 евро в месяц при оплате за год.
2. ExpressVPN

Компания ExpressVPN выпустила свой официальный клиент для Linux в апреле 2016. К сожалению, графического интерфейса пока нет и программа работает только из командной строки. Но это все ещё намного проще чем настройка отдельных конфигурационных файлов.
Список серверов всегда будет в актуальном состоянии, и вы можете переключиться между протоколами UDP и TCP при работе по OpenVPN. Самым большим недостатком этого VPN для Linux есть цена. Сервис стоит вдвое больше чем PIA. В течение 30 дней сервис возвращает деньги, так что вы можете попробовать VPN бесплатно. Но у серверов более внушительные характеристики, а скорость сети намного больше. ExpressVPN работает на Ubuntu, Fedora, Debian и CentOS. Одновременно вы можете подключить до трех устройств.
3. AirVPN

AirVPN предлагает официальные клиенты для дистрибутивов Linux — Debian, Ubuntu, OpenSUSE и Fedora, а также есть ARM версия для работы на Raspberry Pi. Вы можете использовать его как из командной строки, так и через графический интерфейс. Здесь больше всего настроек безопасности. Вы можете подключиться с помощью OpenVPN, SSH или SSL, а также пересылать трафик через ряд альтернативных портов. Этот сервис тоже платный, цена примерно как и у PIA.
4. NordVPN

Сервис NordVPN выпустил отдельное приложение для Linux только в 2018 году, но оно работает только в терминале, без графического интерфейса. Вы можете использовать его или настроить всё вручную по протоколам OpenVPN или IKEv2 или PPTP. Сам VPN размещён в Панаме и разработчики заявляют, что они не хранят логов. Параллельно можно использовать шесть соединений Кроме того серверы NordVPN расположены в более чем 60 странах. По цене этот сервис дороже за все предыдущие. При оплате за год получается примерно 5 долларов в месяц.
5. Mullvad

Сервис Mullvad пошел еще дальше и предлагает клиент с открытым исходным кодом для Debian и Ubuntu. Поддерживаются такие функции, как отключение интернета, защита от утечки DNS, маршрутизация IPv6. Сервис ведет журналы, но не логи соединений, поэтому в плане безопасности он надежный. Одновременно можно использовать три соединения. Также доступно перенаправление портов. Выбор серверов ограничен, но это допустимо. На официальном сайте есть пакеты для Debian и Ubuntu, но программа будет работать в большинстве дистрибутивов.
6. ProtonVPN

Ещё один не очень дорогой VPN, у которого есть консольный клиент для Linux. С помощью него вы можете просматривать список доступных серверов и настраивать подключения. Не может не радовать то, что приложение распространяется с открытым исходным кодом и работает в Ubuntu, Fedora, Manjaro, Arch Linux, Kali и Solus. Для соединения используется протокол OpenVPN. Компания заявляет, что они не ведут логи соединений, а также их VPN интегрирован с сетью Tor. Что касается цены, то VPN доступен за 4 евро в месяц. Дальше рассмотрим лучшие бесплатные VPN.
7. SecurityKISS
Все сервисы, что мы рассматривали выше — платные, они более надежны. Ни один из них не ведет логов подключений, а это значит, что к вашей информации никто не сможет получить доступ: ни злоумышленники, ни правоохранительные органы. В бесплатных сервисах все намного по-другому. Многие из них ведут логи, а также используют небезопасные протоколы связи.
Это еще один лучший бесплатный VPS для Linux, у которого есть официальный клиент для этой операционной системы. Поддерживаются различные протоколы работы в том числе SSH, FTP, RDP, Telnet и так далее. Но как и у других бесплатных VPS здесь есть несколько минусов. Компания хранит журналы и IP адреса пользователей, а это не желательно для тех, кто хочет защитить свою конфиденциальность. Также в бесплатной версии количество доступного трафика ограничено 300 мегабайт в сутки, а это очень мало.
8. VPNBook
Неплохой бесплатный VPN для Linux, работающий по протоколу OpenVPN и PPTP. Здесь нет своего клиента для этой операционной системы, поэтому вам придется установить клиент OpenVPN чтобы настроить его. Главное неудобство здесь, это необходимость время от времени смотреть пароль от VPN сервиса на сайте и обновлять его в своей конфигурации.

9. Свой VPN сервер
Как видите, платные VPN серверы, дорогие, а бесплатные всегда либо сложные в настройке, либо делают не совсем то, что вам нужно. Вы всегда можете купить недорогой виртуальный сервер, который обойдётся вам в 100 рублей в месяц если брать в России и настроить на нём свой OpenVPN сервер. Благо это не так сложно. На нашем сайте есть подробная инструкция по простой настройке OpenVPN. Минус такого подхода в том, что вам придется самому обслуживать этот сервер, исправлять возникающие ошибки и клиента для простой настройки здесь не будет, зато это дешевле.
Выводы
Даже если провайдер VPN не предоставляет официального клиента для Linux, почти все они могут быть настроены с помощью OpenVPN. В этой статье мы рассмотрели лучшие VPN для Linux, причем как бесплатные, так и платные, поэтому вы сможете выбрать то что вам нужно. Бесплатные VPN для Linux имеют свои ограничения, но в некоторых ситуациях с этим можно мириться. А вы используете VPN для работы в сети? Какие бесплатные сервисы могли бы посоветовать другим пользователям? Напишите в комментариях!
Кстати, если вы занимаетесь разработкой на PHP, возможно вам будет интересна статья — настройка Xdebug в PhpStorm.
На завершение небольшая лекция, о том, что такое VPN и как работает эта технология:
Источник


