- Как установить код Visual Studio на Ubuntu 20.04
- Установка кода Visual Studio в виде Snap-пакета
- Установка кода Visual Studio с помощью apt
- Запуск кода Visual Studio
- Выводы
- Running VS Code on Linux
- Installation
- Debian and Ubuntu based distributions
- RHEL, Fedora and CentOS based distributions
- openSUSE and SLE based distributions
- AUR package for Arch Linux
- Installing .rpm package manually
- Updates
- Node.js
- Setting VS Code as the default text editor
- xdg-open
- Debian alternatives system
- Next Steps
- Common Questions
- Azure VM Issues
- Debian and Moving Files to Trash
- error ENOSPC
- I can’t see Chinese characters in Ubuntu
- Package git is not installed
- The code bin command does not bring the window to the foreground on Ubuntu
- Установка Microsoft Visual Studio Code на Ubuntu 20.04
- Требование к установке
- Установка Visual Studio с помощью пакета snap
- Установка Visual Studio Code из репозиториев Microsoft
- Запуск Visual Code Studio
- Заключение
- Видео Как установить Microsoft Visual Studio Code на Ubuntu
- Visual Studio Code on Linux
- Installation
- Debian and Ubuntu based distributions
- RHEL, Fedora, and CentOS based distributions
- openSUSE and SLE-based distributions
- AUR package for Arch Linux
- Nix package for NixOS (or any Linux distribution using Nix package manager)
- Installing .rpm package manually
- Updates
- Node.js
- Setting VS Code as the default text editor
- xdg-open
- Debian alternatives system
- Windows as a Linux developer machine
- Windows Subsystem for Linux
- Next steps
- Common questions
- Azure VM Issues
- Debian and moving files to trash
- Conflicts with VS Code packages from other repositories
- «Visual Studio Code is unable to watch for file changes in this large workspace» (error ENOSPC)
- I can’t see Chinese characters in Ubuntu
- Package git is not installed
- The code bin command does not bring the window to the foreground on Ubuntu
- Cannot install .deb package due to «/etc/apt/sources.list.d/vscode.list: No such file or directory»
- Cannot move or resize the window while X forwarding a remote window
- Using the custom title bar
- Broken cursor in editor with display scaling enabled
- Repository changed its origin value
Как установить код Visual Studio на Ubuntu 20.04
Visual Studio Code — это мощный редактор кода с открытым исходным кодом, разработанный Microsoft. Он имеет встроенную поддержку отладки, встроенный элемент управления Git , подсветку синтаксиса, автозавершение кода, встроенный терминал, рефакторинг кода и фрагменты.
Visual Studio Code является кроссплатформенным, доступен в Windows, Linux и macOS.
В этом руководстве показаны два способа установки Visual Studio Code на Ubuntu 20.04. VS Code можно установить как snap-пакет через магазин Snapcraft или как deb-пакет из репозиториев Microsoft.
Выберите метод установки, наиболее подходящий для вашей среды.
Установка кода Visual Studio в виде Snap-пакета
Пакет оснастки Visual Studio Code распространяется и поддерживается Microsoft.
Снапсы — это автономные программные пакеты, которые включают в двоичный файл все зависимости, необходимые для запуска приложения. Пакеты Snap легко обновить и защитить. В отличие от стандартных пакетов deb, снимки занимают больше места на диске и дольше запускают приложение.
Пакеты Snap могут быть установлены либо из командной строки, либо через приложение Ubuntu Software.
Чтобы установить привязку VS Code, откройте свой терминал ( Ctrl+Alt+T ) и выполните следующую команду:
Вот и все. Visual Studio Code установлен на вашем компьютере с Ubuntu.
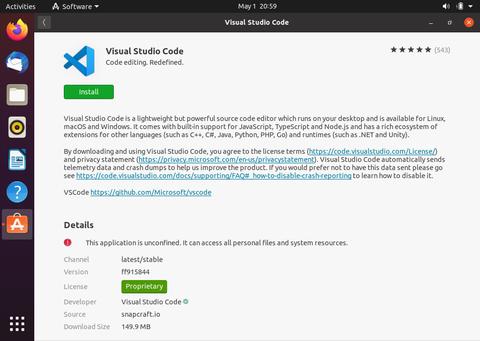
Если вы предпочитаете использовать графический интерфейс, откройте программное обеспечение Ubuntu, найдите «Код Visual Studio» и установите приложение:
Каждый раз при выпуске новой версии пакет Visual Studio Code будет автоматически обновляться в фоновом режиме.
Установка кода Visual Studio с помощью apt
Код Visual Studio доступен в официальных репозиториях Microsoft Apt. Чтобы установить его, выполните следующие действия:
Обновите индекс пакетов и установите зависимости, выполнив следующую команду от имени пользователя с привилегиями sudo :
Импортируйте ключ Microsoft GPG с помощью следующей команды wget :
И включите репозиторий Visual Studio Code, набрав:
После включения репозитория apt установите пакет Visual Studio Code:
Когда будет выпущена новая версия, вы можете обновить пакет Visual Studio Code с помощью стандартного инструмента обновления программного обеспечения на рабочем столе или выполнив следующие команды в своем терминале:
Запуск кода Visual Studio
В строке поиска действий введите «Код Visual Studio» и щелкните значок, чтобы запустить приложение.
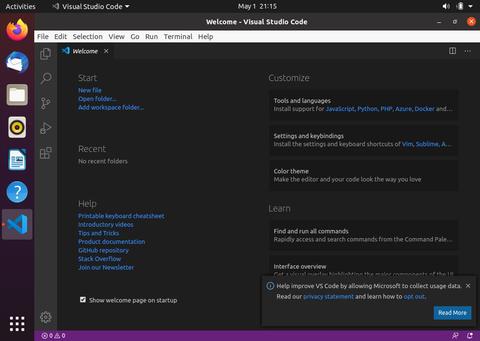
Когда вы запускаете VS Code в первый раз, должно появиться следующее окно:
Теперь вы можете приступить к установке расширений и настройке VS Code в соответствии с вашими предпочтениями.
VS Code также можно запустить из командной строки, набрав code .
Выводы
Мы объяснили, как установить VS Code в Ubuntu 20.04.
Теперь вы можете приступить к установке новых расширений и настройке своего рабочего пространства. Чтобы узнать больше о VS Code, посетите их официальную страницу документации .
Если у вас есть вопросы, оставьте комментарий ниже.
Источник
Running VS Code on Linux
Installation
Debian and Ubuntu based distributions
The easiest way to install for Debian/Ubuntu based distributions is to download and install the .deb package (64-bit) either through the graphical software center if it’s available or through the command line with:
Installing the .deb package will automatically install the apt repository and signing key to enable auto-updating using the regular system mechanism. Note that 32-bit and .tar.gz binaries are also available on the download page.
The repository and key can also be installed manually with the following script:
Then update the package cache and install the package using:
RHEL, Fedora and CentOS based distributions
We currently ship the stable 64-bit VS Code in a yum repository, the following script will install the key and repository:
Then update the package cache and install the package using dnf (Fedora 22 and above):
Or on older versions using yum :
openSUSE and SLE based distributions
The yum repository above also works for openSUSE and SLE based systems, the following script will install the key and repository:
Then update the package cache and install the package using:
AUR package for Arch Linux
There is a community maintained Arch User Repository (AUR) package for VS Code.
Installing .rpm package manually
The .rpm package (64-bit) can also be manually downloaded and installed, however auto-updating won’t work unless the repository above is installed. Once downloaded it can be installed using your package manager, for example with dnf :
Note that 32-bit and .tar.gz binaries are are also available on the download page.
Updates
VS Code ships monthly and you can see when a new release is available by checking Updates. If the VS Code repository was installed correctly, then your system package manager should handle auto-updating in the same way as other packages on the system.
Node.js
Node.js is a popular platform and runtime for easily building and running JavaScript applications. It also includes NPM, a Package Manager for Node.js modules. You’ll see Node.js and NPM mentioned frequently in our documentation and some optional VS Code tooling requires Node.js (for example, the VS Code extension generator).
If you’d like to install Node.js on Linux, see Installing Node.js via package manager to find the Node.js package and installation instructions tailored to your Linux distribution.
To learn more about JavaScript and Node.js, see our Node.js tutorial where you’ll learn about running and debugging Node.js applications with VS Code.
Setting VS Code as the default text editor
xdg-open
You can set the default text editor for text files ( text/plain ) that is used by xdg-open with the following command:
Debian alternatives system
Debian-based distributions allow setting a default editor using the alternatives system, without concern for the mime type. You can set this by running the following and selecting code.
Next Steps
Once you have installed VS Code, these topics will help you learn more about VS Code:
- Additional Components — Learn how to install Git, Node.js, TypeScript and tools like Yeoman.
- User Interface — A quick orientation to VS Code.
- User/Workspace Settings — Learn how to configure VS Code to your preferences through settings.
Common Questions
Azure VM Issues
I’m getting a «Running without the SUID sandbox» error?
You can safely ignore this error.
Debian and Moving Files to Trash
If you see an error when deleting files from the VS Code Explorer on the Debian operating system, it might be because the trash implementation that VS Code is using is not there.
Run these commands to solve this issue:
error ENOSPC
When you see this error, it indicates that the VS Code file watcher is running out of handles. The current limit can be viewed by running:
The limit can be increased to its maximum by editing /etc/sysctl.conf and adding this line to the end of the file:
The new value can then be loaded in by running sudo sysctl -p . Note that Arch Linux works a little differently, view this page for advice.
While 524288 is the maximum number of files that can be watched, if you’re in an environment that is particularly memory constrained, you may wish to lower the number. Each file watch takes up 540 bytes (32-bit) or
1kB (64-bit), so assuming that all 524288 watches are consumed that results in an upper bound of around 256MB (32-bit) or 512MB (64-bit).
I can’t see Chinese characters in Ubuntu
We’re working on a fix. In the meantime, open the application menu, then choose File > Preferences > Settings. Then set editor.fontFamily as shown:
Package git is not installed
This error can appear during installation and is typically caused by the package manager’s being out of date. Try updating it and installing again:
The code bin command does not bring the window to the foreground on Ubuntu
Running ‘code .’ on Ubuntu when VS Code is already open in the current directory will not bring VS Code into the foreground. This is a feature of the OS which can be disabled using ccsm .
Under General > General Options > Focus & Raise Behaviour, set «Focus Prevention Level» to «Off». Remember this is an OS-level setting that will apply to all applications, not just VS Code.
Источник
Установка Microsoft Visual Studio Code на Ubuntu 20.04
Разработанная и поддерживаемая Microsoft Visual Studio Code — это бесплатная кросс-платформенная среда IDE, которая позволяет пользователям разрабатывать веб-сайты, веб-приложения и программное обеспечение. Microsoft Visual Studio в основном используется для отладки, выполнения задач и контроля версий.
Он дает удобный пользовательский интерфейс с классными функциями, такими как тестирование кода, подсветка синтаксиса, рефакторинг кода и тонны полезных плагинов. Microsoft Visual Studio может быть установлена в средах Windows, Mac и Linux.
Существует два способа установки кода Visual Studio: установка с помощью официальных репозиториев Microsoft при помощи диспетчера пакетов APT. Или с помощью пакетов snap. В этой инструкции мы покажем, как установить Visual Studio Code на Ubuntu 20.04.
Требование к установке
Прежде чем начать, убедитесь, что у вас есть следующее:
- Экземпляр Ubuntu 20.04 с графическим интерфейсом
- Пользователь с правами sudo
Установка Visual Studio с помощью пакета snap
Visual Studio Code официально доступен в виде пакета snap. Пакет snap — это контейнерный пакет, содержащий код приложения и все зависимости, необходимые для его запуска. Пакеты Snap легче модернизировать и поддерживать. Программа Snap будет автоматически обновлять VS-код в фоновом режиме. Однако они занимают значительно больше места на диске.
Чтобы установить пакет Visual Studio snap, выполните следующую команду из терминала:
$ sudo snap install – classic code
Выполнение команды займет некоторое время, так что наберитесь терпения. На данный момент последней стабильной версией Microsoft Visual Studio Code является версия 1.57.1
Установка Visual Studio Code из репозиториев Microsoft
Code Visual Studio доступен из репозиториев APT Microsoft. Перед добавлением репозитория в вашу систему, сначала обновите списки пакетов в вашей системе. Сделать это можно следующим образом.
Затем установите необходимые компоненты:
$ sudo apt install software-properties-common apt-transport-https wget
Используя команду wget, импортируйте файл Microsoft GPG:
$ wget -q https://packages.microsoft.com/keys/microsoft.asc -O- | sudo apt-key add —
Вы должны получить ответ «ОК» .
После этого добавьте репозиторий Visual Code Studio, как указано в приведенной ниже команде. Это также обновит индекс пакета для синхронизации с новым репозиторием.
$ sudo add-apt-repository «deb [arch=amd64] https://packages.microsoft.com/repos/vscode stable main»
И наконец, установите Code Visual Studio, выполнив команду:
Заметил, что оба метода установили одну и ту же версию Visual Studio Code, не знаю почему, но это так.
Запуск Visual Code Studio
После установки Visual Code Studio вы можете запустить его с помощью менеджера приложений, как показано ниже.
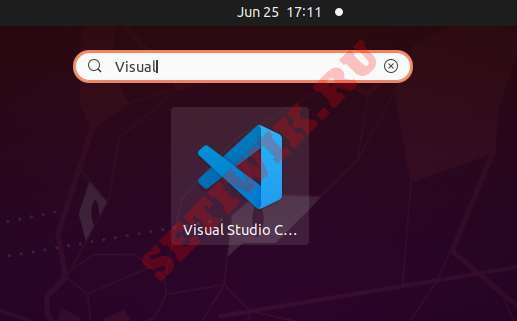 Запуск Visual Studio Code в убунту
При нажатии на значок запускается интерфейс Visual Studio Code, как показано на рисунке. Выберите свою любимую тему, и продолжите работу!
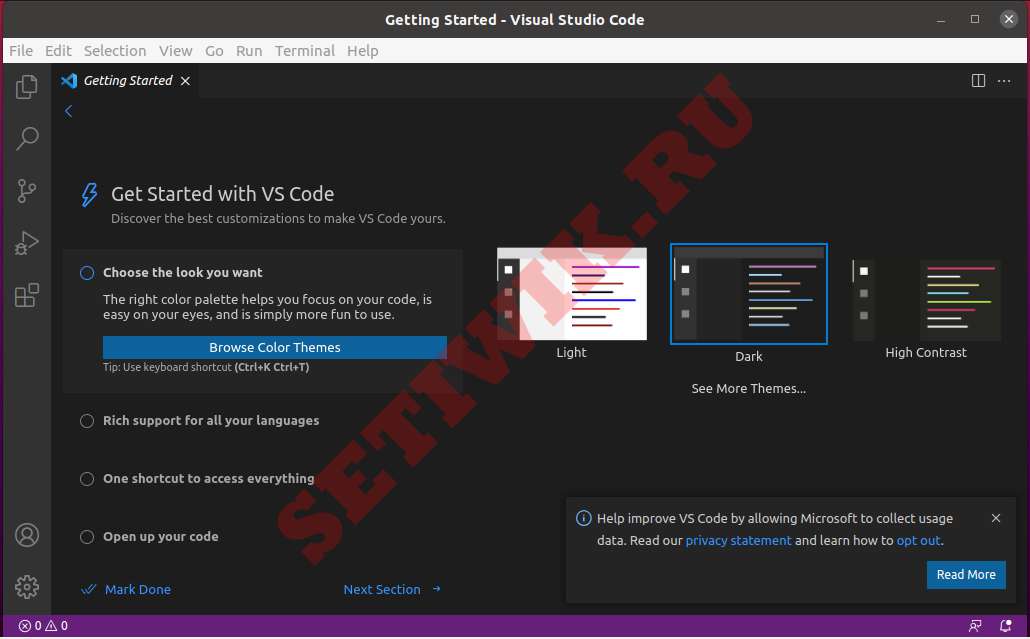 Интерфейс Microsoft Visual Studio Code
Заключение
Microsoft Visual Studio Code, возможно, является одним из самых многофункциональных и интуитивно понятных редакторов кода. Если вы новичок или опытный пользователь, вы можете подумать о том, чтобы провести его тестовый запуск. В этой статье мы продемонстрировали, как установить Visual Studio Code на Ubuntu 20.04.
Видео Как установить Microsoft Visual Studio Code на Ubuntu
Небольшой ролик о том как выполнить установку.
Источник
Visual Studio Code on Linux
Installation
See the Download Visual Studio Code page for a complete list of available installation options.
By downloading and using Visual Studio Code, you agree to the license terms and privacy statement.
Debian and Ubuntu based distributions
The easiest way to install Visual Studio Code for Debian/Ubuntu based distributions is to download and install the .deb package (64-bit), either through the graphical software center if it’s available, or through the command line with:
Note that other binaries are also available on the VS Code download page.
Installing the .deb package will automatically install the apt repository and signing key to enable auto-updating using the system’s package manager. Alternatively, the repository and key can also be installed manually with the following script:
Then update the package cache and install the package using:
RHEL, Fedora, and CentOS based distributions
We currently ship the stable 64-bit VS Code in a yum repository, the following script will install the key and repository:
Then update the package cache and install the package using dnf (Fedora 22 and above):
Or on older versions using yum :
Due to the manual signing process and the system we use to publish, the yum repo may lag behind and not get the latest version of VS Code immediately.
Visual Studio Code is officially distributed as a Snap package in the Snap Store:

You can install it by running:
Once installed, the Snap daemon will take care of automatically updating VS Code in the background. You will get an in-product update notification whenever a new update is available.
Note: If snap isn’t available in your Linux distribution, please check the following Installing snapd guide, which can help you get that set up.
Learn more about snaps from the official Snap Documentation.
openSUSE and SLE-based distributions
The yum repository above also works for openSUSE and SLE-based systems, the following script will install the key and repository:
Then update the package cache and install the package using:
AUR package for Arch Linux
To get more information about the installation from the AUR, please consult the following wiki entry: Install AUR Packages.
Nix package for NixOS (or any Linux distribution using Nix package manager)
There is a community maintained VS Code Nix package in the nixpkgs repository. In order to install it using Nix, set allowUnfree option to true in your config.nix and execute:
Installing .rpm package manually
The VS Code .rpm package (64-bit) can also be manually downloaded and installed, however, auto-updating won’t work unless the repository above is installed. Once downloaded it can be installed using your package manager, for example with dnf :
Note that other binaries are also available on the VS Code download page.
Updates
VS Code ships monthly and you can see when a new release is available by checking the release notes. If the VS Code repository was installed correctly, then your system package manager should handle auto-updating in the same way as other packages on the system.
Note: Updates are automatic and run in the background for the Snap package.
Node.js
Node.js is a popular platform and runtime for easily building and running JavaScript applications. It also includes npm, a Package Manager for Node.js modules. You’ll see Node.js and npm mentioned frequently in our documentation and some optional VS Code tooling requires Node.js (for example, the VS Code extension generator).
If you’d like to install Node.js on Linux, see Installing Node.js via package manager to find the Node.js package and installation instructions tailored to your Linux distribution. You can also install and support multiple versions of Node.js by using the Node Version Manager.
To learn more about JavaScript and Node.js, see our Node.js tutorial, where you’ll learn about running and debugging Node.js applications with VS Code.
Setting VS Code as the default text editor
xdg-open
You can set the default text editor for text files ( text/plain ) that is used by xdg-open with the following command:
Debian alternatives system
Debian-based distributions allow setting a default editor using the Debian alternatives system, without concern for the MIME type. You can set this by running the following and selecting code:
If Visual Studio Code doesn’t show up as an alternative to editor , you need to register it:
Windows as a Linux developer machine
Another option for Linux development with VS Code is to use a Windows machine with the Windows Subsystem for Linux (WSL).
Windows Subsystem for Linux
With WSL, you can install and run Linux distributions on Windows. This enables you to develop and test your source code on Linux while still working locally on a Windows machine. WSL supports Linux distributions such as Ubuntu, Debian, SUSE, and Alpine available from the Microsoft Store.
When coupled with the Remote — WSL extension, you get full VS Code editing and debugging support while running in the context of a Linux distro on WSL.
See the Developing in WSL documentation to learn more or try the Working in WSL introductory tutorial.
Next steps
Once you have installed VS Code, these topics will help you learn more about it:
- Additional Components — Learn how to install Git, Node.js, TypeScript, and tools like Yeoman.
- User Interface — A quick orientation to VS Code.
- User/Workspace Settings — Learn how to configure VS Code to your preferences through settings.
Common questions
Azure VM Issues
I’m getting a «Running without the SUID sandbox» error?
You can safely ignore this error.
Debian and moving files to trash
If you see an error when deleting files from the VS Code Explorer on the Debian operating system, it might be because the trash implementation that VS Code is using is not there.
Run these commands to solve this issue:
Conflicts with VS Code packages from other repositories
Some distributions, for example Pop!_OS provide their own code package. To ensure the official VS Code repository is used, create a file named /etc/apt/preferences.d/code with the following content:
«Visual Studio Code is unable to watch for file changes in this large workspace» (error ENOSPC)
When you see this notification, it indicates that the VS Code file watcher is running out of handles because the workspace is large and contains many files. Before adjusting platform limits, make sure that potentially large folders, such as Python .venv , are added to the files.watcherExclude setting (more details below). The current limit can be viewed by running:
The limit can be increased to its maximum by editing /etc/sysctl.conf (except on Arch Linux, read below) and adding this line to the end of the file:
The new value can then be loaded in by running sudo sysctl -p .
While 524,288 is the maximum number of files that can be watched, if you’re in an environment that is particularly memory constrained, you may want to lower the number. Each file watch takes up 1080 bytes, so assuming that all 524,288 watches are consumed, that results in an upper bound of around 540 MiB.
Arch-based distros (including Manjaro) require you to change a different file; follow these steps instead.
Another option is to exclude specific workspace directories from the VS Code file watcher with the files.watcherExclude setting. The default for files.watcherExclude excludes node_modules and some folders under .git , but you can add other directories that you don’t want VS Code to track.
I can’t see Chinese characters in Ubuntu
We’re working on a fix. In the meantime, open the application menu, then choose File > Preferences > Settings. In the Text Editor > Font section, set «Font Family» to Droid Sans Mono, Droid Sans Fallback . If you’d rather edit the settings.json file directly, set editor.fontFamily as shown:
Package git is not installed
This error can appear during installation and is typically caused by the package manager’s lists being out of date. Try updating them and installing again:
The code bin command does not bring the window to the foreground on Ubuntu
Running code . on Ubuntu when VS Code is already open in the current directory will not bring VS Code into the foreground. This is a feature of the OS which can be disabled using ccsm .
Under General > General Options > Focus & Raise Behaviour, set «Focus Prevention Level» to «Off». Remember this is an OS-level setting that will apply to all applications, not just VS Code.
Cannot install .deb package due to «/etc/apt/sources.list.d/vscode.list: No such file or directory»
This can happen when sources.list.d doesn’t exist or you don’t have access to create the file. To fix this, try manually creating the folder and an empty vscode.list file:
Cannot move or resize the window while X forwarding a remote window
If you are using X forwarding to use VS Code remotely, you will need to use the native title bar to ensure you can properly manipulate the window. You can switch to using it by setting window.titleBarStyle to native .
Using the custom title bar
The custom title bar and menus were enabled by default on Linux for several months. The custom title bar has been a success on Windows, but the customer response on Linux suggests otherwise. Based on feedback, we have decided to make this setting opt-in on Linux and leave the native title bar as the default.
The custom title bar provides many benefits including great theming support and better accessibility through keyboard navigation and screen readers. Unfortunately, these benefits do not translate as well to the Linux platform. Linux has a variety of desktop environments and window managers that can make the VS Code theming look foreign to users. For users needing the accessibility improvements, we recommend enabling the custom title bar when running in accessibility mode using a screen reader. You can still manually set the title bar with the Window: Title Bar Style ( window.titleBarStyle ) setting.
Broken cursor in editor with display scaling enabled
Due to an upstream issue #14787 with Electron, the mouse cursor may render incorrectly with scaling enabled. If you notice that the usual text cursor is not being rendered inside the editor as you would expect, try falling back to the native menu bar by configuring the setting window.titleBarStyle to native .
Repository changed its origin value
If you receive an error similar to the following:
Use apt instead of apt-get and you will be prompted to accept the origin change:
Источник


