- Using VST plug-ins on Windows
- How to install and activate VST plug-ins on Windows
- VST plug-in locations on Windows
- Vst folder on windows
- Vst folder on windows
- How to Install VST Plugins on a DAW (Flstudio, Cubase, Ableton..)
- How to install a VST plugin on a DAW? The Easy Step-by-Step Guide with Pictures:
- How to Find Your Plugins
- How to find VST plugins on a DAW:
- How to Install VST plugins on Fl studio
- How to Install VST plugins on Ableton
- Installing Plugins on Logic Pro X
- How to Install VST on Cubase
- Install VST plug-ins on Pro Tools
- How Install VST plugins on other DAWS
Using VST plug-ins on Windows
- Live Versions: All
- Operating System: Windows
VST plug-ins are instruments and effects from third-party manufacturers that can be installed and used in Live. VST2 plug-ins use the .dll file extension. VST3 plug-ins use the .vst3 file extension.
How to install and activate VST plug-ins on Windows
1. Download the latest installer file from the plug-in manufacturer’s website and run it.
2. Some plug-ins may also have a standalone version which is separate from the VST version. Don’t install the standalone and VST versions to the same folder.
3. Depending on the plug-In format, you can either install to a default folder and/or to a custom folder of your choice. Here are some recommendations for existing folders that you can use:
VST2 plug-ins: C:\Program Files\VSTPlugins
Note: Live 10 and 11 are only available in 64-bit, so 32-bit plug-ins aren’t supported. Likewise, 64-bit plug-ins won’t appear in 32-bit versions of Live.
4. Once installed, launch Live.
5. Open Preferences → Plug-Ins → Plug-In Sources
Note: If you are using a Live version prior to 10.1., you will find it under Preferences → File/Folder → Plug-In Sources.
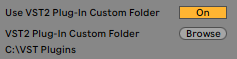
6. Enable Use VST2 Plug-In Custom Folder and click Browse to select the location of your VST2 Plug-Ins:
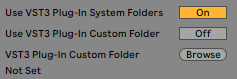
7. Enable Use VST3 Plug-In System Folders to activate your VST3 plug-ins. In case you prefer to use or add a different VST3 folder of your choice, enable Use VST3 Plug-In Custom Folder, but note that it is not recommended to select the same location for both folders.
Note: only add discrete folders that contain VST plug-ins. Adding entire drives or system folders may crash Live. Make sure that the folder contains only VST .dll files. Other system files can use the .dll extension too, but they may crash Live if included in the VST folder.
8. Live scans all available plug-ins and once completed they will show up in Live’s browser under Plug-Ins.
9. If you’ve installed the plug-in correctly but it’s still not appearing in Live, see our dedicated article: VST/AU plug-in doesn’t appear in Live.
VST plug-in locations on Windows
An installed plug-in is missing in your VST host application or you just wonder where your VST plug-ins (virtual instruments and effects) are located? This article provides detailed information on VST plug-in installation paths on Windows.
First of all, it is important to understand that not all VST plug-ins are being installed into the same folder. The installation path of a plug-in depends on several factors:
- VST format: VST2 or VST3?
- Operating system
- Manufacturer
- 32-bit or 64-bit architecture
- Customization
VST3 Plug-in path
The VST3 format has a dedicated installation path all VST3 plug-ins must comply with. All your VST3 plug-ins should be installed here:
| Format | Path | Extension |
| VST3 | C:\Program Files\Common Files\VST3 32-bit VST3 plug-ins on 64-bit Windows: C:\Program Files (x86)\Common Files\VST3 | .vst3 |
VST2 Plug-in paths
As the VST2 standard does not know a dedicated installation folder, VST2 plug-in installers usually let the user select an installation path. But VST2 plug-ins can also have a fixed installation path predefined by the manufacturer. In this case, only the documentation can tell you where to find the plug-in.
The original installation path used when VST had been introduced in 1996 is C:\Program Files\Steinberg\VSTPlugins. Since then, many different plug-in manufacturers used many different folders. In general, it’s not easy for users to keep track of their VST2 plug-ins, which is why VST plug-ins installations often are all over the place even on well-maintained Windows systems.
To prevent a plug-in mess, it is recommended to decide on a single installation folder for all VST2 plug-ins and stick with it as far as possible.
Since it corresponds to the defined VST3 plug-in folder, this path is a good choice for all VST2 plug-ins:
C:\Program Files\Common Files\VST2
32-bit plug-ins on 64-bit Windows: C:\Program Files (x86)\Common Files\VST2
Any other folder your VST host application is scanning during startup by default is also suitable. But, to keep plug-in installations independent from a specific VST host release, never install plug-ins into the program folder of the VST host application or any other program!
The following chart includes other common VST2 paths. Depending on the program version, these folders are the default VST2 folders in Cubase and Nuendo.
| Format | Path | Extension |
| VST2 | C:\Program Files\VSTPlugins C:\Program Files\Steinberg\VSTPlugins C:\Program Files\Common Files\VST2 C:\Program Files\Common Files\Steinberg\VST2 32-bit plug-ins on 64-bit Windows: C:\Program Files (x86)\Steinberg\VstPlugins | .dll |
In any case, remember that your VST host application must know the installation paths of your VST2 plug-ins.
In Cubase and Nuendo, the list of monitored VST2 folders can be managed here:
| Cubase 8/Nuendo 7 or later | Devices > Plug-in Manager > Plug-in Manager Settings (click on gear symbol) |
| older Cubase/Nuendo versions | Devices > Plug-in Information > VST Plug-ins > VST 2.x Plug-in Paths |
Plug-ins can consist of several files on the hard disk and might be spread over several folders. Apart from that, the original installation path might be stored in the registry of Windows. Therefore, moving a plug-in from one folder to a different folder can render it unusable. In many cases, uninstalling and reinstalling a plug-in is the better way, if you really need to change the installation path of a plug-in. Also remember that your VST host application must know the new installation path.
Many plug-in installers offer to choose a custom installation path for sample content and other libraries. In this case, plug-in and related content is being installed separately. The content management (adding, moving or deleting content) is plug-in specific. Please refer to the plug-in’s documentation for more details.
If an installed plug-in is not available in your host application:
- Check if the installation path is actually monitored by your VST host application.
- Remember that 32-bit hosts cannot load 64-bit plug-ins while using 32-bit plug-ins in 64-bit hosts require a bridging solution. Read more.
- The plug-in installation might be corrupted (plug-in cannot be found in the expected folder or is incomplete). Check the plug-in manufacturer’s website for an update. Uninstall via Control Panel > Programs & Features and re-install the latest version of the plug-in (preferably as administrator).
Still haven’t found what you’re looking for?
Our help center provides solutions for almost any known issue.
If you cannot find an answer to your question please submit a support request using the link below.
Vst folder on windows
This is what I was hoping they would do. I actually had created the «/VST Plugins» accidentally through memory, and realized reaper was set to look in «VSTPlugins» with no space. So, I actually just renamed the folder so there was no space. I had figured plugins would all do exactly this, so I should change it to the default. But now I’m going through plugin after plugin, and it’s all going to the one with a space that I created, and so I have to redirect every single time, which sucks.
| Paths are: |
HKEY_LOCAL_MACHINE\Software\VST\, VSTPluginsPath string value (64-bit plugins)
HKEY_LOCAL_MACHINE\Software\WOW6432Node\VST\, VSTPluginsPath string value (32-bit plugins)
k, thx, I’ll check it out.
Installers assume Program Files by default but that isn’t the real issue. Here is the important part.
There are two install locations, metadata such as presets, settings, manuals and so on, those do NOT go into the same directory as the plugin or you’ll end up with the dreaded «Reaper takes forever to scan plugins» problem.
Then there is the location of the actual plugin VST/DLL. so it’s better to properly direct the installer to both locations during the install and chances are the program files location for most meta data is fine, or your own apps directory if you want to move it but you really should keep them separate. The installer in most cases should ask you this, first the metadata location, then where you want the actual VST.
I wouldn’t change the default in the registry if it exists, it’s just asking for trouble when you have to deal with installing non-VST applications and so on because the registry setting knows or cares nothing about VSTs, only that something is being installed as if it were a program.
Vst folder on windows
The third-party plugins should not be placed in that folder as it is intended for Reaper-installed plugins only (not VST(i)s).
Instead create a plug-ins folder of your own, e.g. in Windows XP:
C:\Program Files\VST Plugins
or C:\VST Plugins
and install your VST plugins there (or into sub-folders in that folder).
That is the path you select in Reaper’s Preferences.
Coping/pasting plugins that have been installed may or may not work — the installers may have put pointers elsewhere to the installed locations and these would no longer work. Updates may not work either. It is best to uninstall them completely and reinstall them.
with categories like this:
I decided to go for:
Then they’re organised in three subfolders
C:\Program Files\VSTPlugIns\VST
C:\Program Files\VSTPlugIns\VST Tools
C:\Program Files\VSTPlugIns\VSTi
Except for my Line 6 plugins, which I decided to leave where they’re installed. So my VST plug in path in Reaper is defined as:
C:\Program Files\VSTPlugIns;C:\Program Files\Line6\VST Plugins;C:\Program Files\Line6\POD Farm\VST;C:\Program Files\Line6\POD Farm 2\VST
I suppose if I were starting again I’d group everything under:
C:\VSTPlugIns
I am flooded with VST’s.
Also I have two different os partitions on my system.
My laptop is assigned by my school, I am a teacher.
I use c drive — for the school partition — the image that they have.
I created another partition e for dux nlite.
Both are using xp pro — when I boot to C, the e partition is hidden to prevent interaction with the dux install.
I often need to use reaper while booted on C.
I had two different installs of reaper for a while.
Then I cut back to having reaper install on C with a portable install on the dux partition.
I found syncing them was a pain.
And I was forced to have two separate VST folders, one on each partition in \Program files\steinberg\vstplugins.
Ok — maybe I wasn’t forced, but it was the decision I made at the time.
Now I have another partition f: that I put a portable install of reaper on and removed the other installs and use reaper from either xp or dux.
Now I want to move all the vsts to another partition f:\vst
and have the portable reaper point to them where they are, instead of having two of each.
Installs are going to be a big drag on both os’s and weird drive mapping (different letters depending on which os is booted. ugh.
This will also give me an excuse to thin out my bloated yacht of vsts.
Suggestions welcome
Probably another thread — should I move to win7?
How to Install VST Plugins on a DAW (Flstudio, Cubase, Ableton..)

How to install a VST plugin on a DAW? The Easy Step-by-Step Guide with Pictures:
VST Plug-ins do not always work alone. They are intended to complement a music software that is called a “VST host”, or a “DAW”. It is this DAW software that will allow plugins to be used and that will provide an environment to manage them. If you encounter some difficulties to install a VST plugin, read the guide!
There are many VST hosts. While most known DAW (Digital Audio Workstation) are paying (Fl Studio, Ableton Live, Cubase…), but you can find free ones. Indeed, there are several free DAWs for Mac and PC environments.
[stextbox mode=’css’ shadow=”false”]For most VST host to work, your PC must have an ASIO driver. If this is not the case and you get the message “No ASIO driver!”, You can download ASIO4ALL which should solve this problem.[/stextbox]
The first thing to do after you download the plugins is to dezip them.
If they are in .zip format and are equipped with a PC, this should pose no problem: simply right click on the file allows you to access the menu offering to decompress it.
If they are in the .rar format, you will need a decompression software adapted to this format. If you do not have one, I suggest you Filezip or WinRAR which is free and does the job perfectly.
Once unzipped, you simply have to drag the .dll file into the folder of the host have reserved for plug-ins.
How to Find Your Plugins
If they are in the .exe format, it is automatic installers. Simply double-click the file and follow the instructions.
Then, you must find where your VST plugin .dll file has been installed. If you aren’t sure, the straightforward way would be to do a windows search for the file.
If this doesn’t help, uninstall the plugin, then reinstall it again and pay close attention to the installer. In most cases, the installer will ask you what location on your computer to install the plugin.
[stextbox put all your VST .dll into the same folder. It’s extremely useful especially if you work on several DAWs[/stextbox]
How to find VST plugins on a DAW:
How to Install VST plugins on Fl studio
First, as in the previous version of Fls, we have to open Fl option: option > file setting.
In the “plugin” tab you have to select the VST folder of your plugins (1) then click on “refresh plugin list” (2)
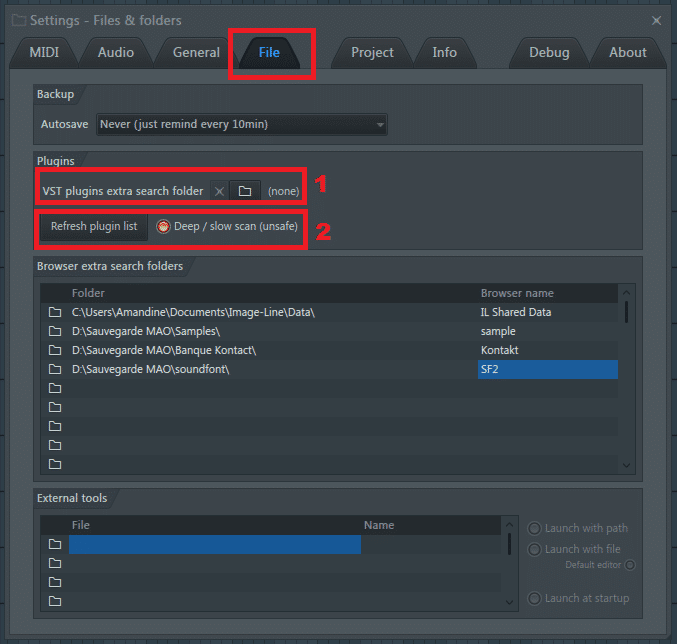
Then, in “refresh plugin list” ( a nice novelty of Fl Studio 12) you can add more files into the “scanner plugin” (plugin search paths> add path)
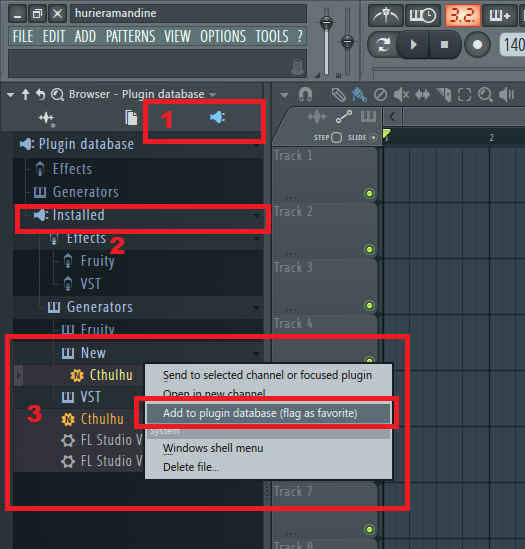
Sweet ! Fl has found all your plugin … those are now in the browser, in “plugin database”.
In my example, I’ve installed Cthulhu:
1 – Plugin Database
2 – Installed
3 – Add to plugin database
And voila! After having done all that you can find your VST finds it in the “generator” section and also in your list of VST (over those of Image Line):

The process is almost the same for previous versions of FL Studio, but you can check our guide on how to install plugins on Fl Studio.
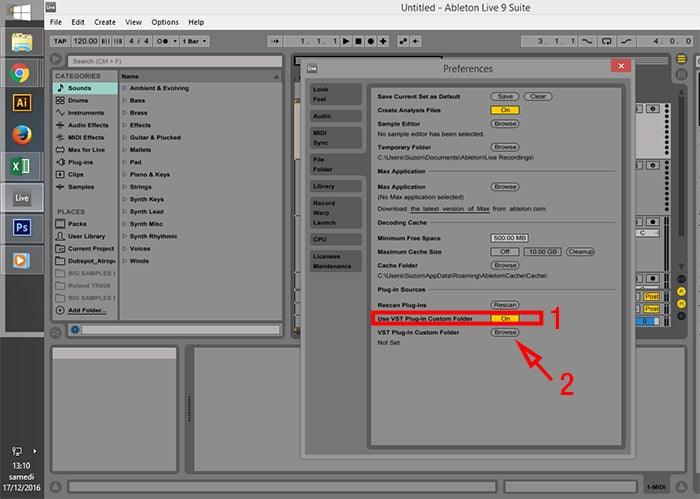
How to Install VST plugins on Ableton
On Ableton, the idea is the same. You must put the .dll of your VST into a specific folder.
Windows users:
Click on Options (1) > Preferences (2)
Preferences» width=»900″ height=»645″ data-lazy-srcset=»https://thehighestproducers.com/wp-content/uploads/2016/12/How-to-install-VST-on-Ableton-Live-9-1.jpg 900w, https://thehighestproducers.com/wp-content/uploads/2016/12/How-to-install-VST-on-Ableton-Live-9-1-775×555.jpg 775w, https://thehighestproducers.com/wp-content/uploads/2016/12/How-to-install-VST-on-Ableton-Live-9-1-768×550.jpg 768w» data-lazy-sizes=»(max-width: 900px) 100vw, 900px» data-lazy-src=»https://thehighestproducers.com/wp-content/uploads/2016/12/How-to-install-VST-on-Ableton-Live-9-1.jpg»/>
After that, you have to click on Use VST Plug-ins Custom Folder (1) (if not activated) so that you can browse your VST folder (2)
When you find the folder, just click on OK:
Finally, create a fresh session with and load your plugins from the Waveshell VST menu.
Mac Users: Live > Preferences(b) Select the File/Folder tab, and under Plug-In sources, toggle Use VST Plug-In Custom (Win)/System Folders (Mac) off and on again.(c) Hold down the [Alt/Option] key and click Rescan.
Installing Plugins on Logic Pro X
Nice video made by HyperProductionTV where they show how to download and install 3rd party plugins VST in Logic Pro X. I’ll also be explaining the difference between different file types and where the specific folders are located.
How to Install VST on Cubase
This (old but always accurate) video will show you how to install and use a VST instrument within Cubase. This covers specifically VST’s you may find out and about freely, and will generally come as a ‘*.dll’ file.
Install VST plug-ins on Pro Tools
How Install VST plugins on other DAWS
Reaper :
Go into Options> Preferences> Plug-ins> VST. Click the Add button and choose the folder that your plugin is installed.
Sibelius 7 :
Install the plugin into C:\Program Files (x86)\Avid\VSTPlugins. You can also locate the .dll file and manually copy and paste it into that folder.
Sonar :
Go to Utilities> Cakewalk Plug-in Manager. In the VST configuration section, click on Options then click Add and select the folder your VST plugin is installed to. Press OK and click the Scan VST Plug-ins button.
[stextbox Are you looking for free VSTs ? Go check out our resource page and get the best free VST instruments and effects[/stextbox]


