- Fix: VT-X is Disabled in the Bios for All CPU Modes (Verr_Vmx_Msr_All_Vmx_Disabled)
- What is causing the VT-X is Disabled in the Bios for All CPU Modes (Verr_Vmx_Msr_All_Vmx_Disabled)?
- Method 1: Verify whether your CPU supports VT-X/ AMD-V
- Method 2: Enable Virtualization Technology (VTX) from BIOS
- Method 3: Enable PAE/NX from VirtualBox Manager
- Method 4: Increasing the RAM size
- Method 5: Preventing 3rd party antivirus from interfering with hardware virtualization
- Ошибка VT-x is not available (verr_vmx_no_vmx) в Windows 10
- 1. Отключить Hyper-V
- 2. Avast
- 3. Изоляция ядра
- 4. Виртуализация в BIOS
Fix: VT-X is Disabled in the Bios for All CPU Modes (Verr_Vmx_Msr_All_Vmx_Disabled)
Several users are encountering the VT-X is Disabled in the Bios for All CPU Modes (Verr_Vmx_Msr_All_Vmx_Disabled) error when trying to open a virtual machine with VM Virtualbox. The issue is reported to occur on all the recent Windows versions and on some Ubuntu distributions. The nature of the virtual machine doesn’t seem to be important as there are reported occurrences with both Windows and Ubuntu virtual sessions that fail with the same error message.
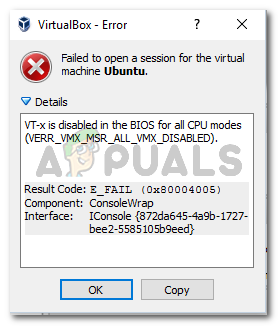 VT-x is disabled in the BIOS for all CPU modes (VERR_VMX_MSR_ALL_VMX_DISABLED
What is causing the VT-X is Disabled in the Bios for All CPU Modes (Verr_Vmx_Msr_All_Vmx_Disabled)?
We investigated this particular error message by looking at various user report and the solution that they used to fix the issue. This problem is not easy to fix since it occurs on both Windows and Linux. However, we managed to spot a few common scenarios that are known to trigger this particular error message:
- Virtualization Technology (VT-X) is disabled from BIOS – Most of the time, this particular issue occurs because VT-X is disabled from the BIOS level on the machine. A 64-bit host needs to have Virtualization Technology (VTx) enabled in the BIOS. On some machines, you’ll also need to enable Virtualization Technology Directed I/O (VTd).
- Your CPU doesn’t support VT-X / AMD-V – Another possible scenario is that your CPU is simply not equipped to support virtualization. This can occur with old setups that use an old CPU.
- PAE and NX are disabled on the host CPU – Several users have reported that the issue was resolved after they made sure that the virtualized CPU is configured to run with Physical Adress Extension (PAE) and NX.
- Allocated RAM is insufficient or exceeding the system’ capabilities – Changing the default Base Memory value has helped a lot of users encountering the same issue to resolve it entirely.
- 3rd-party security solution is interfering with VT-X Vt-D – There are several 3rd party AV clients that are known to cause interference with VirtualBox. Establishing a rule o uninstalling the Av client completely will resolve the conflict.
If you’re currently struggling to resolve this particular issue, this article will provide you with a list of quality troubleshooting steps. Below you have a collection of methods that other users in a similar situation have followed to get the issue resolved.
For the best results, follow the methods below in the order that they are presented until you encounter a fix that resolves the problem in your particular scenario.
Method 1: Verify whether your CPU supports VT-X/ AMD-V
Before you try anything else, let’s make sure that the system that you’re encountering the issue on is designed to accommodate VT-X (Intel) or AMD-V (AMD). If your CPU is old enough, it’s possible that it was simply not designed to support virtualization.
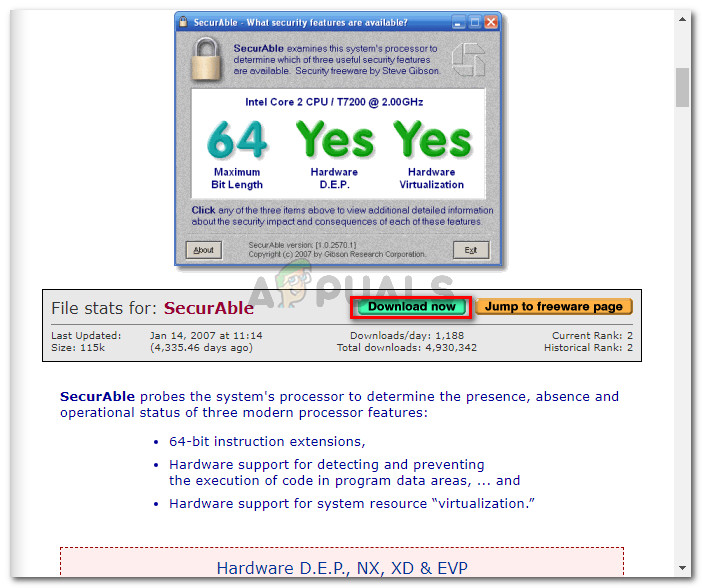
There are several methods that you can follow to verify if your CPU supports virtualization, but we’re going to take the easy route. SecurAble is a freeware that will help us determine your processor features and tell us whether virtualization is achievable.
Here’s a quick guide on downloading and using SecurAble to see whether your CPU supports virtualization:
- Visit this link (here), scroll down to the download section and click on Download now.
 Downloading SecurAble
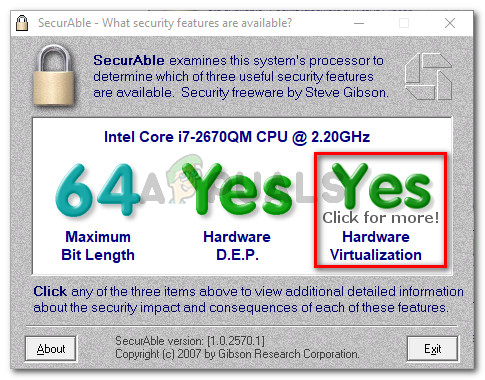 Hardware Virtualization is supported in this example
 If you confirm that hardware virtualization is supported, you can follow the methods below in order knowing that one of them will resolve the VT-X is Disabled in the Bios for All CPU Modes (Verr_Vmx_Msr_All_Vmx_Disabled) error.
In the event that the test showed that your machine does not support hardware virtualization, you will not be able to resolve the issue using the methods below.
Method 2: Enable Virtualization Technology (VTX) from BIOS
If you’re encountering the issue on a 64-bit host, keep in mind that you’ll likely need to enable Virtualization Technology (VTx) from your BIOS settings. On some motherboards, you will also need to enable Virtualization Technology Directed I/O (VTd)
Some motherboards come with this option enabled by default, but manual user intervention or 3rd party interference might disable it.
Note: Windows Hyper V can also be responsible from disabling VT-x on your computer.
Keep in mind that the exact menu options that involve the enabling VT-X or AMD-V will be different according to your motherboard. But in general, the steps are roughly the same. Here’s a quick guide on making sure that VT-X or AMD-V is enabled in your BIOS settings:
- Start your machine and press the Setup key repeatedly until you enter your BIOS. The Setup key will typically be displayed on-screen immediately after you power up your computer. If you don’t see it, try repeatedly pressing the F keys (F2, F4, F8, F10, F12) or the Del key (Dell computers) until you get it right.
 Press Vt x is disabled in the bios windows 10 to enter setup Note: You can do an online search with your “*motherboard version* BIOS key ” to save yourself from experimenting with different combinations.
 - Once you enter your BIOS settings, go to Security > System Security and enable Virtualization Technology (VTx) and/or Virtualization Technology DIrected I/O (VTd).
 Press Vt x is disabled in the bios windows 10 to enter setup Note: You can do an online search with your “*motherboard version* BIOS key ” to save yourself from experimenting with different combinations.
Note: Keep in mind that the names or location will be different depending on your motherboard. On some BIOS versions, you’ll need to enable Virtualization Technology from Advanced BIOS Features. On Intel-based motherboards, you can enable virtualization from Advanced > Intel(R) Virtualization Technology.
If you’re still encountering the same VT-X is Disabled in the Bios for All CPU Modes (Verr_Vmx_Msr_All_Vmx_Disabled) error, move down to the next method below.
Method 3: Enable PAE/NX from VirtualBox Manager
Several users struggling to resolve the same error message have reported that the issue was resolved entirely after they juggled with the Virtual device settings and enabled PAE/NX from the Settings menu.
This option determines whether PAE (Physical Adress Extension) and NX capabilities of the host CPU will be exposed to the virtual machine.
Although this is not guaranteed to work, it’s typically reported to resolve the issue on 64-bit computers that are confirmed to support hardware virtualization. Here’s a quick guide on enabling PAE/NX from Oracle VM VirtualBox:
- Select the machine that is showing the error message from the left-hand pane and then click on the Settings icon. Accessing the Settings menu of the failing machine
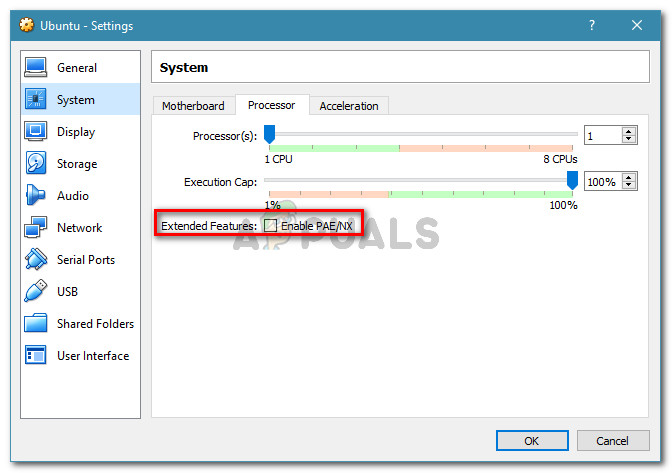
- In the Settings window of the virtual machine, go to the System section (using the left pane) and access the Processor tab. Then make sure that the Enable PAE /NX checkbox (associated with Extended Features) is checked. Processor and check the box associated with Enable PAE/NX» width=»672″ height=»473″ srcset=»https://cdn.appuals.com/wp-content/uploads/2018/11/enabling-pace-nx.jpg 672w, https://cdn.appuals.com/wp-content/uploads/2018/11/enabling-pace-nx-150×106.jpg 150w, https://cdn.appuals.com/wp-content/uploads/2018/11/enabling-pace-nx-300×211.jpg 300w» sizes=»(max-width: 672px) 100vw, 672px»/> go to System > Processor and check the box associated with Enable PAE/NX
- Save the changes and start the virtual machine again.
 Processor and check the box associated with Enable PAE/NX» width=»672″ height=»473″ srcset=»https://cdn.appuals.com/wp-content/uploads/2018/11/enabling-pace-nx.jpg 672w, https://cdn.appuals.com/wp-content/uploads/2018/11/enabling-pace-nx-150×106.jpg 150w, https://cdn.appuals.com/wp-content/uploads/2018/11/enabling-pace-nx-300×211.jpg 300w» sizes=»(max-width: 672px) 100vw, 672px»/> go to System > Processor and check the box associated with Enable PAE/NX
If you’re still seeing the VT-X is Disabled in the Bios for All CPU Modes (Verr_Vmx_Msr_All_Vmx_Disabled) error when attempting to start the virtual machine, move down to the next method below.
Method 4: Increasing the RAM size
Several users encountering the same issue have reported that the issue was resolved after they increased the allocated RAM size and started the virtual machine again.
Update: Some users have reported that in their case, the fix involved actually reducing the allocated RAM size.
If the methods above have proven to be ineffective, follow the steps below to either increase or decrease the RAM size:
- Select the virtual machine that is giving you trouble and click the Settings icon. Accessing the Settings menu of the failing machine
- In the Settings window, go to System and access the Motherboard tab. Once you get there, increase the allocated memory (Base Memory) by adjusting the slider, then click Ok to save the changes. Enlarging the Base Memory
- Run the virtual machine and see if the issue has been resolved. If you’re still seeing the same error, return to the Motherboard tab using step 2 to and bring the Base Memory lower than what it was initially. Shrinking the Base Memory
- Run the machine again and see if the issue has been resolved.
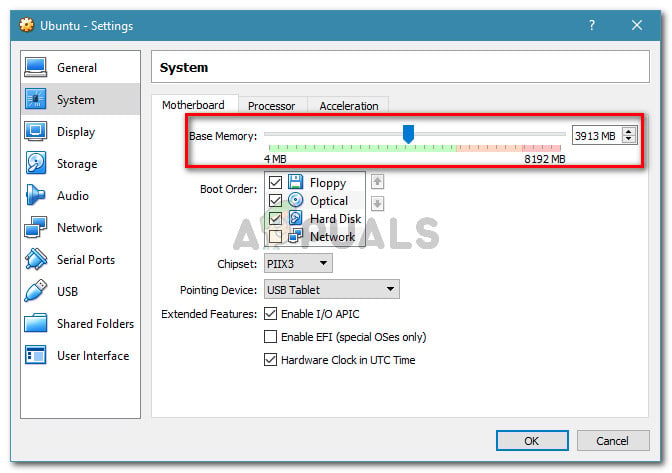 Enlarging the Base Memory
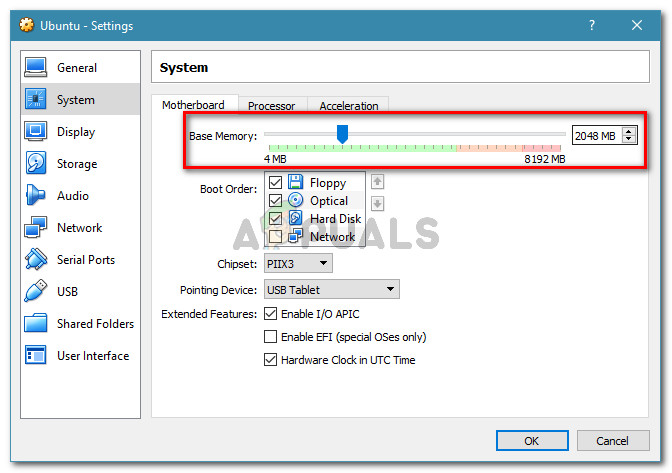 Shrinking the Base Memory
Method 5: Preventing 3rd party antivirus from interfering with hardware virtualization
An unlikely culprit but one that has been identified to cause the issue times and times again is the 3rd party antivirus solution. Several users encountering the same issue have reported that in their case, Avast (or another 3rd party AV client) was triggering the error message.
As it turns out, several 3rd party security solutions are running something in the background to create a “sandbox” feature. This ends up locking up the virtualization features from being used by VirtualBox or a similar client.
If you’re using a 3rd party security client, disabling the real-time protection from it will not help you to resolve the issue. The same security rules will remain firmly in place whether your AV is actively running or not.
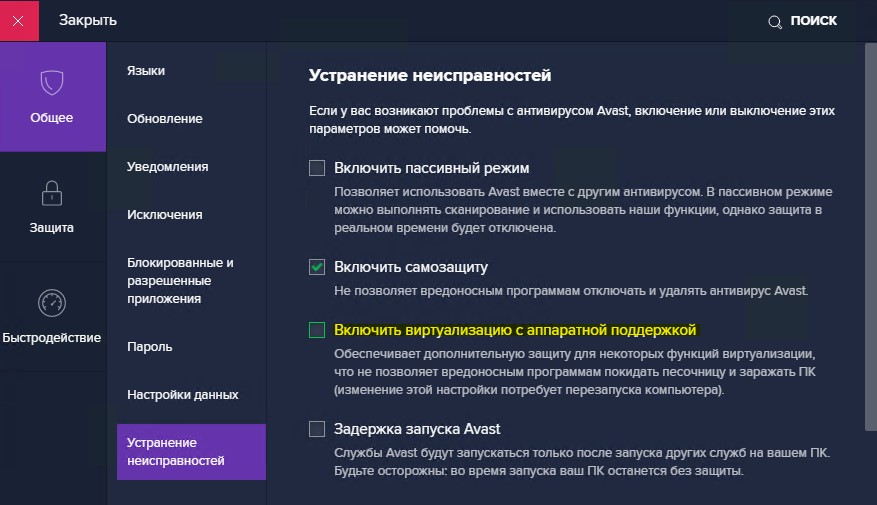
If you’re using Avast, you can prevent the security client from interfering with VirtualBox by going to Settings > Troubleshooting and unchecking the box associated with Enable hardware-assisted virtualization. Restart your system once you’ve made this change.
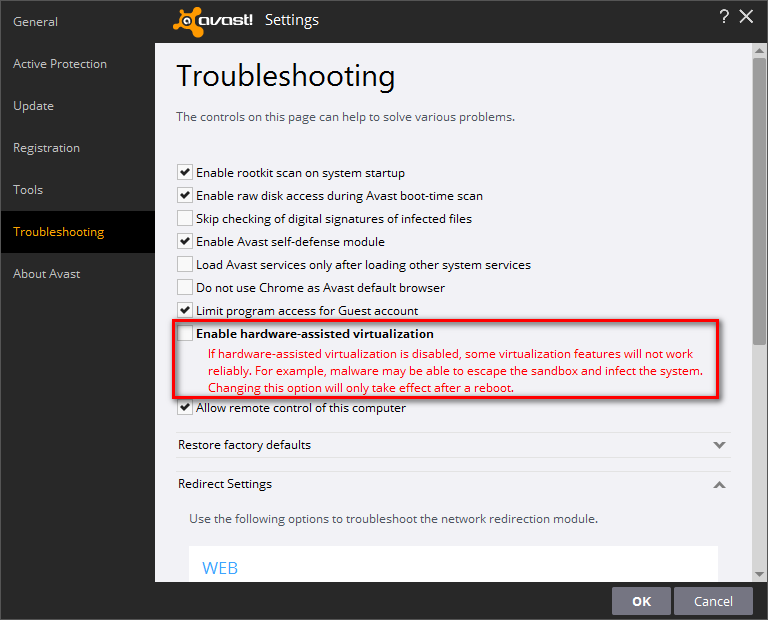 Disabling Avast’s hardware virtualization
If you’re using a different client, search online for the equivalent setting. But keep in mind that some 3rd party AV clients will not allow you to disable the sandboxing feature.
If that’s the case, the only solution is to uninstall your third-party AV completely from your system. You can do this easily by following this guide (here).
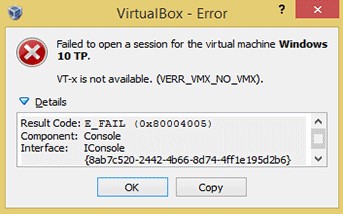
Ошибка VT-x is not available (verr_vmx_no_vmx) в Windows 10
Ошибка vt-x is not available (verr_vmx_no_vmx) появляется, когда пользователь запускает виртуальные машины при помощи VirtualBox на Windows 10. Виновником данной ошибки могут быть несколько причин: не включена виртуализация в BIOS, включен Hyper-V, включена изоляция ядра, Avast может отключить виртуализацию.
1. Отключить Hyper-V
Эта самая распространенная ошибка, когда пользователь при включенном Hyper-V использует и VirtualBox или любую другую стороннюю программу как Docker. Дело в том, что, если включена встроенная виртуальная машина Hyper-V, то она отключает виртуализацю для VirtualBox.
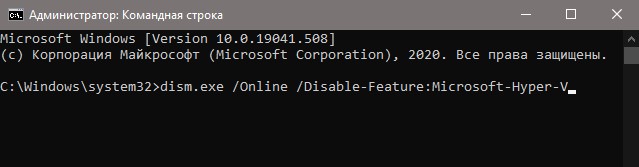
Запустите командную строку от имени администратора и введите ниже команды:
- dism.exe /Online /Disable-Feature:Microsoft-Hyper-V
- bcdedit /set hypervisorlaunchtype off
Перезагрузите ПК и посмотрите появляется ли ошибка vt-x is not available (verr_vmx_no_vmx) при запуске виртуальных машин.
2. Avast
Если у вас стоит сторонний антивирус как Avast, то вам ну;но выключить в параметрах антивируса «Включить виртуализацию с аппаратной поддержкой«.
3. Изоляция ядра
Изоляция ядра это параметр безопасности встроенного антивируса в Windopws 10. Известно что включенная изоляция ядра конфликтует и создает много проблем связанных с виртулизацией.
Откройте защитник Windows и перейдите «Безопасность устройства» > «Сведения об изоляции ядра» > и убедитесь, что параметр «Целостность памяти» выключена. Перезагрузите компьютер, чтобы применить изменения.
Если у вас целостность памяти было включена и вы не можете отключить, то обратитесь к этому руководству , последнему способу.

4. Виртуализация в BIOS
Если выше способы не помогли исправить ошибку vt-x is not available (verr vmx no vmx) при запуске виртуальных машин в Windows 10, то скорее всего виртуализация отключена в BIOS на уровне ядра процессора и её нужно включить.
Зайдите в BIOS или UEFI и включите параметр виртуализации. Так как BIOS у всех разный и параметр может называться по разному, то советую воспользоваться Google или Yandex картинками. К примеру, у вас материнская плата Asus, то просто напишите в поиске «Как включить виртуализацю в BIOS Asus«.


