- Vulkan Run Time Libraries — Что это за программа в Windows 10?
- Для чего нужен Vulkan?
- Vulkan находится на моем компьютере?
- Как Vulkan попал на мой компьютер?
- Какие игры поддерживает Vulkan?
- Должен ли я удалить Vulcan?
- Vulkan — это гвоздь графики
- Getting Started with the Vulkan SDK
- Version for Windows
- Versioning
- Terminology
- System Requirements
- Download the SDK
- Install the SDK
- SDK Contents
- Set up the Runtime Environment
- Run with Alternate SDK
- ICD and Layer Configuration
- Verify the Installation
- Build the Demo Programs
- Trace and Replay
- Enable Validation and Utility Layers
- Create a New Visual Studio Project
- Examine Vulkan Sample Code
- Next Steps
Vulkan Run Time Libraries — Что это за программа в Windows 10?
Время от времени вы прокручиваете список программ, просматриваете установленные приложения, рабочие процессы в диспетчере задач, и наверняка натыкались на не известную вам программу, процесс. Одной из таких программ с которой вы столкнетесь это Vulkan Run Time Libraries. Давайте выясним, что это такое, цель программы и что вы должны с этим делать. Заранее скажу, что это не вирус и не программа от казино «Вулкан».
Vulkan Run Time Libraries — это новейший API (интерфейс прикладного программирования) используемый для компьютерной графики. API это просто набор инструментов, которые программисты могут использовать для создания новых приложений, игр.
Для чего нужен Vulkan?
Vulkan похож на старые графические API, такие как Open Graphics Library (OpenGL) и DirectX от Microsoft. Однако разработчики Vulkan построили его, чтобы обеспечить лучшую производительность и более сбалансированное использование процессора (CPU) и графического (GPU) процессора на вашем компьютере. Он построен вокруг современных задач высокой интенсивности, которые могут обрабатывать современные процессоры. Когда OpenGL и DirectX были новыми, вычислительное оборудование не обладало такой же мощью, как сегодня — они были созданы с использованием одноядерных процессоров. Vulkan более эффективен на современных многоядерных процессорах.
Vulkan является кросс-платформенным API, что позволяет ему работать на Android и Linux. В отличие от DirectX, который работает только на Windows и Xbox. Все это означает, что Vulkan — это своего рода новый стандарт для последних 3D-игр. Но это не значит, что старые API-интерфейсы бесполезны! Многие игры все еще используют их, и они все равно получают обновления.
Vulkan находится на моем компьютере?
Вы можете легко проверить, есть ли у вас библиотеки Vulkan Run Time Libraries, установленные на вашем компьютере или ноутбуке.
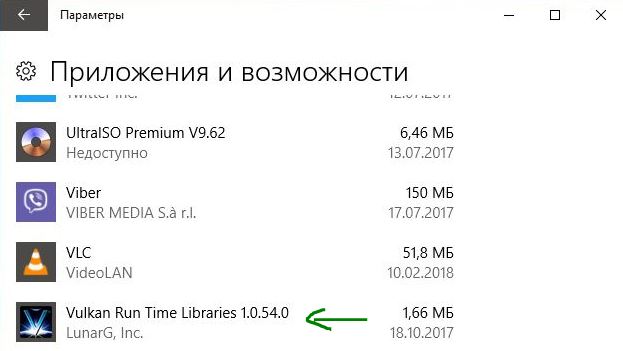
В Windows 10 откройте «Все параметры» > «Приложения» > «Приложении и Возможности«. Если вы видите запись Vulkan Run Time Libraries 1.0.54.0 или другую версию, значит он установлен уже в вашей системе Windows 10.
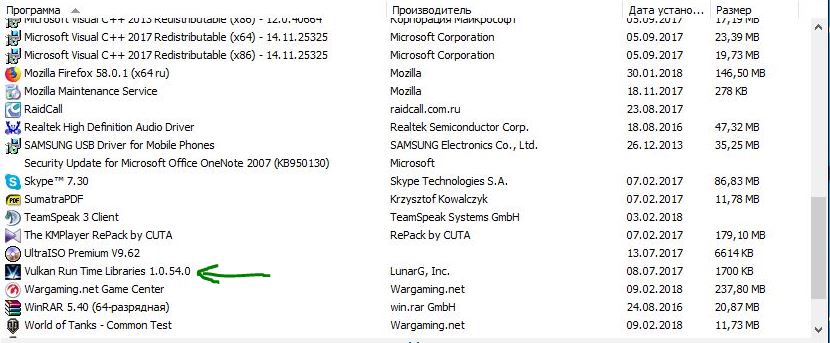
В Windows 7 зайдите в «Панель управления» > «Программы и компоненты» или «Удаление программ». Прокрутите страницу вниз, чтобы найти запись.
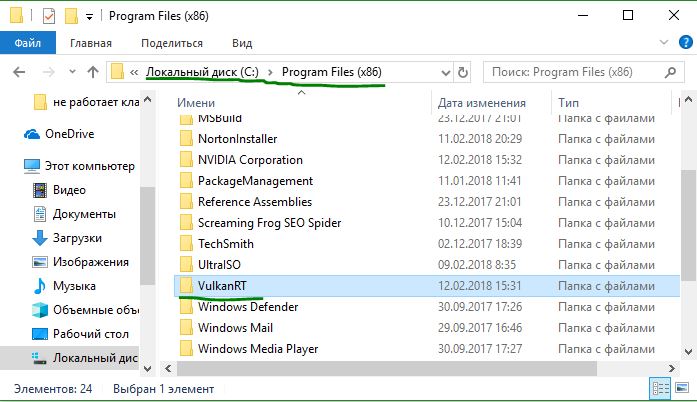
Еще можно просто зайти на локальный системный диск, где установлена сама windows, по следующему пути C:\Program Files (x86)\VulkanRT. Она может быть в папке и без (x86).
Как Vulkan попал на мой компьютер?
Если вы не помните установку Vulkan, то не переживайте. Когда вы обновили или установили новейшие драйвера видеокарты, то Vulkan Run Time Libraries установится автоматически. Обе графические карты NVIDIA и AMD теперь включают в себя Vulkan с обновлением драйверов. Поскольку Vulkan был выпущен только в начале 2016 года, старые видеокарты могут его не поддерживать.
Какие игры поддерживает Vulkan?
Поскольку Vulkan — это новый API, вы не найдете сотни игр, которые его поддерживают. Тем не менее это не означает, что игры не используют его. Полный список игр, вы можете посмотреть в Википедии . (На русском списка не нашел).
- The Talos Principle (2014): эта отличная игра-головоломка от первого лица была первой поддерживающим «Вулкан».
- Dota 2 (2013): популярная компания Valve MOBA представила поддержку Vulkan, вскоре после выхода API.
- Wolfenstein II: The New Colossus (2017): этот шутер от первого лица отличается только поддержкой Vulkan на ПК, а не старыми API.
Помимо этих игр, эмуляторы поддерживают Vulkan, такие как Dolphin (который эмулирует Nintendo GameCube) и игровые движки, такие как Source 2, Unity и CryEngine. Таким образом, мы можем ожидать больше игр с помощью Vulkan в будущем.
Должен ли я удалить Vulcan?
Если у вас установлен Vulkan на вашем компьютере, то вы скорее всего геймер или любитель поиграть в игры. Поскольку он загружается только с новейшими драйверами видеокарты. Вы не получите Vulkan при использовании встроенной видеокарты с интегрированной графикой.
Вы обязательно должны оставить и не удалять Vulkan с компьютера. Поскольку это новейший графический API, без помощи которого вы не сможете запускать более новые игры. Кроме того, нет возможности установить отдельно программу Vulkan Run Time Libraries. Если вы удалите ее, и решили потом снова установить, то вам придется переустановить графические драйверы видеокарт. Наличие этой библиотеки на вашем компьютере не приведет ни к каким поломкам. Он занимает мало места, не отвлекает вас разными уведомлениями и не является вирусом, как многие думают.
Vulkan — это гвоздь графики
Теперь вы знаете, что такое Vulkan Run Time Libraries, почему они находятся на вашем компьютере и что они делают для вас. Любой компьютерный геймер должен иметь этот набор библиотек в своей системе, чтобы последние игры шли гладко. Вы должны получать обновления для Vulkan, когда вы обновляете свои графические драйверы, поэтому вам не о чем беспокоиться.
Getting Started with the Vulkan SDK

Version for Windows
This guide describes the requirements and procedure for installing the Vulkan SDK for Windows. All documentation for the SDK can be found online at vulkan.lunarg.com, as well as SDK issue tracking and any latest information.
The Vulkan API is a low-overhead, explicit, cross-platform graphics API that provides applications with direct control over the GPU, maximizing application performance. For more information on the Vulkan specification and API, refer to Khronos.org. For tutorial-level information, refer to the Vulkan tutorial at the Vulkan SDK Download Site.
This SDK does NOT include a Vulkan driver. Please contact your GPU hardware vendor for a Vulkan Installable Client Driver (ICD). This SDK will allow you to build Vulkan applications but you will need a Vulkan ICD to execute them.
Versioning
The Vulkan SDK provides the development and runtime components required to build, run, and debug Vulkan applications. This SDK is based on the Khronos Vulkan API header, whose version is reflected in the Vulkan SDK version number (for example, SDK version 1.1.70.0 indicates the SDK uses Vulkan header revision 1.1.70). The SDK also includes certain Vulkan extensions for window system integration and debug extensions (refer to the release notes for further details).
Note: This version number does not indicate an application cannot be developed for earlier Vulkan versions. As such, a 1.1 SDK can still be used to develop Vulkan 1.0 applications but cannot be used to develop applications for future versions of Vulkan. Furthermore, the presence of a 1.1 SDK does not necessarily indicate a system can actually run Vulkan 1.1. A Vulkan 1.1 driver is required for applications to use most Vulkan 1.1 functionality. For more information on how to query Vulkan versions programmatically, see the 1.1 samples in the SDK.
Terminology
| Term | Description |
|---|---|
| ICD | Installable Client Driver—A Vulkan-compatible display driver |
| GLSL | OpenGL Shading Language |
| Layer | A library designed to work as a plug-in for the loader. It usually serves to provide validation and debugging functionality to applications |
| Loader | A library which implements the Vulkan API entry points and manages layers, extensions, and drivers. It can be found in the SDK as well as independent hardware vendor driver installs |
| SPIR‑V | Standard Portable Intermediate Representation—A cross-API intermediate language that natively represents parallel compute and graphics programs |
| Vulkan | A low-overhead, explicit graphics API developed by the Khronos Group and member companies |
| WSI | Window System Integration |
System Requirements
Vulkan development using the Vulkan SDK requires a Windows development system to meet specific hardware and software requirements. These specifications are as follows:
- Windows 7, 8, 8.1, or 10 (64-bit and 32-bit)
- Note: 64-bit is preferred and better tested
- Graphics card and ICD that support Vulkan. Contact your graphics hardware supplier for information on Vulkan support.
- 8 GB memory
- Sufficient free disk space to install the Vulkan SDK (approximately 1 GB)
In addition, to build the samples and demos, one must install the following programs:
- CMake 3.10.2 is recommended.
- Python 3.0 or newer (samples only)
- Visual Studio 2015 or newer (Visual Studio 2013 may work in a limited capacity)
- Note:
- Starting with Vulkan SDK 1.0.54.0, all binaries in the SDK are generated using Visual Studio 2015. This change was made to allow building the Runtime with Control Flow Guard protection.
- If you continue to use Visual Studio 2013, you may encounter issues linking a project built with Visual Studio 2013 to the static Vulkan runtime library or shaderc included in the SDK.
- If this use case is important to you, we suggest you upgrade to Visual Studio 2015 or newer.
- Note:
Download the SDK
Download the Vulkan SDK from the Vulkan SDK Download Site. The SDK download file is named VulkanSDK- version -Installer.exe on the SDK download page. Make note of the directory to which the file was downloaded.
Install the SDK
The Vulkan SDK For Windows is a self-extracting installer. Run the downloaded executable file to install the SDK. The default SDK install location is C:\VulkanSDK\ version .
Installing the Vulkan SDK sets the system environment variable VULKAN_SDK to the directory in which the SDK is installed, which will look like C:\VulkanSDK\1.0.0.0 , but with the version number being the version that was installed. Installing the Vulkan SDK also prepends the expansion of %VULKAN_SDK%\Bin ( %VULKAN_SDK%\Bin32 on 32-bit Windows) to the system PATH environment variable. The system environment variable VK_SDK_PATH is set to the same value as VULKAN_SDK for compatibility with prior releases. Note: The programs and command shells that were running during installation may not see the updated environment variables until they are restarted.
The Vulkan loader, vulkan-1.dll , is installed in C:\Windows\System32 . This will be a 32-bit DLL on 32-bit Windows targets and a 64-bit DLL on 64-bit Windows targets. 64-bit targets will also have the 32-bit Vulkan loader (of the same name) installed in C:\Windows\SysWOW64 . Vulkan applications will find and use the appropriate library by default.
By default, the SDK installer will bring up a window to guide you through the installation. This may be problematic for anyone wishing to install the SDK through an automated mechanism. In order to install the SDK without any prompts, pass the /S flag to the SDK installer. For example, silently installing an SDK from the command prompt would look like:
SDK Contents
The Vulkan SDK provides the development and runtime components to create, trace, and replay Vulkan applications. The SDK also includes the runtime components to load and run Vulkan Application Validation and Debug Layers. The SDK installation process installs contents as described in the table below. Paths are relative to the directory in which the SDK is installed.
| Directory | Description |
|---|---|
| Bin | 64-bit Release build of executables that belong in the system path (Note: This folder is not present on 32-bit Windows installs) |
| Bin32 | 32-bit Release build of executables that belong in the system path |
| Config | Sample layer settings file |
| Demos | Source and MS Visual Studio project files for the Vulkan Cube and Vulkan Info programs |
| glslang | Source and header files for glslang; used by the programs in Samples |
| Include | Header files required to compile Vulkan applications |
| LayerFactory | Source files and a Visual Studio project that are necessary to build layers using the Vulkan Layer Factory |
| Lib | 64-bit libraries for loader, layers, and tools (Note: This folder is not present on 32-bit Windows installs) |
| Lib32 | 32-bit libraries for loader, layers, and tools |
| RunTimeInstaller | Vulkan runtime installer; this installer can be included by a Vulkan application or driver installer to install the Vulkan runtime libraries during an application or driver install; see README.txt for more information |
| Samples | A collection of Vulkan C++ samples |
| shaderc | The source code for shaderc, a command line tool and library to compile shaders |
| spirv-tools | Source and header files for spirv-tools; used by the programs in Samples |
| Templates | Visual Studio Vulkan project templates |
| Third-Party | Libraries that are not used by the SDK but which may be useful for developers and which may be required for templates—currently, GLM and SDL are included |
| Tools | 64-bit binaries for tools that do not belong in the system path. (Note: This folder is not present on 32-bit Windows installs) |
| Tools32 | 32-bit binaries for tools that do not belong in the system path |
Note: To aid in debugging, the SDK includes PDB files for the Vulkan loader. The PDB files for the loader shipped in the Vulkan runtime are located in Lib (64-bit) and Lib32 (32-bit). These PDB files correspond to vulkan-1.dll , found in System32 and SysWOW64 .
Set up the Runtime Environment
Be sure you have installed a graphics driver that includes ICD support for Vulkan. Please contact your graphics hardware vendor for the appropriate drivers.
Run with Alternate SDK
If more than one version of the SDK is installed on the system, the path to the Bin directory of the most recently installed SDK version will be referenced first in the PATH environment variable. To switch between different versions of the SDK simply re-install the SDK version you wish to use; it is not a requirement to remove an SDK before re-installing another.
ICD and Layer Configuration
The Vulkan loader library vulkan-1.dll examines string values in the Windows registry to determine the location of ICD libraries, the location of layer libraries, and which layers are active.
Verify the Installation
Verify the installation of the Vulkan SDK by running a few things:
- Run the Vulkan Installation Analyzer (VIA) to determine if it believes everything can execute properly.
- VIA (executable name vkvia ) can be found as a shortcut under the Start Menu
- Start Menu->Vulkan SDK version >->VIA
- See the VIA page for more information.
- Run a Vulkan application such as Vulkan Info. (See the vulkaninfo webpage for more information about the Vulkan Info application and how to use it.)
You can also run the Vulkan Cube demo program by selecting the program in Start Menu->Vulkan SDK .
Build the Demo Programs
The Vulkan SDK includes the source for two demo applications: Vulkan Info and Vulkan Cube. There are two versions of Vulkan Cube: one written in C using vulkan.h and another written in C++11 using vulkan.hpp . The vulkan.hpp header file is a low-level C++11 API for Vulkan.
The Vulkan demo applications use Microsoft Visual Studio solution files. To build the demo programs, open the InstallPath >\Demos\DEMOS.sln file. This will launch Microsoft Visual Studio, opening the solution with a default build configuration of Debug/Win32. Select the desired build configuration (i.e., Debug/x64 ). Building the solution will build all of the demo applications. If you are using a version of Visual Studio newer than 2015, you will be prompted to update the project files. Doing so should not present any issue.
Trace and Replay
The Vulkan SDK supports tracing and replaying Vulkan applications. Refer to the Vulkan Trace and Replay Tools guide for detailed information on Vulkan trace and replay.
Trace the Vulkan Cube demo program by running the following commands from a command prompt:
The program will close on it’s own after a few seconds. Do not stop the program by using ctrl+c as doing so may result in an incomplete trace file. Notice the trace options used in the command above.
-p, —Program : Name of the program to trace
-o, —OutputTrace : Name of the generated trace file—this must have an extension of «.vktrace».
-a, —Arguments : Arguments to pass to the program—in this case we passed the —c 250 arguments to Vulkan Cube, which tells it to exit after 250 frames
The generated trace file, vkcube_trace.vktrace , is created in the current directory.
Replay the Vulkan Cube trace file you just generated:
Notice the options used in the command above.
-o, —Open : Name of trace file to replay
-l, —NumLoops : Number of times to replay the trace
The -l 2 option replays the trace twice.
Enable Validation and Utility Layers
The Vulkan SDK includes runtime support for validation and utility layers. These layers can be enabled for an application run or a trace replay by setting the VK_INSTANCE_LAYERS environment variable to a semi-colon-separated list of layer or extension names, as found in the layer manifest files. Refer to the Vulkan Validation and Utility Layers document for more information on layer manifest files.
The Vulkan SDK includes the following layers:
| Layer Name | Layer Type | Description |
|---|---|---|
| VK_LAYER_LUNARG_api_dump | utility | print API calls and their parameters and values |
| VK_LAYER_KHRONOS_validation | validation | Main Vulkan validation layer: validates parameter correctness, Vulkan object lifetimes, externally synchronized thread safety, and the core state-tracked Vulkan validation checks |
| VK_LAYER_LUNARG_device_simulation | utility | allows modification of an actual device’s reported features, limits, and capabilities |
| VK_LAYER_LUNARG_monitor | utility | outputs the frames-per-second of the target application in the applications title bar |
| VK_LAYER_LUNARG_screenshot | utility | outputs specified frames to an image file as they are presented |
Refer to the Vulkan Validation and Utility Layers documentation for detailed information on layers.
The layers can be enabled either by using the graphical tool, Vulkan Configurator, or by setting environment variables. As an example, this section will show how to enable the API dump layer with Vulkan Configurator. The API dump layer will allow you to examine the Vulkan API calls from an application. More information on Vulkan Configurator can be found here.
Open the Start Menu, navigate the the Vulkan SDK directory, and click on «Vulkan Configurator».
Select the «Layer Manager» tab at the top.
Find the pane labeled «Unset Explicit Layers». One of the layers in that pane should read «LunarG: Api Dump». Select this layer by clicking on it.
Click the left arrow directly to the left of the «Unset Explicit Layers» pane. The API dump layer should now move to the «Enabled Layers» pane.
On the pane on the far right, the settings options for API dump should now be visible. Find the option called «Output to File». Set it to true.
Click the «Save» button at the bottom left of the window, and do not exit the Vulkan Configurator.
Run the Vulkan Cube program from a command prompt:
Stop the program after a few seconds and examine the vk_apidump.txt file to see the api dump layer output. This file will be located in the directory you ran the Vulkan Cube program from. The VK_LAYER_LUNARG_api_dump debug layer will print API calls, parameters, and values.
Deactivate the layers you just enabled from Vulkan Configurator by clicking the «Clear» button at the bottom of the window.
Create a New Visual Studio Project
The Vulkan SDK includes Visual Studio templates so a programmer can easily create a Vulkan project without setting up include paths and libraries. The templates are located in SDK install directory, in a subdirectory called «Templates.» In order to make these templates appear in Visual Studio they must be copied into the directory where Visual Studio searches for C++ templates. By default this is located at:
The Vulkan SDK includes separate templates for Visual Studio 2015, 2017, and 2019. The templates can be enabled by copying the zip files from the SDK template directory into the Visual Studio path given above. You may have to create one or more directories in the path given above.
Note: It is possible to point Visual Studio at the templates in the SDK without any copying but doing so means that any additional templates would have to be put into the Vulkan SDK installation. As a result, copying the files is the recommended approach.
Note: The included templates require the Windows 8.1 and Windows 10 (26624) SDKs to be installed with Visual Studio 2017. If these SDKs are not installed you will still be able to use the templates but any projects created through the templates will need to be retargeted to an installed Windows SDK before they can be built.
Note: SDK 26624 was previously referred to as 10240.
Once you have copied the templates you can now create a new project or solution from these templates. Open the project creation dialog by going to File -> New -> Project . Then locate the list of Visual C++ templates. (The exact location of the list depends on your version of Visual Studio but should be easy to find in the New Project dialog.) You should see a list of the built-in templates and at the bottom should be the Vulkan templates. The included templates are described below:
| Name | Description |
|---|---|
| Vulkan Program | A simple Vulkan program with no dependencies, except the Vulkan loader and validation layers. This program creates and then destroys a simple Vulkan instance using the C Vulkan API. |
| Vulkan Windowed Program | A Vulkan program that depends upon SDL and GLM. This program creates a blank window, initializes a Vulkan surface on that window, and then waits for the user to close the window. This template uses the C Vulkan API. |
| Vulkan C++ Program | A simple Vulkan program with no dependencies, except the Vulkan loader and validation layers. This program creates and then destroys a simple Vulkan instance using the C++ Vulkan API. |
| Vulkan C++ Windowed Program | A Vulkan program that depends on SDL and GLM. This program creates a blank window, initializes a Vulkan surface on that window, and then waits for the user to close the window. This template uses the C++ Vulkan API. |
| Vulkan Layer | A Vulkan layer that is built using the Vulkan Layer Factory framework. |
Choose «Vulkan Windowed Program», enter a name for your project, and click OK. You should see a new solution and project open in Visual Studio. Build and run the project. When you run the project you should see a blank window pop up and when you close the window the program should exit with code 0. Now, change the configuration to x64, build, and run the project again. You should see the same results but now with a 64-bit build.
You should take some time to examine the source code in this project. The project enables validation layers if the project is built in a debug mode. This project is creating a Vulkan surface on the window but does not render anything to the screen.
You now have a working Vulkan project. Feel free to use this as a base for larger projects. For additional information on using Vulkan be sure to go through the Vulkan samples or find the many samples available online.
Examine Vulkan Sample Code
The Samples folder in the Vulkan SDK install folder contains Vulkan sample programs. This set of Vulkan code Samples is a work in progress. Refer to the Vulkan Samples guide for information about building and running the sample programs.
Next Steps
This guide provided an introduction to the main components and tools in the Vulkan SDK. Refer to the Vulkan SDK Download Site for the most up to date SDK information, including the complete set of SDK documentation.


