- How to wake up computer from Sleep at a particular time in Windows 10
- Wake up computer from Sleep
- Wake-On-LAN в Windows: лучшая функция, которую вы не используете
- Что такое Wake-On-LAN?
- Как работает Wake-On-LAN?
- Почему Wake-On-LAN полезен?
- Включите компьютер из любого места
- Как включить Wake-On-LAN
- Включение Wake-On-LAN в Windows
- Включение Wake-On-LAN в BIOS
- Последствия безопасности во время пробуждения по локальной сети
- WAKE UP TIMER FOR THE COMPUTER?
- How to prevent PC from waking up on Windows 10
- How to determine what is waking up PC on Windows 10
- How to disable wake timers on Windows 10
- Stop device from waking up computer
- Stop scheduled tasks from waking up computer
- Disable system scheduled task
- Stop automatic maintenance from waking up computer
- Disable all wake timers on Windows 10
How to wake up computer from Sleep at a particular time in Windows 10
You can use the Windows Task Scheduler to wake up your Windows 10 computer wake from sleep mode, automatically at a preset time. This can be useful if you want a particular task performed at a particular time. Maybe you want to download large files at a specific time!
Wake up computer from Sleep
To wake up your Windows computer from Sleep mode at a fixed time, type Task Scheduler in Start Search and hit Enter.
In the right side, select Create Task. A new window will open. Here, under the General tab, fill in the Name and Description. Also check, Run with highest privileges.
Under the Triggers tab, click New. Another window will open. Here. Select One time (or Daily if you want it repeated every day at a particular time). Set the Date and Time when you want your Vista to wake up from Sleep.
Next, under the Actions tab, you have to mention a task. Click New. You can run a simple task, like say, first launching & then closing the command prompt window. This thus will wake your Vista machine at the pre-set time to carry out the task!
Select Action as: Start a program . To schedule a task that executes the command cmd .exe with command line arguments, copy-paste under Program/script
Under Conditions tab, check on the Wake the computer to run this task check-box. This is important!
Click OK and Exit Task Scheduler.
Your computer will wake up from Sleep at a particular time.
Wake-On-LAN в Windows: лучшая функция, которую вы не используете
Wake-on-LAN (WoL) является недооцененной и недостаточно используемой частью операционной системы Windows 10. Если вы являетесь не заядлым пользователем системы windows, то вам наверняка фраза Wake-on-LAN будет не интересна. Эта функция связана с подключением по локальной сети, которая в свою очередь заинтересует геймеров и техническую поддержку. В прошлом этот параметр был слаб, но на сегодня настройка функции «Wake-on-LAN» в Windows 10 дает больше, чем было. Итак, что такое Wake-on-LAN? Как это может быть полезно для обычных пользователей? И что самое главное, как его настроить?
Что такое Wake-On-LAN?
Wake-on-LAN — это сетевой стандарт, позволяющий компьютеру включаться дистанционно. Он имеет дополнительный стандарт под названием Wake-on-Wireless-LAN (WoWLAN).
Чтобы WoL работал, вам нужно три вещи:
- Ваш компьютер должен быть подключен к источнику питания.
- Материнская плата компьютера должна быть совместима с ATX. Не волнуйтесь, большинство современных материнских плат соответствуют требованиям.
- Сетевая карта компьютера (Ethernet или беспроводная) должна быть включена в WoL. Поддержка WoL почти универсальна.
Wake-on-LAN широко распространена в мире компьютеров. Поскольку поддержка требуется на аппаратном уровне, WoL работает на компьютерах под управлением Windows, Mac и Linux без проблем. С точки зрения Windows ваш компьютер может включаться из любых состояний питания по умолчанию, таких как гибернация и спящий режим, а также от полного отключения питания.
Как работает Wake-On-LAN?
Wake-on-LAN использует «magic packets», когда сетевая карта обнаруживает пакет, он сообщает компьютеру включить себя. Именно поэтому ваш компьютер должен быть подключен к источнику питания, даже если он выключен. Сетевые карты с поддержкой WoL будут продолжать получать небольшой заряд круглосуточно, пока они сканируют «magic packets» (волшебный пакет).
Но что же происходит?
«Волшебный пакет» отправляется с сервера. На сервере может быть много чего, к примеру специализированное программное обеспечение, маршрутизаторы, веб-сайты, компьютеры, мобильные устройства, интеллектуальные телевизоры. Сервер отправляет пакет по всей вашей сети. Сам пакет содержит важную информацию, включая сведения о подсети, сетевом адресе и самое главное MAC-адрес компьютера, который вы хотите включить. Вся эта информация, объединенная в один пакет, называется фреймом пробуждения. Ваша сетевая карта постоянно сканирует их.
Почему Wake-On-LAN полезен?
Теперь вы знаете, что такое Wake-on-LAN и как оно работает. Но почему это полезно? Почему средний пользователь должен заботиться об этой технологии?
Включите компьютер из любого места
Трудно представить себя в командировке без забытых файлах дома, к которым вы не сможете удаленно получить доступ. Чтобы удаленно использовать ваш рабочий стол, вам понадобится приложение для удаленного рабочего стола, поддерживающее Wake-On-LAN. Популярный Google Chrome Remote Desktop не работает, но Team Viewer дает такую возможность.
Примечание: BIOS должен поддерживать Wakeup-on-PME (событие управления питанием). И тогда вы сможете пробудить компьютер с выключенного состояния.
Как включить Wake-On-LAN
Включение WoL — это двухшаговый процесс. Вам необходимо настроить Windows и BIOS вашего компьютера.
Включение Wake-On-LAN в Windows
- Чтобы включить Wake-on-LAN в Windows, вам нужно открыть приложение «Диспетчер устройств». Нажмите Win + R и напишите devmgmt.msc.

- Прокрутите список устройств до тех пор, пока не найдете сетевые адаптеры. Нажмите «>«,чтобы развернуть меню. Теперь вам нужно найти свою сетевую карту.

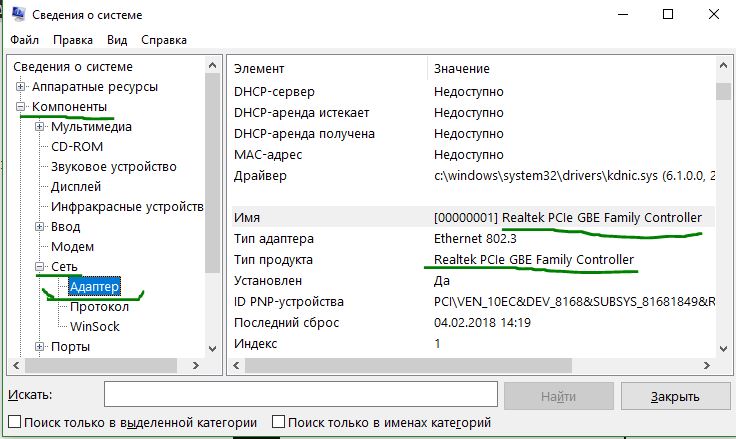
- Если вы не знаете, какая из них является вашей сетевой картой, наберите в поиске windows «Сведения о системе«.

- Перейдите «Компоненты» > «Сеть» > «Адаптер» и справа найдите имя или тип продукта. Запомните эти значения и переходим обратно в диспетчер устройств.
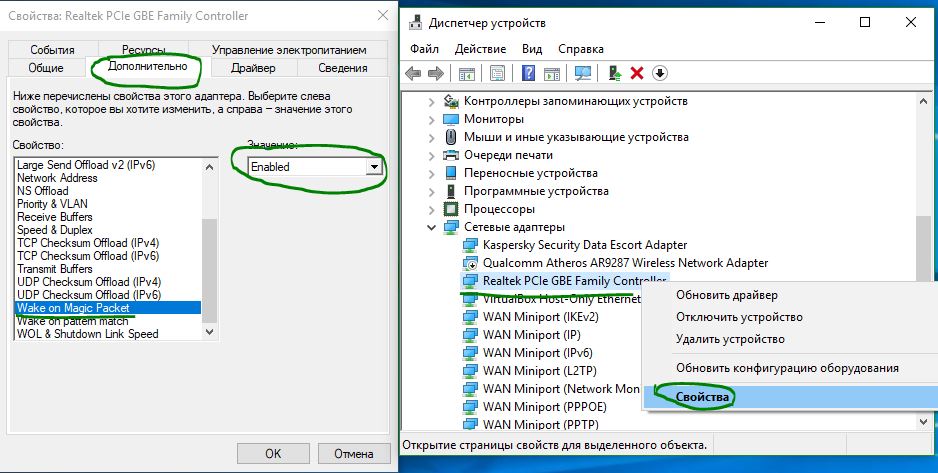
- В диспетчере устройств, нажимаем на своем сетевом адаптере правой кнопкой мыши и выбираем свойства. Далее в новом появившимся окне перейдите на вкладку «Дополнительно«, пролистайте список вниз и найдите Wake-On-LAN, выберите значение Enabled (включено). Название может различаться между устройствами и у некоторых будет Wake on magic packet.
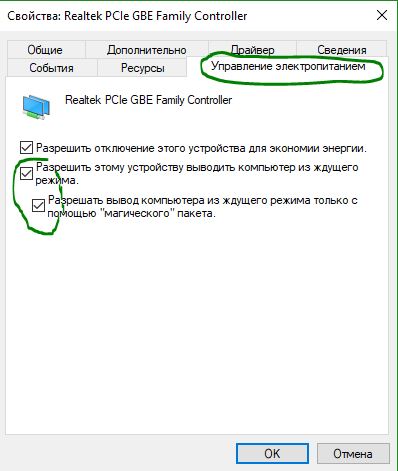
- Далее перейдите на вкладку «Управление электропитанием» и у вас там должны быть отмечены два пункта: разрешить этому устройству выводить компьютер из ждущего режима и разрешить вывод компьютера из ждущего режима только с помощью «магического пакета». Нажмите OK.
Включение Wake-On-LAN в BIOS
К сожалению меню BIOS различается на компьютерах и ноутбуках, что делает невозможным предоставление точных инструкций. В общем, вам нужно нажать конкретную клавишу, пока ваш компьютер загружается. Как правило, кнопкой являются Escape, Delete или F1. Смотрите подробное руководство, как зайти в BIOS .
- В меню BIOS вам нужно найти вкладку «Power» и найти запись Wake-on-LAN и включить (Enabled). Не забудьте сохранить настройки биос.
- Вкладка также может быть названа Power Management или вы можете найти эту функцию даже в Advanced Settings.
Последствия безопасности во время пробуждения по локальной сети
Магические пакеты отправляются с использованием уровня OSI-2. На практике это означает, что любой пользователь в той же сети, что и WoL, может использовать ваш компьютер для загрузки. В домашней обстановке это несущественная проблема. В общественной сети это более проблематично. Теоретически WoL позволяет только включать компьютеры. Он не будет обходить проверки безопасности, экраны паролей или другие формы безопасности. Это также не позволит выключить компьютер снова.
Однако были случаи, когда злоумышленники использовали комбинацию серверов DHCP и PXE для загрузки машины с собственным загрузочным изображением. Это дает им доступ к любым незащищенным дискам в локальной сети.
WAKE UP TIMER FOR THE COMPUTER?
![]()
You can set the computer to wake from hibernation or sleep with a scheduled network task set to occur at a certain time.
Here’s a somewhat better article on how to do it without using 3rd party software:http://www.vistax64.com/tutorials/166809-task-scheduler-wake-up-computer.html.
Here’s another option not using any 3rd party software:
1. Go to Start | All Programs | Accessories | System Tools | Scheduled Tasks.
2. Launch the Scheduled Task Wizard by double-clicking Add Scheduled Task.
3. Click Next and select the program that you want to start when your system wakes up. Click Next.
4. In the following three screens, select the Daily option, the time that you want your system to wake up, and then type a username and password with Administrative privileges.
5. On the last page, select the Open Advanced Properties check box and click Finish.
6. When you see the Properties dialog box for the scheduled task, choose the Setting tab and select the Wake The Computer To Run This Task check box.
7. Click OK.
I hope this helps.
Lorien — MCSE/MCSA/Network+/A+ — If this post helps to resolve your issue, please click the «Mark as Answer» or «Helpful» button at the top of this message. By marking a post as Answered, or Helpful you help others find the answer faster.
How to prevent PC from waking up on Windows 10
If your computer is waking up randomly, it could be a scheduled task or peripherals, use these steps to fix the problem on Windows 10.

On Windows 10, the ability to hibernate or sleep your computer are excellent features to quickly resume where you left off at a later time, and even to save energy. However, using these features can also cause the system to constantly wake up automatically in the middle of the night or when you’re not using it.
The operating system includes multiple power states, including sleep, hibernation, and hybrid, when you use any of these features, even though the computer isn’t functioning, it’s still able to wake up automatically to perform scheduled tasks, and peripherals, such as network card, mouse, keyboard, and others can also switch the power state to fully functional.
If your computer keeps waking up randomly, Windows 10 includes the tools to find out the reason of the problem and to disable the wake timers per device, task, or globally.
In this guide, you’ll learn the steps to keep Windows 10 from waking up automatically.
How to determine what is waking up PC on Windows 10
To determine if a device or scheduled task is requesting to wake up computer, use the steps:
Open Start.
Search for Command Prompt, right-click the top result, and select the Run as administrator option.
Type the following command to find out devices allowed to wake up the computer and press Enter:
 powercfg devicequery wake_armed command
Type the following command to determine the device waking up the computer and press Enter:
 powercfg lastwake command
Type the following command to find out the scheduled tasks requesting to wake up the computer and press Enter:
 powercfg waketimers command
Confirm whether a device and task are waking up your computer.
Once you complete the steps, you’ll have an understanding of what’s waking up your computer at night or when you’re not using it.
How to disable wake timers on Windows 10
There at least two solutions to prevent the computer from waking up accidentally. You can disable the device or scheduled task individually, or you can disable all wake timers on Windows 10. The steps below will explain the steps to complete both scenarios.
Stop device from waking up computer
If you have determined a device (network card, keyboard, mouse, etc.) is waking up the computer every night, you can disable the power on feature from Device Manager using these steps:
Open Start on Windows 10.
Search for Device Manager and click the top result to open the app.
Expand the branch with device you want to configure.
Right-click the device and select the Properties option.
 Device Manager properties option
Click the Power Management tab.
Clear the Allow this device to wake the computer option.
 Device Manager allow this device to wake the computer option
Once you complete the steps, the device will no longer wake the computer in the middle of the night.
If you don’t want any device accidentally waking up the computer, repeat the above steps for every device allowed to start the computer.
Stop scheduled tasks from waking up computer
If you the problem is a scheduled task, you’ll need to modify or disable task to prevent the computer from waking up.
To stop a scheduled task from requesting to wake up computer, use these steps:
Open Start.
Search for Task Scheduler and click the top result to open the app.
Navigate to the task causing the random wake up.
Right-click the task and select the Properties option.
 Scheduled task waking up computer on Windows 10
Click the Conditions tab.
Clear the Weak the computer to run this task option.
 Disable wake up computer option on scheduled task
Click the OK button.
After you complete the steps, the task will no longer wake up the computer.
Disable system scheduled task
If you’re not able to save the changes of the scheduled task as result of not enough permissions, you’ll need to use the Microsoft PsExec tool to disable the task using Command Prompt.
Click the Download PsTools link and download the file to your computer.
 Download Sysinternals PsTools
Open the zip folder with File Explorer.
Select the PsExec.exe file.
Click the Copy option from the “Home” tab.
 Extract PsExe
Click on This PC from the left pane.
Open the Local Disk drive.
Click the Paste option from the Home tab.
Open Start.
Search for Command Prompt, right-click the top result, and select the Run as administrator option.
Type the following command to navigate to the root of the drive and press Enter:
Type the following command to start the tool and press Enter:
Type the following command to disable the task waking up the computer and press Enter:
In the command, make sure to change PATH\TO\TASK with the path for the scheduled task you determined earlier using the powercfg /waketimers .
This example disables the Universal Orchestrator Start task:
 Disable scheduled task waking up PC command on Windows 10
Once you complete the steps, Windows 10 should no longer wake up your computer. If you found multiple tasks waking up the computer, you may need to repeat the steps to disable those scheduled tasks as well.
Stop automatic maintenance from waking up computer
Windows 10 includes a feature to perform automatic maintenance, which can cause the computer to wake up automatically (usually at middle of the night).
To prevent automatic maintenance from waking up device, use these steps:
Open Control Panel.
Click on System and Security.
Click on Security and Maintenance.
Expand the Maintenance section.
Under the “Automatic Maintenance” section, click the Change maintenance settings option.
 Change maintenance settings on Windows 10
Clear the Allow scheduled maintenance to wake my computer at the scheduled time option.
 Disable wake up timer for Windows 10 automatic maintenance
(Optional) Change the maintenance schedule time as needed.
Click the OK button.
After you complete the steps, the computer will no longer wake up to perform an automatic maintenance.
Disable all wake timers on Windows 10
If you want to prevent any scheduled task or device from waking up your computer, you can disable all wake timers globally.
To disable wake timers on Windows 10, use these steps:
Open Settings.
Click on System.
Click on Power & sleep.
Under the “Related settings” section, click the Additional power settings option.
 Additional power settings option on Windows 10
Click the Change plan settings option for the current power plan option.
 Power options change plan settings option
Click the Change advanced power settings option.
 Change advanced power settings
Expand the Sleep branch.
Expand the Allow wake timers branch.
In the “Setting” field, select the Disable option.
 Disable all wake timers on Windows 10
Click the Apply button.
Click the OK button.
Once you complete the steps, device nor scheduled task will no longer be able to run while the computer is asleep or hibernating preventing the computer from waking up automatically.
We may earn commission for purchases using our links to help keep offering the free content. Privacy policy info.
All content on this site is provided with no warranties, express or implied. Use any information at your own risk. Always backup of your device and files before making any changes. Privacy policy info.


