- Pros, Cons, and Costs of Floor to Ceiling Windows (with 15 Examples)
- A. Pros and Cons of Floor to Ceiling Windows
- B. How Much is the Price for Floor to Ceiling Windows?
- Floor to Ceiling Windows
- Floor to Ceiling Window as A Wall
- Floor-to-Ceiling Windows with Half Circle Frame
- Floor-to-Ceiling Window with Cathedral Style
- The Cost of Floor to Ceiling Windows
- Floor to Ceiling Window: Pros & Cons
- Floor to Ceiling Window: THE PROS
- Floor to Ceiling Window: THE CONS
- Sweet Home 3D Blog
- How to design a sloping ceiling with a window
- Create your space
- Prepare the sloping ceiling
- Export your sloping ceiling
- Import your sloping ceiling
Pros, Cons, and Costs of Floor to Ceiling Windows (with 15 Examples)
Published date: April 17, 2021 by Shana Yuri
From various upgrades to add in a house, floor to ceiling windows are among the most dramatic. Having these windows will quickly transform any room. They are large, allowing much natural light, but of course with several downsides.
Are you interested in installing floor to ceiling windows? Read this guide first, so you have the right expectations.
Table of Contents
A. Pros and Cons of Floor to Ceiling Windows
Installing floor to ceiling windows presents you with a set of pros and cons. Understand them before paying extra for such large glass windows.
Pros
- More natural light (which means saving more energy)
- More visual access to natural beauty outside
- Improving a small house, making it look more spacious
- Improving a regular house, making it more interesting
Cons
- Offering less privacy than regular windows
- Prone to vandalism, such as rock-throwing
- More expensive in installation, glazing, and special frames
- More difficult to clean and maintain
These windows can also heat a room more quickly, which demands more installation products to prevent extreme temperature exposure.
B. How Much is the Price for Floor to Ceiling Windows?
Calculating floor to ceiling window cost can be difficult because it depends on the exact calculations. If you choose wall-style windows (large, solid plates that extend from top to bottom), you should pay between USD700 and USD1,600 per foot.
If you like something unique, try a curved window. It does not reach the ceiling because of the shape. Expect to pay USD450 for every foot. The costs will add up if you ask for extra features, such as special glaze, custom shape, or double pane.
Floor to Ceiling Windows

A floor to ceiling window is famous for the effect it’ll expose you. A regular window acts as a border that prevents you from the outside world.
This model, however, fuses you with nature outside of your house.
Moreover, this model is increasingly used in modern-day houses. If you don’t believe that, we’ve provided you with the reasons why people choose to use the floor-to-ceiling windows.
The reasons will start with these three floor-to-ceiling windows styles.
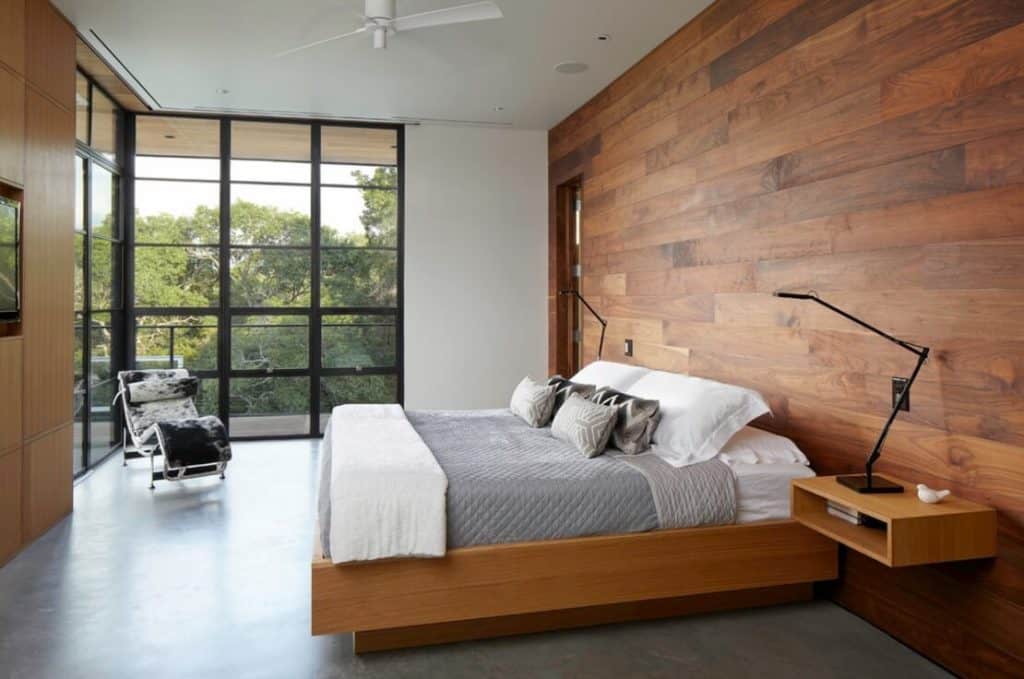
Floor to Ceiling Window as A Wall
Let’s say your house is located by the lake, like what’s seen in the picture.
It’ll be foolish if you border the house from the view. Utilize the floor to ceiling windows as a wall to obtain a stunning look.
Preferably, the windows are installed in the room where the kitchen, eating table, and relaxing couch located.
The glass provides an infinity effect. Besides, it’s easier for natural light to come in and shines the entire room.
Remember, this model is suitable for houses with a beautiful garden, an inviting swimming pool, or other serene scenery that offers relaxation.
However, one of the challenges of installing floor to ceiling windows is the measurement is a bit tricky. It’s challenging to acquire the precise measurement so that the window will fit perfectly.
Moreover, the price per foot is between $700 and $1,600.
 imgur.com
Some factors that are included in the price are the frame and glazing. One of the things that increase the fee is the energy-effective system that comes with the product.
This system can be seen through the frames which are insulated and the Low E finishes.
Remember, altering the look of your house isn’t just a matter of updating furniture, it’s also about effectiveness.
As an adult, you have to make a financial plan, right?
Therefore, you need to make a reasonable expense. Since the floor to ceiling window is the most preferred model these days, the cost must be high. Another alternative is the moving glass door.
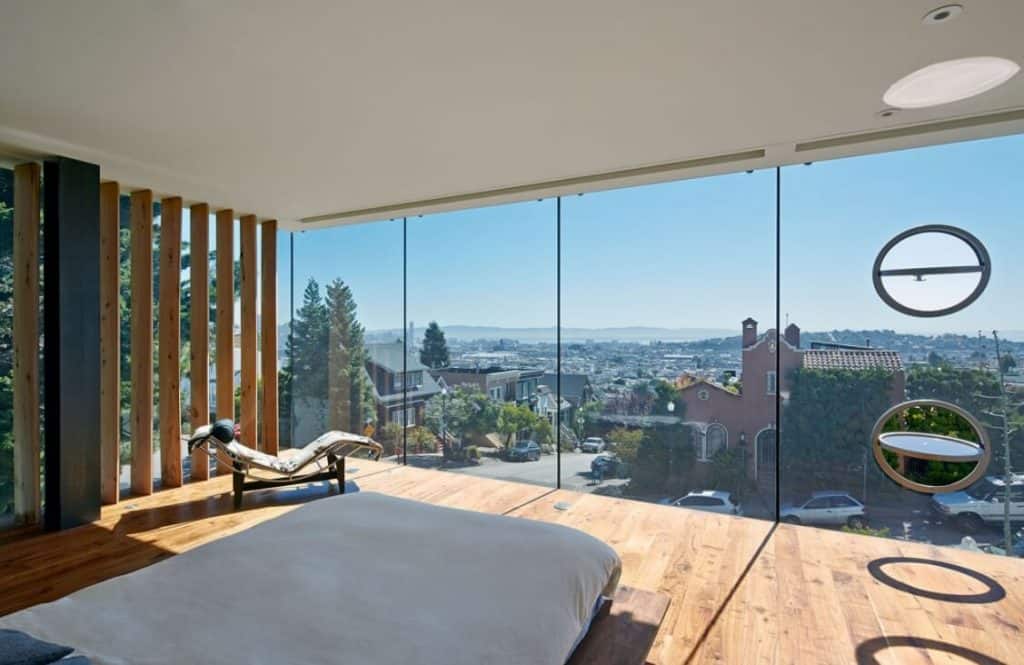
Floor-to-Ceiling Windows with Half Circle Frame
Transforming an entire wall into a floor to ceiling window-wall is quite an obstacle, but the result is impeccable.
Look at this stunning view, enjoying the city life while eating dinner is something else.
Moreover, the floor to ceiling window model for this style has a geometric frame, which adds to its uniqueness.
If your space is small and you’re eager to have a bigger room, this floor to ceiling window with a geometric frame is a great alternative.
The cost of this type of window is more affordable when buying it form a factory.
 czmcam.com
However, when it comes to the price, you can plan the budget first. The cost will depend on the model that you choose.
It can either cost you over $450 for a mid-grade image window or lower. The expense needed to pay the installer is excluded.
Read Also:
Floor-to-Ceiling Window with Cathedral Style
Not a fan of the geometric frame windows? Hate to see a large square window too?
Well, have no fear, my friends. We have you these unique, beautiful cathedral style floor-to-ceiling windows.
This method is more gothic than just beautiful. Especially if your house has a high ceiling, such as the example, this model will be appropriate.
A lot of people utilize this model are scared that the model’s style will alter the look and the atmosphere of the room.
However, the problem can be solved by using less decoration, which has angular lines and more glass pieces.
As a result, the area will look fantastic.
You can come up with your design.
By doing so, the price may be higher or lower depends on the design you want to realize.
 hungarianprovence.com
If you’re eager to own a vintage mansion-like room such as this one, we suggest you consult a professional or a high-end interior designer, so you can also make a budget plan.
Remember, consulting requires more expenses, even when you’re told to choose pieces with high quality or limited uniqueness, the cost will increase.
For a more affordable price, go with a pre-made panel, because a customized craftsmen piece requires more expense.
If you’re willing to walk around a little bit, you can find pieces below $5,000. Moreover, you’ll find pieces that look incredible and appropriate to your taste.
If you like to put unique decor on your ceiling, you would love to see Avantela’s post on ceiling decor ideas.
The Cost of Floor to Ceiling Windows
Eventually, it all comes to the cost. The cost of floor to ceiling windows is various.
You can either purchase a stunning high-end looking model with a reasonable price or an ordinary model with a high price.
Talking about price, we know that it’s always been various.
The cost of floor to ceiling windows depends on what material you’re planning to use, how tall your house is, what quality of the glass will be, additional options, or simply what brand you go with.
According to the material cost calculator, you can purchase an 8 ft. window for less than $1500, with a 7 out of 10 quality.
The cost of floor to ceiling windows can be expensive, and they can be cheap too.
It’s understandable if the glass is too expensive.
If that’s the case, vinyl and fiberglass can be great alternatives because they’re cheaper. Even though they’re the most affordable, they have the lowest quality compared to wood.
But, if you prefer quality and do not care about the price, then a full customized wood type of floor to ceiling windows is your perfect match. The choice is all yours.
Wood material has the best quality; therefore, when the price isn’t the primary obstacle, customized wood floor to ceiling windows should be the choice.
Moreover, you can ask for additional features, such as double-pane, glazing options, slider, custom shape, etc. will cost you more than the standard price.
Floor to Ceiling Window: Pros & Cons
Floor to Ceiling Window: THE PROS
Since floor to ceiling window is merging the function of wall and window, the natural light that comes through it becomes the most important aspect.
Installing this model can help you relax because of the enjoyable view.
We all agree that the outside view becomes more enjoyable when viewed from the floor to ceiling window, but there is one more aspect that becomes essential, that is the spaciousness of the inside room.
As you see, the floor to ceiling window provides an infinity view, eliminating the border between the living space and nature outside. As a result, the living area becomes more spacious.
Floor to Ceiling Window: THE CONS
Despite how great the floor to ceiling window is, there are—still—some disadvantages or cons. One of the concerns of having the floor to ceiling window is the loss of privacy.
Yet, that is such an issue can be tackled down by simply using drapes or solar tones.
If you prefer losing privacy, then it will become a significant security issue, even more, when it comes to the room’s temperature.
The floor to ceiling window is an open medium between you and the outside world.
Without proper tempering, the heat will come inside, elevating the temperature.
Especially if you have children, pets, or both, a glass window might become a huge problem.
I love the idea that I’ll get to fuse my house with the nature that exists outside of my house if I get a floor-to-ceiling window. Though I love to have a house with no windows in it, I realized its importance when I got to live in one and I got really sad and frustrated because I got no view at all until I have to get out of the house just to let the sunshine in. If I were to choose, I’ll hire someone to install such kinds of windows in the living room once I begin my new house’s construction that I’ll tailor to have a modern look to it so that it would suit its theme.
Great article… thank you for all the pictures to explain the options.
Sweet Home 3D Blog
This blog presents news and tips about Sweet Home 3D.
How to design a sloping ceiling with a window
With Sweet Home 3D, you can’t incline neither a wall, nor a window, except when you import them as an object.
This tip shows the way to tilt an item; in this case, a wall with a window in it, which will be used as a sloping ceiling (Sweet Home 3D is able to compute a sloping ceiling but you can’t add any window to it).
You will find this tip useful to design a room under a roof, for example.
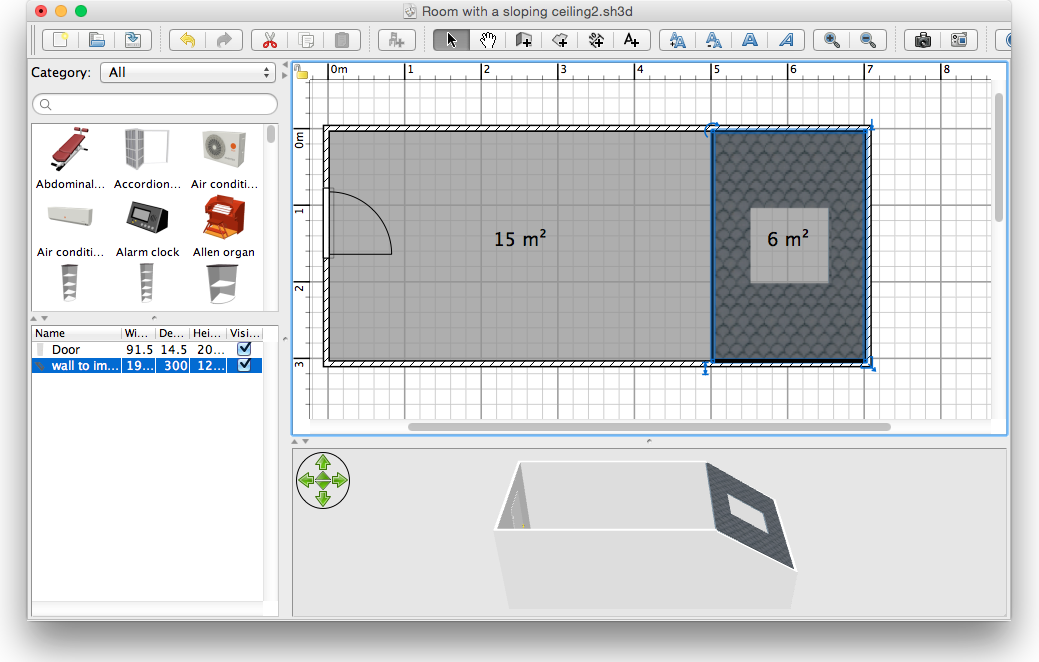
Create your space
Draw 2 separated rooms:
- One with the flat ceiling,
- The other will receive the sloping ceiling.
In our example, we drew first the rooms with the Create room tool and added the walls by double clicking in each rooms. Then, we removed the wall in the middle.
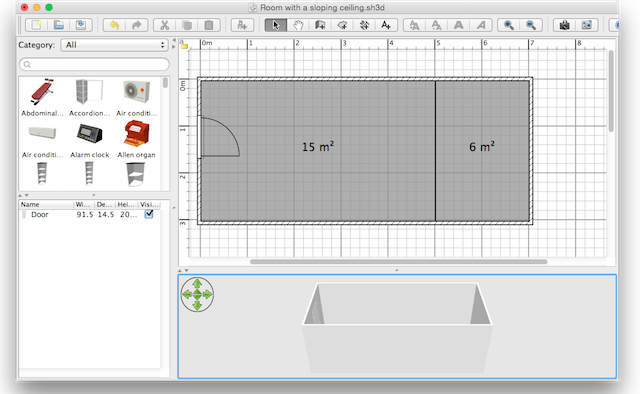
Prepare the 3 walls where the sloping ceiling will appear:
- Change the height at end for the wall number 1.
- Change the height at start for the wall number 2 (see the picture below).
- Change the whole height of the rectangular wall number 3.

Prepare the sloping ceiling
Open a new file and create a simple inclined wall, with an angle approximately equal to the sloping ceiling one. This will be your sloping ceiling.
Then insert a window in the middle. Here we chose a Fixed window.
For a good rendering, you’d better:
- Choose the aspect of each wall side, especially if you want to apply textures inside the room.
- Check the height of your wall which should match the length of wall 3 of the room.
- Check the difference between abscissa X of the start point and the end point : it has to be approximatively equal to the length of walls 1 and 2.
Pay attention because you won’t be able to change this wall, once imported as the «ceiling» object (it is quite difficult to have the perfect result at the first time…).

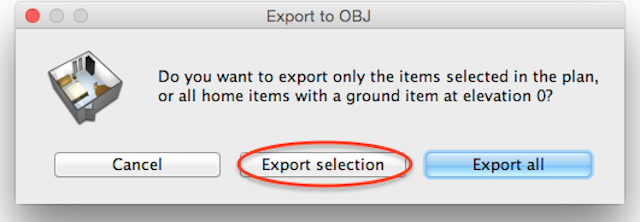
Export your sloping ceiling
Ensure that the wall and the window are selected.
Choose 3D view > Export to OBJ format menu item, enter a file name and when prompted, select Export selection option.
Import your sloping ceiling
Come back to your main file. Choose Furniture > Import furniture menu item and select the file of your exported model (your wall).
At the second step of the Furniture import wizard, change the orientation of your wall to display entirely the roof side in the Top view.
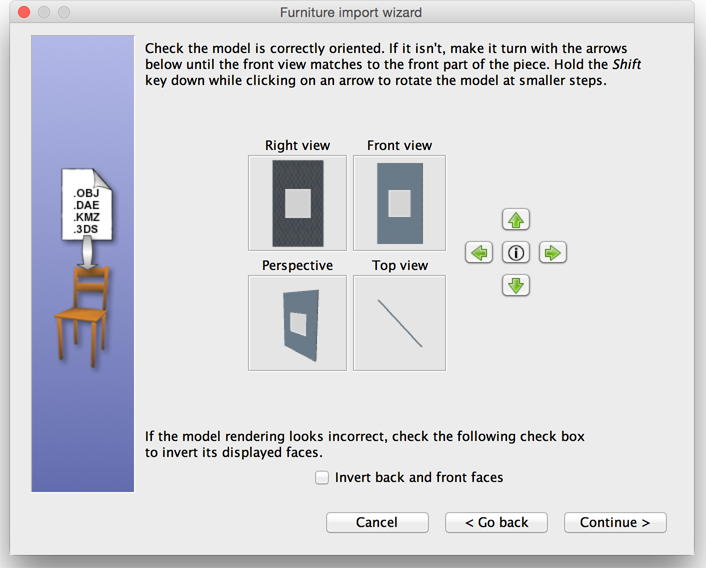
Initial orientation

Correct orientation
At the third step of the Furniture import wizard, adjust the elevation of your ceiling.
Finally, place your imported ceiling at the desired position. You might have to correct its height to get a perfect result.
To view the ceiling of the main room from bottom, don’t also forget to double click on the main room and select the ceiling Visible check box in its modification pane.
Now you are ready to decorate your room (make your sloping ceiling invisible temporarily to add any kind of objet under it more easily).
Enjoy your life style under the roof!

If you’re interested, the home file created in this tip is available in the file RoomWithSlopingCeiling.sh3d.
[Note than from version 5.5, you can rotate furniture different from doors and windows around their horizontal axis, so you might find it easier to design the wall with its window vertically, and rotate it afterwards once imported]


