- Установка сервера World Of Warcraft 3.3.5 на ubuntu 18.04
- 1. Установка ПО:
- 2. Выключение STRICT_MODE в Mysql 5.7 (требуется для работы TrinityCore)
- 3. Создаем пользователя и заходим под ним:
- 4. Скачиваем Trinity Core
- 5. Компиляция сервера
- 6.Копируем конфигурационные файлы из шаблонов
- 7. Извлекаем ресурсы из клиента
- Извлекаем DBC и файлы карт:
- Извлекаем Визуальные карты:
- Извлечение карт передвижений
- 8. Настройка базы данных для Trinity
- Создадим пользователя и БД:
- 9. ОПЦИОНАЛЬНО: проброс портов, открытие портов:
- 10. Запуск сервера
- 11. Создание аккаунта и назначение GM
- 12. Настройка клиента
- В итоге.
- Warcraft III + ICCup на Linux (рабочая версия)
- 5 Комментарии “ Warcraft III + ICCup на Linux (рабочая версия) ”
- How can I run Warcraft 3 on Ubuntu 18.04?
- 2 Answers 2
- Install Warcraft 3 on Ubuntu Linux – A Visual Guide
- 1. Video Drivers
- 2. Install WINE
- 3. Game Installation
- 4. Post-Installation
- Game Screenshots
Установка сервера World Of Warcraft 3.3.5 на ubuntu 18.04

Захотелось мне вспомнить старые пейзажи. Да и просто занять чем-то руки и голову, и решил я на свой простаивающий домашний сервачок нагнать ужаса ледяного, от Короля Личей… Короче, решил сервер WOW поднять под linux. Поглядел чего из эмуляторов есть, почитал мануал, да и запустил. Запустил Trinity Core 3.3.5 версию на ubuntu 18.04. О чем вам и спешу рассказать.
1. Установка ПО:
2. Выключение STRICT_MODE в Mysql 5.7 (требуется для работы TrinityCore)
Содержимое файла:
3. Создаем пользователя и заходим под ним:
4. Скачиваем Trinity Core
5. Компиляция сервера
Смотрим что исходники (директория /home/wow/TrinityCore и её содержимое) на месте. У меня почему-то её не оказалось. Пришлось клонировать заново.
6.Копируем конфигурационные файлы из шаблонов
7. Извлекаем ресурсы из клиента
Где искать клиент 3.3.5 — дело сугубо лично ваше. По интернету их полным полно
Извлекаем DBC и файлы карт:
изменить datadir c «.» на «/home/wow/server/data»
Извлекаем Визуальные карты:
Далее в той же директории клиента продолжаем:
Примечание: если остановить работу vmap4extractor до завершения, то нужно будет удалить директорию Buildings прежде чем начать заново извлечение vmaps.
По завершению работы, которая в зависимости от железа может занять длительное время, вы получите сообщение что-то типа такого:
Это нормально. Главное что нет ошибок.
Извлечение карт передвижений
Опиционально, делается еще дольше чем vmaps, но рекомендуется.
8. Настройка базы данных для Trinity
Идем по адресу: https://github.com/TrinityCore/TrinityCore/releases
Находим последний релиз TDB 335, копируем ссылку на 7z архив далее:
Создадим пользователя и БД:
mysql > USE mysql;
mysql > CREATE USER ‘trinity’@’localhost’ IDENTIFIED BY ‘password’;
mysql > GRANT ALL PRIVILEGES ON `trinity`.* TO ‘trinity’@’localhost’; mysql > FLUSH PRIVILEGES;
Экcпортируем в mysql файл create_mysql.sql
Поправить /home/wow/server/etc/worldserver.conf и /home/wow/server/etc/authserver.conf указав пользователь;бд;пароль :
Заменить trinity;trinity;trinity на trinity;trinity;password
Далее БД должна экспортироваться при первом запуске world сервера.
9. ОПЦИОНАЛЬНО: проброс портов, открытие портов:
для 3.3.5 используются порты: 3724 и 8085
10. Запуск сервера
11. Создание аккаунта и назначение GM
Выполняется в консоли worldserver
12. Настройка клиента
Откройте realmlist.wtf внутри директории клиента World of WarcraftData. IP адрес внутри файла realmlist.wtf должен быть адресом вашего сервера.
Измените строку: set realmlist X.X.X.X
Например: set realmlist 127.0.0.1
Опционально: если хотите использовать WoW Launcher.exe для запуска клиента, то вы должны установить patchlist тот же ip/dns что и для вашего сервера.
В итоге.
Надеюсь у вас всё получилось, мой сервер запущен, все шаги я записывал, хотя мог что-то напутать или забыть.

Осталось подождать пока будет время зайти в игру и лично убедиться что всё работает. Пишите, кидайте скрины с вашей игры 😉
Источник
Warcraft III + ICCup на Linux (рабочая версия)
«Дело было вечером делать было нечего». И решил я все-таки попробовать установить iccup, но первые попытки не увенчались успехом… В итоге лаунчер сдался и запустил варкрафт, и даже подключился к батле =)
Для нелюбителей читать слезливые истории переходите сразу к процессу установки ниже.
Первым делом я прошелся по гуглу и почитал статьи на тему запуска iccup’a под никсами. Разработчики лаунчера на их форуме отказываются каким-либо образом помогать пользователям их беспристрастного античита запустить все это дело под ненавистной многим осью. Благо, они переписали его на Qt, что избавляет нас от некоторых проблем.
Первым делом я запустил iccup под «чистым» вайном, но он начал брыкаться при попытке указать путь к Warcraft’у, установленному через CrossOver (разработчики славно постарались, и под кроссовером он запускается даже на очень-очень слабой видеокарте, поэтому сначала вариант с запуском варкрафта под чистым вайном я не рассматривал).
Второй попыткой была установка лаунчера под собственно кроссовером, но и тут я уперся в тупик. Путь к war3.exe лаунчером принимался, но при запуске игры лаунчер выбивал ошибку «Внутренние ошибки — получены неверные параметры«. В темах на русскоязычном форуме убунты (к слову, я пользую Linux Mint 14) несколько раз проскакивали упоминания о playonlinux, и я решил попробовать и его…
Сразу оговорюсь, что нижеописанный способ установки возможно было бы провернуть и на чистом вайне, но все постигается методом проб и ошибок. Одной из причин возникновения проблем на чистом вайне скорее всего была его относительно старая версия (1.4.1), а как было сказано на каком-то форуме каким-то очень умным линуксоидом: лучше ставить альфа версии wine’a, так как они почти всегда будут лучше стабильных веток.
Итак, мой тернистый путь к запуску Iccup и Warcraft:
Будем считать, что у нас уже есть распакованная версия WarCraft и инсталятор лаунчера Iccup.
- Открываем терминал и вводим
или ищем playonlinux в центре приложений
playonlinux
или через меню приложений.
Теперь кликнув по ярлыку можно запустить лаунчер. При запуске он пытается обновиться, но у меня по какой-то неведомой причине он зависал на последних килобайтах первого или второго файла, поэтому я решил забить на это дело и просто выключил автообновление лаунчера.
Подготовка клиента Warcraft:
Как уже было сказано, будем считать, что у нас уже лежит в отдельной папке и ждет своего часа распакованная версия Warcraft. Я ее взял из кроссовера, но с отдельно скачанным клиентом проблем возникнуть не должно.
и копируем сюда клиент Warcraft
В лаунчере (если он еще не запущен, надо его запустить) жмем на кнопку «Начать игру» и указываем ему путь к war3.exe, который будет лежать в соседней папке. После этого игра запускается, и мы спокойно входим в Battle.NET.
Проблема №1. Игра запускается, но видим множество артефактов (причина из-за слабой видеокарты).
открываем файл user.reg и вставляем в него где-то после «Keyboard Layout» (в принципе местоположение не важно, самое главное, чтобы там не было записей Warcraft. Если они есть, надо их заменить) на следующие параметры:
После этого у меня клиент запустился без проблем, дальше уже настроил по своему вкусу.
Проблема №2. При попытке присоединиться к игре пишет, что порт уже занят.
Решение простое. Идем в настройки и меняем порт в разделе «Игра» на отличный от 6112 (6114 к примеру)
5 Комментарии “ Warcraft III + ICCup на Linux (рабочая версия) ”
Решение простое. Идем в настройки и меняем порт в разделе «Игра» на отличный от 6112 (6114 к примеру)
это где ? в playonlinux Настройки ? или в самом warcraft-e ?
Забил немного на блог, извините =)
сейчас случайно увидел, в самом варкрафте настройки сразу после запуска
Дохуя вас тут таких умных. На деле глюки сплошные.
Источник
How can I run Warcraft 3 on Ubuntu 18.04?
The guide here : How to install World of Warcraft? has not worked for a decade. this question needs to be answered anew and with the particular context of ubuntu 18.04.1 and Wine development halting:
Wine is undergoing a bit of an odd transition. The maintainers of Wine’s staging branch recently abandoned it, but the Lutris project quickly picked it back up.
At the time you’re reading this, it might not be a concern, but right now, it definitely is. As a result, the main guide will focus on the latest vanilla Wine release from Ubuntu, but you can absolutely install the latest staging or Gallium Nine versions when they become available.
I think this particular build of Ubuntu is incompatible with past solutions for running Warcraft 3.
I get this screen:

I’ve tried many different methods:
This guide which is specifically for 18.04, with wine-staging, but using this source:
But at the end of the first guide I run:
this sticks out:
and I get the screen again:

2 Answers 2
I have faced the same problem: Same Ubuntu version, same tries, same everything; and I was about to go crazy. I have resorted to install the game on a Windows machine, zip the game folder and move it to my Linux.
And I discovered that somehow, the war3 LAUNCHER works better than the setup to install the game.
You still need a key to use the game, so I don’t care about giving out the exe.
It worked perfectly with staging-pba-3.18 for me, you’ll have to tell me if that works for you.
Online should be fine, you’ll need a warcraft3 «battle.net» account, that you can create in-game, the main concern would be Blizzard anti cheat not liking wine, but a lot of people, including myself, have been playing SC2 and Overwatch on wine for a while, and Blizzard does not seem to care, so I don’t see why they would care about War3.
I don’t know about LAN tho, and can’t really test it .
For the resolution, it’s really funny, cause it’s not a Linux bug, some people are also having the issue on Windows since patch 1.30 😀
Two possible fixes are:
Use the -nativefullscr argument when launching the game (it does not work for me, my graphics card would not output anything after the game launched, my screen behaved as if it was disconnected).
Edit the wine registry to force the startup resolution, which while feeling a bit hack-ish works really well. Keys are in HKEY_CURRENT_USER/Software/Blizzard Entertainment/Warcraft III/Video and you want to change resheight and reswidth to your screen size, values are in hexadecimal, but the input window should allow you to type in decimal values.
Note that while the game will be rendered in the resolution and aspect ratio you want, the menu will stay in 4/3.
Источник
Install Warcraft 3 on Ubuntu Linux – A Visual Guide
June 4, 2009 — Reading time: 16 minutes
 Warcraft 3 may be far from the hottest new game out there, but it’s still one of the most fun games I’ve ever played. And thanks to advancements in the WINE project, it’s also easy to install and run on the Linux operating system. Plus, it doesn’t require massive hardware just to run decently.
I remember trying to get my Warcraft 3 Battle Chest running in Linux a few years ago and ran into several problems. Now, it’s practically a point-and-click experience.
While these directions are specific to Ubuntu, most any other Linux variant should be similar. I tested these instructions on both Ubuntu 8.04 LTS and the current version 9.04. All the screenshots are from Ubuntu 9.04 Jaunty,
The main system specifications I used are quite modest ancient indeed, but Warcraft 3 ran fine anyway.
- Processor – AMD Athlon XP 2400+ (2.0 GHz)
- RAM – 1 GB PC2100 (266 MHz)
- Video Card – Nvidia GeForce 7600 GS (512 MB)
1. Video Drivers
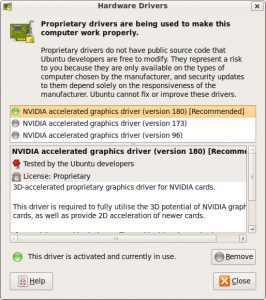 It goes without saying that in order to play most video games, you need video acceleration. Fortunately, the last few releases of Ubuntu have all offered a convenient way to install proprietary video drivers.
To install most common video drivers, go to System -> Administration -> Hardware Drivers. You can see if you already have a proprietary video driver in use, or if there is one available to install.
Ubuntu found and installed a driver for my Nvidia card just fine. I don’t own any ATI video cards, so I cannot offer any help there.
To see if you have video acceleration enabled, fire up a Terminal and type:
If the direct rendering response is Yes, then you’re in business.
2. Install WINE
WINE is a translation layer with a somewhat-humorous full name of Wine Is Not (an) Emulator. No matter what you call it, WINE provides an easy way to run a growing number of Windows applications on Linux and other POSIX-compatible operating systems.
Installing WINE on Ubuntu is as simple as launching a Terminal and typing:
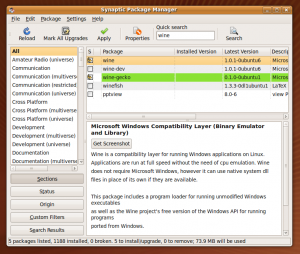
Alternatively, you can launch the Synaptic Package Manager (System -> Administration) and search for wine. Just add a check next to the wine package, then click the Apply button to download and install.
Following these instructions will install the latest stable release of WINE. On Ubuntu 9.04, the current stable WINE release is version 1.01. To find out which version you have installed, launch a Terminal and type:
I found that both version 1.0 and 1.0.1 worked well for running Warcraft 3.
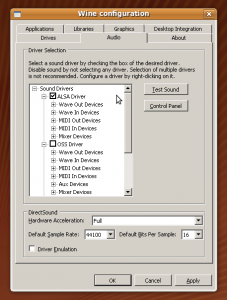
Once WINE is installed, go ahead and launch it (Applications -> Wine -> Configure Wine). The default settings should be fine, but I do suggest that you take a look at the Audio settings and ensure that a suitable sound driver is selected.
I suggest sticking with the ALSA driver by default. If the sound is garbled or doesn’t work well, try switching to the older OSS driver.
Click OK to save your settings. Now it’s time to install Warcraft 3.
3. Game Installation
This may come as a shock, but installing Warcraft 3 on Linux is practically no different from installing it on Windows. You will need a copy of the game and valid serial numbers. If you don’t have it, the Battle Chest is pretty cheap.
Pop in the CD for Reign of Chaos. You should see an icon for the disc load on your desktop. Double-click that disc icon to view the contents. Find the file called install.exe and open it. It should open automatically with WINE and start the installation process.
From there, install the game just as you would on a Windows system, including choosing an installation path of C:\Program File\Warcraft III. Yes, WINE handles that for you automatically.
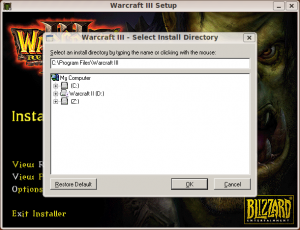
Allow the game to install as usual. If you have The Frozen Throne expansion pack, install it as well. Do not play the game yet!
Update Patch
Recent Warcraft 3 game updates have removed the requirement to run with the original disc in the drive. Therefore, unless you’re just a glutton for punishment, I suggest downloading and installing the latest game patch instead of hunting for a No-CD crack.
The current game update (as of this writing) is 1.23a. Once the patch downloads, just double-click to install. It should open with WINE and install just like on a Windows machine.
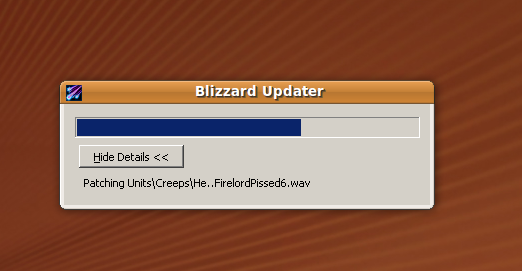
Note: once the Blizzard Updater finishes patching the game, it will try to launch Warcraft III automatically. If the game crashes or freezes, don’t worry. We’ll fix that in the post-installation below.
4. Post-Installation
On my system, the game froze upon first launch. The reason is that it tries (and fails) to play the opening cinematic video. We can easily work around this issue by renaming the Movies folder.
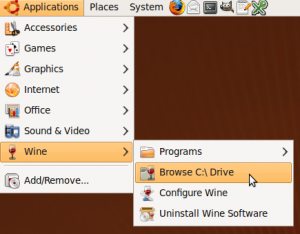
Go to Applications -> Wine -> Browse C:\ Drive. Pretend that you’re on Windows now and continue to Program Files -> Warcraft III. Rename the Movies folder to something else, such as _Movies.
As you might suspect, this is only a workaround and not a true fix. It prevents any in-game cinematic videos from playing, but does not affect game-play in any way. You can still watch those videos at any time by opening them in something like Totem or VLC.
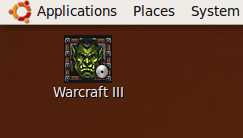
Try launching the game now. You’ll find it under Applications -> Wine -> Warcraft III.
Visual Effects
Here’s another minor issue you might run into. When you launch the game, it runs fine, but you still see the horizontal Ubuntu panels across the top and bottom. Annoying, huh?
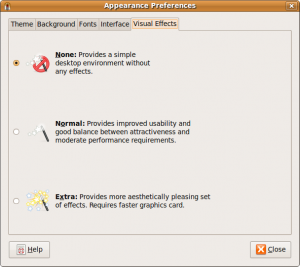
It’s easy enough to fix. On my system, I found that they were caused by having some visual effects enabled in Ubuntu. As nice as the eye candy may be, try disabling it before launching Warcraft III.
Navigate to System -> Preferences -> Appearance and switch to the Visual Effects tab. Set the level to None. When you launch the game again, the panels should be gone.
Create Launcher
Now that the game is installed and working, let’s create a launcher for it.
Right-click on your desktop and Create Launcher. Here are some parameters:
- Type – Application
- Name – Whatever you want
- Command – “/home/your-username/.wine/drive_c/Program Files/Warcraft III/Frozen Throne.exe”
The command is simply the full path to the Warcraft III executable file (in quotes). You can also add some options at the end of the command, after the quotes. For instance, you may get better performance by adding an opengl option, like this:
«/home/your-username/.wine/drive_c/Program Files/Warcraft III/Frozen Throne.exe» -opengl
You can stack the options. For instance, if you want to require opengl AND make the game run in its own window, try this:
«/home/habibbijan/.wine/drive_c/Program Files/Warcraft III/Frozen Throne.exe» -opengl -window
Icons
If you’re looking for a couple of good icons to use with your launcher, feast your eyes on these.
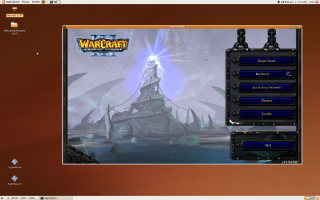
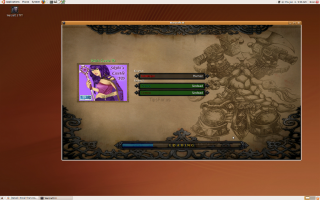
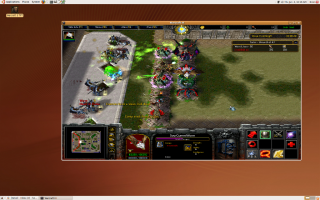
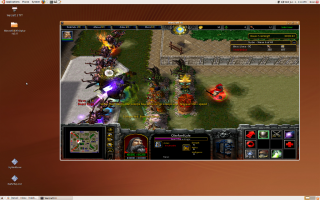
Game Screenshots
For your viewing pleasure, here’s are a few screenshots of Warcraft III running on Ubuntu. I ran the game in window mode instead of full-screen to prove that it does work on Linux. Yeah, I enjoy Skibi’s Castle a lot.

Have fun! If you have any additional tips for running Warcraft III on Linux, let us know in the comments.
Источник


