- WebStorm
- Информация
- Описание
- Install WebStorm
- System requirements
- Install using the Toolbox App
- Install the Toolbox App
- Install the Toolbox App
- Install the Toolbox App
- Standalone installation
- Silent installation on Windows
- Silent configuration file
- Install as a snap package on Linux
- WebStorm для Mac OS
- Mac OS
- Windows
- Linux
- Характеристики
- Описание
- What’s new in WebStorm 2021.2
- Code Editing
- Reload pages on save
- Actions on save
- Faster creation of scratch files
- Synchronized completion for Code With Me
- JavaScript & TypeScript
- Auto-import for require()
- Support for TypeScript types in JSDoc
- New action for arrow functions
- Preview tab when debugging
- Frameworks & Technologies
- Rename refactoring for React useState hooks
- Completion for private npm packages
- Support for classnames and clsx libraries
- Generic support for web-types
- Version Control
- New pre-commit check
- GPG signature support
- Local History search
- Usability
- Localized UI
- Faster tool window reorganization
- Easier customization of project icons
- Update notifications from the Toolbox App
- Improved Preferences / Settings dialog
- Automatic cache and log cleanup
- New features for the built-in terminal
WebStorm
Информация
Описание
WebStorm – среда для разработки на jаvascript, которая подходит как для front-end-разработки, так и для создания приложений на Node.js.
Главное достоинство WebStorm – это удобный и умный редактор JavaSсript, HTML и CSS, который также поддерживает языки, такие как TypeScript, CoffeeScript, Dart, Less, Sass и Stylus и фреймворки, например, AngularJS, React и Meteor.
WebStorm, как и другие IDE, разработанные на основе платформы IntelliJ IDEA, делает разработку проще и удобней, обеспечивая подсветку и автодополнение кода, его анализ по ходу редактирования, быструю навигацию и рефакторинг и предоставляя разработчику мощные инструменты отладки и интеграцию с системами управления версиями. WebStorm по-настоящему понимает структуру вашего проекта и код, обнаруживает возможные проблемы еще до того, как вы открыли проект в браузере, и предлагает их решение. Встроенные в IDE инструменты для тестирования и работы с проектом помогут в разработке и сделают ее удобней и продуктивней.
Умный редактор кода
WebStorm находит применение всем возможностям современной jаvascript-экосистемы! Используйте умное автодополнение кода, проверку ошибок на лету, быструю навигацию по коду и рефакторинги для jаvascript, TypeScript, языков стилей, а также для популярных фреймворков.
Отладить приложение можно прямо в IDE: cтавьте точки останова в исходном коде, просматривайте стек вызовов, следите за значениями переменных и используйте интерактивную консоль.
Тесная интеграция с инструментами
Пользуйтесь преимуществами разных инструментов, интегрированных с IDE: REST-клиента, линтеров, инструментов сборки и запуска тестов. Если нужна командная строка, она всегда под рукой – прямо в IDE.
Юнит-тестирование
Запускайте и отлаживайте тесты с использованием Karma, Mocha, Protractor и Jest прямо в WebStorm. Результаты тестов мгновенно отобразятся в редакторе, а также в отдельном окне в виде дерева, из которого можно легко перейти к любому тесту.
Интеграция с системами контроля версий
Используйте простой универсальный интерфейс для работы с Git, GitHub, Mercurial и другими системами контроля версий. Делать коммиты, просматривать внесенные изменения и разрешать конфликты можно прямо в IDE.
Источник
Install WebStorm
WebStorm is a cross-platform IDE that provides consistent experience on the Windows, macOS, and Linux operating systems.
System requirements
| Requirement | Minimum | Recommended |
|---|---|---|
| RAM | 2 GB of free RAM | 8 GB of total system RAM |
| CPU | Any modern CPU | Multi-core CPU. WebStorm supports multithreading for different operations and processes making it faster the more CPU cores it can use. |
| Disk space | 2.5 GB and another 1 GB for caches | SSD drive with at least 5 GB of free space |
| Monitor resolution | 1024×768 | 1920×1080 |
| Operating system | Latest 64-bit version of Windows, macOS, or Linux (for example, Debian, Ubuntu, or RHEL) |
You do not need to install Java to run WebStorm because JetBrains Runtime is bundled with the IDE (based on JRE 11).
Install using the Toolbox App
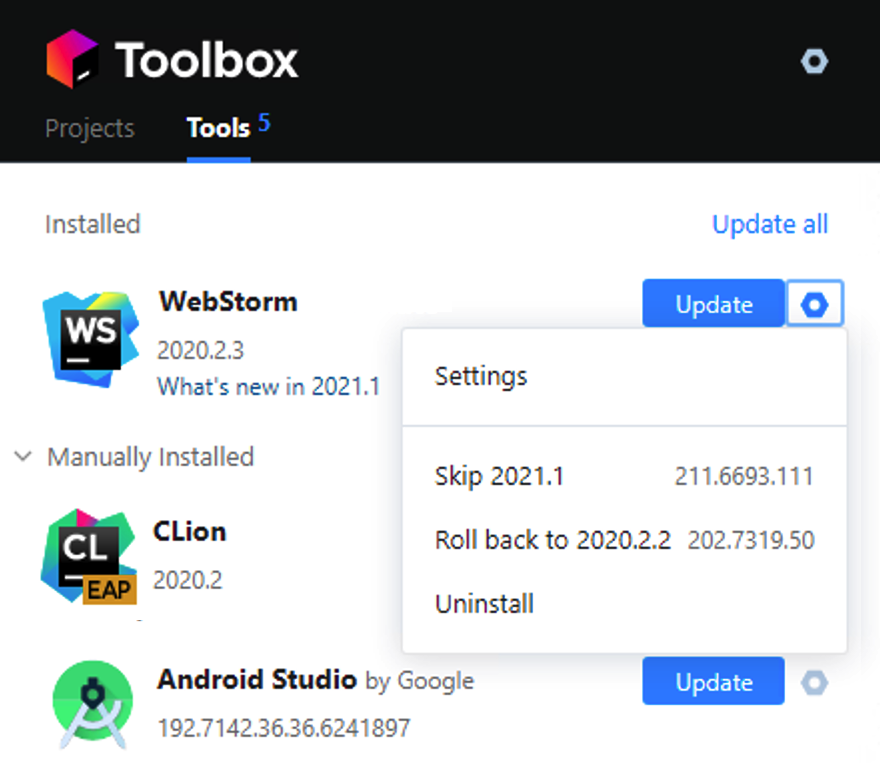
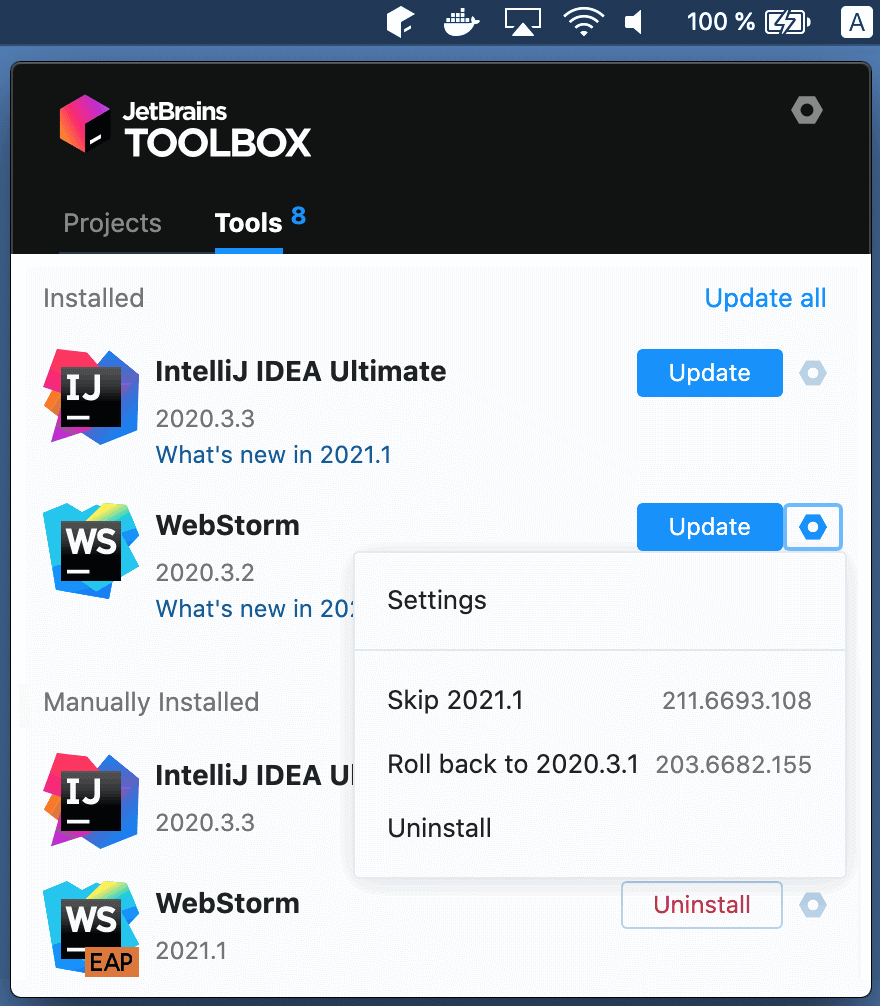
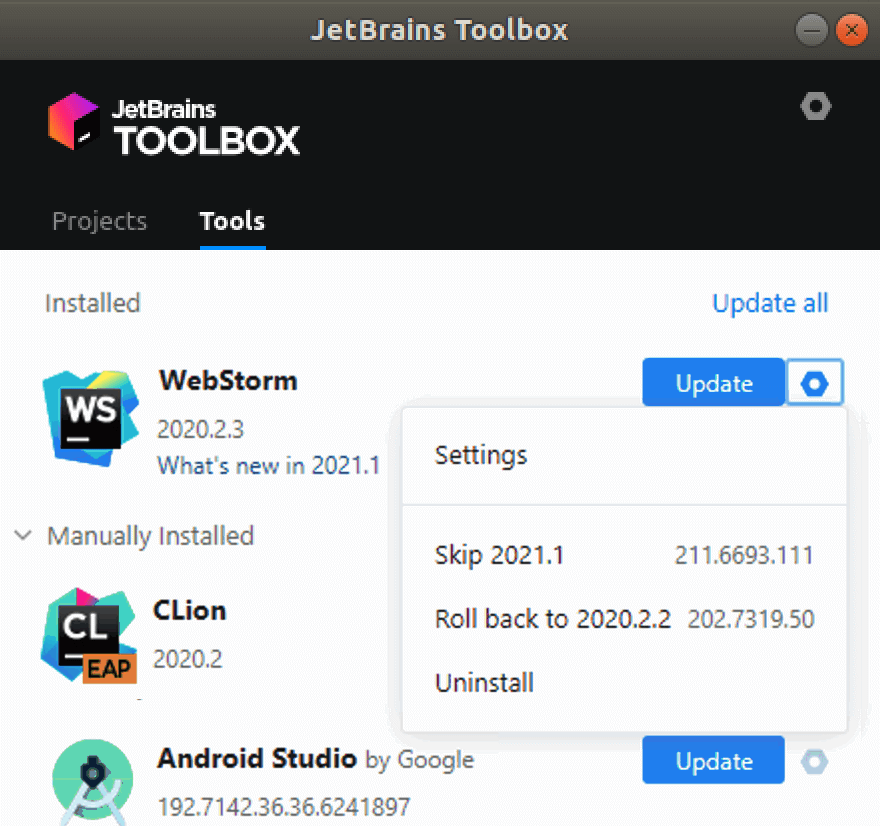
The JetBrains Toolbox App is the recommended tool to install JetBrains products. Use it to install and manage different products or several versions of the same product, including Early Access Program (EAP) and Nightly releases, update and roll back when necessary, and easily remove any tool. The Toolbox App maintains a list of all your projects to quickly open any project in the right IDE and version.
Install the Toolbox App
Download the installer .exe from the Toolbox App web page.
Run the installer and follow the wizard steps.
After you run the Toolbox App, click its icon in the notification area and select which product and version you want to install.
Log in to your JetBrains Account from the Toolbox App and it will automatically activate the available licenses for any IDE that you install.
Install the Toolbox App
Download the disk image .dmg from the Toolbox App web page.
There are separate disk images for Intel and Apple Silicon processors.
Mount the image and drag the JetBrains Toolbox app to the Applications folder.
After you run the Toolbox App, click its icon in the main menu and select which product and version you want to install.
Log in to your JetBrains Account from the Toolbox App and it will automatically activate the available licenses for any IDE that you install.
Install the Toolbox App
Download the tarball .tar.gz from the Toolbox App web page.
Extract the tarball to a directory that supports file execution.
For example, if the downloaded version is 1.17.7391, you can extract it to the recommended /opt directory using the following command:
Execute the jetbrains-toolbox binary from the extracted directory to run the Toolbox App and select which product and version you want to install. After you run the Toolbox App for the first time, it will automatically add the Toolbox App icon to the main menu.
Log in to your JetBrains Account from the Toolbox App and it will automatically activate the available licenses for any IDE that you install.
You can use this shell script that automatically downloads the tarball with the latest version of the Toolbox App, extracts it to the recommended /opt directory, and creates a symbolic link in the /usr/local/bin directory.
Standalone installation
Install WebStorm manually to manage the location of every instance and all the configuration files. For example, if you have a policy that requires specific install locations.
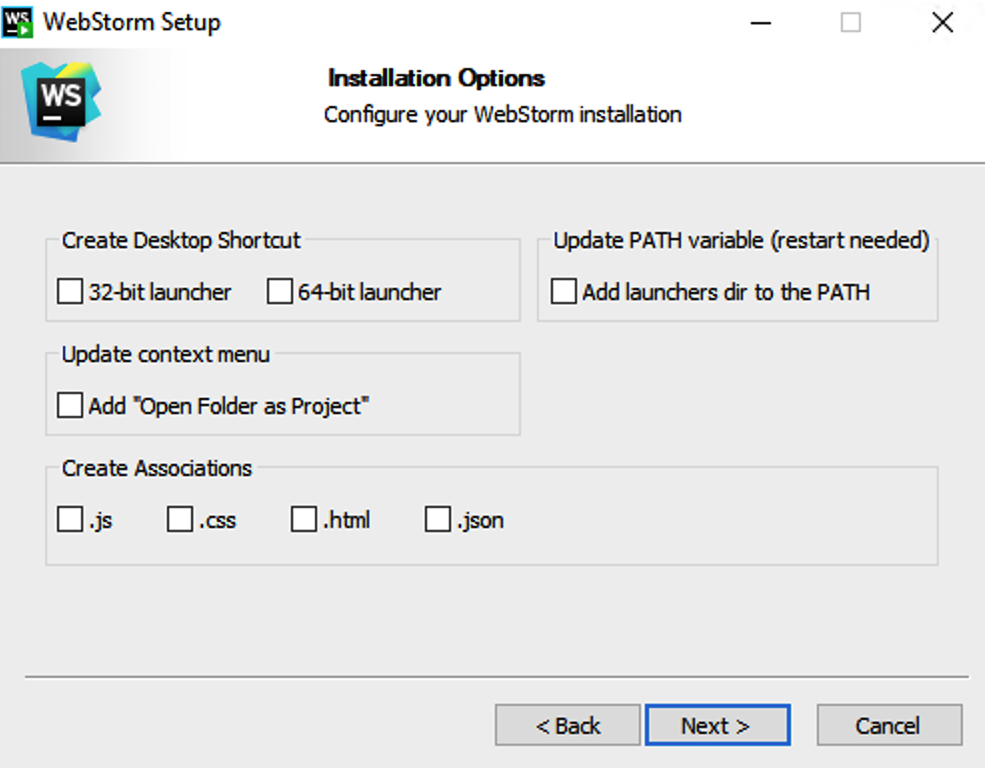
Run the installer and follow the wizard steps.
On the Installation Options step, you can configure the following:
Create a desktop shortcut for launching WebStorm.
Add the directory with WebStorm command-line launchers to the PATH environment variable to be able to run them from any working directory in the Command Prompt.
Add the Open Folder as Project action to the system context menu (when you right-click a folder).
Associate specific file extensions with WebStorm to open them with a double-click.
To run WebStorm, find it in the Windows Start menu or use the desktop shortcut. You can also run the launcher batch script or executable in the installation directory under bin .
There are separate disk images for Intel and Apple Silicon processors.
Mount the image and drag the WebStorm app to the Applications folder.
Run the WebStorm app from the Applications directory, Launchpad, or Spotlight.
Extract the tarball to a directory that supports file execution.
For example, to extract it to the recommended /opt directory, run the following command:
Do not extract the tarball over an existing installation to avoid conflicts. Always extract it to a clean directory.
Execute the WebStorm.sh script from the extracted directory to run WebStorm.
To create a desktop entry, do one of the following:
On the Welcome screen, click Configure | Create Desktop Entry
From the main menu, click Tools | Create Desktop Entry
For information about the location of the default IDE directories with user-specific files, see Directories used by the IDE.
Silent installation on Windows
Silent installation is performed without any user interface. It can be used by network administrators to install WebStorm on a number of machines and avoid interrupting other users.
To perform silent install, run the installer with the following switches:
/S : Enable silent install
/CONFIG : Specify the path to the silent configuration file
/D : Specify the path to the installation directory
This parameter must be the last in the command line and it should not contain any quotes even if the path contains blank spaces.
To check for issues during the installation process, add the /LOG switch with the log file path and name between the /S and /D parameters. The installer will generate the specified log file. For example:
Silent configuration file
You can download the default silent configuration file for WebStorm at https://download.jetbrains.com/webstorm/silent.config
The silent configuration file defines the options for installing WebStorm. With the default options, silent installation is performed only for the current user: mode=user . If you want to install WebStorm for all users, change the value of the installation mode option to mode=admin and run the installer as an administrator.
The default silent configuration file is unique for each JetBrains product. You can modify it to enable or disable various installation options as necessary.
It is possible to perform silent installation without the configuration file. In this case, omit the /CONFIG switch and run the installer as an administrator. Without the silent configuration file, the installer will ignore all additional options: it will not create desktop shortcuts, add associations, or update the PATH variable. However, it will still create a shortcut in the Start menu under JetBrains .
Install as a snap package on Linux
You can install WebStorm as a self-contained snap package. Since snaps update automatically, your WebStorm installation will always be up to date.
To use snaps, install and run the snapd service as described in the installation guide.
On Ubuntu 16.04 LTS and later, this service is pre-installed.
WebStorm is distributed via two channels:
The stable channel includes only stable versions. To install the latest stable release of WebStorm, run the following command:
The —classic option is required because the WebStorm snap requires full access to the system, like a traditionally packaged application.
The edge channel includes EAP builds. To install the latest EAP build of WebStorm, run the following command:
When the snap is installed, you can launch it by running the webstorm command.
To list all installed snaps, you can run sudo snap list . For information about other snap commands, see the Snapcraft documentation.
Источник
WebStorm для Mac OS
Mac OS
Windows
Linux
Версия: 2021.2.2 Build: 212.5284.41
Характеристики
Версия: 2021.2.2 Build: 212.5284.41
Обновлено: 2021-09-16 17:52:50
Размер: 472.66 МБ
Разрядность: 32 и 64 бит
Совместимость: Mac OS X
Описание
Программа представляет собой инструмент для разработки web-сайтов и редактирования HTML, CSS и javascript кода. WebStorm обеспечивает быструю навигацию по файлам и генерирует уведомления о возникающих проблемах в коде в режиме реального времени. WebStorm позволяет добавлять разметку HTML-документов или элементов SQL непосредственно в javascript. Программа осуществляет развертывание и синхронизацию проектов через протокол FTP.
Используя возможности кода HTML/XHTML и XML, WebStorm обеспечивает автоматическое завершение стилей, ссылок, атрибутов и других элементов кода. При работе с CSS осуществляется завершение кода классов, HTML-номеров, ключевых слов и т. д. WebStorm предлагает автоматическое решение таких проблем, как выбор формата, свойств, классов, ссылок на файлы и других атрибутов CSS. Решение позволяет использовать мощность инструмента Zen coding для верстки HTML, отображает действия тэга на web-странице. Продукт осуществляет завершение кода javascript для ключевых слов, лейблов, переменных, параметров и функций DOM и поддерживает специфические особенности популярных браузеров. Реализованные в решении функции рефакторинга javascript позволяют преобразовывать структуру кода и файлов и .js.
Источник
What’s new in WebStorm 2021.2
Reload pages in your browser on save, auto-import for require, a rename refactoring for React useState hooks, completion for private npm packages, and usability improvements.
Code Editing

Reload pages on save
You asked us to improve the Live Edit feature and so we did! WebStorm can now automatically update the pages in a browser as you edit and save your HTML, CSS, and JavaScript files. To get started, open an HTML file in the editor, hover over it, and click on the icon for the browser you want to use – all browsers are supported.
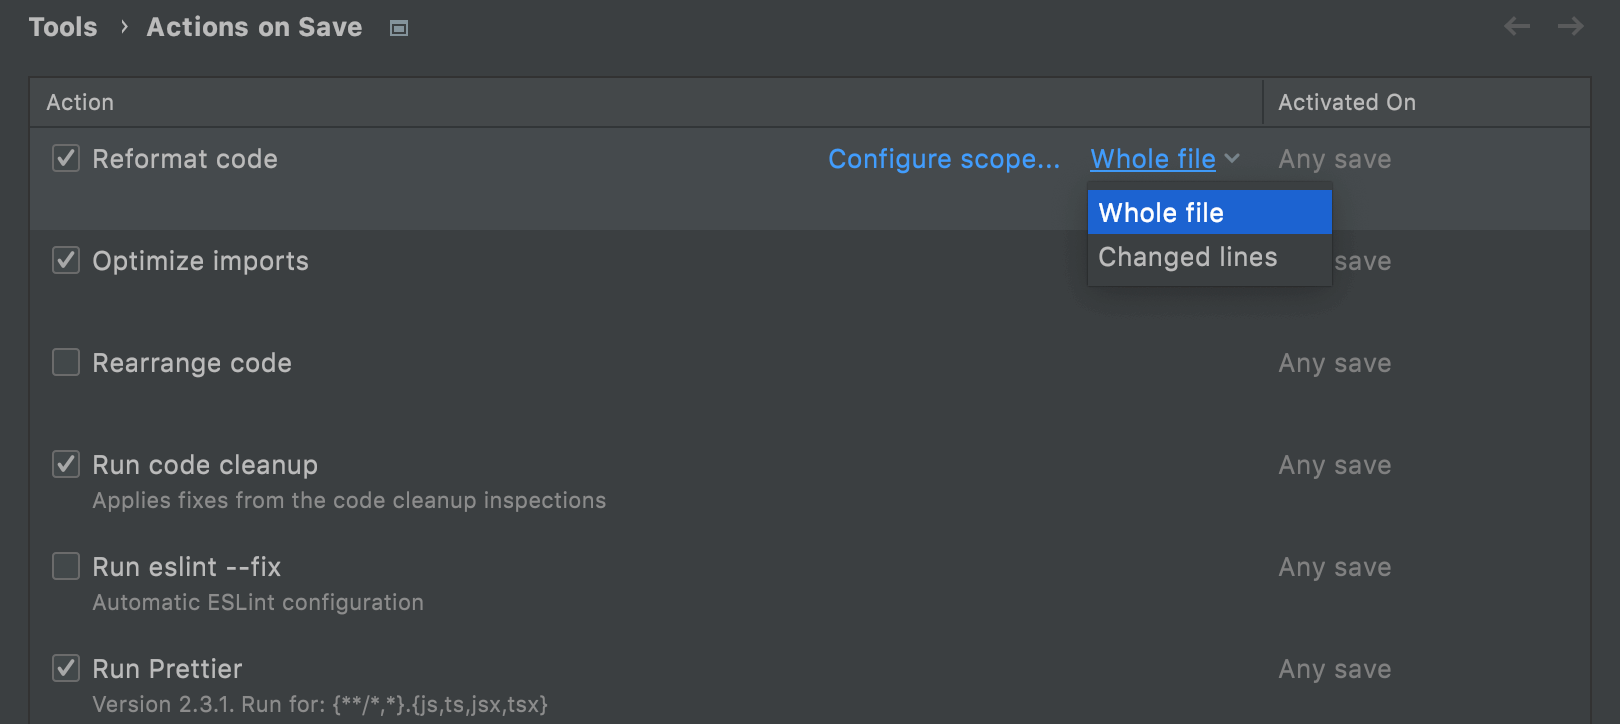
Actions on save
Do you like performing certain operations on save? WebStorm 2021.2 now properly supports this workflow! We’ve reworked all the existing functionality, collected it in one place, and enhanced it with some new options, including the ability to reformat code and optimize imports on save.
Faster creation of scratch files
Want to work on some code outside of the project context? Select it in the editor, then press Alt+Enter and choose Create new scratch file from selection. This will create a scratch file with the desired code.
Synchronized completion for Code With Me
When you’re in Following mode during a Code With Me session, you can now keep track of the code completion suggestions that the person you’re following uses.
JavaScript & TypeScript
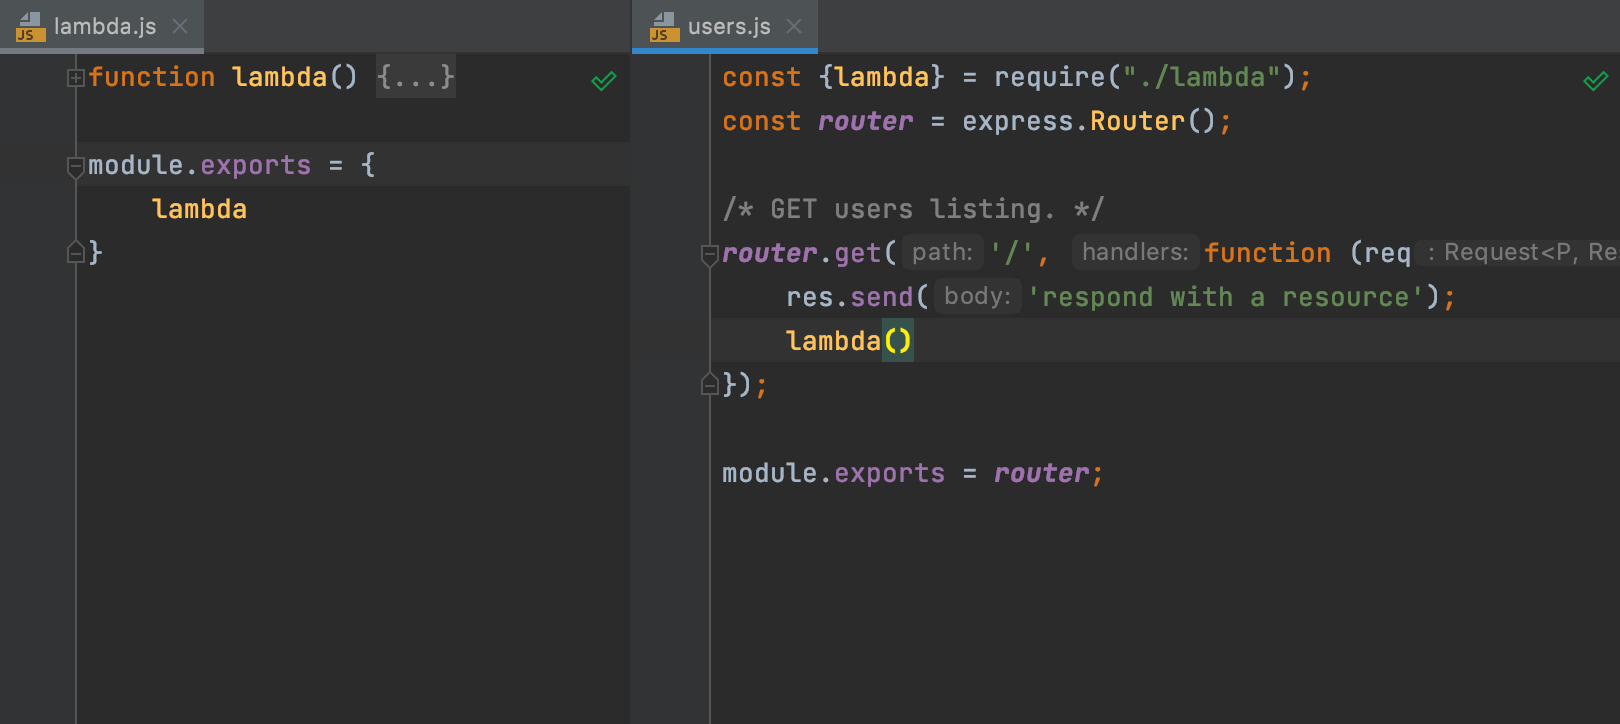
Auto-import for require()
Did you know that WebStorm can add missing import statements as you complete ES6 symbols? It can now also do the same for CommonJS modules – require imports can be inserted on code completion.
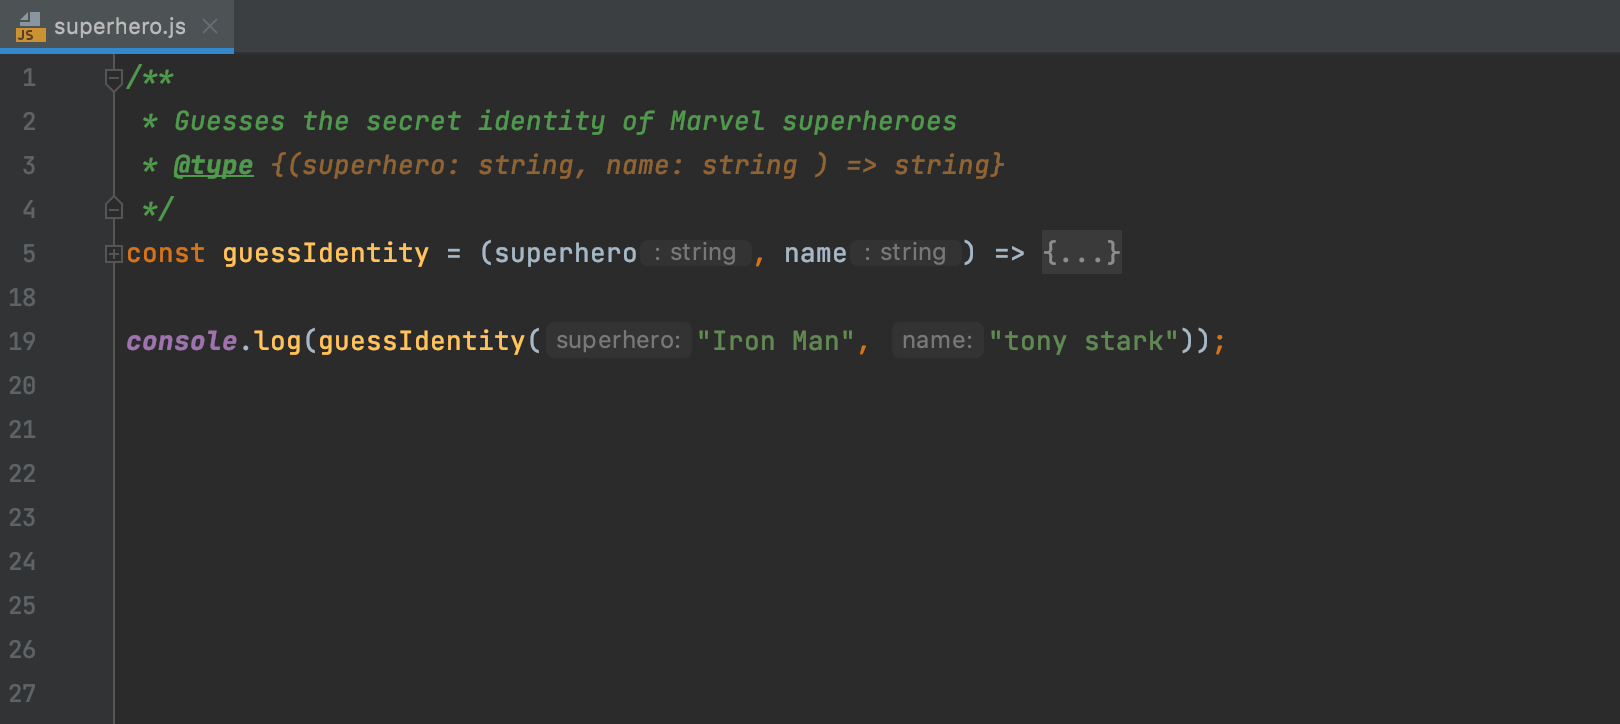
Support for TypeScript types in JSDoc
WebStorm now properly supports the TypeScript syntax used within JSDoc comments in your .js files. We’ve reworked and expanded the existing support and fixed a lot of known issues.
![]()
New action for arrow functions
Need to quickly add an arrow function to your code? You can now surround a block of code with an arrow function using Ctrl+Alt+J . You can also type arf and press Tab to expand the template and add an empty arrow function.
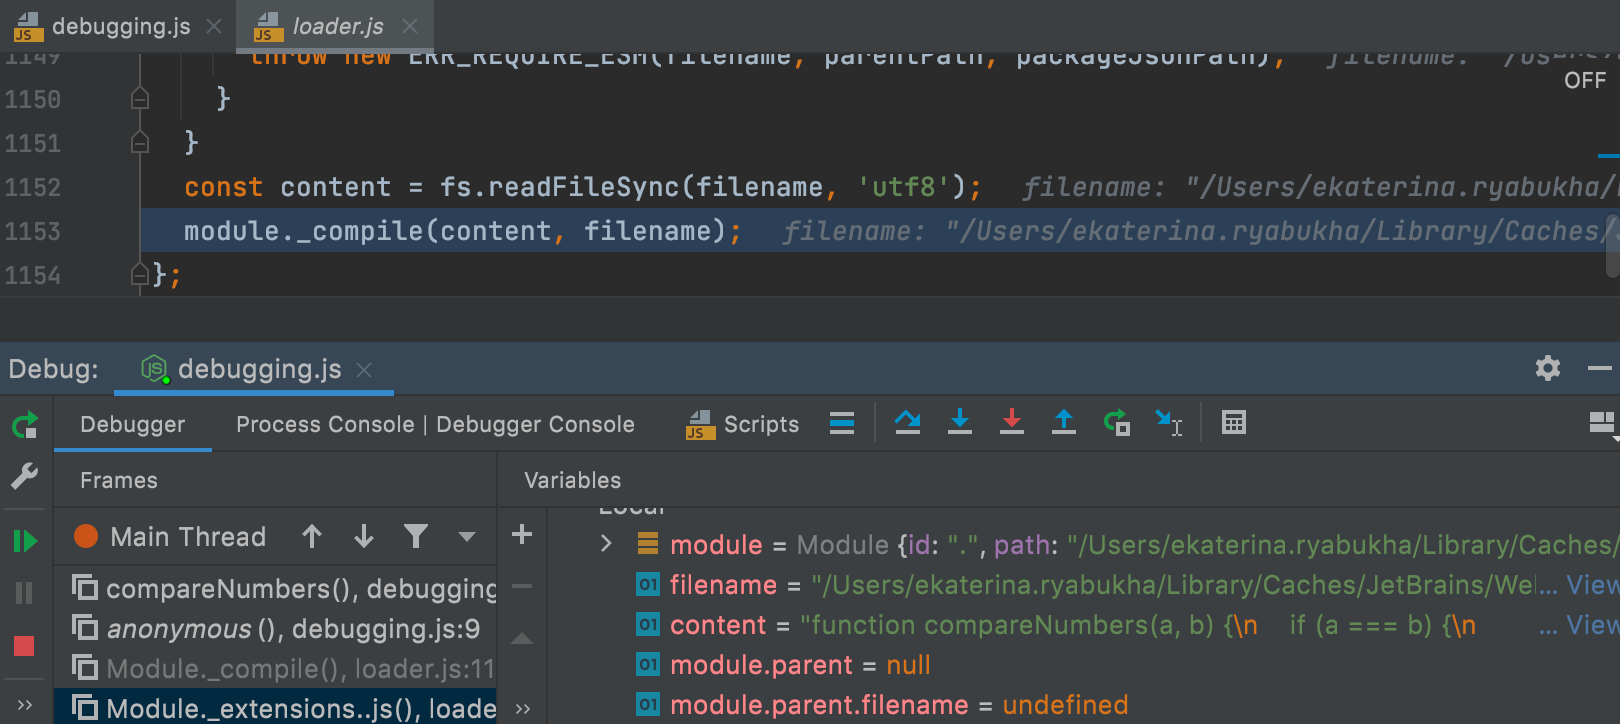
Preview tab when debugging
The preview tab, which used to work only for the Project view, now works when you debug your app. To turn it on, go to Preferences / Settings | Editor | General | Editor Tabs and tick the Enable preview tab checkbox. This will help you avoid cluttering the editor with multiple files, as WebStorm will open the files successively in one tab.
Frameworks & Technologies
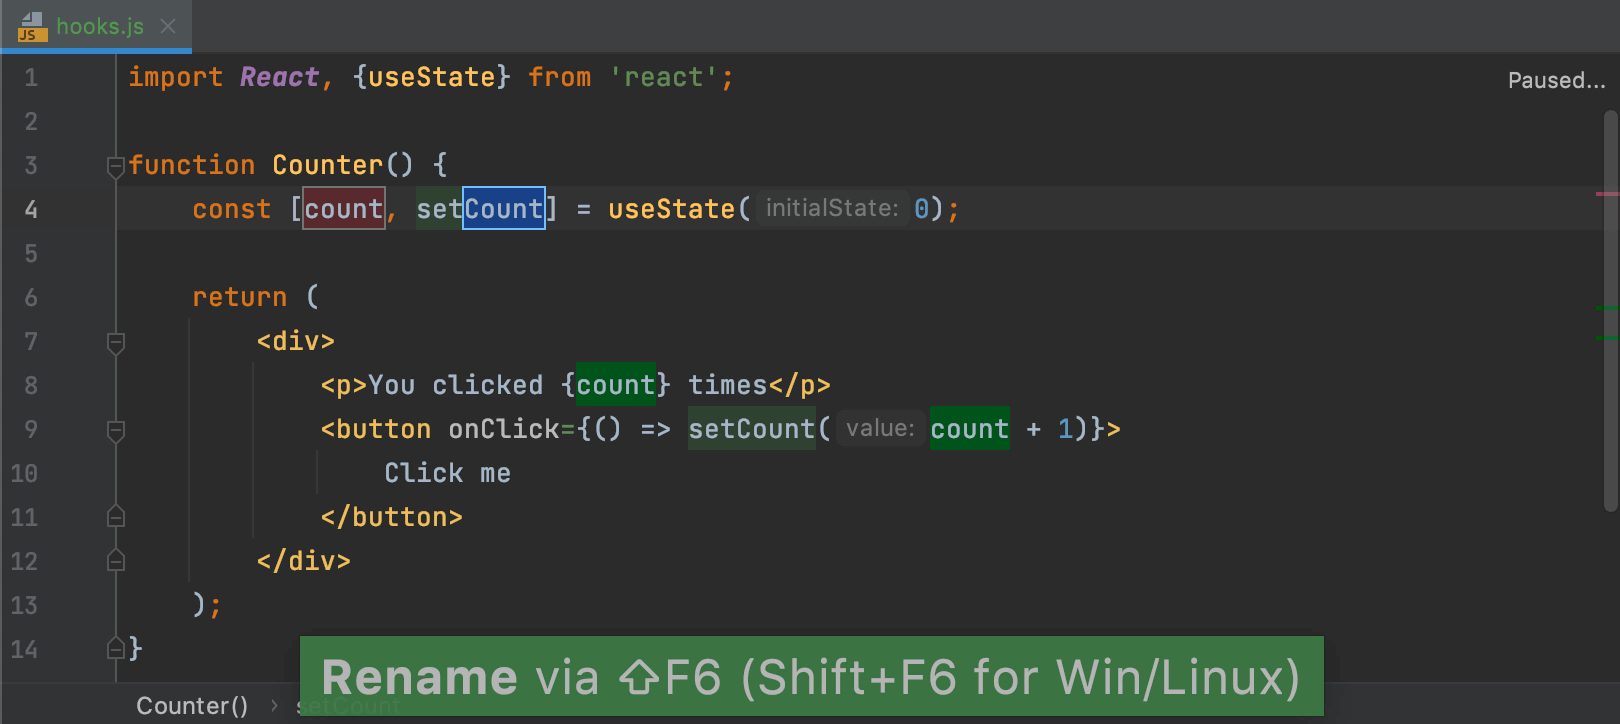
Rename refactoring for React useState hooks
You no longer need to waste time on refactoring useState values and functions one by one – WebStorm can now rename both for you! Place the caret on a state value and press Shift+F6 or go to Refactor | Rename from the right-click context menu.
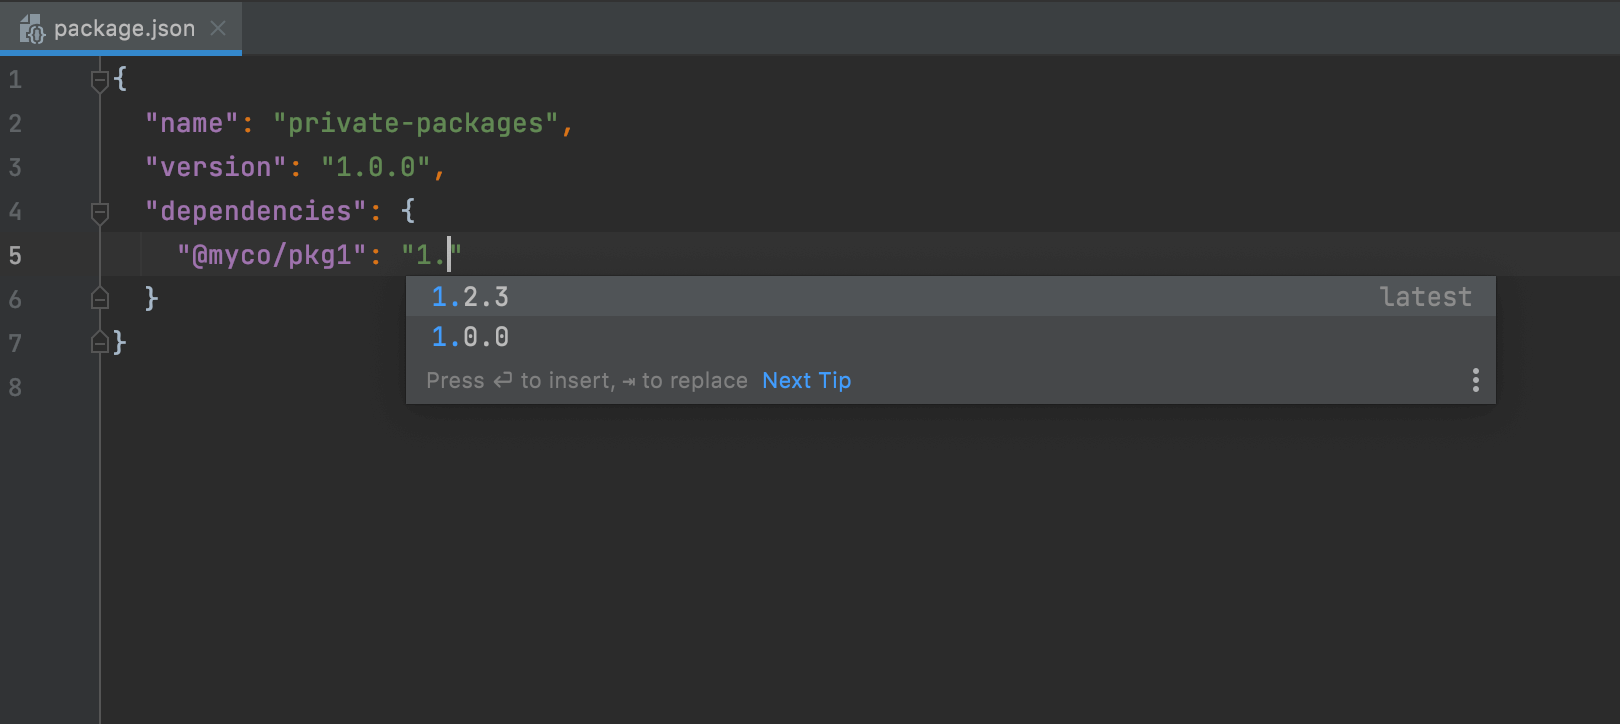
Completion for private npm packages
Adding new project dependencies to package.json has become even easier, as code completion now works for private npm packages. WebStorm lets you check information about the latest versions of the package, just like it does for public packages.
Support for classnames and clsx libraries
To help you work more efficiently with CSS classes in your React projects, we’ve added support for popular classnames and clsx libraries. WebStorm will show completion suggestions for your CSS classes and resolve all symbols in string literals and properties with literal names.
Generic support for web-types
We’ve extended support for web-types, an open-source standard for documenting web frameworks. It was previously focused on Vue support. But now you can use it to enrich the coding assistance for custom components in your HTML files. Watch this webinar recording to learn more.
Version Control
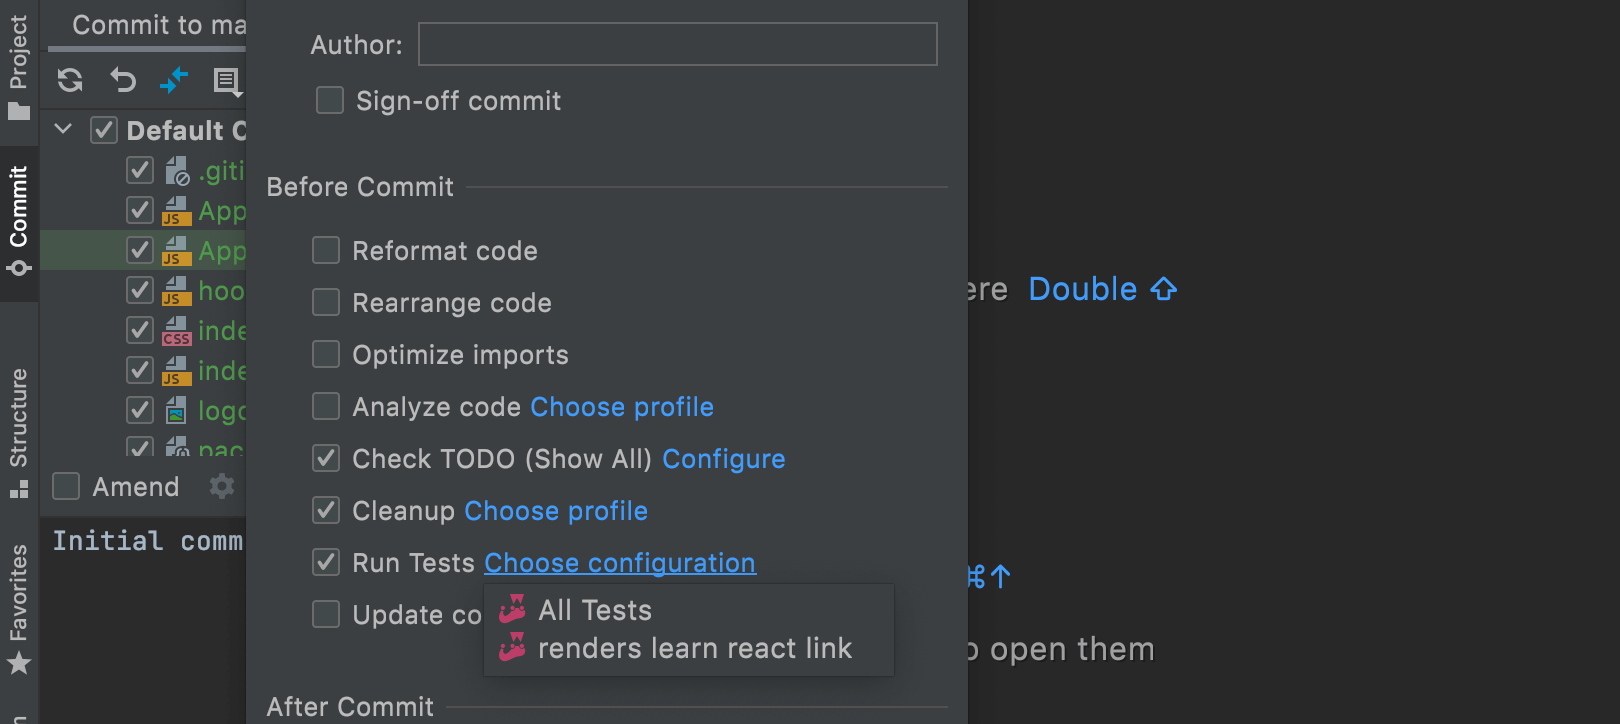
New pre-commit check
Want to run tests to check your code before committing it? We’ve added a new option to help you do so. Click on the gear icon in the Commit tool window, select Run Tests, and choose the desired run configuration. WebStorm will test your files and warn you about any problems.
GPG signature support
You can now secure your commits by signing them with a GPG key. You can turn this feature on via Configure GPG Key… in Preferences / Settings | Version Control | Git.
Local History search
Going through the revisions in Local History is now easier. Right-click on a changed file, then go to Local History | Show History and use the search field to navigate around your revisions.
Usability

Localized UI
Starting from this version, you can enjoy a fully localized WebStorm UI in Chinese, Korean, and Japanese. Localization is available as non-bundled language pack plugins, which can be installed in WebStorm from Preferences / Settings | Plugins.
Faster tool window reorganization
It is now easier to reorganize tool windows. Hover over the top of the tool window you want to move, then drag it to where you want it and drop it there. This will work if you want to detach a tool window from the main WebStorm window, too – just drag it outside of the IDE frame.
Easier customization of project icons
Did you know you can assign custom icons to your projects? We’ve made this process more straightforward. Right-click on a project on WebStorm’s Welcome screen, then select the Change Project Icon… option and upload the SVG file you want to associate with that project.
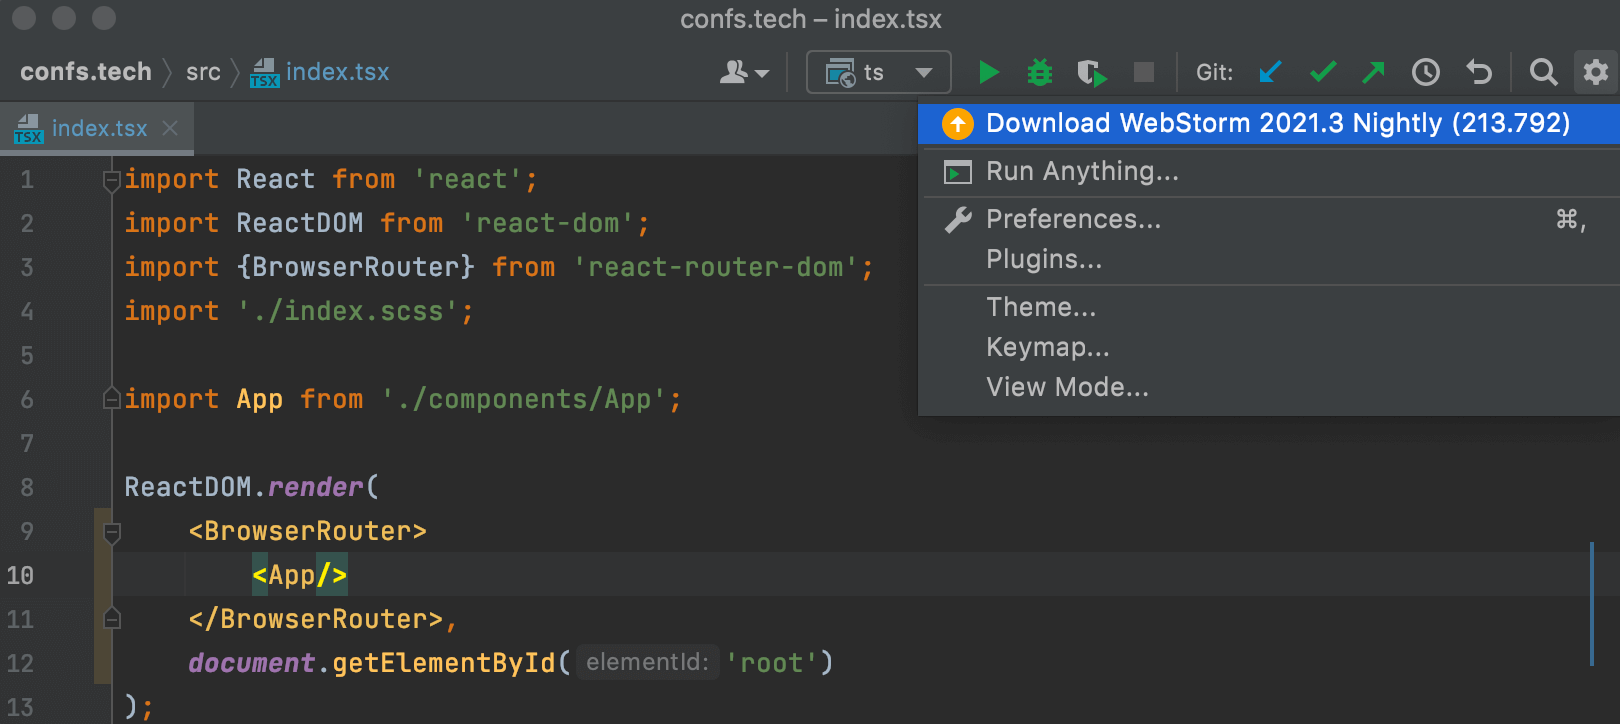
Update notifications from the Toolbox App
You will no longer miss any critical product updates from the Toolbox App. WebStorm will inform you if a new version is available for download and give you the option to upgrade to it – just make sure you have Toolbox App version 1.20.8804 or later.
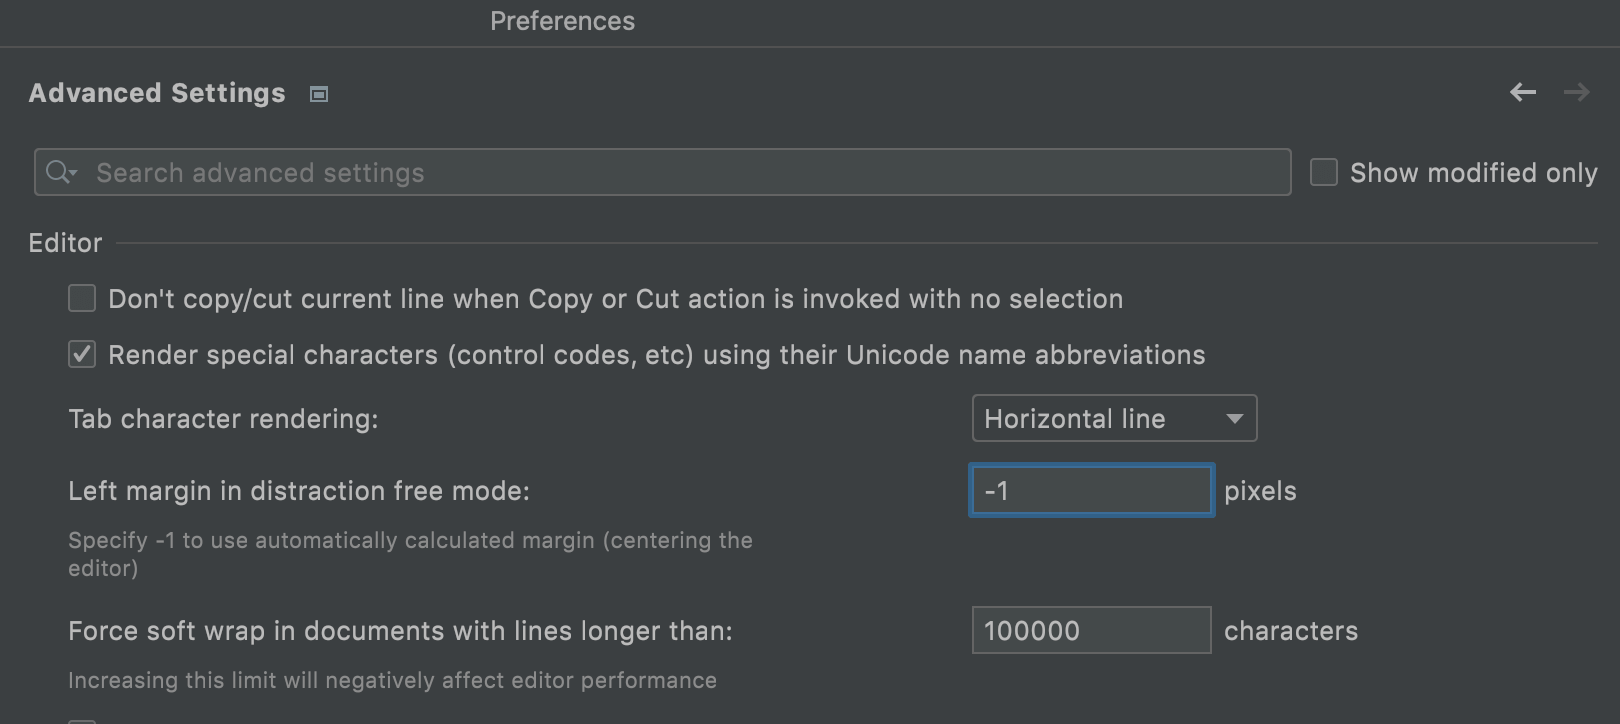
Improved Preferences / Settings dialog
There is now a node with advanced settings in your Preferences / Settings dialog. You can find some new configuration options there, including the ability to set a left margin in Distraction-free mode. Also, you can now jump between recently opened nodes faster – just use the arrows in the right-hand corner of the dialog.
Automatic cache and log cleanup
After each major update, WebStorm will clean up any cache and log directories that were last updated more than 180 days ago. The system settings and plugins directories will stay intact. To trigger this process manually, go to Help | Delete Leftover IDE Directories… in the main menu.
New features for the built-in terminal
We added three new features to our built-in terminal to improve your experience with it. You can now change the cursor shape and make the ⌥ key act as a meta modifier – look for these options in Preferences / Settings | Tools | Terminal. Also, working with the http links is now more convenient.
Источник


