- Best Free WebDav Client for Windows
- 1. FileZilla
- 2. WinSCP
- 3. FireFTP
- 4. Cyberduck
- 5. Coffee Cup Free FTP
- Как подключить диск Webdav в Windows 10
- Как подключить диск Webdav в Windows 10
- Как подключить диск WebDAV в Windows 10 — шаги
- Что делать, если не удается подключиться к каталогу WebDAV
- Скачать WebDAV Client для ПК
- WebDAV Client для ПК Скриншоты
- загрузить и установить WebDAV Client на вашем персональном компьютере и Mac
- Шаг 1: Загрузите эмулятор Android для ПК и Mac
- Шаг 2: установите эмулятор на ПК или Mac
- Шаг 3: WebDAV Client для ПК — Windows 7/8 / 8.1 / 10
- Шаг 4: WebDAV Client для Mac OS
- Windows 10 WebDAV
- Windows 10 WebDAV Requirements
- 13 Steps for Windows 10 WebDAV mapping
- Things to do if you can’t connect to the directory of Windows 10 WebDAV
- WebDAV Clients
- WebDAV Clients
- Benefits of using these type of Clients for WebDAV
- Top reasons Businesses Choose WebDAV Clients
- High-performance value, that means it will speed up the work as compared to regular FTPs
- Guarantees Perfect reliability along with trouble-free processing of even complex WebDAV tasks
- The Security standards are very high and they keep your data safe
- It has Space-saving user interface which allows you to concentrate on your primary tasks
- WebDAV Clients for Various Operating Systems
- Top Windows WebDAV Clients
- WebDAV Clients for Mac
- Linux WebDAV Clients
Best Free WebDav Client for Windows

FTP (File Transfer Protocol) is a special network protocol to transfer the file from your computer to a web hosting server.
FTP Client is a software that allows managing the files located on the Internet through your personal computer. You may use such program to put the files into the root directory on your site.
We have gathered some of the best free WebDav Clients to easier the procedure of placing the files into the root directory, as it’s rather frequent and necessary action using our service.
1. FileZilla
FileZilla is the most popular multi-platform FTP Client. It offers support of FTP, FTPS and SFTP and IPv6 as well. User-friendly interface, easy to use, with a sufficient amount of options and opportunities. You may upload the files up to 4 Gb.
Available for: all platforms

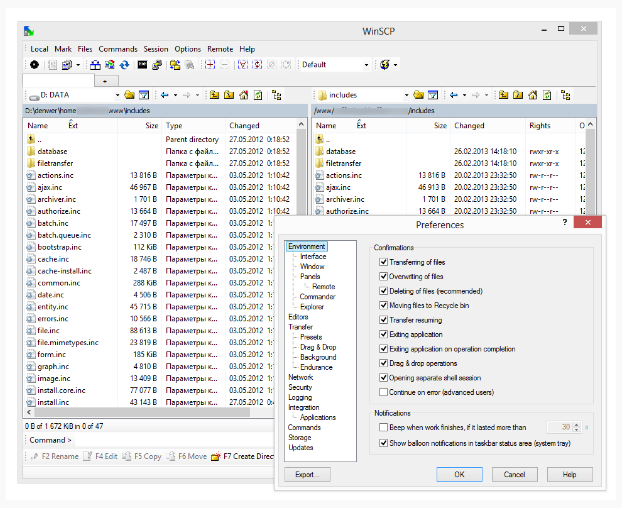
2. WinSCP
WinSCP is a good alternative for FileZilla. It is an open source FTP Client for Windows users, which offers support for FTP, SFTP and WebDAV protocols. It’s one of the most powerful and secure FTP clients. The simple interface allows you to use drag-and-drop file transfer and shortcut icons. There is a feature, Directory Synchronization, which let you keep two directories in sync, either automatically or semi-manually.
Available for: Windows
3. FireFTP
FireFTP is not a dedicated FTP Client. It is integrated with Mozilla Firefox browser. If Mozilla is your default browser, then this is the best solution for you, as this Client runs on all platforms. It offers support for various protocols, including SFTP. Among the other options, there are drag-and-drop support, file compression, FXP support, proxy support, timestamp synchronization, IPv6 and File Hashing.
Available for: all platforms (Mozilla Firefox browser only)

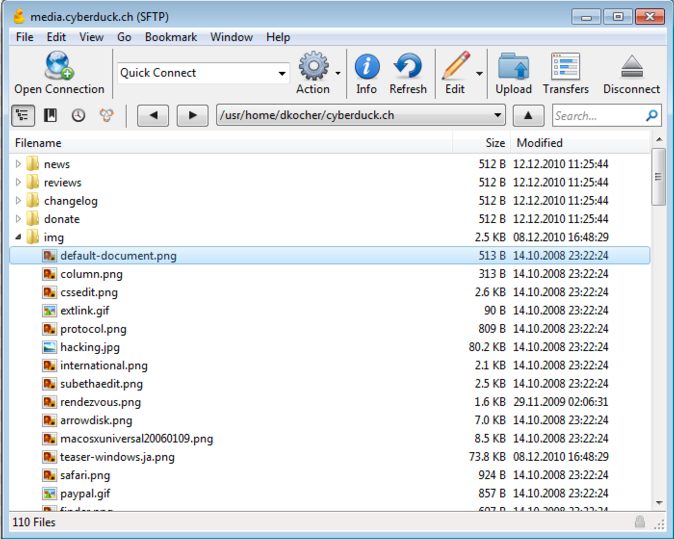
4. Cyberduck
Cyberduck is not a typical FTP Client; it’s also a “file browser” . It offers support for protocols FTP, SFTP, WebDAV, Cloud Files, Google Drive, Google Storage, Amazon S3 and Akamai CDNs . Compared to the other FTP Clients, Cyberduck optimizes options for organizing and bookmarking, such as Spotlight Importer, history, etc. Cyberduck is rather popular thanks to these features.
Available for: Windows, Mac
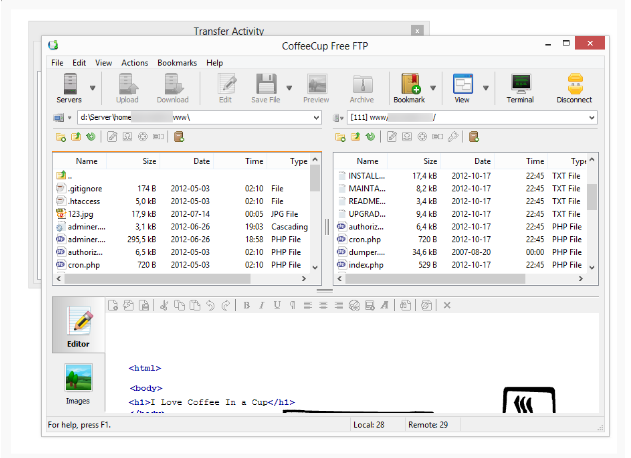
5. Coffee Cup Free FTP
This FTP Client is super easy to use with the animated creative interface. It is best for beginners. There are just basic options, no extra functions you don’t need. It also contains the insert ZIP-archiver. It offers support for FTP, SFTP and FTPS protocols.
Available for: Windows XP+
Have you used any of these FTP Clients? What is your favorite one?
Share your experience in the comments.
This articles will also come in handy while placing the file to the root directory correctly:

It’s High Time to Create a Mobile Friendly Website

Things to Do If You Want to Fail at Online Business
Как подключить диск Webdav в Windows 10
Как подключить диск Webdav в Windows 10
Web Distributed Authoring and Versioning (WebDAV) — это расширение HTTP, обеспечивающее совместный способ редактирования и управления файлами на удаленном веб-сервере. В этой статье вы узнаете, как как подключить диск Webdav в Windows 10, чтобы вы могли обращаться к удаленным файлам напрямую в проводнике.
Для подключения к каталогу WebDAV в Windows 10 вам потребуется WebDAV URL-адрес сайта, данные для входа в учетную запись WebDAV и имя для ярлыка или подключения.

Все три позволяют сопоставить WebDAV, смонтировав его папку как подключенный диск, чтобы вы могли просматривать, редактировать или удалять файлы с удаленного веб-сервера с помощью вашего компьютера.
Как подключить диск WebDAV в Windows 10 — шаги
1. Откройте проводник на своем компьютере и щелкните правой кнопкой мыши этот компьютер.
2. Нажмите Подключить сетевой диск…
3. В новом диалоговом окне введите букву диска, к которому вы хотите подключиться, и папку, в которую вы будете добавлять или редактировать файлы WebDAV на локальном компьютере.
4. Если вы выберете опцию «Обзор» рядом с упоминанием папки и получите сообщение ниже, включите обнаружение сети в Центре управления сетями и общим доступом, затем перейдите к следующему шагу.
5. Установите флажок «Повторно подключаться при входе в систему» и «Подключиться, используя разные учетные данные». Установка флажка «Повторное подключение при входе в систему» позволяет восстановить подключение WebDAV при перезагрузке компьютера.
6.Нажмите на ссылку Подключиться к веб-сайту, на котором вы можете хранить свои документы и изображения.
7. Нажмите Далее.
8. Теперь нажмите «Выбрать пользовательское сетевое расположение».
9. Нажмите Далее.
10. Введите URL-адрес своего домена в поле «Интернет» или «Сетевой адрес» с каталогом WebDAV в конце.
11. Введите свое имя пользователя и пароль WebDAV.
12. Нажмите ОК. Введите имя для этого сетевого расположения уже заполнено, но при желании вы можете изменить его.
13. Нажмите Далее, а затем нажмите Готово.
В проводнике файлов папка WebDAV будет отображаться как подключенный диск. Теперь вы можете добавлять, редактировать или удалять файлы или каталоги через проводник.
Что делать, если не удается подключиться к каталогу WebDAV
Примечание. В случае возникновения проблем с подключением к каталогу WebDAV обновите базовый уровень аутентификации в реестре Windows.
1. Щелкните правой кнопкой мыши «Пуск» и выберите «Выполнить».
2. Введите regedit и нажмите Enter, чтобы открыть редактор реестра Windows.
3. Перейдите в путь к каталогу: HKEY_LOCAL_MACHINESYSTEMCurrentControlSetServicesWebClientParameters.
4. Найти значение BasicAuthLevel. По умолчанию это значение равно 2, но если это не так, щелкните правой кнопкой мыши и выберите «Изменить», а затем измените на 2.
Удалось ли подключить диск WebDAV к Проводнику файлов и получить доступ к удаленным файлам в Windows 10? Поделитесь своим опытом в комментарии ниже.
Скачать WebDAV Client для ПК
- Категория: Utilities
- Дата выпуска: 2011-11-30
- Текущая версия: 1.0
- Размер файла: 438.61 kB
- Совместимость: Требуется Windows 10/8.1/8/7/Vista
WebDAV Client для ПК Скриншоты

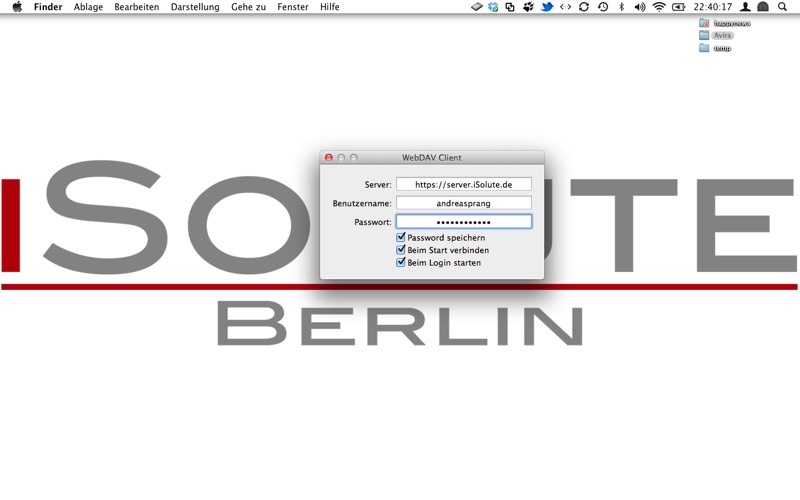
загрузить и установить WebDAV Client на вашем персональном компьютере и Mac
Некоторые приложения, например, те, которые вы ищете, доступны для Windows! Получите это ниже:
| SN | заявка | Скачать | рецензия | Разработчик |
|---|---|---|---|---|
| 1. |  DriveHQ WebDAV Service DriveHQ WebDAV Service | Скачать | 4.5/5 32 рецензия |
Или следуйте инструкциям ниже для использования на ПК :
Если вы хотите установить и использовать WebDAV Client на вашем ПК или Mac, вам нужно будет загрузить и установить эмулятор Desktop App для своего компьютера. Мы усердно работали, чтобы помочь вам понять, как использовать app для вашего компьютера в 4 простых шагах ниже:
Шаг 1: Загрузите эмулятор Android для ПК и Mac
Хорошо. Прежде всего. Если вы хотите использовать приложение на своем компьютере, сначала посетите магазин Mac или Windows AppStore и найдите либо приложение Bluestacks, либо Приложение Nox . Большинство учебных пособий в Интернете рекомендуют приложение Bluestacks, и у меня может возникнуть соблазн рекомендовать его, потому что вы с большей вероятностью сможете легко найти решения в Интернете, если у вас возникнут проблемы с использованием приложения Bluestacks на вашем компьютере. Вы можете загрузить программное обеспечение Bluestacks Pc или Mac here .
Шаг 2: установите эмулятор на ПК или Mac
Теперь, когда вы загрузили эмулятор по вашему выбору, перейдите в папку «Загрузка» на вашем компьютере, чтобы найти приложение эмулятора или Bluestacks.
Как только вы его нашли, щелкните его, чтобы установить приложение или exe на компьютер или компьютер Mac.
Теперь нажмите «Далее», чтобы принять лицензионное соглашение.
Чтобы правильно установить приложение, следуйте инструкциям на экране.
Если вы правильно это сделаете, приложение Emulator будет успешно установлено.
Шаг 3: WebDAV Client для ПК — Windows 7/8 / 8.1 / 10
Теперь откройте приложение Emulator, которое вы установили, и найдите его панель поиска. Найдя его, введите WebDAV Client в строке поиска и нажмите «Поиск». Нажмите на WebDAV Clientзначок приложения. Окно WebDAV Client в Play Маркете или магазине приложений, и он отобразит Store в вашем приложении эмулятора. Теперь нажмите кнопку «Установить» и, например, на устройстве iPhone или Android, ваше приложение начнет загрузку. Теперь мы все закончили.
Вы увидите значок под названием «Все приложения».
Нажмите на нее, и она перенесет вас на страницу, содержащую все установленные вами приложения.
Вы должны увидеть . Нажмите на нее и начните использовать приложение.
Шаг 4: WebDAV Client для Mac OS
Привет. Пользователь Mac!
Шаги по использованию WebDAV Client для Mac точно такие же, как для ОС Windows выше. Все, что вам нужно сделать, это установить Nox Application Emulator или Bluestack на вашем Macintosh. Вы можете получить Это здесь .
Спасибо за чтение этого урока. Хорошего дня!
Windows 10 WebDAV

It cannot be denied that WebDAV is the commonly used HTTP extension to manage and edit your files in a remote web server. Windows 10 WebDAV integration is stable, and allows one to work with file transfers and versioning with confidence.With this article, you will learn the steps on mapping WebDAV in Windows 10. In return, you can directly access the files on the File Explorers.
Table of Contents — WebDAV
Windows 10 WebDAV Requirements
You must have a WebDAV site URL to connect on the WebDAV directory in Windows 10. You also need WebDAV account login information and the name for connection or shortcut. With these 3 requirements, you can map WebDAV through mounting the folder as a mapped drive. With this, you can edit, view, or delete files on the remote web server with your computer.
13 Steps for Windows 10 WebDAV mapping
- The first step is to open your computer’s File Explorers and right-click, “This PC.”
- You can now select the “Map network drive.”
- Next, you will see another dialog box, and you can enter the drive letter you desire to map to as well as the folder wherein you edit or add WebDAV files on your local computer.
- As you click the “Browse” option beside the folder mention, you can encounter this message:
- “Network discovery is turned off. Network computers and devices are not visible. Please turn on network discovery in Network and Sharing Center.”
- As you see this message, you must enable the network discovery in the Network and Sharing Center.
- Check the Reconnect in sign-in and Connect with the use of various credentials boxes. Checking the Reconnect I the sign-in box will restore the WebDAV connection if you reboot your computer.
- You can now select the link “Connect to a website that you can use to store your pictures and documents.”
- Then click Next.
- You can now select ‘Choose a custom network location.’
- Click Next.
- You can now enter the domain URL in the Network address or Internet with WebDAV directory at the end.
- Enter your username and password for WebDAV client
- Choose OK. Then, the “Type a name for this network location” is ready, but you can still modify it.
- Then, choose Next and click Finish.
As you complete these steps, the Windows 10 WebDAV folder will be displayed on File Explorer as a mapped drive. With this, you can edit, add as well as delete directories and files using the File Explorer.
Meanwhile, there are some instances that you can’t connect to the directory of WebDAV. Don’t worry because the following ideas will solve this problem.

Things to do if you can’t connect to the directory of Windows 10 WebDAV
You must update with Basic Authentication Level in Windows Registry with the following steps:
- Right-click and choose Run
- Enter Regedit and click Enter for opening the Windows Registry Editor.
- Proceed to directory path: “HKEY_LOCAL_MACHINE \ SYSTEM \ CurrentControlSet\Services\WebClient\Parameters.”
- Search “BasicAuthLevel” value. The value is set at 2 by default. If it is not, you can right-click and change it to 2.
You can now map the WebDAV drive in File Explorer and get the access on your remote files in Windows 10.
WebDAV Clients
Let’s see it as a simple overview of what are these WebDAV clients and how is the use of using them.
So generally many cloud-based collaboration services use WebDAV protocol to enable their collaborative features.
These features can be accessed through a WebDAV client in which users can log into their WebDAV account and take control over their server.
Table of Contents — WebDAV
WebDAV Clients
So when the question arises of what is a WebDAV Client?
One could can say that these are the same as FTP clients, just these clients connect users to a web server where they can download or upload files.
WebDAV clients also enable users to edit and collaborate on files on a WebDAV server.
The key advantage of WebDAV against other FTPS is the inclusion of additional properties like author and modification time of any file in its metadata.

This also facilitates the WebDAV locking feature that is called DAV locking.

DAV Locking
The locking feature blocks the write permission for everyone but the person currently editing a file.
This feature prevents overwrite conflicts, and it allows a resource to be occupied by one user only at a time. One user cannot overwrite another user’s edits; the person who opened the document first has the edit rights.
Furthermore, WebDAV can display who last edited a file, which is very useful for administrators and support teams.
Benefits of using these type of Clients for WebDAV
WebDAV allows easy smooth sailing transactions from individuals to multiple users by letting them collaborate the work where multiple users can edit the same file that too remotely.

This the reason why WebDAV is extremely beneficial in a corporate setting, and WebDAV Clients help it in doing so.
Top reasons Businesses Choose WebDAV Clients

Following are the reasons show why a WebDAV client is preferable
High-performance value, that means it will speed up the work as compared to regular FTPs
- It uses multiple connections which allows access, writing, deleting, copying or moving of files from remote directories.
- It also uses high-speed multipart and multithreaded transfer technology automatically.
Guarantees Perfect reliability along with trouble-free processing of even complex WebDAV tasks
- The interrupted or incomplete requests which normally disappears in usual FTPS can be automatically resumed here with just an application restart.
- It has a built-in request manager, which keeps a track of the user’s activities and keeps them in detail
The Security standards are very high and they keep your data safe
- It consists of strong cryptographic algorithms. These type of algorithms are normally used in banking systems.
- It also offers optional password protection. To keep your server definitions safe.
It has Space-saving user interface which allows you to concentrate on your primary tasks
- This minimizes the amount of space occupied on the users desktop to one small screen which shows the status of running requests
The current version of WebDAV clients usually supports all kinds of FTP, FTPS, SFTP, HTTP, HTTPS and all other WebDAV protocols such as direct (FXP) and indirect (protocol independent) server-to-server transfers.
These are the generic knowledge about WebDAV.
WebDAV Clients for Various Operating Systems
Here are a short list of clients that you may want to try on various operating Systems.
![]()
Where links are available, we have more extensive write ups on the webdav capabilities of each.
Otherwise we provide a ‘download’ or site link that will take you to the product in order to try it out or buy it yourself.
Most of the best webdav clients are paid products but offer free trials so you can see if they are compatible with your workflow.
Example of a WebDAV Clients offerings
Top Windows WebDAV Clients

Although we don’t judge which is best Windows WebDAV
Clients in this post, we will provide you a list of software to try out and let us know.
WebDAV Clients for Mac
What is the Best WebDAV Client for Mac? Well, we will cover that type of comparison in a different post, but here is a straight list of clients you can try out.
Linux WebDAV Clients
These are just one snippet of the thousands of products, but we’ll leave it up to you to decide the Best Linux WebDAV Client.


