- WebDAV repository
- Contents
- WebDAV configuration
- Options
- Configuring WebDAV on Microsoft Windows Server 2003 R2 (Service Pack 2), IIS V6.0
- Configure Windows Server 2003
- Install and Enable WebDAV on the Server
- Configure IIS
- Create New Virtual Directory
- Configuring Virtual Directory Properties
- Testing WebDAV on Windows XP
- Repository permissions
- How to enable Windows 2003 as a WebDAV client?
- 2 Answers 2
- How to enable Windows 2003 as a WebDAV client ?
- Using the WebDAV Redirector
- Installing the WebDAV Redirector
- Prerequisites
- Windows Vista, Windows 7, Windows 8, or Windows 8.1
- Windows Server 2008, Windows Server 2008 R2, Windows Server 2012, or Windows Server 2012 R2
- Mapping Drives using the WebDAV Redirector
- Method 1: Mapping Drives using the Map Network Drive Wizard
- Method 2: Mapping Drives from a Command Prompt
- Troubleshooting the WebDAV Redirector
- WebDAV Redirector Registry Settings
WebDAV repository
Web-based Distributed Authoring and Versioning (WebDAV) is a set of methods based on the Hypertext Transfer Protocol (HTTP) that facilitates collaboration between users in editing and managing documents and files stored on World Wide Web servers.
A WebDAV repository can be enabled by a site administrator in Administration > Site administration > Plugins > Repositories > Manage repositories.
Contents
WebDAV configuration
After enabling the WebDAV repository, a repository instance can be created in Administration > Site administration > Plugins > Repositories > WebDAV repository.

Options
WebDAV type: Choose from HTTP or HTTPS connection
WebDAV server: The server name
WebDAV path: The path to webdav directory
Authentication: We currently only support HTTP Basic Authentication
WebDAV server port: The webdav server port
WebDAV server user: HTTP Basic authentication username
WebDAV server password: HTTP Basic authentication password
For example, if you are going to add a webdav server at http://webdavserver.tld/path/to/dir, you should use following options: WebDAV type: HTTP WebDAV Server: webdavserver.tld
Configuring WebDAV on Microsoft Windows Server 2003 R2 (Service Pack 2), IIS V6.0
Configure Windows Server 2003
First we need to install WebDAV on the server. Note: when you promote a basic Windows Server 2003 installation to an application server, it installs various IIS 6 components but WebDAV isn’t one of them.
Install and Enable WebDAV on the Server
To install WebDAV on the IIS 6 machine, use Add or Remove Programs in Control Panel and run the Windows Components Wizard. You can find WebDAV under Application Server -> Internet Information Services -> World Wide Web Service -> WebDAV Publishing.
Once WebDAV is installed it needs to be enabled. Check the WebDAV option under the Web Service Extensions node in IIS Manager.
Configure IIS
Configuring a new virtual directory in IIS is a two-step process:
- Create a new virtual directory using the Virtual Directory wizard
- Configure the access permissions on the new virtual directory
Create New Virtual Directory
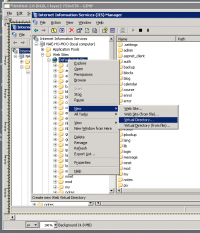
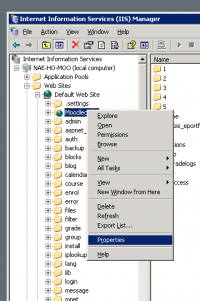
- Open IIS and right-click on your Moodle website. Select New -> Virtual Directory. from the pop-up menu.

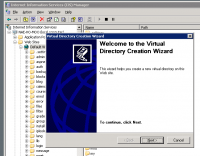
- Select New -> Virtual directory. from the pop-up menu. The Create New Virtual Directory Wizard is displayed.
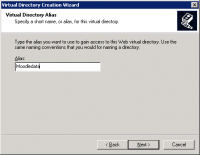
- Call the new virtual directory Moodledata.
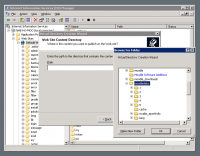
- Specify the path to the Moodledata directory.
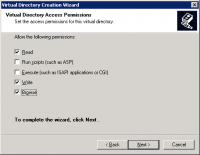
- Ensure the new virtual directory has Read, Write and Browse permissions.
- Press the Finish button to create the new virtual directory.
Configuring Virtual Directory Properties
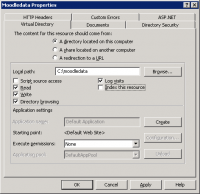
- Right-click on the new virtual directory and select Properties from the pop-up menu.
- Ensure that Read, Write, Directory browsing, and Log visits are checked. Ensure Index this resource is unchecked.
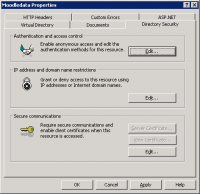
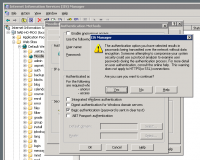
- Click on the Directory Security tab and press the Authentication and access control Edit. button
- Authenticated access configuration will depend on your needs. Basic access will require you to uncheck Enable anonymous access and check Basic authentication (password is sent in clear text). You may get a warning about security:
- Your new virtual directory is ready for testing.
Testing WebDAV on Windows XP
WebDAV needs to be enabled on any client machines that will be used to create and manage content for Moodle. Windows XP has a built-in WebDAV client service that needs to be enabled:
- Open the Services console under Administrative Tools and find the WebClient service.
- Double-click on this service to open its Properties sheet.
- Change the Startup Type to Automatic, then click the Start button to start the service.
Note: Internet Explorer 8.0 no longer supports web folders. See this blog post from David Conner for details. Instead, you will need to map a network drive (instructions on mapping a network drive are also given in David’s blog post).
WebDAV path: /path/to/dir/
Repository permissions
This repository is accessible by default to administrators, course creators, teachers, editing teachers and managers, but not to guests or students. This capability can be changed to control access to users with specific roles.
How to enable Windows 2003 as a WebDAV client?
I have written a program that uses webDAV to download documents from a sharepoint server. It works well with client OS (XP, Vista, 7) but it doesn’t on the 2003 server it’s supposed to work.
How can I enable WebDAV client (not server) on Windows server 2003 x86 ?


2 Answers 2
On Server 2003 Web Folders (WebDAV client) is not installed by default. You can install it from Microsoft website: http://www.microsoft.com/download/en/details.aspx?displaylang=en&id=15123
Note that this will install Web Folders extension. In case you wish to use Map Network Drive wizard (mini-redirector, another WebDAV client) follow this steps:
Make sure WebClient service is running. Open Services snap-in and find WebClient service. On Windows Server 2003 this service is disabled by default. If the service is disabled open WebClient Properties dialog and on General tab set Startup Type to Automatic. Restart the computer.
Your WebDAV server must be located on a default port 80. Map Network Drive wizard will fail to connect to any ports other than 80 displaying “The network path http://server/folder/ could not be found” message. Map Network Drive feature does not support SSL / HTTPS connections.
Your WebDAV server must accept anonymous connections or use Integrated Windows Authentication. Map Network Drive will fail to connect to WebDAV servers using Basic or Digest authentication. Use NTLM or Kerberos instead.
How to enable Windows 2003 as a WebDAV client ?
I have written a program that uses WebDAV to download documents from a sharepoint server. It works well with client OS (XP, Vista, 7) but it doesn’t on the 2003 server it’s supposed to work.
How can I enable WebDAV client (not server) on Windows server 2003 x86 ? The «WebClient» service is started but I’m getting an error when I try to map the resource:
It normally just works. Have you tried using Explorer’s map network drive wizard to connect to the resource?
Yes: I have the same result. I have created a simple Windows 7 VM and placed my program on that for the time being: all it does is connect to the resource, check the file type and load them into the DB. It worked without problem out of the box. I am, however, unable to get the same result from the machine it was supposed to be installed on.
Seems to cover your exact issue.
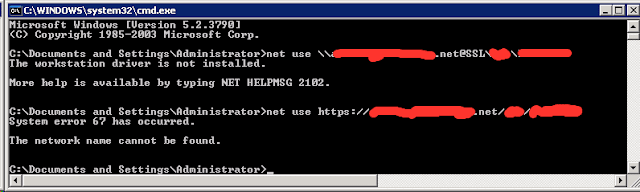
Did you ever receive this message when trying to access WebDav — MOSS through command prompt?
Due to a bug in Windows Server 2003, you will need to restart WebClient redirector service and then start webclient service.
NET STOP MRXDAV
NET START WEBCLIENT
[Resolved in Windows Server 2008]
Thanks. It actually only turns the «workstation driver not installed» error into «network name cannot be found» one.
I’m starting to wonder if WebDAV over SSL simply can happen on 2003 server at all.
IIRC webdav over SSL is implemented from Vista and higher.
I’ll have to check it, but it actually fits the symptoms. Ah well: a good reason to migrate to 2008, then. Thanks
I’ll have to check it, but it actually fits the symptoms. Ah well: a good reason to migrate to 2008, then. Thanks
Yes, that is correct, Vista+ for WebDAV over SSL.
It should be noted that WebDAV over SSL doesn’t work on 2003 only when trying to map a drive, it does support connecting to SSL enabled WebDAV shares when setup/accessed via Network Places (our 2003 Citrix servers can open SSL-enabled SharePoint document libraries in Explorer View for example and you can manually add a Network Place for a WebDAV folder or SP document library — you just can’t net use to the path like you can on Vista/2008 and newer).
Hm. Pardon me but that makes no sense. When you open a network resource, you’re using the network redirector. «mapping» a letter is purely creating an alias for a network connection inside that redirector. If it works in explorer, it works while mapping a drive. Look at my samples: I’m NOT mapping a drive, I’m establishing a connection without mapping a letter: that should work and so should the copy commands as long as I use full UNC path.
Furthermore, it doesn’t with in the GUI either. there is something fishy with that machine. Oh well: migration to 2008 is planned and I’ll use the 7 VM meanwhile.
Hey, don’t shoot the messenger, I’m just telling you the limitations within 2003 with SSL enabled WebDAV — Network Places works, mapping a drive doesn’t. XP has the same limitation and you can find others online who have blogged about the limitation; here are couple examples:
I just tried it again and the behavior described in the second link is exactly what I see on my Citrix servers. I know you’re going to eventually use Windows 2008, but if you browse to your SharePoint site within a browser on the 2003 system, are you able to open the document library in Explorer View (as a way to validate the Web Client is working correctly)?
I’ll try to refrain opening fire, sorry. The behavior described doesn’t makes sense to me but it doesn’t really matter, does it ? 
I get the same error trying to see the folder in explorer. The only thing that works from that machine is using the SharePoint web interface.
Using the WebDAV Redirector
Microsoft has created a new WebDAV extension module that has been completely rewritten for Windows Server 2008 and Windows Server 2012. This new WebDAV extension module incorporates many new features that enable web authors to publish content better than before.
This document walks you through using the WebDAV redirector to publish content to an existing web site that has the new WebDAV module installed.
Installing the WebDAV Redirector
Prerequisites
You must be running one of the following operating systems:
- Windows Vista, Windows 7, or Windows 8
- Windows Server 2008, Windows Server 2008 R2, or Windows Server 2012
You must be connecting to a web server that already has the WebDAV module installed.
Windows Vista, Windows 7, Windows 8, or Windows 8.1
If you are using a desktop operating system like Windows Vista, Windows 7, Windows 8, or Windows 8.1, the WebDAV redirector is already installed.
Windows Server 2008, Windows Server 2008 R2, Windows Server 2012, or Windows Server 2012 R2
If you are using a server operating system like Windows Server 2008 or later, you need to install the Desktop Experience feature. To do so, use the following steps:
- Start the Windows Server Manager.
- In the tree view, highlight the Features node.
- In the details pane, click Add Features.
- In the Add Features Wizard, check the Desktop Experience box, and then click Next.
- Click Install.
- When the Add Features Wizard has finished, click Close.
- Click Yes when promoted to restart the computer.
Mapping Drives using the WebDAV Redirector
Once the WebDAV Redirector has been installed, you can map drives to your web site using WebDAV. There are two ways to accomplish this:
Method 1: Mapping Drives using the Map Network Drive Wizard
To map a drive using the Map Network Drive Wizard, use the following steps:
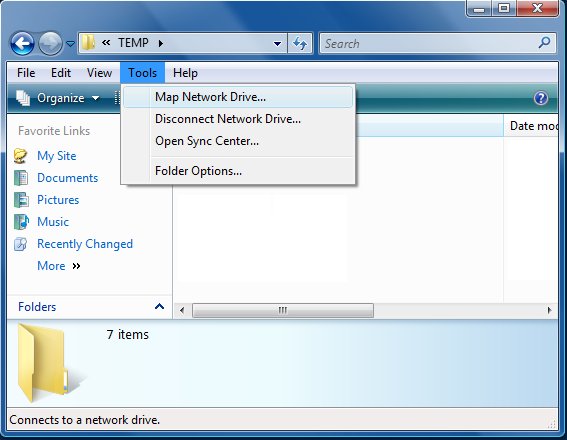
Open the Map Network Drive wizard. This can be accomplished by using one of the following methods:
- Opening a folder in Windows Explorer and clicking Tools, then Map Network Drive:
- Opening the Network and Sharing Center in the Windows Control Panel and clicking Tools, then Map Network Drive:
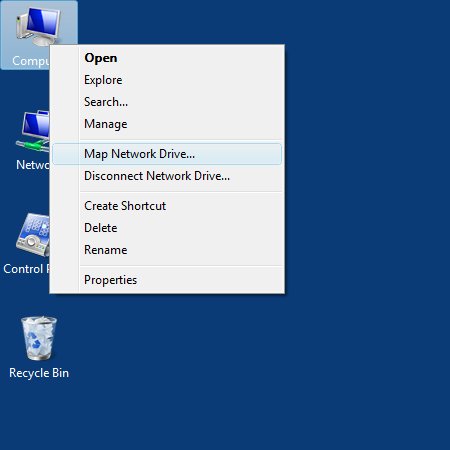
- Right-clicking on the desktop icons for Computer or Network, then clicking Map Network Drive:

When the Map Network Drive Wizard appears, enter the URL for your web site then click Finish: 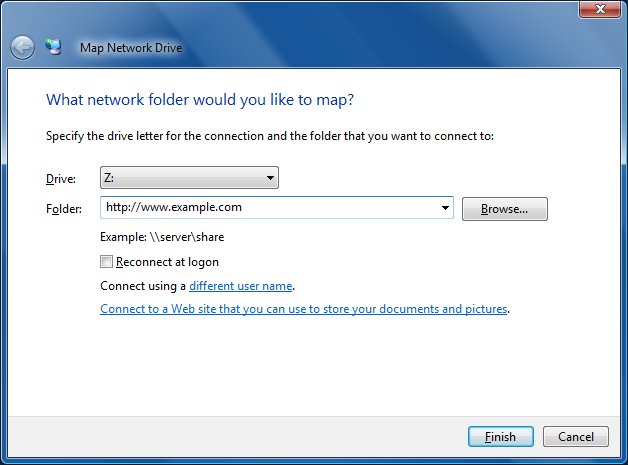
If prompted for credentials, enter your user name and password, then click OK. 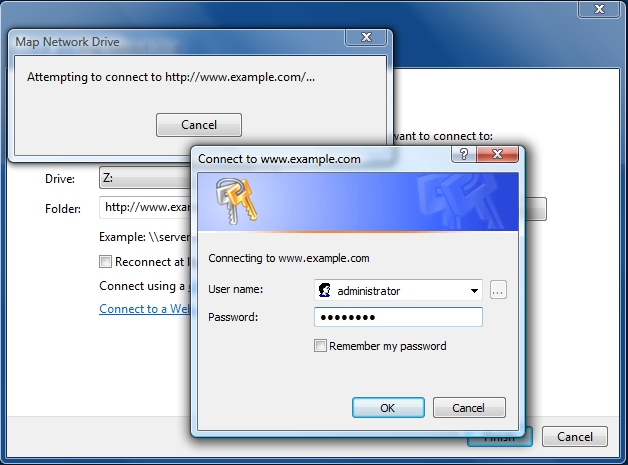
Once these steps have been completed, the networked drive should open in Windows Explorer: 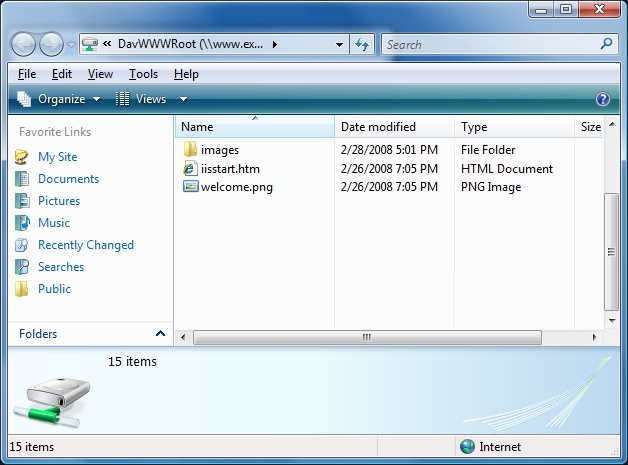
If you receive an error, please see the Troubleshooting the WebDAV Redirector section for more information.
Method 2: Mapping Drives from a Command Prompt
To map a drive from a command prompt, use the following steps:
Click the Windows Start icon.
Click All Programs.
Click Accessories.
Click Command Prompt.
When the command prompt opens, type the following command:
Where www.example.com is the URL for your server.
Once completed, you should have the next available drive letter mapped to your web site.
The following image shows what this might look like:

If you receive an error, please see the Troubleshooting the WebDAV Redirector section for more information.
Troubleshooting the WebDAV Redirector
The following list of error conditions is designed to help troubleshoot situations that you might see when working with WebDAV.
When attempting to map a drive to a WebDAV site, you receive the following error:
System error 67 has occurred.
The network name cannot be found.
This can be caused by one of the following conditions:
- IIS is not installed or is not running on the server that you are attempting to connect to.
- You have not installed the WebDAV Redirector on your client system.
- The WebClient service is not running on your client system.
- You have not enabled WebDAV on your web site.
- You are using Basic Authentication and connecting to your web site using HTTP instead of HTTPS.
- You are connecting to a web site on your local network that is using Fully-Qualified Domain Names (FQDNs) for name resolution, your web site uses Windows Authentication, and you have not added the web site’s FQDN to the proxy server bypass list on your client.
When attempting to map a drive to a WebDAV site, you receive the following error:
System error 1920 has occurred.
The file cannot be accessed by the system.
This error occurs when the account that you are using does not have an authoring rule created for it.
When attempting to map a drive to a WebDAV site, you receive the following error:
System error 5 has occurred.
Access is denied.
This can be caused by one of the following conditions:
- The account that you are attempting to use does not exist.
- You entered the incorrect password for the account that you are using.
- The account that you are using does not have sufficient permissions for your web site’s content.
- You have not enabled any authentication methods for your web site.
When attempting to map a drive to a WebDAV site using HTTPS, you are prompted with the following dialog:
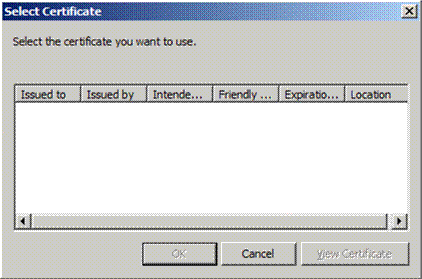
This occurs when the SSL certificate for the site that you are using does not match the name of the address that you used. For example, you are connecting to a site named www.contoso.com , but your SSL certificate was issued to shopping.contoso.com .
When attempting to map a drive to a WebDAV site, you receive the following error:
System Error 1244 has occurred.
The operation being request was not performed because the user has not been authenticated.
This can be caused by one of the following conditions:
- The server that you are connecting to does not have any authentication methods enabled.
- The WebDAV client is running into the problems that are described in KB941050 or KB943280.
- The logon type for content on a UNC share is incorrect; this setting is configured in the Physical Path Credentials Logon Type option in the Advanced Settings for a website or application, and is defined by the logonMethod attribute for the virtualDirectory settings for a website or virtual directory. For example: if the directory for your website’s content is on a network share, you may need to change your settings from Clear Text to Network depending on your network configuration.
When attempting to map a drive to a WebDAV site, you receive the following error:
System error 59 has occurred.
An unexpected network error occurred.
This can be caused by one of the following conditions:
- The web site that you are attempting to connect to has been stopped.
- The application pool for the web site that you are attempting to connect to has been stopped.
When attempting to map a drive to a WebDAV site, you receive the following error:
System error 1397 has occurred.
Mutual Authentication failed. The server’s password is out of date at the domain controller.
This error occurs when the WebDAV client is running into the problems that are described in KB941298.
When attempting to map a drive to a WebDAV site, you receive the following error:
System error 58 has occurred.
The specified server cannot perform the requested operation.
This error occurs when the WebDAV server does not have the correct host name in its bindings. For example, if you have DNS entries for contoso.com and www.contoso.com , but you only have an IIS binding for contoso.com , you will see the error when you attempt to map a drive to www.contoso.com .
When attempting to map a drive to a WebDAV site, you receive the following error:
System error 224 has occurred.
Access Denied. Before opening files in this location, you must first add the web site to your trusted sites list, browse to the web site, and select the option to login automatically.
This error occurs when the WebDAV site is not trusted by the WebDAV redirector. To resolve this issue, you need to add the website’s URL to the list of trsuted sites. To do so, use the following steps:
- Open the Windows Control Panel.
- Open Internet Options.
- Click the Security tab.
- Click the Trusted sites icon.
- Click the Sites button.
- Type your website’s URL in the Add this website to the zone text box, and then click the Add button.
(Note: You may need to uncheck the Require server verification (https:) for all sites in this zone checkbox if your website uses an HTTP URL.) - Click the Close button.
- Click the OK button.
WebDAV Redirector Registry Settings
There are several settings that control the behavior of the WebDAV redirector that can be configured in the following registry key:
The following table details the various settings and values that are available.
After changing any of these values, the Web Client will need to be restarted or your computer will need to be rebooted.
WARNING: If you use Registry Editor incorrectly, you may cause serious problems that may require you to reinstall your operating system. Microsoft cannot guarantee that you can solve problems that result from using Registry Editor incorrectly. Use Registry Editor at your own risk.


