- Установка клиента WebDAV в Windows Server 2016
- Что такое WebDAV?
- Установка WebDAV Client Windows Server 2016
- Включение автозапуска службы WebDAV
- Настройка WebDAV Client Windows Server
- Подключение сетевой папки WebDAV в Windows Server 2016
- Требуется настройка Windows Server?
- Setting up WebDAV on Windows Server 2016
- Setting up WebDAV on Windows Server 2016
- WebDAV on a Windows Server 2016
- Prepare Server
- Install WebDAV
- Set up WebDAV
- Integrate WebDAV on client
- Summary
- WebDAV File System
- Overview
- Compatibility
- Setup
- Windows Server 2012 or Windows Server 2012 R2
- Windows 8 or Windows 8.1
- Windows Server 2008 R2
- Windows 7
- Windows Server 2008 or Windows Vista
- How To
- How to allow hidden files to be listed in WebDAV responses
- Configuration
- Attributes
- Child Elements
- Configuration Sample
- Sample Code
Установка клиента WebDAV в Windows Server 2016
Не оставляю без внимания Windows Server 2016. Недавно потребовалось подключить Яндекс.Диск к одному терминальному серверу, поэтому сегодня познакомимся с протоколом WebDAV – выполним установку, настройку и подключение диска.
Нет времени читать статью?🚀 Закажите настройку Windows Server и служб под Ваши задачи! Заявку можно оставить любым удобным способом, используя контакты технической поддержки.👍
Что такое WebDAV?
WebDAV (Web Distributed Authoring and Versioning) – расширение протокола HTTP / 1.1, которое позволяет обращаться к файлам на удаленном сервере и выполнять с ними общие операции:
- чтение;
- запись;
- копирование;
- удаление файлов и т.д.
Как правило, этот протокол используется пользователями для совместной работы с удаленными файлами. Проще говоря, webdav — это, по сути, общая сетевая папка, расположенная на веб-сервере. Для доступа к общим ресурсам WebDAV на клиентской стороне должен быть установлен клиент WebDAV.
В серверных операционных системах Microsoft отдельного клиента WebDAV нет. Например, в Windows Server 2008 R2,2012/2012 R2 клиент WebDAV входит в состав компоненты Desktop-Experience. Поэтому для доступа к WebDAV ресурсам на этих ОС необходимо установить это расширение. Запускаем Power Shell от имени администратора и выполняем следующую команду:
Совет. В Windows Server 2008 R2, отсутствует командлет Install-WindowsFeature, вместо него нужно использовать другой командлет — Add-WindowsFeature.
Установка WebDAV Client Windows Server 2016
В Windows Server 2016 появился отдельный компонент WebDAV-Redirector. Для эго установки, нужно выполнить такую команду (потребуется перезагрузка сервера):
После перезагрузки проверим, что компонент WebDAV-Redirector установлен:
В системе при этом появятся две новые службы:
- WebClient (get-service WebClient) – позволяет программ Windows создавать, изменять и получать доступ к файлам в Интернете;
- MRxDAV (get-service MRxDAV) – драйвер файловой системы (WebDav Client Redirector Driver).
Включение автозапуска службы WebDAV
По умолчанию служба WebClient и драйвер MRxDAV отключены и настроены на запуск в ручном режиме, при срабатывании определенного триггера. По-видимому, идея разработчиков была в том, что сервис должен автоматически запускаться при попытке доступа через драйвер MRXDAV.SYS, но, увы, это не работает. Поэтому лучше изменить тип запуска этих служб на автоматический.
Осталось запустить данные службы:
Настройка WebDAV Client Windows Server
Служба WebClient настраивается только через реестр. Все ее параметры хранятся в ветке HKLM\SYSTEM\CurrentControlSet\Services\WebClient\Parameters.
С практической точки зрения, могут быть интересны следующие параметры службы WebClient:
- AcceptOfficeAndTahoeServers — отвечает за возможность подключения к веб-серверам SharePoint и Office Web Server (по умолчанию значение — 1);
- BasicAuthLevel – тип аутентификации, используемый клиентом WebClient. Доступны следующие значения:
- 0 — Базовая (Basic) аутентификация отключена;
- 1 — Базовая (аутентификация включена только SSL каталогов — это значение используется по умолчанию в Windows Server 2016);
- 2 и выше— используется базовая аутентификация для любого типа общих каталогов, как с поддержкой SSL, так и без (это небезопасный вариант, т.к. имя и пароль пользователя при таком типе аутентификации пересылаются по сети в открытом виде).
- FileSizeLimitInBytes — максимальный размер передаваемых файлов (задается в байтах, по умолчанию размер файлов ограничен 50 Мб)
Для проверки работы клиента WebDav можно попробовать подключить к общедоступному ресурсу с включенной поддержкой Webdav, например live.sysinternals.com. В этом веб-каталоге хранятся популярные утилиты от Sysinternals (Марка Русиновича).
Подключение сетевой папки WebDAV в Windows Server 2016
Сетевую папку WebDAV в Windows Server 2016 можно подключить следующими способами :
- Без SSL: net use * \\live.sysinternals.com\
- С SSL: net use * \\live.sysinternals.com@ssl\
- Можно указать данные для авторизации на удаленном сервере: net use * \\live.sysinternals.com@ssl\ /user:vmblog *
- Можно указать конкретный порт TCP: \\live.sysinternals.com@80\folder или \\live.sysinternals.com@ssl\share
- Чтобы отмонтировать подключенный по WebDav диск, выполните команду: net use * /del /y
Если при монтировании диска WebDAV через Проводник Windows или командную строку вы получаете ошибку:
Проверьте, что служба WebClient запущена, измените значение ключа реестра BasicAuthLevel, на 1 и перезагрузите сервер.
Требуется настройка Windows Server?
Закажите настройку Windows сервера под Ваши задачи и получите расширенную консультацию системного администратора!💥
📞 8-800-511-24-07 | 📩 support@gotoadm.ru |👍 telegram
Нашли ошибку в тексте? Выделите фрагмент текста и нажмите Ctrl+Enter
Setting up WebDAV on Windows Server 2016
Setting up WebDAV on Windows Server 2016

WebDAV on a Windows Server 2016
WebDAV is a protocol mainly used by Windows to share folders over the Internet. The folder shared on the server can be mounted on clients as a network drive. So it is possible to use remoter resources without additional programs or similar. In contrast to FTP, files can be opened, edited and processed directly from the WebDAV directory. It is similar to a folder shared with SAMBA in the local network.
This article shows you step-by-step how to share a folder using WebDAV and then connect it from a Windows client.
Prepare Server
A fully installed and configured IIS is a prerequisite for the use of WebDAV. The installation of IIS 10 on Windows Server 2016 is shown in this article.
If IIS is installed and ready for use, you can start the installation of WebDAV.
Install WebDAV
Similar to IIS, WebDAV is installed using Server Manager. Open the Server Manager (as explained in the IIS article) to select “Add Roles and Features”. Afterwards, the wizard can be clicked until “Server Roles” appears. There, under Web Server (IIS), select “Web Server” and then click on WebDAV Publishing.

Windows Authentication is also required. This can be found under Web Server IIS -> Web Server -> Security -> Windows Authentication. 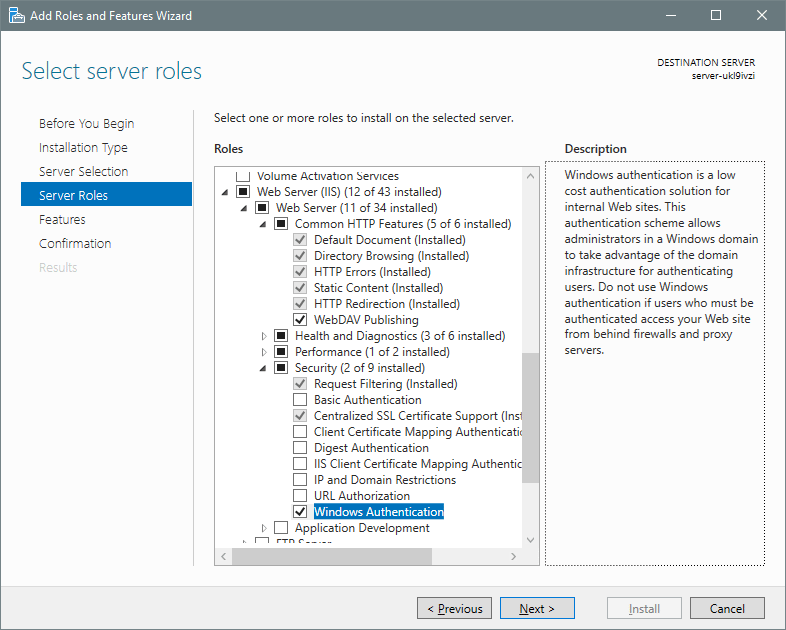
Then click Next. The point features are skipped. Then the summary is shown again. Click on Install.

When the installation is complete, WebDAV is installed. However, to use WebDAV, some settings are still required.
Set up WebDAV
Next, open the IIS Manager to create a Virtual Directory. To do this, navigate to Default Web Site (or your site) in the left menu, and then click View Virtual Directory on the left side of the menu. By clicking on Add Virtual Directory (also in the left menu) you can now add a new directory. This will later be the directory to be shared via WebDav. The alias that is given here is later part of the URL. In this example, the corresponding address would be

Then click on the directory you just created and select WebDAV Authoring Rules.
 Set Up WebDav Rules»/>
In the right-hand menu you can select Add Authoring Rule. Here you have to define the type of content that can be viewed by whom. For example, UserGroup “employees” can only see “.docx” files, or group “guest” can only see “.jpg and .png” files. The permissions are also important here. You specify whether the user can only view or use the file.
If the selection is made, you can confirm with OK.

The authentication method must then be selected and activated. To do this, click on the directory on the left of the menu and then select Authentication.
Right-click “Windows Authentication”.

You can then click on the Default Web Site (or the site of your choice) on the left side of the menu to select WebDAV Authoring Rules. On the right, WebDAV must be activated by clicking Enable WebDAV.

You must then click again on Default Web Site (or any other website) on the left side. The IIS service can then be restarted by clicking Restart.

WebDAV is now ready. Depending on the configuration, the port 80 / TCP may have to be released in the firewall.
Integrate WebDAV on client
To create the created folder now on the client, the Explorer must be opened. Click on Map network drive at the top.

Then the path to the corresponding folder must be entered. The following syntax applies:

It is important that WebDAV is case-sensitive. The folder name must be entered exactly as it is stored in IIS.
If the client already has access data for the server but the WebDAV folder is used for other data, a checkmark must be made for “Connect using different credentials”. If no access data is stored at all, the next step is prompted to enter it.
The folder can now be reached under the selected drive letter (in the example “Z:”).
Summary
The setup of WebDAV directories is done quickly and offers the possibility to make folders accessible from outside. However, as always when it is possible to reach services from the Internet, there is a certain security risk. Therefore it is recommended to encrypt all services with an SSL certificate and use only encrypted protocols. How a WebDAV server is converted to https shows you in our article Convert WebDAV server to https (German only).
WebDAV on a Windows Server 2016 WebDAV is a protocol mainly used by Windows to share folders over the Internet. The folder shared on the server can be mounted on clients as a network drive. So it is possible to use remoter resources without additional programs or similar. In contrast to FTP, files can be […]
Thank you for your feedback!
We will get back to you as soon as the article is finished.
WebDAV File System
Overview
Compatibility
| Version | Notes |
|---|---|
| IIS 10.0 | The element was not modified in IIS 10.0. |
| IIS 8.5 | The element was not modified in IIS 8.5. |
| IIS 8.0 | The element was not modified in IIS 8.0. |
| IIS 7.5 | The element of the element ships as a feature of IIS 7.5. |
| IIS 7.0 | The element of the element was introduced in WebDAV 7.0, which was a separate download for IIS 7.0. |
| IIS 6.0 | N/A |
The WebDAV 7.0 and WebDAV 7.5 modules shipped out-of-band for IIS 7.0, which required downloading and installing the modules from the following URL:
With Windows 7 and Windows Server 2008 R2, the WebDAV 7.5 module ships as a feature for IIS 7.5, so downloading WebDAV is no longer necessary.
Setup
To support WebDAV publishing for your Web server, you must install the WebDAV module. To do so, use the following steps.
Windows Server 2012 or Windows Server 2012 R2
- On the taskbar, click Server Manager.
- In Server Manager, click the Manage menu, and then click Add Roles and Features.
- In the Add Roles and Features wizard, click Next. Select the installation type and click Next. Select the destination server and click Next.
- On the Server Roles page, expand Web Server (IIS), expand Web Server, expand Common HTTP Features, and then select WebDAV Publishing. Click Next.

- On the Select features page, click Next.
- On the Confirm installation selections page, click Install.
- On the Results page, click Close.

Windows 8 or Windows 8.1
- On the Start screen, move the pointer all the way to the lower left corner, right-click the Start button, and then click Control Panel.
- In Control Panel, click Programs and Features, and then click Turn Windows features on or off.
- Expand Internet Information Services, expand World Wide Web Services, expand Common HTTP Features, and then select WebDAV Publishing.
- Click OK.
- Click Close.

Windows Server 2008 R2
- On the taskbar, click Start, point to Administrative Tools, and then click Server Manager.
- In the Server Manager hierarchy pane, expand Roles, and then click Web Server (IIS).
- In the Web Server (IIS) pane, scroll to the Role Services section, and then click Add Role Services.
- On the Select Role Services page of the Add Role Services Wizard, expand Common HTTP Features, select WebDAV Publishing, and then click Next.
- On the Confirm Installation Selections page, click Install.
- On the Results page, click Close.

Windows 7
- On the taskbar, click Start, and then click Control Panel.
- In Control Panel, click Programs and Features, and then click Turn Windows Features on or off.
- Expand Internet Information Services, then World Wide Web Services, and then Common HTTP Features.
- Select WebDAV Publishing, and then click OK.

Windows Server 2008 or Windows Vista
Download the installation package from the following URL:
Follow the instructions in the following walkthrough to install the WebDAV module:
How To
How to allow hidden files to be listed in WebDAV responses
Open Internet Information Services (IIS) Manager:
If you are using Windows Server 2012 or Windows Server 2012 R2:
- On the taskbar, click Server Manager, click Tools, and then click Internet Information Services (IIS) Manager.
If you are using Windows 8 or Windows 8.1:
- Hold down the Windows key, press the letter X, and then click Control Panel.
- Click Administrative Tools, and then double-click Internet Information Services (IIS) Manager.
If you are using Windows Server 2008 or Windows Server 2008 R2:
- On the taskbar, click Start, point to Administrative Tools, and then click Internet Information Services (IIS) Manager.
If you are using Windows Vista or Windows 7:
- On the taskbar, click Start, and then click Control Panel.
- Double-click Administrative Tools, and then double-click Internet Information Services (IIS) Manager.
In the Connections pane, expand the server name, and then go to the site, application, or directory where you want to enable WebDAV publishing.
In the Home pane, double-click WebDAV Authoring Rules. 
In the Actions pane, click WebDAV Settings.
In the WebDAV Settings pane, choose select True for Allow Hidden Files to be Listed if you want properties for hidden files to be returned in property responses; otherwise, choose False. 
Click Apply in the Actions pane.
Configuration
The element is configurable only at the site level in the ApplicationHost.config file. Any elements at other levels or in Web.config files are ignored.
Attributes
| Attribute | Description |
|---|---|
| allowHiddenFiles | Optional Boolean attribute. true if WebDAV will display hidden files in the responses to property requests; otherwise, false. |
Note: Even though files may be hidden from property requests, they can still be requested directly. For example, if you hid the Web.config file for your Web site, it would not be displayed in directory listings, but you could still open the file in a WebDAV-based editor if you knew that the path existed. The default value is false .
When set to false, the WebDAV module will not enforce any form of transactional processing. When set to true, the WebDAV module will enforce transactional processing by failing the operation if the base file system cannot transactions. The default value is false .
true if virtual directories are hidden from WebDAV requests; otherwise, false.
Note: This attribute was added in WebDAV 7.5 and IIS 7.5.
The default value is false .
Child Elements
Configuration Sample
The following example lists a sample element for the Default Web Site. This example clears any existing authoring rules, adds a single rule for the administrators group, enables WebDAV authoring, specifies that hidden files are allowed, enables WebDAV locks and specifies the lock provider, and enables WebDAV properties and specifies the default XML namespace for property mapping.
Sample Code
The following examples configure the WebDAV file system settings so that hidden files and virtual directories will be returned in property query responses.


