- WebRTC — Voice Demo
- Signaling Server
- Client Application
- Делаем свой персональный Skype, пошаговая инструкция создания WebRTC приложения
- 1. getUserMedia — получение доступа к медиа устройствам (микрофон/вебкамера)
- 2. Signaling server (сигнальный сервер)
- 3. WebRTC
- Webrtc voice engine linux
- Before You Start
- Getting the Code
- Updating the Code
- Building
- Generating Ninja project files
- Compiling
- Using Another Build System
- Working with Release Branches
- Contributing Patches
- Chromium Committers
- Example Applications
- Peerconnection
- Call App
- Relay Server
- STUN Server
- TURN Server
WebRTC — Voice Demo
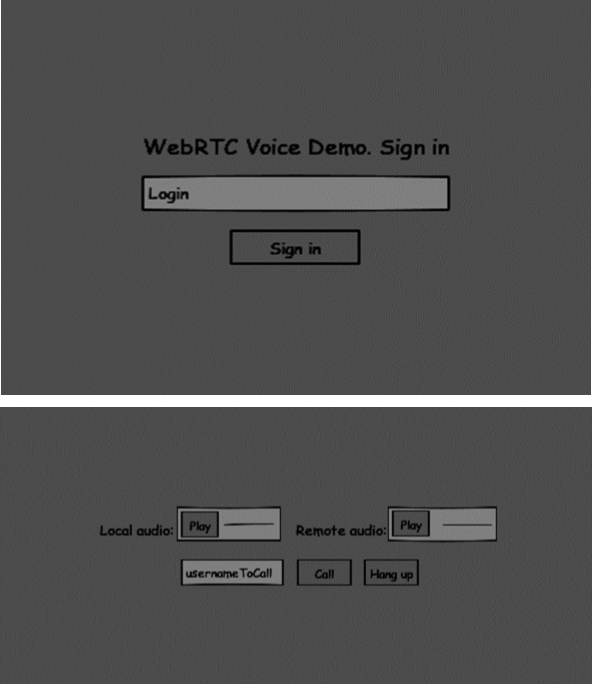
In this chapter, we are going to build a client application that allows two users on separate devices to communicate using WebRTC audio streams. Our application will have two pages. One for login and the other for making an audio call to another user.
The two pages will be the div tags. Most input is done through simple event handlers.
Signaling Server
To create a WebRTC connection clients have to be able to transfer messages without using a WebRTC peer connection. This is where we will use HTML5 WebSockets − a bidirectional socket connection between two endpoints − a web server and a web browser. Now let’s start using the WebSocket library. Create the server.js file and insert the following code −
The first line requires the WebSocket library which we have already installed. Then we create a socket server on the port 9090. Next, we listen to the connection event. This code will be executed when a user makes a WebSocket connection to the server. We then listen to any messages sent by the user. Finally, we send a response to the connected user saying “Hello from server”.
In our signaling server, we will use a string-based username for each connection so we know where to send messages. Let’s change our connection handler a bit −
This way we accept only JSON messages. Next, we need to store all connected users somewhere. We will use a simple Javascript object for it. Change the top of our file −
We are going to add a type field for every message coming from the client. For example if a user wants to login, he sends the login type message. Let’s define it −
If the user sends a message with the login type, we −
- Check if anyone has already logged in with this username.
- If so, then tell the user that he hasn’t successfully logged in.
- If no one is using this username, we add username as a key to the connection object.
- If a command is not recognized we send an error.
The following code is a helper function for sending messages to a connection. Add it to the server.js file −
When the user disconnects we should clean up its connection. We can delete the user when the close event is fired. Add the following code to the connection handler−
After successful login the user wants to call another. He should make an offer to another user to achieve it. Add the offer handler −
Firstly, we get the connection of the user we are trying to call. If it exists we send him offer details. We also add otherName to the connection object. This is made for the simplicity of finding it later.
Answering to the response has a similar pattern that we used in the offer handler. Our server just passes through all messages as answer to another user. Add the following code after the offer handler −
The final part is handling ICE candidate between users. We use the same technique just passing messages between users. The main difference is that candidate messages might happen multiple times per user in any order. Add the candidate handler −
To allow our users to disconnect from another user we should implement the hanging up function. It will also tell the server to delete all user references. Add the leave handler −
This will also send the other user the leave event so he can disconnect his peer connection accordingly. We should also handle the case when a user drops his connection from the signaling server. Let’s modify our close handler −
The following is the entire code of our signaling server −
Client Application
One way to test this application is opening two browser tabs and trying to make an audio call to each other.
First of all, we need to install the bootstrap library. Bootstrap is a frontend framework for developing web applications. You can learn more at http://getbootstrap.com/. Create a folder called, for example, “audiochat”. This will be our root application folder. Inside this folder create a file package.json (it is necessary for managing npm dependencies) and add the following −
Then run npm install bootstrap. This will install the bootstrap library in the audiochat/node_modules folder.
Now we need to create a basic HTML page. Create an index.html file in the root folder with the following code −
This page should be familiar to you. We have added the bootstrap css file. We have also defined two pages. Finally, we have created several text fields and buttons for getting information from the user. You should see the two audio elements for local and remote audio streams. Notice that we have added a link to a client.js file.
Now we need to establish a connection with our signaling server. Create the client.js file in the root folder with the following code −
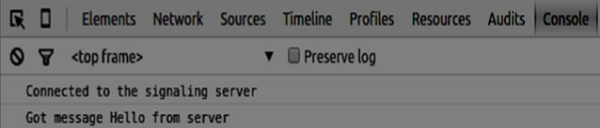
Now run our signaling server via node server. Then, inside the root folder run the static command and open the page inside the browser. You should see the following console output −
The next step is implementing a user log in with a unique username. We simply send a username to the server, which then tell us whether it is taken or not. Add the following code to your client.js file −
Firstly, we select some references to the elements on the page. The we hide the call page. Then, we add an event listener on the login button. When the user clicks it, we send his username to the server. Finally, we implement the handleLogin callback. If the login was successful, we show the call page and starting to set up a peer connection.
To start a peer connection we need −
- Obtain an audio stream from a microphone
- Create the RTCPeerConnection object
Add the following code to the “UI selectors block” −
Modify the handleLogin function −
Now if you run the code, the page should allow you to log in and display your local audio stream on the page.

Now we are ready to initiate a call. Firstly, we send an offer to another user. Once a user gets the offer, he creates an answer and start trading ICE candidates. Add the following code to the client.js file −
We add a click handler to the Call button, which initiates an offer. Then we implement several handlers expected by the onmessage handler. They will be processed asynchronously until both the users have made a connection.
The last step is implementing the hang-up feature. This will stop transmitting data and tell the other user to close the call. Add the following code −
When the user clicks on the Hang Up button −
- It will send a “leave” message to the other user
- It will close the RTCPeerConnection and destroy the connection locally
Now run the code. You should be able to log in to the server using two browser tabs. You can then make an audio call to the tab and hang up the call.
Источник
Делаем свой персональный Skype, пошаговая инструкция создания WebRTC приложения

WebRTC позволяет реализовать real-time аудио/видео связь через браузер ( и ).
В этом топике я расскажу как реализовать простейшее WebRTC приложение.
1. getUserMedia — получение доступа к медиа устройствам (микрофон/вебкамера)
Ничего сложного, с помощью 10 строк javascript-кода вы сможете увидеть и услышать себя в браузере(демо).
К элементу video вы можете применить css3-фильтры.
Огорчает здесь то, что на данном этапе развития WebRTC я не могу сказать браузеру «этому сайту я доверяю, всегда давай ему доступ к моей камере и микрофону» и нужно нажимать Allow после каждого открытия/обновления страницы.
Ну и не лишним будет напомнить, что если вы дали доступ к камере в одном браузере, другой при попытке получить доступ получит PERMISSION_DENIED.
2. Signaling server (сигнальный сервер)
Здесь я нарушаю последовательность большинства «webrtc getting started» инструкций потому как они вторым шагом демонструруют возможности webRTC на одном клиенте, что лично мне только добавило путаницы в объяснение.
Сигнальный сервер — это координирующий центр WebRTC, который обеспечивает коммуникацию между клиентами, инициализацию и закрытие соединения, отчеты об ошибках.
Сигнальный сервер в нашем случае это Node.js + socket.io + node-static, он будет слушать порт 1234.
Плюс ко всему node-static может отдать index.html, что сделает наше приложение максимально простым.
В папке приложения установим необходимое:
Скачайте server.js в папку приложения. Серверную часть я не буду разбирать, она довольна проста для понимания, к тому же она не является непосредственной частью WebRTC, поэтому просто запустите сервер:
3. WebRTC
Теперь у нас все готово для работы непосредственно с WebRTC. Скачайте рабочий index.html полностью, дальше я буду разбирать его по кускам.
3.0. Стандарты пока не приняты, поэтому пока что мы вынуждены использовать префиксы для различных браузеров:
3.1. getUserMedia
Эту часть мы уже разбирали в самом начале поста, за исключением того, что в функции gotStream мы создаем PeerConnection и добавляем два обработчика событий:
- onicecandidate отдает нам сгенерированные ICE Candidate, которые мы передадим сигнальному серверу, который в свою очередь передаст их собеседнику
- onaddstream будет вызван когда мы получим медиапоток собеседника
3.2. Call Offer
Call Offer — это инициализация сессии WebRTC. Call Offer и Call Answer(следующий шаг) имеют формат SDP (Session Description Protocol) и служат для описания параметров(разрешение, кодек и т.д.) инициализации медиапотоков клиентов.
ВАЖНО: клиенты должны дать доступ к медиаустройствам ДО отправки Call Offer.
3.3. Call Answer
Call Answer отправляет собеседник сразу после получения Call Offer. Отмечу что callback-функция у createOffer() и createAnswer() одна и та же — gotLocalDescription, т.е. localDescription для одного клиента создан функцией createOffer() , для другого — функцией createAnswer() .
3.4. ICE Candidate
ICE (Interactive Connectivity Establishment) Candidate выполняет функцию соединения клиентов, устанавливая путь между клиентами, по которому будут передаваться медиапотоки. Сгенерированные ICE Candidate мы также отправляем сигнальному серверу, описание обработки сообщений от сигнального сервера на следующем шаге.
3.5. Обработка сообщений от сигнального сервера
Код простой, но поясню:
- как только получили Call Offer, вызываем createAnswer
- при получении как Call Offer так и Call Answer вызываем setRemoteDescription с полученным SDP
- при получении ICE Candidate вызываем addIceCandidate
3.6. gotRemoteStream
Если все прошло успешно, то будет вызван обработчик onaddstream из шага 3.1, который будет содержать медиапоток от собеседника.
Напомню, что исходный код приложения целиком можно взять здесь.
Источник
Webrtc voice engine linux
The currently supported platforms are Windows, Mac OS X, Linux, Android and iOS. See the Android and iOS pages for build instructions and example applications specific to these mobile platforms.
Before You Start
First, be sure to install the prerequisite software.
Getting the Code
For desktop development:
Create a working directory, enter it, and run fetch webrtc :
NOTICE: During your first sync, you’ll have to accept the license agreement of the Google Play Services SDK.
The checkout size is large due the use of the Chromium build toolchain and many dependencies. Estimated size:
- Linux: 6.4 GB.
- Linux (with Android): 16 GB (of which
8 GB is Android SDK+NDK images).
Optionally you can specify how new branches should be tracked:
Alternatively, you can create new local branches like this (recommended):
See Android and iOS pages for separate instructions.
NOTICE: if you get Remote: Daily bandwidth rate limit exceeded for , make sure you’re logged in. The quota is much larger for logged in users.
Updating the Code
Update your current branch with:
Building
Ninja is the default build system for all platforms.
See Android and iOS for build instructions specific to those platforms.
Generating Ninja project files
Ninja project files are generated using GN. They’re put in a directory of your choice, like out/Debug or out/Release , but you can use any directory for keeping multiple configurations handy.
To generate project files using the defaults (Debug build), run (standing in the src/ directory of your checkout):
To generate ninja project files for a Release build instead:
To clean all build artifacts in a directory but leave the current GN configuration untouched (stored in the args.gn file), do:
See the GN documentation for all available options. There are also more platform specific tips on the Android and iOS pages.
Compiling
When you have Ninja project files generated (see previous section), compile (standing in src/ ) using:
For Ninja project files generated in out/Default :
Using Another Build System
Other build systems are not supported (and may fail), such as Visual Studio on Windows or Xcode on OSX. GN supports a hybrid approach of using Ninja for building, but Visual Studio/Xcode for editing and driving compilation.
To generate IDE project files, pass the —ide flag to the GN command. See the GN reference for more details on the supported IDEs.
Working with Release Branches
To see available release branches, run:
To create a local branch tracking a remote release branch (in this example, the branch corresponding to Chrome M80):
NOTICE: depot_tools are not tracked with your checkout, so it’s possible gclient sync will break on sufficiently old branches. In that case, you can try using an older depot_tools:
The above is untested and unsupported, but it might help.
For more details, read Chromium’s Working with Branches and Working with Release Branches pages. To find the branch corresponding to a Chrome release check the [Chromium Dashboard][https://chromiumdash.appspot.com/branches].
Contributing Patches
Please see Contributing Fixes for information on how to run git cl upload , getting your patch reviewed, and getting it submitted.
This also includes information on how to run tryjobs, if you’re a committer.
Chromium Committers
Many WebRTC committers are also Chromium committers. To make sure to use the right account for pushing commits to WebRTC, use the user.email Git config setting. The recommended way is to have the chromium.org account set globally as described at the depot tools setup page and then set user.email locally for the WebRTC repos using (change to your webrtc.org address):
Example Applications
WebRTC contains several example applications, which can be found under src/webrtc/examples and src/talk/examples . Higher level applications are listed first.
Peerconnection
Peerconnection consist of two applications using the WebRTC Native APIs:
A server application, with target name peerconnection_server
A client application, with target name peerconnection_client (not currently supported on Mac/Android)
The client application has simple voice and video capabilities. The server enables client applications to initiate a call between clients by managing signaling messages generated by the clients.
Setting up P2P calls between peerconnection_clients
Start peerconnection_server . You should see the following message indicating that it is running:
Start any number of peerconnection_clients and connect them to the server. The client UI consists of a few parts:
Connecting to a server: When the application is started you must specify which machine (by IP address) the server application is running on. Once that is done you can press Connect or the return button.
Select a peer: Once successfully connected to a server, you can connect to a peer by double-clicking or select+press return on a peer’s name.
Video chat: When a peer has been successfully connected to, a video chat will be displayed in full window.
Ending chat session: Press Esc. You will now be back to selecting a peer.
Ending connection: Press Esc and you will now be able to select which server to connect to.
Testing peerconnection_server
Start an instance of peerconnection_server application.
Open src/webrtc/examples/peerconnection/server/server_test.html in your browser. Click Connect. Observe that the peerconnection_server announces your connection. Open one more tab using the same page. Connect it too (with a different name). It is now possible to exchange messages between the connected peers.
Call App
Target name call (currently disabled). An application that establishes a call using libjingle. Call uses xmpp (as opposed to SDP used by WebRTC) to allow you to login using your gmail account and make audio/video calls with your gmail friends. It is built on top of libjingle to provide this functionality.
Further, you can specify input and output RTP dump for voice and video. It provides two samples of input RTP dump: voice.rtpdump which contains a stream of single channel, 16Khz voice encoded with G722, and video.rtpdump which contains a 320×240 video encoded with H264 AVC at 30 frames per second. The provided samples will interoperate with Google Talk Video. If you use other input RTP dump, you may need to change the codecs in call_main.cc (lines 215-222).
Relay Server
Target name relayserver . Relays traffic when a direct peer-to-peer connection can’t be established. Can be used with the call application above.
STUN Server
Target name stunserver . Implements the STUN protocol for Session Traversal Utilities for NAT as documented in RFC 5389.
TURN Server
Target name turnserver . Used for unit tests.
Источник


