Выделяем слово и меняем всюду в файле на необходимое: ctrl + alt + shift + j
Навигация по коду:
go to class css: ctrl + N
go to file: shift + ctrl + N
переход к символу (селектор, переменная, имена методов и т.д.): shift + ctrl + alt + N
общий способ: shift X 2
Открывает структуру кода нашего файла: ctrl + f12
Переход на определение метода: ctrl + B
Просмотре метода в текущем контексте: shift + ctrl + I
Работа с version control, vcs (система управления версиями)
Статус строки в vsc: отображается слева (после № строки, зеленым (синим) цветом; в зависимости от состояния)
Открыть окно для коммита: ctrl + K
push: ctrl + shift + K
Клонируем проект с гитхаба:
Копируем путь (например,https://github.com/puzzle/ng-user-auth.git) в: shift X 2 прописываем action clone , выбираем корневую папку для проекта, и нажимаем clone .
Продвинутое редактирование
Множественные курсоры (выделение): alt + (ставим клики, где надо) и заполняем
Контекстное выжеление: Выделяем корректный кусок кода, при каждом ctrl + W код расширяется на логический кусок. Обратный shortcut: ctrl + shift + W
Автодополнение наступает при начале печати. При нажатии ctrl + Q можно просмотреть документацию.
Вставить из истории (все что мы на «копипастили»): ctrl + shift + v
Локальная история: alt +
, далее show history
Генерируем болванку для своей документаии: начинаем набирать в коде /** + enter
Сниппеты (по примеру в sublime text) идем в Editor — Live Templates. Также можно создавать свои сниппеты. Не забудьте вырать контекст, в котором будет работать сниппет.
Плагины можно установить, например, для angular или nodejs: Settings — Plugins
Автоматизация
Любую задачу, анпример, в grunt or gulp, можно открыть и запустить непосредственно в редакторе: ctrl + E , выбираем, например, grunt-файл и запускаем требуемые команды.
Создать свою задачу можно перейдя на: Edit Configuration ( shift + alt + F10 ). Достаточно выбрать нужный config, далее webstorm сам подскажет какие пути проставить в нужных полях. Назовите задачу в поле name и запускайте ее, вызвав shift + ctrl + A и прописав там же имя задачи.
Вызов внешнего инструмента
action External Tools
Вызов action или option name, например, External Tool: shift + ctrl + A
На примере ESLINT (ставится в node modules):
Тесты
Заходим в Edit Configuration ( shift + alt + F10 ).
Достаточно выбрать нужный config, далее webstorm сам подскажет какие пути проставить в нужных полях.
Debug
Правой кнопкой мышки и Debug. В js-файлк можно поставить breakpoint .
Правой кнопкой мышки по breakpoint и можно поставить условие ( condition ), при котором сработает breakpoint .
WebStorm keyboard shortcuts
WebStorm has keyboard shortcuts for most of its commands related to editing, navigation, refactoring, debugging, and other tasks. Memorizing these hotkeys can help you stay more productive by keeping your hands on the keyboard.
If your keyboard does not have an English layout, WebStorm may not detect all of the shortcuts correctly.
The following table lists some of the most useful shortcuts to learn:
Shortcut
Action
Double Shift
Quickly find any file, action, class, symbol, tool window, or setting in WebStorm, in your project, and in the current Git repository.
Find a command and execute it, open a tool window, or search for a setting.
Launch run/debug configurations, run npm and yarn scripts, and reopen recent projects.
Quick-fixes for highlighted errors and warnings, intention actions for improving and optimizing your code.
Jump to the next or previous highlighted error.
Select a recently opened file from the list.
Increase or decrease the scope of selection according to specific code constructs.
Comment out a line or block of code.
Show all places where a code element is used across your project.
If you are using one of the predefined keymaps for your OS, you can print the default keymap reference card and keep it on your desk to consult it if necessary. This cheat sheet is also available under Help | Keymap Reference .
Choose the right keymap
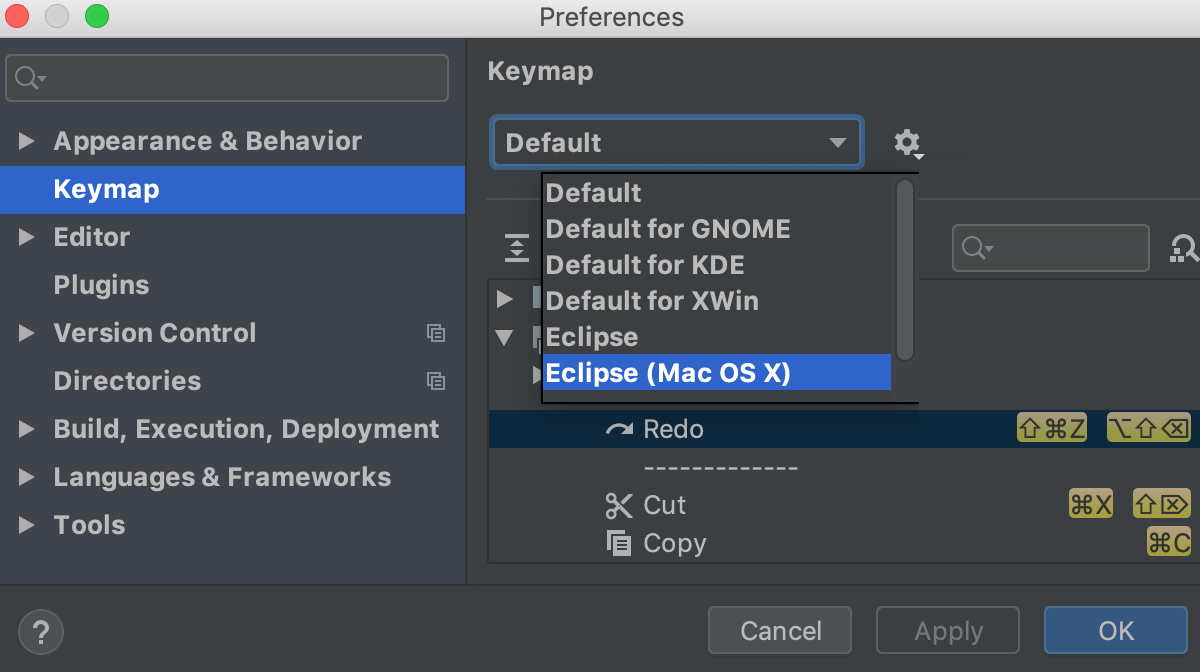
To view the keymap configuration, open the Settings/Preferences dialog Ctrl+Alt+S and select Keymap .
Enable function keys and check for possible conflicts with global OS shortcuts.
Use a predefined keymap
WebStorm automatically suggests a predefined keymap based on your environment. Make sure that it matches the OS you are using or select the one that matches shortcuts from another IDE or editor you are used to (for example, Eclipse or NetBeans ).
Tune your keymap
You can modify a copy of any predefined keymap to assign your own shortcuts for commands that you use frequently.
Import custom keymap
If you have a customized keymap that you are used to, you can transfer it to your installation.
Besides the default set of keymaps, you can add more as plugins (such as, keymaps for GNOME and KDE): open the Settings/Preferences dialog Ctrl+Alt+S , select Plugins and search for keymap in the Marketplace.
If your keymap stopped working after an update, it is likely that the keymap is not available by default in the new version of WebStorm. Find this keymap as a plugin and install it on the Plugins page as described in Manage plugins.
Print your keymap
If you prefer a hard copy, download the default WebStorm keymap reference and print it out as a card:
Learn shortcuts as you work
WebStorm provides several possibilities to learn shortcuts:
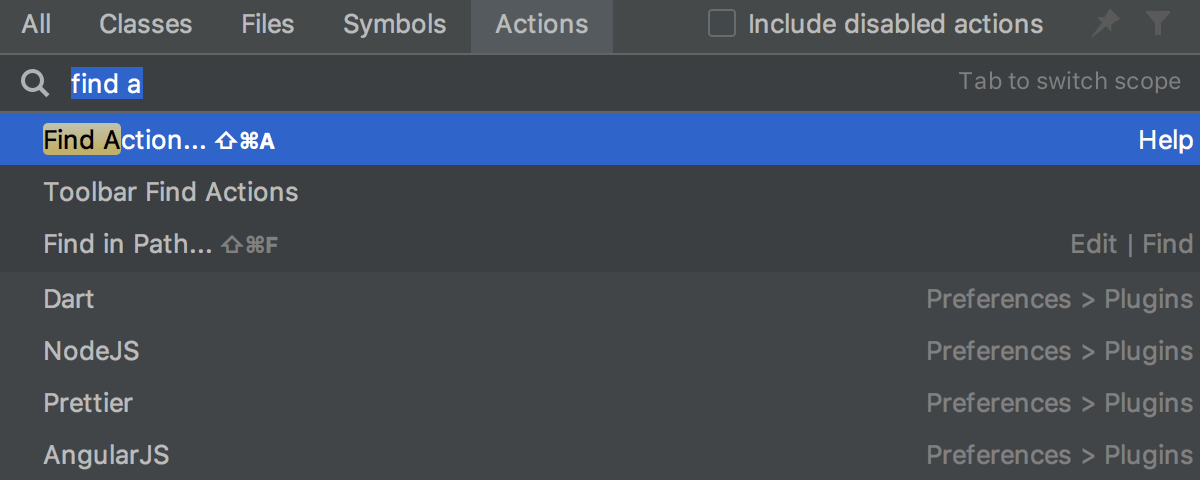
Find Action is the most important command that enables you to search for commands and settings across all menus and tools.
Press Ctrl+Shift+A and start typing to get a list of suggested actions. Then select the necessary action and press Enter to execute it.
Key Promoter X is a plugin that shows a popup notification with the corresponding keyboard shortcut whenever a command is executed using the mouse. It also suggests creating a shortcut for commands that are executed frequently.
If you are using one of the predefined keymaps for your OS, you can print the default keymap reference card and keep it on your desk to consult it if necessary. This cheat sheet is also available under Help | Keymap Reference .
To print a non-default or customized keymap, use the Keymap exporter plugin.
If an action has a keyboard shortcut associated with it, the shortcut is displayed near the name of the action. To add a shortcut for an action that you use frequently (or if you want to change an existing shortcut), select it and press Alt+Enter .
Use advanced features
You can further improve your productivity with the following useful features:
If there is a group of actions that you often use, create a quick list to access them using a custom shortcut. For example, you can try using the following predefined quick lists:
Refactor this Ctrl+Alt+Shift+T
VCS Operations Alt+`
WebStorm provides a lot of typing assistance features , such as automatically adding paired tags and quotes, and detecting CamelHump words.
When the focus is on a tool window with a tree, list, or table, start typing to see matching items.
Many actions in WebStorm provide more results when you execute them multiple times. For example, when you invoke basic code completion with Ctrl+Space on a part of a field, parameter, or variable declaration, it suggests names depending on the item type within the current scope. If you invoke it again, it will include classes available through module dependencies. When invoked for the third time in a row, the list of suggestions will include the whole project.
Resize tool windows
You can adjust the size of tool windows without a mouse:
To resize a vertical tool window, use Ctrl+Shift+Left and Ctrl+Shift+Right
To resize a horizontal tool window, use Ctrl+Shift+Up and Ctrl+Shift+Down
Configure keyboard shortcuts
WebStorm includes several predefined keymaps and lets you customize frequently used shortcuts.
To view the keymap configuration, open the Settings/Preferences dialog Ctrl+Alt+S and select Keymap .
WebStorm automatically suggests a predefined keymap based on your environment. Make sure that it matches the OS you are using or select the one that matches shortcuts from another IDE or editor you are used to (for example, Eclipse or NetBeans ).
You cannot change predefined keymaps. When you modify any shortcut, WebStorm creates a copy of the currently selected keymap, which you can configure. Click to duplicate the selected keymap, rename, remove, or restore it to default values.
A custom keymap is not a full copy of its parent keymap. It inherits unmodified shortcuts from the parent keymap and defines only those that were changed. For information about the keymap files, see Location of user-defined keymaps.
The keymap itself is a list of actions with corresponding keyboard and mouse shortcuts, and abbreviations. To find an action by name, type it in the search field. If you know the shortcut of an action, click and press the key combination in the Find Shortcut dialog.
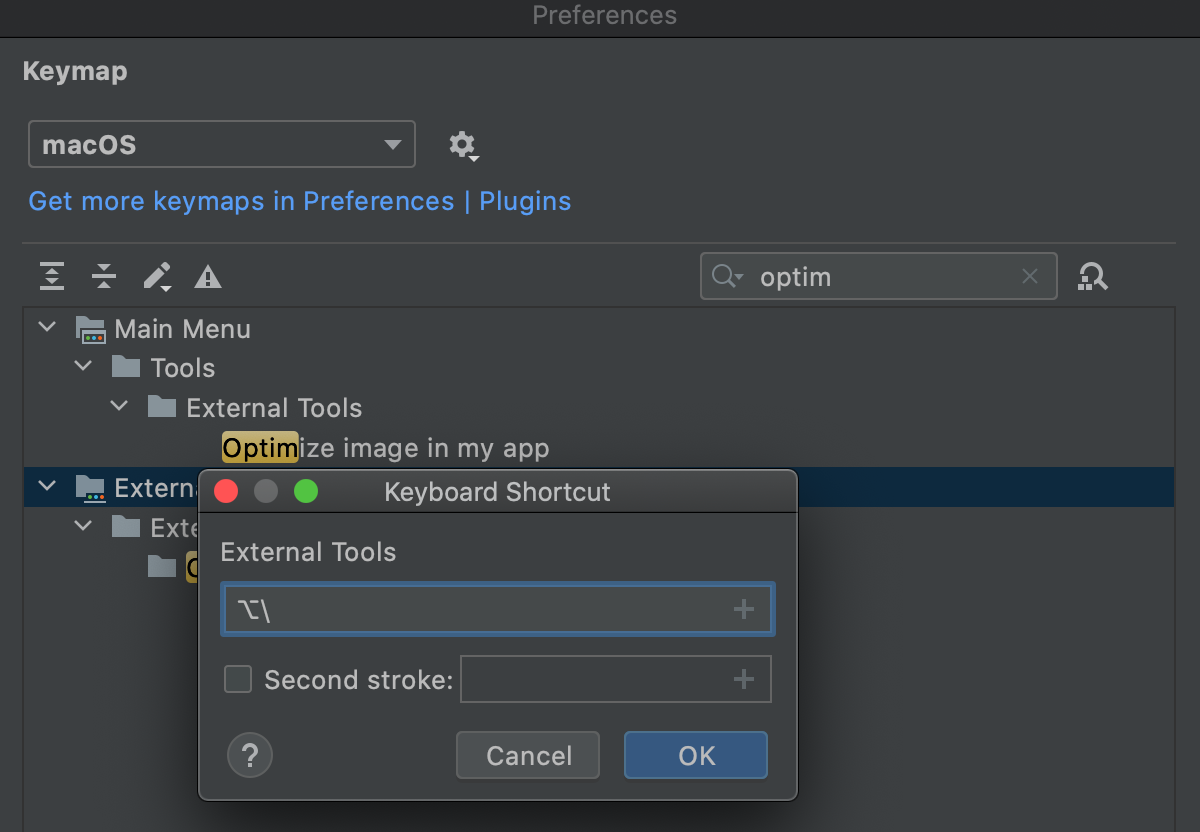
Add a keyboard shortcut
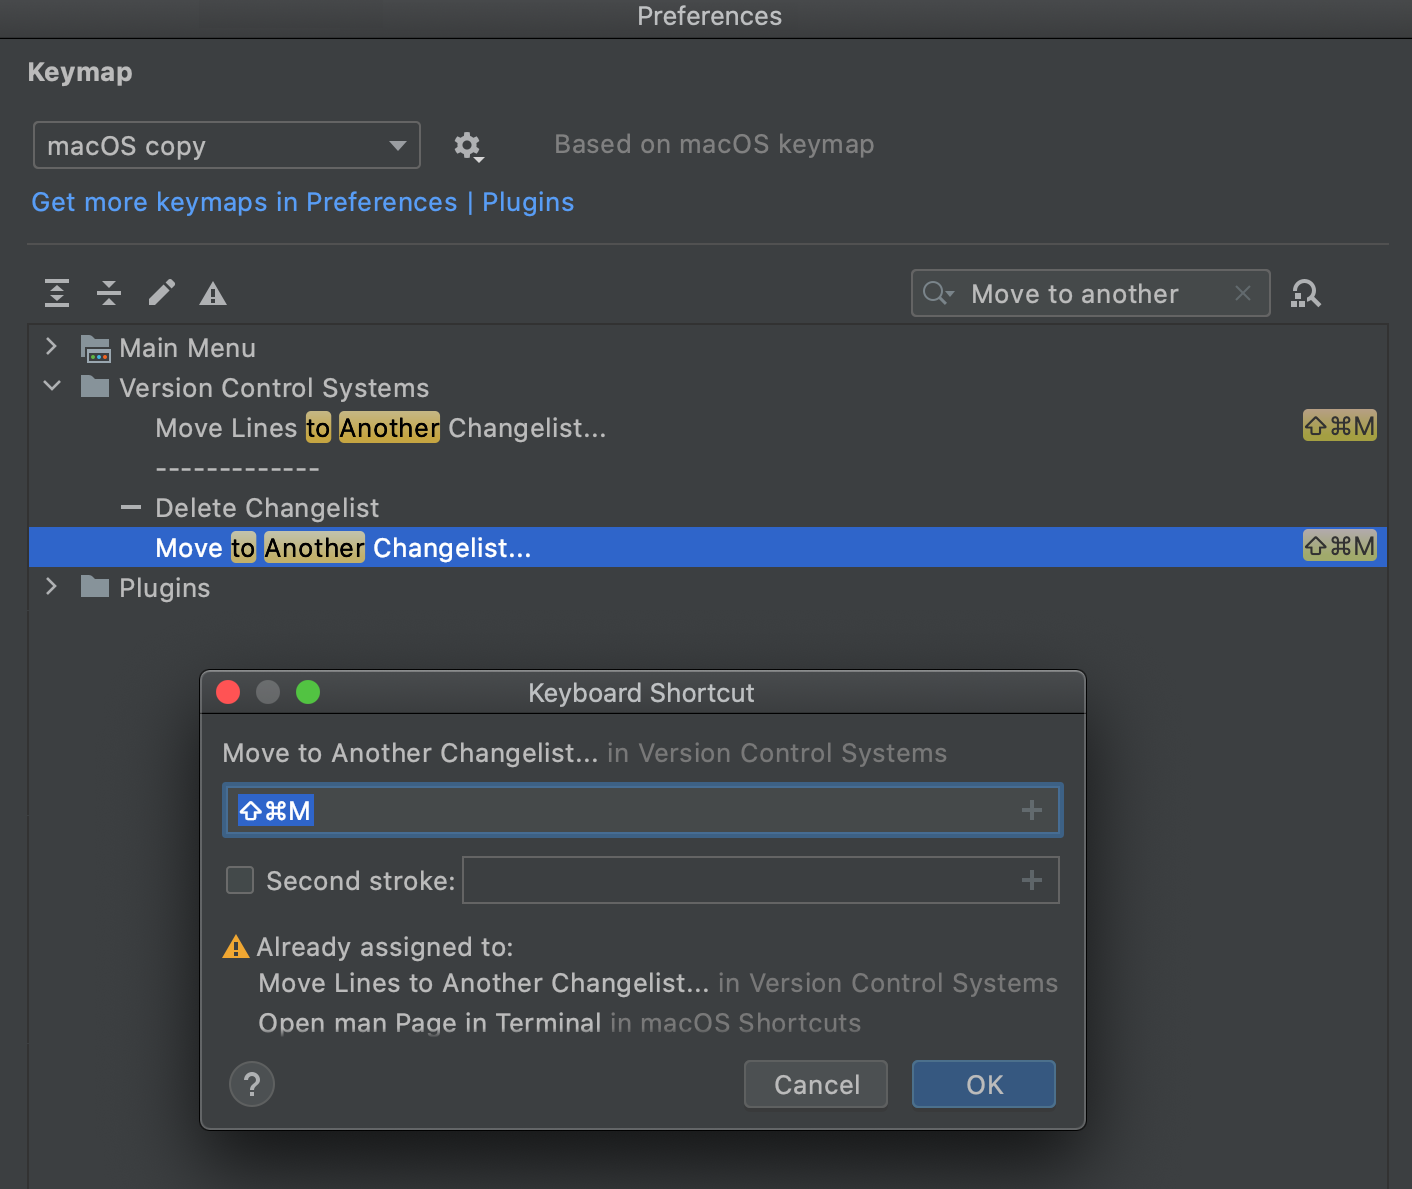
On the Keymap page of the Settings/Preferences dialog Ctrl+Alt+S , right-click an action and select Add Keyboard Shortcut .
In the Keyboard Shortcut dialog, press the necessary key combination.
If you want to use Enter , Escape , or Tab , click and select the necessary key or combination. Pressing them in the Keyboard Shortcut dialog will result in the actual action, such as closing the dialog.
If necessary, select the Second stroke checkbox to define a complex shortcut with two sequential key combinations.
Click OK to save the shortcut.
The key combination that you press is displayed in the Keyboard Shortcut dialog, as well as a warning if it conflicts with existing shortcuts.
Add a mouse shortcut
On the Keymap page of the Settings/Preferences dialog Ctrl+Alt+S , right-click an action and select Add Mouse Shortcut .
In the Mouse Shortcut dialog, move the mouse pointer to the central area and click or scroll as necessary.
Click OK to save the shortcut.
The performed mouse manipulations are displayed in the Mouse Shortcut dialog, as well as a warning if it conflicts with existing shortcuts.
Add an abbreviation
An abbreviation can be used to quickly find an action without a shortcut. For example, you can press Ctrl+Shift+A and type the name of the Jump to Colors and Fonts action to quickly modify the color and font settings of the element under the current caret position. If you assign an abbreviation for this action (like JCF ), you can then type it instead of the full action name.
On the Keymap page of the Settings/Preferences dialog Ctrl+Alt+S , right-click an action and select Add Abbreviation .
In the Abbreviation dialog, type the desired abbreviation and click OK .
Reset action shortcuts to default
If you changed, added, or removed a shortcut for an action, you can reset it to the initial configuration.
On the Keymap page of the Settings/Preferences dialog Ctrl+Alt+S , right-click an action and select Reset Shortcuts .
Location of user-defined keymaps
All user-defined keymaps are stored in separate configuration files under the keymaps subdirectory in the WebStorm configuration directory:
\keymaps Example C:\Users\JohnS\AppData\Roaming\JetBrains\WebStorm2021.1\keymaps
Each keymap file contains only the differences relative to the parent keymap.
You can use these files to share your custom keymaps with team members or between your IDE instances. Copy the corresponding keymap file and put it in the keymaps directory on another WebStorm installation.
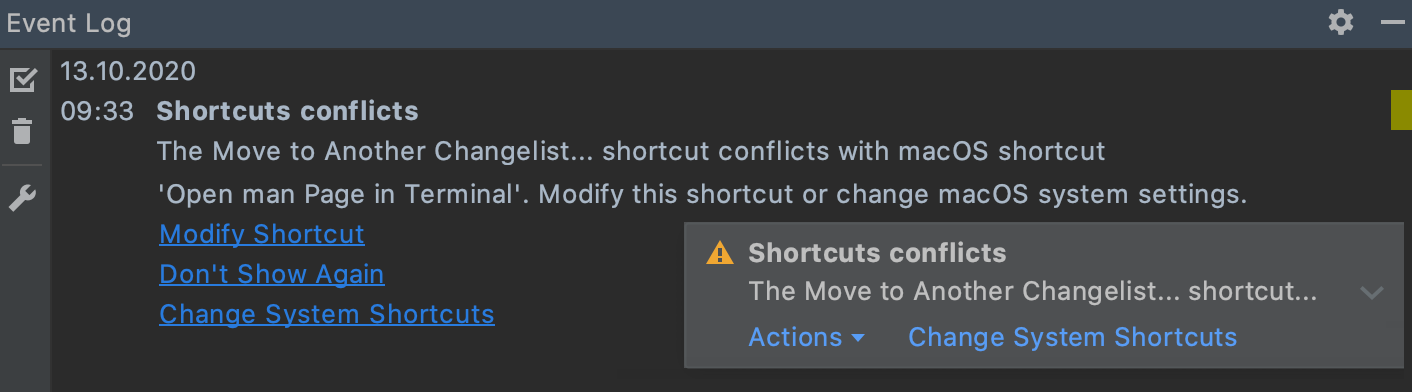
Conflicts with global OS shortcuts
Predefined keymaps do not cover every possible platform, version, and configuration. Some shortcuts can conflict with global system actions and shortcuts for third-party software. To fix these conflicts, you can reassign or disable the conflicting shortcut.
WebStorm detects the conflicts and notifies you with a popup message. If you miss the popup, you can always view the message in the Event log tool window:
Click Modify shortcuts to open the Keymap settings dialog where you can make the necessary adjustments:
Here are a few examples of possible system shortcut conflicts with the default keymap in WebStorm. Make sure that function keys are enabled on your system.
ArtDanshin / features&keys.md
— Переключатель схем
Distraction Free Mode — Оставить только код
если в конце названия файла поставить : и число, то перейдет на строку в файле
Если нужны файлы в определенных папках, то начинаем набирать название папки / файл
Навигация в коде:
cmd + F12(fn + F12) — Отображение структуры файла
cmd + b на методе в файле — переход к его определению
cmd + y — тоже самое для ленивых во всплывающем окне
VCS — Version Control System
ctrl — V — Popup VCS с пунктами меню для работы
Можно клонировать проекты прям из программы
При изменении в файле проектов около номера строки будет появляться цветная полоска GitGutter’а при клике на которую можно делать разные действия
cmd + alt + z — Откатить изменения
cmd + k — Коммит и просмотр изменений. Применить crtl/cmd + enter
cmd + shift + k — Запушить
Киллер фича ctrl + v -> Show History — показывает всю историю изменения файла на компьютере(не git)
Крутой инструмент для merge’а
Дерево git веток, как в SourceTree
shift — cmd + v — выбор для вставки того, что было когда либо скопировано во время работы
Множественные выделения:
alt + click — Вручную ставить каретку
cmd + f — поиск по файлу
Выделить слово нажать ctrl + cmd + g — выделится все что нашел
Выделить слово и нажать ctrl + g — последовательно все выделить + shift — снимаем выделения
Clone Carret Above/Below — Клонирование каретки. Клавиша не назначена. Я назначил fn + ctrl вверх/вниз
alt + вверх/вниз — последовательное выделение блоков кода
Волшебный автокомплит. F1 — если вы пишете документацию, то высветится документация по методу
Постфиксное автодополнение. Вводим имя класса, нажимаем enter — выводятся его методы.
Документация к методу/функции — Начинаем набирать шаблон /** нажимаем enter и магия происходит! Появляется разметка доки с параметрами метода/функции
Snippet’ы находятся в Preferences/Editor/Live Templates
alt + cmd + L — Автоформатирование кода
Запуск скриптов gulp/grunt/npm
ctrl + alt + r — Маленькая панелька для запуска скриптов. Можно редактировать. Можно добавить совсем простые команды npm — например npm shrinkwrap
Можно добавить выполнение тестов
Встроенный литер
Можно подключить, настроить ESLint.
Можно настроить цветовые схемы для ошибок. Чтобы прям в глаза бросались
Есть встроенный дебаггер. Позволяет запускать приложение на своем внутреннем сервере и проводить дебаггинг
Можно удобно назначать свои горячие клавиши:
Например:
Переключение между проектами — Open Reseant — ctrl + cmd + p
Папку .idea можно не игнорить в IDE. Можно игнорить отдельные файлы типа workspace, а вот файл для конфигурации run’ов лучше оставить — ибо проще для всех в команде