- File sharing over a network in Windows 10
- Общий доступ к файлам Windows Windows file sharing
- Доступ к файлам с помощью общего доступа к файлам Windows Accessing your files using Windows file sharing
- Запуск и остановка сервера общего доступа к файлам Starting and stopping the file sharing server
- Отключение и включение сервера общего доступа к файлам при запуске Disabling and enabling the file sharing server on startup
- Common Shares
- Windows
- Editions of Windows
- Windows Home
- Windows Pro
- Business editions
- Why is Microsoft Windows called Windows?
- Microsoft Windows help pages
- Related pages
- Use an Azure file share with Windows
- Prerequisites
- Using an Azure file share with Windows
- Mount the Azure file share
- Mount the Azure file share with File Explorer
- Accessing share snapshots from Windows
- List previous versions
- Restore from a previous version
- Securing Windows/Windows Server
- Auditing SMB 1 usage
- Removing SMB 1 from Windows Server
- Removing SMB 1 from Windows client
- Disabling SMB 1 on legacy versions of Windows/Windows Server
- SMB resources
- Next steps
File sharing over a network in Windows 10
In Windows 10, some features of file and folder sharing over a network have changed, including the removal of HomeGroup. Read on for answers to common questions about other changes to file and folder sharing in Windows 10.
To share a file or folder in File Explorer, do one of the following:
Right-click or press a file, select Give access to > Specific people.

Select a file, select the Share tab at the top of File Explorer, and then in the Share with section select Specific people.

If you select multiple files at once, you can share them all in the same way. It works for folders, too—share a folder, and all files in it will be shared.
To stop sharing in File Explorer, do one of the following:
Right-click or press a file or folder, then select Give access to > Remove access.

Select a file or folder, select the Share tab at the top of File Explorer, and then in the Share with section select Remove access.

File Explorer shows the «Remove access» option («Stop sharing» in older versions of Windows 10) for all files, even those that aren’t being shared over a network.
Open File Explorer, then type \\localhost into the address bar.
Note: When you’ve shared a file from a folder in your user profile and you go to \\localhost, you’ll see your user profile and all its files there. This doesn’t mean that all of your files are shared—just that you have access to all your own files.
If you open File Explorer, go to Network, and see an error message («Network discovery is turned off….»), you’ll need to turn on Network discovery to see devices on the network that are sharing files. To turn it on, select the Network discovery is turned off banner, then select Turn on network discovery and file sharing.

To troubleshoot problems with sharing files or folders, follow the steps below on all computers from which you’re trying to share.
Make sure the computers are on the same network. For example, if your computers connect to the internet through a wireless router, make sure they all connect through the same wireless router.
If you’re on a Wi-Fi network, set it to Private. To find out how, read Make a Wi-Fi network public or private in Windows 10.
Turn on network discovery and file and printer sharing, and turn off password protected sharing.
Select the Start button, then select Settings > Network & Internet , and on the right side, select Sharing options.
Under Private, select Turn on Network discovery and Turn on file and printer sharing.
Under All Networks, select Turn off password protected sharing.
Make sharing services start automatically.
Press the Windows logo key + R.
In the Run dialog box, type services.msc, and then select OK.
Right-click each of the following services, select Properties, if they’re not running, select Start, and next to Startup type, select Automatic:
Общий доступ к файлам Windows Windows file sharing
Для перемещения файлов на устройство и с него можно использовать общий доступ к файлам Windows. You can use Windows file sharing to transfer files to and from your device.
Доступ к файлам с помощью общего доступа к файлам Windows Accessing your files using Windows file sharing
Сервер общего доступа к файлам на устройстве Windows IoT базовая запускается автоматически при загрузке. The file sharing server on your Windows IoT Core device starts automatically on boot. Для подключения к нему требуется IP-адрес устройства. In order to connect to it, you need the IP address of your device. IP-адрес можно найти в приложении по умолчанию, которое загружается при запуске устройства. You can find the IP address on the default app that boots when your device starts.

Получив IP-адрес, откройте проводник на компьютере и введите \\ \c$ , где — это имя или IP-адрес устройства Windows IOT базовая, а затем нажмите клавишу ВВОД. Once you have the IP, open up File Explorer on your computer and type \\ \c$ , where is either the name or the IP Address of your Windows IoT Core device, then hit Enter.
При появлении запроса введите имя пользователя и пароль администратора. Enter your administrator username and password if prompted. Имя пользователя должно иметь префикс с IP-адресом устройства Windows IoT базовая. The username should be prefixed with the IP Address of your Windows IoT Core device. Пример: username: 192.168.1.118\Administrator пароль:

- Теперь вы можете получить доступ к файлам на устройстве, используя общий доступ к файлам Windows. Now you can access the files on your device using Windows file sharing.
Запуск и остановка сервера общего доступа к файлам Starting and stopping the file sharing server
Подключитесь к устройству с помощью PowerShell или SSH. Connect to your device through PowerShell or SSH.
По умолчанию сервер совместного использования файлов запускается при загрузке устройства. By default the file sharing server is started when the device is booted.
Чтобы отключить сервер общего доступа к файлам, введите net stop Server /y To stop the file sharing server, type net stop Server /y
Чтобы запустить сервер общего доступа к файлам, введите net start Server To start the file sharing server, type net start Server

Отключение и включение сервера общего доступа к файлам при запуске Disabling and enabling the file sharing server on startup
Подключитесь к устройству с помощью PowerShell или SSH. Connect to your device through PowerShell or SSH.
По умолчанию сервер совместного использования файлов запускается при загрузке устройства. By default the file sharing server is started when the device is booted.
Чтобы отключить сервер совместного использования файлов, чтобы он не запускался при запуске устройства, введите reg add HKEY_LOCAL_MACHINE\SYSTEM\CurrentControlSet\services\lanmanserver /v Start /t REG_DWORD /d 0x3 /f To disable the file sharing server so that it does not start when the device starts, type reg add HKEY_LOCAL_MACHINE\SYSTEM\CurrentControlSet\services\lanmanserver /v Start /t REG_DWORD /d 0x3 /f
Чтобы включить сервер общего доступа к файлам, который запускается при запуске устройства, введите reg add HKEY_LOCAL_MACHINE\SYSTEM\CurrentControlSet\services\lanmanserver /v Start /t REG_DWORD /d 0x2 /f To enable the file sharing server, so that starts when the device starts, type reg add HKEY_LOCAL_MACHINE\SYSTEM\CurrentControlSet\services\lanmanserver /v Start /t REG_DWORD /d 0x2 /f
Common Shares
Meaning and definition of Common Shares
Common shares can be aptly defined as securities in lieu of equity ownership in a corporation. These common shares provide voting rights and entitle the share holder to a share of the success of the company through capital appreciation and dividends. The common shareholders, in the occurrence of liquidation, can have the rights to the assets of the company only after preferred shareholders, bond holders, and other debt holders have been satisfied.
Common shareholders also have the privilege of voting rights concerning other matters in the company, like company objectives and stock splits. Other than these voting rights, common shareholders, sometimes, also enjoy “preemptive rights” which let common shareholders maintain their relative ownership in the company during the time when company issues a new offering of the stock. This means that the common shareholders can buy as desired shares of stock.
When a shareholder buys the common shares of a company, he/she becomes a part owner of the company. As a part owner, the shareholder shares the profits of the company either through rising value of shares or through the way of dividends. But if, in case, the company does not do well and faces a loss, the shareholder will receive no dividends and the value of shares will consequently drop.
However, over a long period of time, the common shares have provided the investors with higher returns than those received through any other kind of investment.
What are the risks involved?
Generally, stocks are considered as risky investments. This is because the whole of your investment would be lost if the company invested in fails in market. The shareholders are the last ones lined up for receiving money in the event of wounding up of a bankrupt company. However, some stocks can prove to be even more risky than others.
Smaller companies, not having the records of unswerving profit and yet paying the dividends, are the most risky ones. Besides, large companies, which are well established in their industries, and have improved their profits consistently and have been paying regular dividends, are found to be less risky.
Windows
Windows may refer to any of the following:

1. Microsoft Windows (also referred to as Windows or Win) is a graphical operating system developed and published by Microsoft. It provides a way to store files, run software, play games, watch videos, and connect to the Internet.
Microsoft Windows was first introduced with version 1.0 on November 10, 1983. Over a dozen versions of Windows were released after that, including the current version, Windows 10.
Editions of Windows
Starting with Windows XP, Microsoft has published various editions of Windows. Each of these Windows editions has the same core operating system, but some editions have additional features, at an additional cost.
The two most common editions of Windows for home computers are Windows Home and Windows Professional.
Windows Home
Windows Home (also called Win Home) is the basic edition of Windows. It provides all the fundamental functions of Windows, such as connecting to the Internet, browsing the web, watching videos, using office software, and playing video games. It is the least expensive edition of Windows, and it comes preinstalled on many new computers.
Windows Pro
Windows Professional (also called Windows Pro, or Win Pro) is an enhanced Windows edition, for power users, and small to medium sized businesses. It includes all the features of Windows Home, plus the following:
- Remote Desktop — allows you to remotely control another Windows computer connected to the Internet.
- Bitlocker — Microsoft’s integrated file encryption.
- Trusted Boot — provides encryption of the boot loader, protecting the computer against rootkits.
- Hyper-V — a Windows hypervisor for running virtual machines, equivalent to third-party software, such as VirtualBox.
- Windows Sandbox — provides a lightweight, sandboxed Windows 10 instance. You can use this isolated «Windows within Windows» environment to safely run suspicious or untrusted software. Windows Sandbox requires a Windows Insider build of Windows 10 Pro or Enterprise.
- Group policy management — Administrators can define group policies, for managing multiple Windows users in a business or organization.
- Support for more than 128 GB of RAM.
- Greater Windows Update installation options, including more flexible scheduling and postponement for up to 35 days.
Business editions
Windows Professional for Workstations and Windows Enterprise provide advanced features for professional studios and large businesses. For more information, refer to the side-by-side comparison in the official Microsoft Windows business edition comparison chart.
Why is Microsoft Windows called Windows?

Before the release of Microsoft Windows, Microsoft users were used to the single task command line operating system MS-DOS. Because Microsoft names most of its products with one word, it needed a word that best described its new GUI operating system. Microsoft chose «Windows» because of the multiple windows that allow different tasks and programs to run at the same time. Because you cannot trademark a common name like «Windows,» it’s officially known as «Microsoft Windows». The first version of Microsoft Windows was version 1.0, released in 1985.
Microsoft Windows help pages
Related pages
2. In general, a window is a fundamental part of a computer GUI (graphical user interface). A window is an area of the display containing a single running application. The window can be moved, resized, hidden, or maximized as desired by the user. The Microsoft Windows operating system is named after this UI element.
3. Regarding Unix-like operating systems, such as Linux or BSD, Windows may refer to the X Window System.
Use an Azure file share with Windows
Azure Files is Microsoft’s easy-to-use cloud file system. Azure file shares can be seamlessly used in Windows and Windows Server. This article discusses the considerations for using an Azure file share with Windows and Windows Server.
In order to use an Azure file share outside of the Azure region it is hosted in, such as on-premises or in a different Azure region, the OS must support SMB 3.0.
You can use Azure file shares on a Windows installation that is running either in an Azure VM or on-premises. The following table illustrates which OS versions support accessing file shares in which environment:
| Windows version | SMB version | Mountable in Azure VM | Mountable on-premises |
|---|---|---|---|
| Windows Server 2019 | SMB 3.0 | Yes | Yes |
| Windows 10 1 | SMB 3.0 | Yes | Yes |
| Windows Server semi-annual channel 2 | SMB 3.0 | Yes | Yes |
| Windows Server 2016 | SMB 3.0 | Yes | Yes |
| Windows 8.1 | SMB 3.0 | Yes | Yes |
| Windows Server 2012 R2 | SMB 3.0 | Yes | Yes |
| Windows Server 2012 | SMB 3.0 | Yes | Yes |
| Windows 7 3 | SMB 2.1 | Yes | No |
| Windows Server 2008 R2 3 | SMB 2.1 | Yes | No |
1 Windows 10, versions 1507, 1607, 1803, 1809, 1903, 1909, and 2004.
2 Windows Server, versions 1809, 1903, 1909, 2004.
3 Regular Microsoft support for Windows 7 and Windows Server 2008 R2 has ended. It is possible to purchase additional support for security updates only through the Extended Security Update (ESU) program. We strongly recommend migrating off of these operating systems.
We always recommend taking the most recent KB for your version of Windows.
Prerequisites
Ensure port 445 is open: The SMB protocol requires TCP port 445 to be open; connections will fail if port 445 is blocked. You can check if your firewall is blocking port 445 with the Test-NetConnection cmdlet. To learn about ways to work around a blocked 445 port, see the Cause 1: Port 445 is blocked section of our Windows troubleshooting guide.
Using an Azure file share with Windows
To use an Azure file share with Windows, you must either mount it, which means assigning it a drive letter or mount point path, or access it via its UNC path.
This article uses the storage account key to access the file share. A storage account key is an administrator key for a storage account, including administrator permissions to all files and folders within the file share you’re accessing, and for all file shares and other storage resources (blobs, queues, tables, etc.) contained within your storage account. If this is not sufficient for your workload, Azure File Sync may be used, or you may use identity-based authentication over SMB.
A common pattern for lifting and shifting line-of-business (LOB) applications that expect an SMB file share to Azure is to use an Azure file share as an alternative for running a dedicated Windows file server in an Azure VM. One important consideration for successfully migrating a line-of-business application to use an Azure file share is that many line-of-business applications run under the context of a dedicated service account with limited system permissions rather than the VM’s administrative account. Therefore, you must ensure that you mount/save the credentials for the Azure file share from the context of the service account rather than your administrative account.
Mount the Azure file share
The Azure portal provides you with a script that you can use to mount your file share directly to a host. We recommend using this provided script.
To get this script:
Navigate to the storage account that contains the file share you’d like to mount.
Select File shares.
Select the file share you’d like to mount.
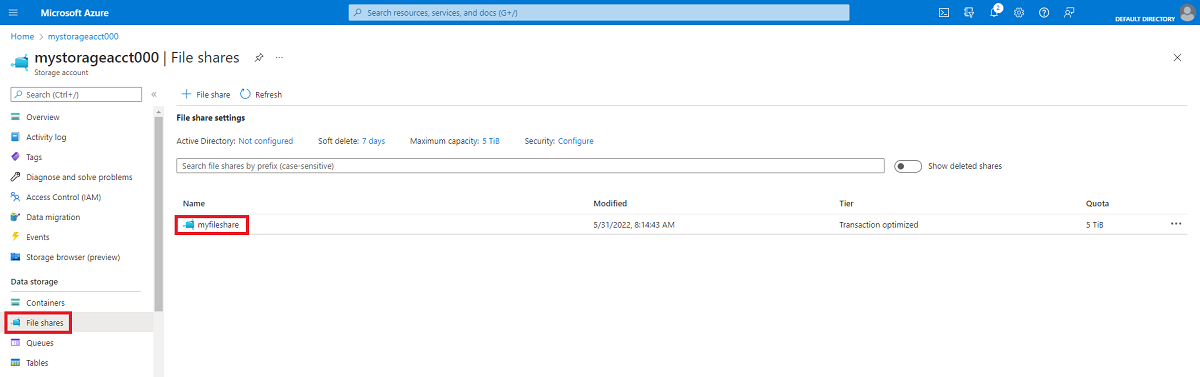
Select Connect.
Select the drive letter to mount the share to.
Copy the provided script.
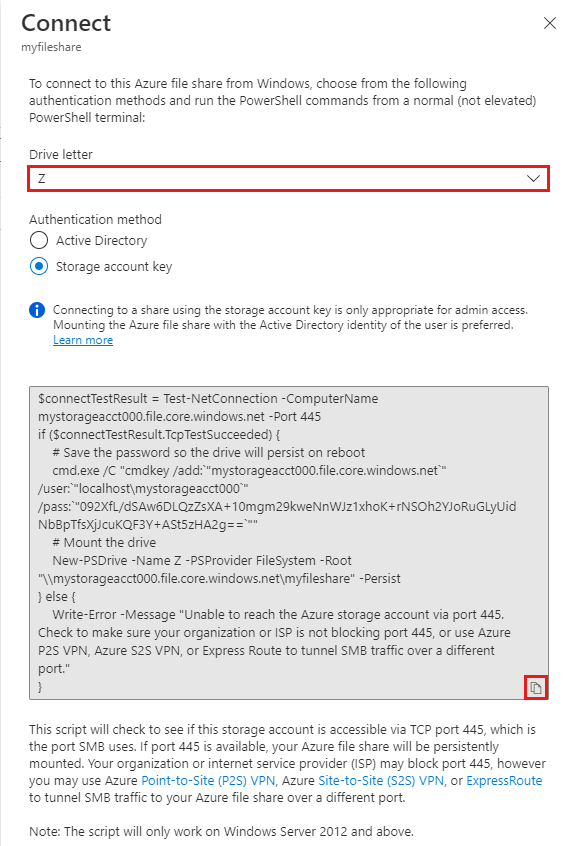
Paste the script into a shell on the host you’d like to mount the file share to, and run it.
You have now mounted your Azure file share.
Mount the Azure file share with File Explorer
Note that the following instructions are shown on Windows 10 and may differ slightly on older releases.
Open File Explorer. This can be done by opening from the Start Menu, or by pressing Win+E shortcut.
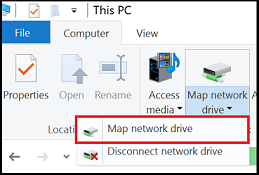
Navigate to This PC on the left-hand side of the window. This will change the menus available in the ribbon. Under the Computer menu, select Map network drive.
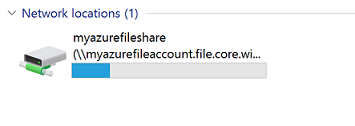
Select the drive letter and enter the UNC path, the UNC path format is \\ .file.core.windows.net\ . For example: \\anexampleaccountname.file.core.windows.net\example-share-name .

Use the storage account name prepended with AZURE\ as the username and a storage account key as the password.

Use Azure file share as desired.
When you are ready to dismount the Azure file share, you can do so by right-clicking on the entry for the share under the Network locations in File Explorer and selecting Disconnect.
Accessing share snapshots from Windows
If you have taken a share snapshot, either manually or automatically through a script or service like Azure Backup, you can view previous versions of a share, a directory, or a particular file from file share on Windows. You can take a share snapshot using Azure PowerShell, Azure CLI, or the Azure portal.
List previous versions
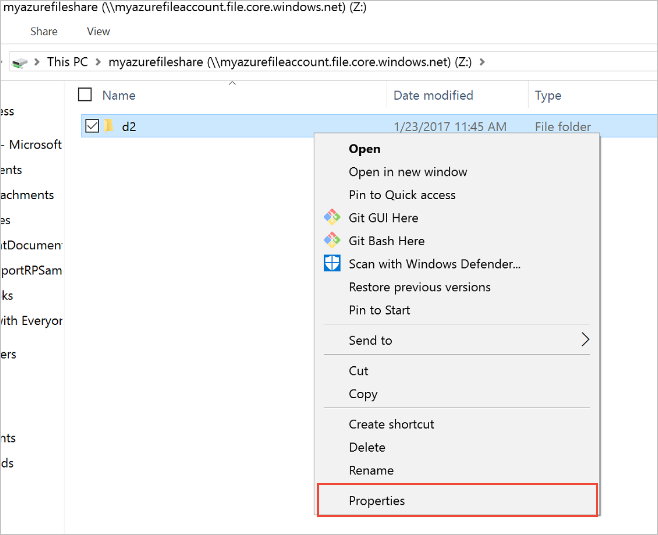
Browse to the item or parent item that needs to be restored. Double-click to go to the desired directory. Right-click and select Properties from the menu.
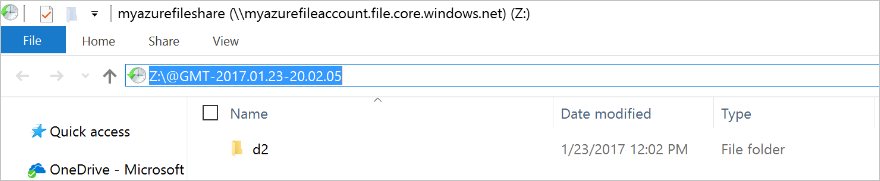
Select Previous Versions to see the list of share snapshots for this directory. The list might take a few seconds to load, depending on the network speed and the number of share snapshots in the directory.

You can select Open to open a particular snapshot.
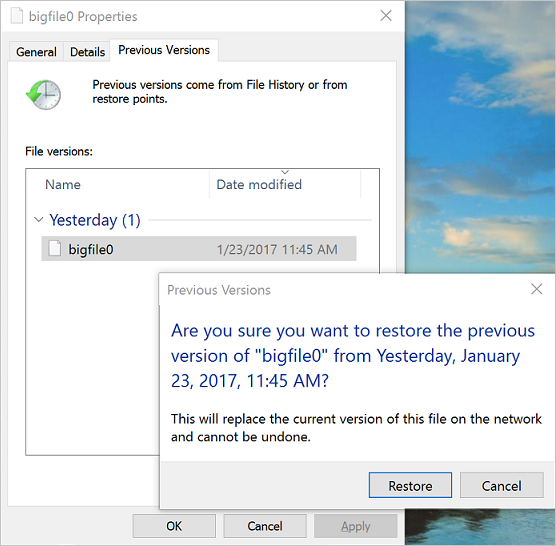
Restore from a previous version
Select Restore to copy the contents of the entire directory recursively at the share snapshot creation time to the original location.
Securing Windows/Windows Server
In order to mount an Azure file share on Windows, port 445 must be accessible. Many organizations block port 445 because of the security risks inherent with SMB 1. SMB 1, also known as CIFS (Common Internet File System), is a legacy file system protocol included with Windows and Windows Server. SMB 1 is an outdated, inefficient, and most importantly insecure protocol. The good news is that Azure Files does not support SMB 1, and all supported versions of Windows and Windows Server make it possible to remove or disable SMB 1. We always strongly recommend removing or disabling the SMB 1 client and server in Windows before using Azure file shares in production.
The following table provides detailed information on the status of SMB 1 each version of Windows:
| Windows version | SMB 1 default status | Disable/Remove method |
|---|---|---|
| Windows Server 2019 | Disabled | Remove with Windows feature |
| Windows Server, versions 1709+ | Disabled | Remove with Windows feature |
| Windows 10, versions 1709+ | Disabled | Remove with Windows feature |
| Windows Server 2016 | Enabled | Remove with Windows feature |
| Windows 10, versions 1507, 1607, and 1703 | Enabled | Remove with Windows feature |
| Windows Server 2012 R2 | Enabled | Remove with Windows feature |
| Windows 8.1 | Enabled | Remove with Windows feature |
| Windows Server 2012 | Enabled | Disable with Registry |
| Windows Server 2008 R2 | Enabled | Disable with Registry |
| Windows 7 | Enabled | Disable with Registry |
Auditing SMB 1 usage
Applies to Windows Server 2019, Windows Server semi-annual channel (versions 1709 and 1803), Windows Server 2016, Windows 10 (versions 1507, 1607, 1703, 1709, and 1803), Windows Server 2012 R2, and Windows 8.1
Before removing SMB 1 in your environment, you may wish to audit SMB 1 usage to see if any clients will be broken by the change. If any requests are made against SMB shares with SMB 1, an audit event will be logged in the event log under Applications and Services Logs > Microsoft > Windows > SMBServer > Audit .
To enable auditing support on Windows Server 2012 R2 and Windows 8.1, install at least KB4022720.
To enable auditing, execute the following cmdlet from an elevated PowerShell session:
Removing SMB 1 from Windows Server
Applies to Windows Server 2019, Windows Server semi-annual channel (versions 1709 and 1803), Windows Server 2016, Windows Server 2012 R2
To remove SMB 1 from a Windows Server instance, execute the following cmdlet from an elevated PowerShell session:
To complete the removal process, restart your server.
Starting with Windows 10 and Windows Server version 1709, SMB 1 is not installed by default and has separate Windows features for the SMB 1 client and SMB 1 server. We always recommend leaving both the SMB 1 server ( FS-SMB1-SERVER ) and the SMB 1 client ( FS-SMB1-CLIENT ) uninstalled.
Removing SMB 1 from Windows client
Applies to Windows 10 (versions 1507, 1607, 1703, 1709, and 1803) and Windows 8.1
To remove SMB 1 from your Windows client, execute the following cmdlet from an elevated PowerShell session:
To complete the removal process, restart your PC.
Disabling SMB 1 on legacy versions of Windows/Windows Server
Applies to Windows Server 2012, Windows Server 2008 R2, and Windows 7
SMB 1 cannot be completely removed on legacy versions of Windows/Windows Server, but it can be disabled through the Registry. To disable SMB 1, create a new registry key SMB1 of type DWORD with a value of 0 under HKEY_LOCAL_MACHINE > SYSTEM > CurrentControlSet > Services > LanmanServer > Parameters .
You can easily accomplish this with the following PowerShell cmdlet as well:
After creating this registry key, you must restart your server to disable SMB 1.
SMB resources
Next steps
See these links for more information about Azure Files:


