- Windows Firewall Profiles
- Windows Firewall Profiles — Restrictions per Profile
- About User Profiles
- Types of User Profiles
- User Profile Tiles in Windows 7 and Later
- How to Change a Network Location from Public to Private on Windows 10/Windows Server 2016?
- What is a Network Location (Profile) in Windows?
- How to Set a Network Profile in Windows 10?
- How to Change Windows 10 Network Location from Public to Private?
- Change Network Types Using PowerShell in Windows 10
- Setting Network Type Using Windows Registry
Windows Firewall Profiles
When authoring your firewall rules it is best to only plumb your firewall rules to profiles that are appropriate for your scenarios and to modify your rules according to each specific profile.
Windows Firewall offers three firewall profiles: domain, private and public. The domain profile applies to networks where the host system can authenticate to a domain controller. The private profile is a user-assigned profile and is used to designate private or home networks. Lastly, the default profile is the public profile, which is used to designate public networks such as Wi-Fi hotspots at coffee shops, airports, and other locations.
Windows Firewall provides public APIs which can be used to acquire the current profile and to enable firewall rule groups on specific profiles. These APIs should be utilized by all installers to provide the best user experience and seamless integration.
Best practices are to create your rules in all three profiles, but only enable the firewall rule group on the profiles that suit your scenarios. For example, if you are installing a home media sharing application that is only used on a private network then it would be best to create firewall rules in all three profiles, but only enable the firewall rule group containing your rules on the private profile.
If the current profile is not one of the profiles which apply to your scenarios, then inform the user that your firewall rules are not enabled in the current profile. You should also inform the user that the application will not function as expected unless the user moves to a network which has one of the profiles that applies to your scenario or re-categorizes the current network.
Enabling rules that have been created in the public profile by default is not recommended.
Windows Firewall Profiles — Restrictions per Profile
You may also wish to modify the restrictions on your firewall rules depending on which profile the rules are applied to. For applications and services that are designed to only be accessed by devices or other computers within a home or small business network, it is best to modify the remote address restriction to specify «Local Subnet» only. The same application or service would not have this restriction when used in an enterprise environment. This can be done by adding the remote address restriction to rules that are added to the private and public profiles, while leaving them unrestricted in the domain profile. This remote address restriction should not apply to applications or services that require global Internet connectivity.
About User Profiles
The system creates a user profile the first time that a user logs on to a computer. At subsequent logons, the system loads the user’s profile, and then other system components configure the user’s environment according to the information in the profile.
Types of User Profiles
- Local User Profiles. A local user profile is created the first time that a user logs on to a computer. The profile is stored on the computer’s local hard disk. Changes made to the local user profile are specific to the user and to the computer on which the changes are made.
- Roaming User Profiles. A roaming user profile is a copy of the local profile that is copied to, and stored on, a server share. This profile is downloaded to any computer that a user logs onto on a network. Changes made to a roaming user profile are synchronized with the server copy of the profile when the user logs off. The advantage of roaming user profiles is that users do not need to create a profile on each computer they use on a network.
- Mandatory User Profiles. A mandatory user profile is a type of profile that administrators can use to specify settings for users. Only system administrators can make changes to mandatory user profiles. Changes made by users to desktop settings are lost when the user logs off.
- Temporary User Profiles. A temporary profile is issued each time that an error condition prevents the user’s profile from loading. Temporary profiles are deleted at the end of each session, and changes made by the user to desktop settings and files are lost when the user logs off. Temporary profiles are only available on computers running WindowsВ 2000 and later.
A user profile consists of the following elements:
- A registry hive. The registry hive is the file NTuser.dat. The hive is loaded by the system at user logon, and it is mapped to the HKEY_CURRENT_USER registry key. The user’s registry hive maintains the user’s registry-based preferences and configuration.
- A set of profile folders stored in the file system. User-profile files are stored in the Profiles directory, on a folder per-user basis. The user-profile folder is a container for applications and other system components to populate with sub-folders, and per-user data such as documents and configuration files. Windows Explorer uses the user-profile folders extensively for such items as the user’s Desktop, Start menu and Documents folder.
User profiles provide the following advantages:
- When the user logs on to a computer, the system uses the same settings that were in use when the user last logged off.
- When sharing a computer with other users, each user receives their customized desktop after logging on.
- Settings in the user profile are unique to each user. The settings cannot be accessed by other users. Changes made to one user’s profile do not affect other users or other users’ profiles.
User Profile Tiles in Windows 7 and Later
In WindowsВ 7 or later, each user profile has an associated image presented as a user tile. These tiles appear to users on the User Accounts Control Panel item and its Manage Accounts subpage.. The image files for the default Guest and default User accounts also appear here if you have Administrator access rights.
NoteВ В The Manage Accounts subpage is accessed through the Manage another account link in the User Accounts Control Panel item.
- %ProgramData%\Microsoft\User Account Pictures\Guest.bmp
- %ProgramData%\Microsoft\User Account Pictures\User.bmp
The user’s tile image is stored in the %SystemDrive%\Users\ \AppData\Local\Temp folder as .bmp. Any slash characters (\) are converted to plus sign characters (+). For example, DOMAIN\user is converted to DOMAIN+user.
The image file appears in the user’s Temp folder:
- After the user completes the initial system setup (OOBE).
- When the user first launches the User Accounts Control Panel item.
- When the user goes to the Manage Accounts subpage of the User Accounts Control Panel item. In addition, tiles for all other users on the computer are shown.
Those instances are the only times that the images are created or updated. Therefore, there are several caveats to keep in mind when using the Temp folder location programmatically:
The user’s tile is not guaranteed to be present. If the user deletes the .bmp file, for instance manually or through a utility that deletes temporary files, that user tile is not automatically recreated until the user launches the User Accounts Control Panel item or Manage Accounts subpage.
User tiles for other users on the computer might not be present in the currently logged-on user’s Temp folder. For example, if User A creates User B through the User Accounts Control Panel item, User B’s tile is created in User A’s Temp folder when Windows sends User A to the Manage Accounts subpage. Because the directory structure is not created for User B until he or she logs on, User A’s Temp folder is the only location that User B’s tile is stored. When User B logs on, the only image stored in User B’s Temp folder is his or her own.
- To get all user tiles for users on a system, applications might need to search in each user’s Temp directory.
- Because the access control list (ACL) of these Temp directories allows access to SYSTEM, Administrator, and the current user, applications need to elevate to access for other users.
Other users’ tiles are not guaranteed to be up-to-date in their Temp folders. If User B updates his or her user tile, User A will not see the change until User A accesses the Manage Accounts subpage. Therefore, if applications use User A’s Temp folder to obtain User B’s tile, those applications can get an out-of-date image file.
How to Change a Network Location from Public to Private on Windows 10/Windows Server 2016?
In this article, we will consider the concept of a network profile in Windows, consider what types of network profiles are, what they are used for and how to change the assigned network profile from Public to Private or vice versa in Windows 10 and Windows Server 2019/2016. This is necessary if the network location is mistakenly detected as Public Network, when it should be Private.
Windows network profiles are a part of the Windows Defender Firewall with Advanced Security and allow you to apply different firewall rules depending on the type of network the computer is connected to. Depending on the profile used for your network connection, other computers may or may not see your computer on the network (network discovery settings), use shared network folders and printers.
What is a Network Location (Profile) in Windows?
Network profiles firstly appeared in Vista/Windows Server 2008. In Windows 10 (Windows Server 2016), you can assign one of the following network security profiles (locations) for your NIC (network interface card), whether Ethernet or Wi-Fi:
- Private or Home network – a profile for a trusted network (home or office networks). In such a network, the computer will be available for discovery by other devices; you can share your files and printers.
- Public network – a profile for an untrusted network (public Wi-Fi network in the subway, cafe, airport). You don’t trust other devices on such a network, your computer will be hidden to other network devices, no one will be able to access shared network folders and printers on your computer;
- Domain network – a profile for computers that are members of an Active Directory domain. Applies automatically after joining Windows to the AD domain. You can apply domain firewall policies for this profile.
The Network Location Awareness (NLA) service is used by Windows to determine if a network connection is on a Public, Private, or Domain network.
As mentioned earlier, different Windows Firewall rules apply to your network connection based on the network profile of your NIC.
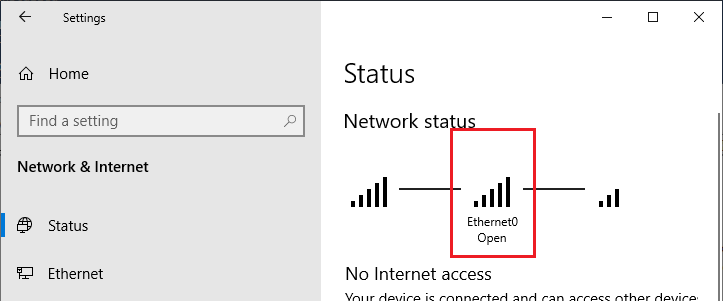
In Windows 10, you can check the current network profile (location) assigned to the network connection in the Settings -> Network & Internet. In my screenshot, you can see that the Open (Public) profile is assigned to the Ethernet0 NIC.
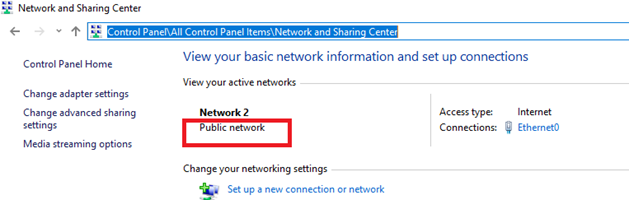
In the classic Control Panel, the network type for active network connections is displayed here: Control Panel -> All Control Panel Items -> Network and Sharing Center. But you cannot change the assigned network location from the classic Control Panel. For example, in Windows Server 2012 R2 / Windows 8.1, you can only change the network profile through the PowerShell, registry, or local security policy (described below).
How to Set a Network Profile in Windows 10?
The network profile in Windows 10 is selected by the user when the device connected to the new network for the first time. A prompt appears:
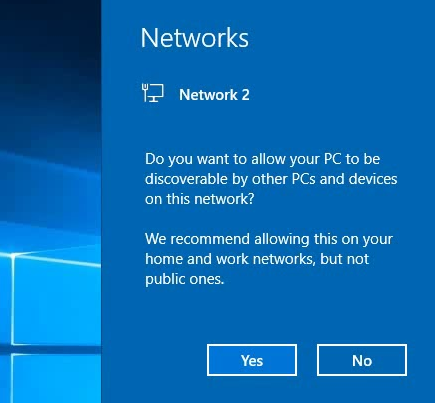
If you select “Yes”, the Private profile will be assigned to the network, or the Public profile if you select “No”. The next time you connect to the same LAN or WiFi network, the previously selected profile is automatically assigned.
You can hide “Network Location Wizard” when connecting to a new network through the registry. Just create an empty registry key HKEY_LOCAL_MACHINE\System\CurrentControlSet\Control\Network\NewNetworkWindowOff. After that, all networks are considered Public.
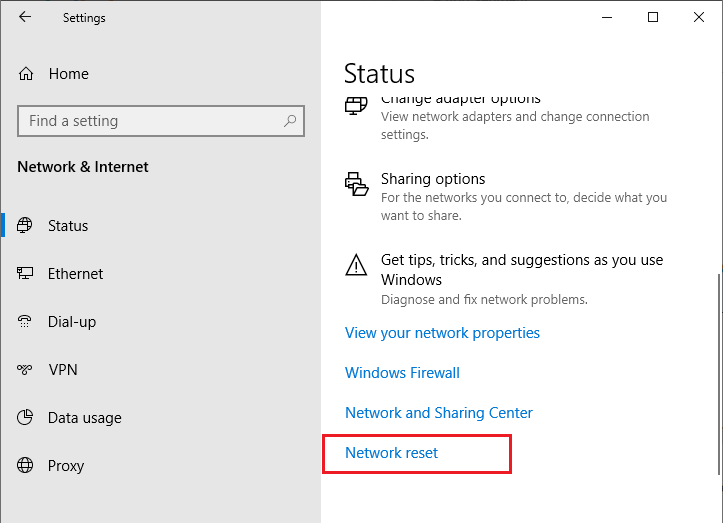
You can reset all settings and profiles for saved networks in Windows 10 by selecting Settings -> Network & Internet -> Status -> Network Reset and reboot the computer.
Now when you connected to the network, a network discovery request appears again.
How to Change Windows 10 Network Location from Public to Private?
You can change the network profile from the Windows 10 GUI. If you are using the new Settings panel, go to “Network & Internet” -> “Status” -> “Change connection properties”.
Here you can switch the network location profile from Public to Private and vice versa.

You cannot change the network profile from the classic Control Panel in Windows 10.
Also, you cannot change the network profile on the domain-joined computer. The Domain profile will always be used for a domain network connection.
Change Network Types Using PowerShell in Windows 10
On Windows 10/Windows Server 2016/2019, you can manage network connection location from the PowerShell. Run the elevated PowerShell console.
Now use the Get-NetConnectionProfile cmdlet to get a list of network adapters on your computer and their associated network profiles.
In my example, there is only one physical network adapter on a computer with a Public network location type (in the NetworkCategory value, you can see the following types of network profiles: Public, Private or DomainAuthenticated).
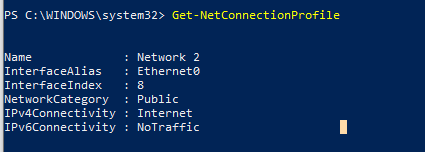
Let’s try to change the assigned network profile for the NIC. We need to get the index assigned to this network card. In this example, InterfaceIndex is 8.
After you get the network adapter index, you can change the network type to Private:
Set-NetConnectionProfile -InterfaceIndex 8 -NetworkCategory Private
Check that the network profile has changed:
Get-NetConnectionProfile -InterfaceIndex 19

The new firewall rules will be applied to the interface according to the assigned network profile without rebooting.
You can also change the network profile for all network adapters of the computer at once:
Get-NetConnectionProfile | Set-NetConnectionProfile -NetworkCategory Private
Setting Network Type Using Windows Registry
The network type can also be changed from the Registry Editor. To do this, run regedit.exe and go to the following key: HKEY_LOCAL_MACHINE\SOFTWARE\Microsoft\Windows NT\CurrentVersion\NetworkList\Profiles. This registry key contains profiles of all network connections.
You can find the necessary network profile by its name listed (from the Network and Sharing Center) in the ProfileName registry parameter.

The network type is specified in the Category parameter. The following values are available:
- 0 — Public Network
- 1 — Private Network
- 2 — Domain Network

Change the key value to the one you need and restart your computer.


