- Windows Driver Signing Tutorial
- Overview
- How to Sign an Unsigned Driver for x64 Windows 10, 8.1 or 7 with a Self-signed Certificate
- Tools for Signing Drivers
- Create a Self-Signed Certificate and Private Key
- Creating a Catalog File (CAT) for Driver Package
- Signing the Driver Using Self-signed Certificate
- Installing the Self-Signed Certificate
- Installation of the Driver Signed with the Self-signed Certificate
- Fix: Windows Requires a Digitally Signed Driver Windows 7, 8 and 10
- How to fix Windows requires a Digitally Signed Driver
- Disable Driver Signing
- Turning TESTSIGNING On
- Permanently disabling driver signature enforcement
Windows Driver Signing Tutorial
This tutorial provides an overview and details the steps to sign driver binaries for Windows in one consolidated location. The following subtopics describe the process:
Overview
Starting with WindowsВ Vista, x64-based versions of Windows required all software running in kernel mode, including drivers, to be digitally signed in order to be loaded.
Microsoft provides the following two ways to digitally sign drivers:
- Certify your driver with Microsoft and Microsoft will provide a signature for it. When your driver package passes the certification tests, it can be signed by Windows Hardware Quality Labs (WHQL). If your driver package is signed by WHQL, it can be distributed through the Windows Update program or other Microsoft-supported distribution mechanisms.
- Vendors or driver developers can obtain a software publishing certificate (SPC) from a Microsoft authorized Certificate Authority (CA) and use it to sign kernel mode and user mode binaries by themselves.
In the case of boot-start drivers during system start, drivers that are loaded by the system loader (WindowsВ Vista and later versions of Windows), vendors must use a Software Publishers Certificate (SPC) to embed-sign their driver binary image file.
NoteВ В The mandatory kernel-mode code-signing policy applies to all kernel-mode software for x64-based systems that are running on WindowsВ Vista and later versions of Windows. However, Microsoft encourages publishers to digitally sign all kernel-mode software, including device drivers (user-mode drivers included) for 32-bit systems as well. WindowsВ Vista and later versions of Windows, verify kernel-mode signatures on 32-bit systems. Software to support protected media content must be digitally signed even if it is 32-bit.
User-mode drivers, like the Printer driver will install and work in an x64-based computer. A dialog will appear to the user during installation asking for approval to install the driver. Beginning in WindowsВ 8 and later versions of Windows, installation will not proceed unless these driver packages are also signed.
The following resources describe Driver Signing in greater detail:
How to Sign an Unsigned Driver for x64 Windows 10, 8.1 or 7 with a Self-signed Certificate
By default, all 64-bit Windows versions, starting from Windows 7, prohibit to install devices drivers that are not signed with a valid digital signature. Unsigned drivers are blocked by the operating system. The digital signature guarantees (to some extent) that the driver has been released by a certain developer or vendor, and its code hasn’t been modified after it was signed.
In 64-bit (x64) Windows 10, 8.1 and 7 there are several ways to disable driver signature verification for the unsigned drivers: using a group policy or a test boot mode. Today we’ll show how to sign any unsigned driver for the 64-bit version of Windows 10 or Windows 7.
Suppose you have a certain unsigned device driver (without digital signature) for Windows 10 x64 or Windows 7 x64. In this example, it is the driver for quite old graphics card. The archive with drivers for your Windows version has been downloaded from the vendor’s website (I was able to find the video driver version for Windows Vista x64) and its contents has been extracted to c:\tools\drv1\. Let’s try to install the driver by adding it to Windows driver store with a standard pnputil tool:
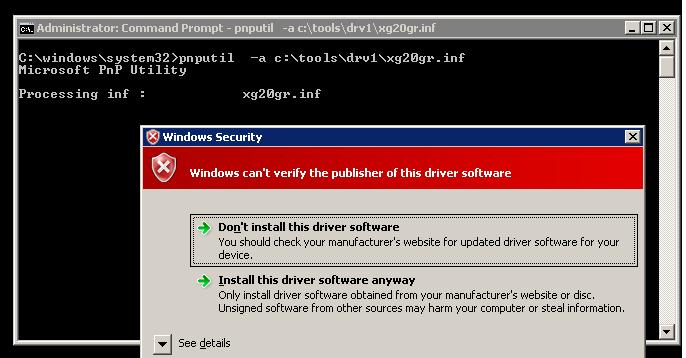
Pnputil –a c:\tools\drv1\xg20gr.inf
During driver installation, Windows 7 displays a warning that the system can’t verify the digital signature of this driver:
Windows can’t verify the publisher of this driver software.
In Windows 10 this warning doesn’t appear, but a warning appears in the console:
Processing inf: xg20gr.inf
Adding the driver package failed: The third-party INF does not contain digital signature information.

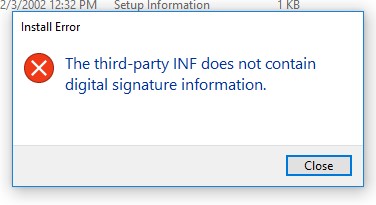
If you right click on the inf driver file and select Install when installing a driver from File Explorer, you receive an error:
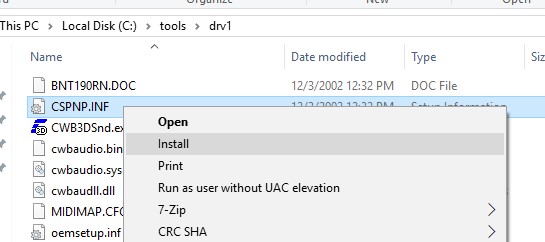
The third-party INF does not contain digital signature information.
Let’s try to sign this driver with a self-signed certificate.
Tools for Signing Drivers
To generate a signature and sign the driver, you need to download and install the following Windows application development tools (with the default settings):
- Windows SDK (or Microsoft Visual Studio 2005 or later) for your version of Windows. These packages include Windows SDK Signing tools for Desktop, which includes the necessary utility – signtool.exe;
- Windows Driver Kit 7.1.0.
Create a Self-Signed Certificate and Private Key
Create a C:\DriverCert folder in the root of the system drive.
Open the command prompt and go to the following directory:
cd C:\Program Files (x86)\Microsoft SDKs\Windows\v7.1\bin
Create a self-signed certificate and private key, that is issued, for example, for the company WinOSHub:
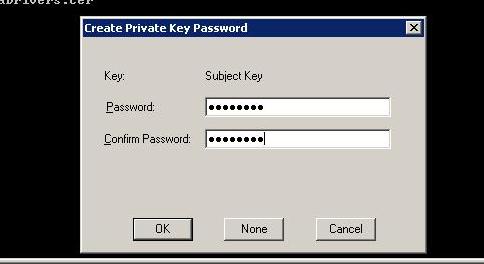
makecert -r -sv C:\DriverCert\myDrivers.pvk -n CN=»WinOSHub» C:\DriverCert\myDrivers.cer
During the creation of the certificate, the tool will prompt you to specify a password for the key, let it be P@ss0wrd.
Create a public key for a publisher certificate (PKSC) we have created earlier:
cert2spc C:\DriverCert\myDrivers.cer C:\DriverCert\myDrivers.spc
Combine the public key (.spc) and the private key (.pvk) in a single certificate file with format Personal Information Exchange (.pfx):
pvk2pfx -pvk C:\DriverCert\myDrivers.pvk -pi P@ss0wrd -spc C:\DriverCert\myDrivers.spc -pfx C:\DriverCert\myDrivers.pfx -po P@ss0wrd
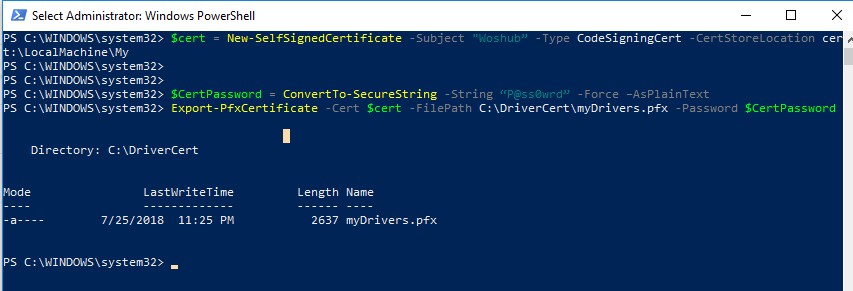
$cert = New-SelfSignedCertificate -Subject «Woshub” -Type CodeSigningCert -CertStoreLocation cert:\LocalMachine\My
Then you need to export this certificate to the pfx file with the password:
$CertPassword = ConvertTo-SecureString -String “P@ss0wrd” -Force –AsPlainText
Export-PfxCertificate -Cert $cert -FilePath C:\DriverCert\myDrivers.pfx -Password $CertPassword
Creating a Catalog File (CAT) for Driver Package
Create the directory C:\DriverCert\xg20 and copy all files from the folder into which the driver from the archive has been originally extracted (c:\tools\drv1\). Make sure that there are files with the extensions .sys and .inf among these files (in our case, they are xg20grp.sys and xg20gr.inf).
Go to the directory:
Generate a CAT file (contains information about all the files in the driver package) on the base of the INF file. On the base of an inf file using the inf2cat.exe tool (included in the Windows Driver Kit – WDK) generate a cat file for your platform (it contains information about all files in the driver package):
inf2cat.exe /driver:»C:\DriverCert\xg20″ /os:7_X64 /verbose
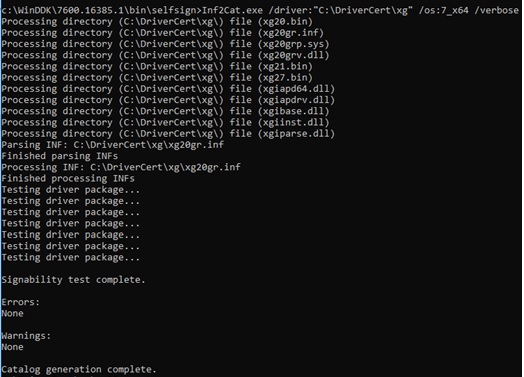
To make sure that the procedure was correct, check if the log file contains the messages:
Signability test complete.
Catalog generation complete.
Signability test failed.
Errors:
22.9.7: DriverVer set to incorrect date (must be postdated to 4/21/2009 for newest OS) in \hdx861a.inf 
To fix the error, find the line with DriverVer = in the [Version] section and replace it with:
DriverVer=05/01/2009,9.9.9.9 
After the command is executed, the xg20gr.cat file should be updated in the drivers’ directory.
Signing the Driver Using Self-signed Certificate
Go to the following folder:
cd C:\Program Files (x86)\Microsoft SDKs\Windows\v7.1\Bin
Sign the set of the driver files with the certificate you have created earlier using Globalsign as a timestamp service. The following command will sign the CAT file with a digital signature using with a certificate stored in a PFX file, protected by a password:
signtool sign /f C:\DriverCert\myDrivers.pfx /p P@ss0wrd /t http://timestamp.verisign.com/scripts/timstamp.dll /v C:\DriverCert\xg20\xg20gr.cat
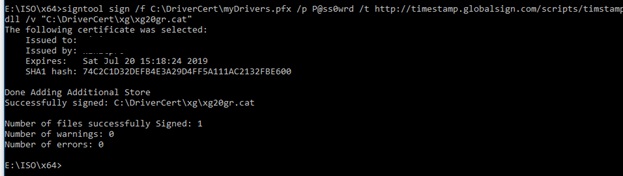
If the file is successfully signed, the following message should appear:
Successfully signed: C:\DriverCert\xg\xg20gr.cat
Number of files successfully Signed: 1
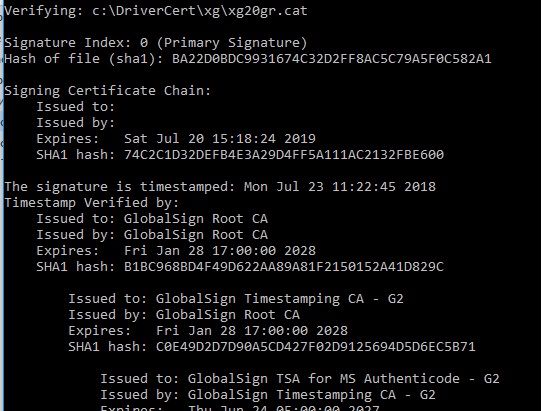
SignTool verify /v /pa c:\DriverCert\xg\xg20gr.cat
Or in the file properties on the Digital Signatures tab:
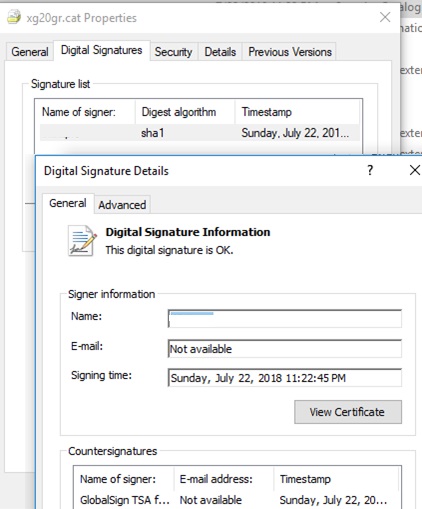
The CAT file contains digital signatures (thumbprints) of all the files that are in the driver directory (files listed in the INF file in the CopyFiles section). If any of these files has been changed, the checksum of the files will not match the data in the CAT file, and, as a result, the installation of such a driver will fail.
Installing the Self-Signed Certificate
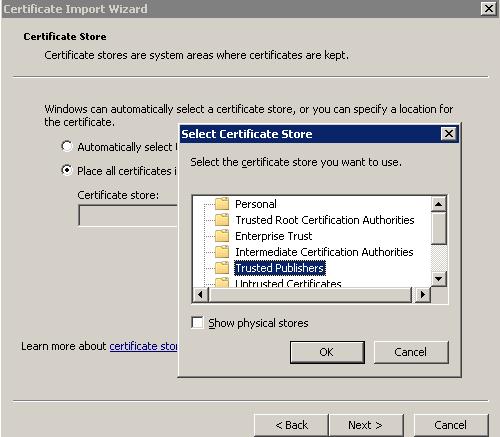
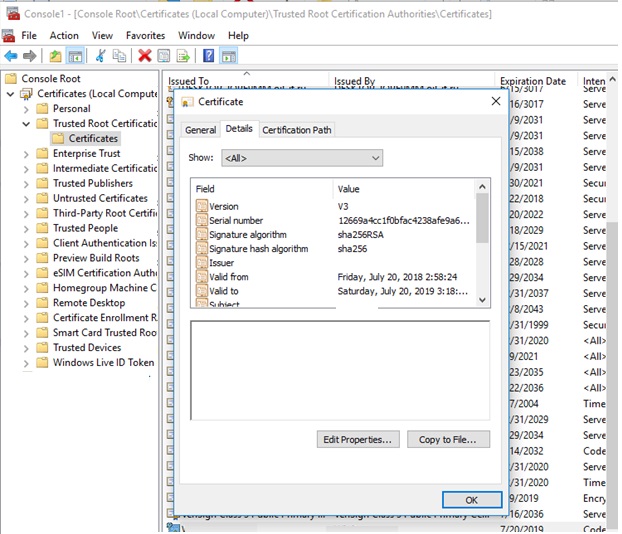
Since the certificate we created is self-signed, by default the system doesn’t trust it. Add your certificate to the local computer certificate store. You can do it using the following commands:
certmgr.exe -add C:\DriverCert\myDrivers.cer -s -r localMachine ROOT
certmgr.exe -add C:\DriverCert\myDrivers.cer -s -r localMachine TRUSTEDPUBLISHER
Or do it with the graphical certificate import wizard (you need to place the certificate in the Trusted Publishers and Trusted Root Certification Authorities stores of the local machine). In a domain, you can distribute this certificate to client computer using Group Policy.
Installation of the Driver Signed with the Self-signed Certificate
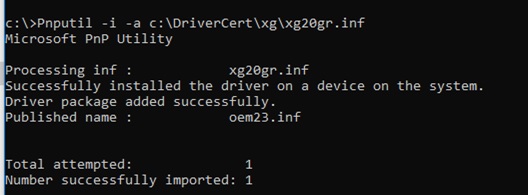
Try to install the driver we have signed again using the command:
Pnputil –i –a C:\DriverCert\xg20\xg20gr.inf
Now you won’t see the warning about the missing digital signature of the driver.
Successfully installed the driver on a device on the system.
Driver package added successfully.
The following warning appears in Windows 7 x64: Would you like to install this device software? In Windows 10 x64 1803, this pop-up window doesn’t appear. By clicking “Install”, you install the driver in the system.
Fix: Windows Requires a Digitally Signed Driver Windows 7, 8 and 10
What are Digitally Signed Drivers? Digitally Signed Drivers are signed drivers from it’s vendors that ensures driver integrity and checksum to make sure that the Driver file being installed isn’t modified in anyway other then what the Signing Authority has allowed or modified.
The error “Windows requires a digitally signed driver” occurs when Windows blocks the installation of a driver when it is without a digital signature.

How to fix Windows requires a Digitally Signed Driver
Windows allows you to proceed with the installation by turning off the digital signature check – which isn’t recommended but needed sometimes when the Driver isn’t signed but it is an original driver. There are several fixes that we have gathered and tested that would fix this issue. This guide applies to fixing Digitally Signed Driver is Required Error on Windows 10, Windows 8 or Windows 7
Disable Driver Signing
Driver signing, like mentioned before, is enabled by default in Windows operating system as a way to make sure that malicious software disguised as drivers are not installed on your computer. It adds an extra layer of security for your computer. However, if this is causing errors and not letting you install third-party drivers, you can disable the driver signing using the steps below:
- Press Windows + R, type “gpedit.msc” in the dialogue box and press Enter.
- Once in the group policy editor, navigate to the following path:
- Select the option Enabled and from the drop-down, select Ignore (under ‘When Windows detects a file without drivers’).
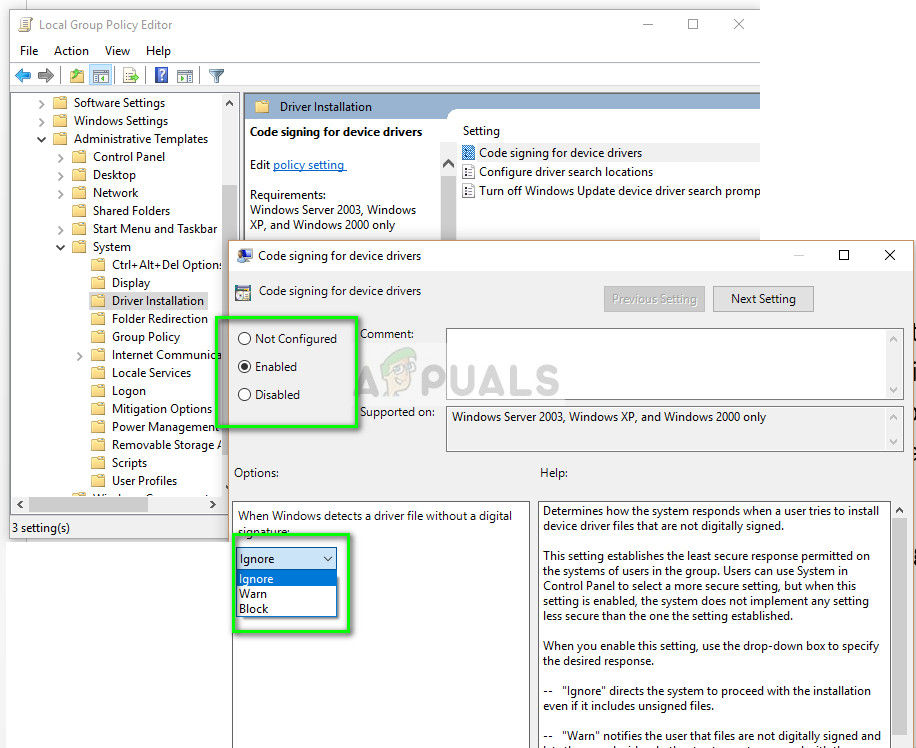
- Press OK to save changes and exit. Now check if the problem is solved.
Turning TESTSIGNING On
The TESTSIGNING determines whether Windows will install any test-signed kernel-mode code which is not digitally signed by relevant software companies. This is another safe guard which acts like a firewall to prevent any kernel-level drivers from being installed unless they are in the whitelist. If you really want to install the driver despite the safe measures by Windows, you can turn TESTSIGNING on.
- Press Windows + S, type “command prompt” in the dialogue box, right-click on the application and select “Run as administrator”.
- Once in the command prompt, execute the following command:
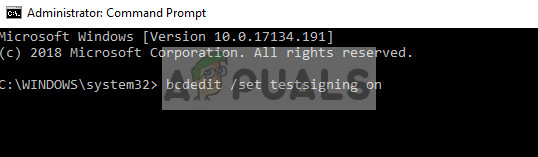
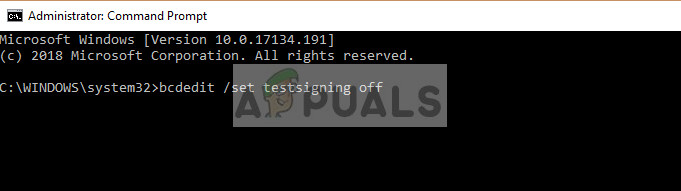
- Now restart your computer properly. After restarting, log back in and try installing the driver.
- If you ever want to turn the test mode off, execute the following command:
Permanently disabling driver signature enforcement
Another you can try if all the above methods fail is disabling the driver signature enforcement on your computer off permanently. You will have to manually turn the mechanism on again and there will be no safe guards for any drivers installed on your computer. Make sure you keep this method as a last resort.
- Press Windows + R, type “command prompt” in the dialogue box, right-click on the application and select “Run as administrator”.
- Once in the command prompt, execute the following command:

Restart your computer completely and try installing the driver.
- If you ever want to turn the enforcement mechanism back on, execute the following command:
Note: Usually all verified and genuine drivers are digitally signed. Make sure that you are completely positive of the driver before installing.


