- Authenticating Users with Windows Authentication (C#)
- Enabling Windows Authentication
- Authorizing Windows Users and Groups
- Windows Authentication
- Overview
- New in IIS 7.5
- Compatibility
- Setup
- Windows Server 2012 or Windows Server 2012 R2
- Windows 8 or Windows 8.1
- Windows Server 2008 or Windows Server 2008 R2
- Windows Vista or Windows 7
- How To
- How to enable Windows authentication for a Web site, Web application, or Web service
- How to enable Extended Protection for Windows authentication
- Configuration
- Attributes
- Child Elements
- Configuration Sample
- Sample Code
Authenticating Users with Windows Authentication (C#)
Learn how to use Windows authentication in the context of an MVC application. You learn how to enable Windows authentication within your application’s web configuration file and how to configure authentication with IIS. Finally, you learn how to use the [Authorize] attribute to restrict access to controller actions to particular Windows users or groups.
The goal of this tutorial is to explain how you can take advantage of the security features built into Internet Information Services to password protect the views in your MVC applications. You learn how to allow controller actions to be invoked only by particular Windows users or users who are members of particular Windows groups.
Using Windows authentication makes sense when you are building an internal company website (an intranet site) and you want your users to be able to use their standard Windows user names and passwords when accessing the website. If you are building an outwards facing website (an Internet website) consider using Forms authentication instead.
Enabling Windows Authentication
When you create a new ASP.NET MVC application, Windows authentication is not enabled by default. Forms authentication is the default authentication type enabled for MVC applications. You must enable Windows authentication by modifying your MVC application’s web configuration (web.config) file. Find the section and modify it to use Windows instead of Forms authentication like this:
When you enable Windows authentication, your web server becomes responsible for authenticating users. Typically, there are two different types of web servers that you use when creating and deploying an ASP.NET MVC application.
First, while developing an MVC application, you use the ASP.NET Development Web Server included with Visual Studio. By default, the ASP.NET Development Web Server executes all pages in the context of the current Windows account (whatever account you used to log into Windows).
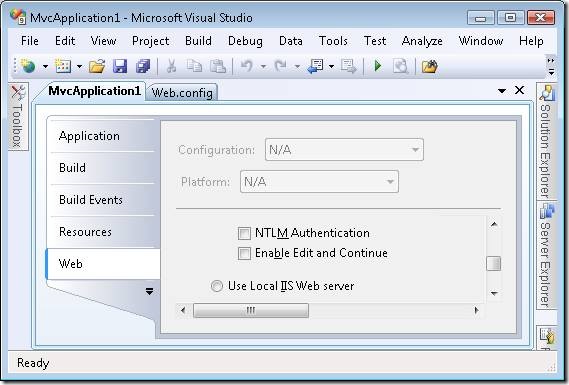
The ASP.NET Development Web Server also supports NTLM authentication. You can enable NTLM authentication by right-clicking the name of your project in the Solution Explorer window and selecting Properties. Next, select the Web tab and check the NTLM checkbox (see Figure 1).
Figure 1 – Enabling NTLM authentication for the ASP.NET Development Web Server
For a production web application, on the hand, you use IIS as your web server. IIS supports several types of authentication including:
- Basic Authentication – Defined as part of the HTTP 1.0 protocol. Sends user names and passwords in clear text (Base64 encoded) across the Internet. — Digest Authentication – Sends a hash of a password, instead of the password itself, across the internet. — Integrated Windows (NTLM) Authentication – The best type of authentication to use in intranet environments using windows. — Certificate Authentication – Enables authentication using a client-side certificate. The certificate maps to a Windows user account.
For a more detailed overview of these different types of authentication, see https://msdn.microsoft.com/library/aa292114(VS.71).aspx.
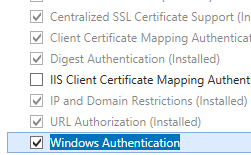
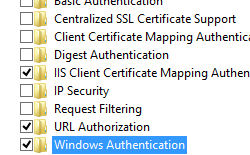
You can use Internet Information Services Manager to enable a particular type of authentication. Be aware that all types of authentication are not available in the case of every operating system. Furthermore, if you are using IIS 7.0 with Windows Vista, you will need to enable the different types of Windows authentication before they appear in the Internet Information Services Manager. Open Control Panel, Programs, Programs and Features, Turn Windows features on or off, and expand the Internet Information Services node (see Figure 2).
Figure 2 – Enabling Windows IIS features

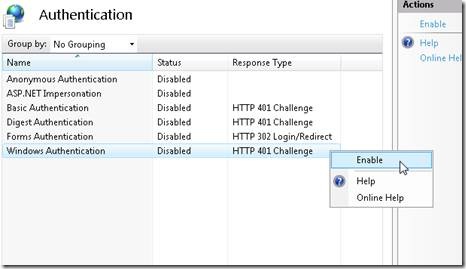
Using Internet Information Services, you can enable or disable different types of authentication. For example, Figure 3 illustrates disabling anonymous authentication and enabling Integrated Windows (NTLM) authentication when using IIS 7.0.
Figure 3 – Enabling Integrated Windows Authentication
Authorizing Windows Users and Groups
After you enable Windows authentication, you can use the [Authorize] attribute to control access to controllers or controller actions. This attribute can be applied to an entire MVC controller or a particular controller action.
For example, the Home controller in Listing 1 exposes three actions named Index(), CompanySecrets(), and StephenSecrets(). Anyone can invoke the Index() action. However, only members of the Windows local Managers group can invoke the CompanySecrets() action. Finally, only the Windows domain user named Stephen (in the Redmond domain) can invoke the StephenSecrets() action.
Listing 1 – Controllers\HomeController.cs
Because of Windows User Account Control (UAC), when working with Windows Vista or Windows Server 2008, the local Administrators group will behave differently than other groups. The [Authorize] attribute won’t correctly recognize a member of the local Administrators group unless you modify your computer’s UAC settings.
Exactly what happens when you attempt to invoke a controller action without being the right permissions depends on the type of authentication enabled. By default, when using the ASP.NET Development Server, you simply get a blank page. The page is served with a 401 Not Authorized HTTP Response Status.
If, on the other hand, you are using IIS with Anonymous authentication disabled and Basic authentication enabled, then you keep getting a login dialog prompt each time you request the protected page (see Figure 4).
Figure 4 – Basic authentication login dialog
Windows Authentication
Overview
The element defines configuration settings for the Internet Information Services (IIS) 7 Windows authentication module. You can use Windows authentication when your IIS 7 server runs on a corporate network that is using Microsoft Active Directory service domain identities or other Windows accounts to identify users. Because of this, you can use Windows authentication whether or not your server is a member of an Active Directory domain.
Windows authentication (formerly named NTLM, and also referred to as Windows NT Challenge/Response authentication) is a secure form of authentication because the user name and password are hashed before being sent across the network. When you enable Windows authentication, the client browser sends a strongly hashed version of the password in a cryptographic exchange with your Web server.
Windows authentication supports two authentication protocols, Kerberos and NTLM, which are defined in the
element. When you install and enable Windows authentication on IIS 7, the default protocol is Kerberos. The element can also contain a useKernelMode attribute that configures whether to use the kernel mode authentication feature that is new to Windows Server 2008.
Windows authentication is best suited for an intranet environment for the following reasons:
- Client computers and Web servers are in the same domain.
- Administrators can make sure that every client browser is Internet Explorer 2.0 or later.
- HTTP proxy connections, which are not supported by NTLM, are not required.
- Kerberos version 5 requires a connection to Active Directory, which is not feasible in an Internet environment.
New in IIS 7.5
The element was introduced in IIS 7.5, which allows you to configure the settings for the new extended protection features that have been integrated into Windows authentication.
Compatibility
| Version | Notes |
|---|---|
| IIS 10.0 | The element was not modified in IIS 10.0. |
| IIS 8.5 | The element was not modified in IIS 8.5. |
| IIS 8.0 | The element was not modified in IIS 8.0. |
| IIS 7.5 | The element was added in IIS 7.5. |
| IIS 7.0 | The element was introduced in IIS 7.0. |
| IIS 6.0 | The element replaces portions of the IIS 6.0 AuthType and AuthFlags metabase properties. |
Setup
The default installation of IIS 7 and later does not include the Windows authentication role service. To use Windows authentication on IIS, you must install the role service, disable Anonymous authentication for your Web site or application, and then enable Windows authentication for the site or application.
After you install the role service, IIS 7 commits the following configuration settings to the ApplicationHost.config file.
Windows Server 2012 or Windows Server 2012 R2
- On the taskbar, click Server Manager.
- In Server Manager, click the Manage menu, and then click Add Roles and Features.
- In the Add Roles and Features wizard, click Next. Select the installation type and click Next. Select the destination server and click Next.
- On the Server Roles page, expand Web Server (IIS), expand Web Server, expand Security, and then select Windows Authentication. Click Next.
 .
. - On the Select features page, click Next.
- On the Confirm installation selections page, click Install.
- On the Results page, click Close.
 .
.Windows 8 or Windows 8.1
- On the Start screen, move the pointer all the way to the lower left corner, right-click the Start button, and then click Control Panel.
- In Control Panel, click Programs and Features, and then click Turn Windows features on or off.
- Expand Internet Information Services, expand World Wide Web Services, expand Security, and then select Windows Authentication.
- Click OK.
- Click Close.
Windows Server 2008 or Windows Server 2008 R2
- On the taskbar, click Start, point to Administrative Tools, and then click Server Manager.
- In the Server Manager hierarchy pane, expand Roles, and then click Web Server (IIS).
- In the Web Server (IIS) pane, scroll to the Role Services section, and then click Add Role Services.
- On the Select Role Services page of the Add Role Services Wizard, select Windows Authentication, and then click Next.
- On the Confirm Installation Selections page, click Install.
- On the Results page, click Close.

Windows Vista or Windows 7
- On the taskbar, click Start, and then click Control Panel.
- In Control Panel, click Programs and Features, and then click Turn Windows Features on or off.
- Expand Internet Information Services, then World Wide Web Services, then Security.
- Select Windows Authentication, and then click OK.
How To
How to enable Windows authentication for a Web site, Web application, or Web service
Open Internet Information Services (IIS) Manager:
If you are using Windows Server 2012 or Windows Server 2012 R2:
- On the taskbar, click Server Manager, click Tools, and then click Internet Information Services (IIS) Manager.
If you are using Windows 8 or Windows 8.1:
- Hold down the Windows key, press the letter X, and then click Control Panel.
- Click Administrative Tools, and then double-click Internet Information Services (IIS) Manager.
If you are using Windows Server 2008 or Windows Server 2008 R2:
- On the taskbar, click Start, point to Administrative Tools, and then click Internet Information Services (IIS) Manager.
If you are using Windows Vista or Windows 7:
- On the taskbar, click Start, and then click Control Panel.
- Double-click Administrative Tools, and then double-click Internet Information Services (IIS) Manager.
In the Connections pane, expand the server name, expand Sites, and then the site, application, or Web service for which you want to enable Windows authentication.
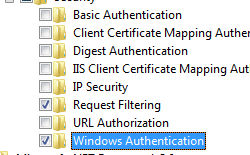
Scroll to the Security section in the Home pane, and then double-click Authentication.
In the Authentication pane, select Windows Authentication, and then click Enable in the Actions pane. 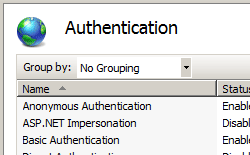
How to enable Extended Protection for Windows authentication
Open Internet Information Services (IIS) Manager:
If you are using Windows Server 2012 or Windows Server 2012 R2:
- On the taskbar, click Server Manager, click Tools, and then click Internet Information Services (IIS) Manager.
If you are using Windows 8 or Windows 8.1:
- Hold down the Windows key, press the letter X, and then click Control Panel.
- Click Administrative Tools, and then double-click Internet Information Services (IIS) Manager.
If you are using Windows Server 2008 or Windows Server 2008 R2:
- On the taskbar, click Start, point to Administrative Tools, and then click Internet Information Services (IIS) Manager.
If you are using Windows Vista or Windows 7:
- On the taskbar, click Start, and then click Control Panel.
- Double-click Administrative Tools, and then double-click Internet Information Services (IIS) Manager.
In the Connections pane, expand the server name, expand Sites, and then the site, application, or Web service for which you want to enable Extended Protection for Windows authentication.
Scroll to the Security section in the Home pane, and then double-click Authentication.
In the Authentication pane, select Windows Authentication.
Click Enable in the Actions pane. 
Click Advanced Settings in the Actions pane.
When the Advanced Settings dialog box appears, select one of the following options in the Extended Protection drop-down menu:
- Select Accept if you want to enable extended protection while providing down-level support for clients that do not support extended protection.
- Select Required if you want to enable extended protection without providing down-level support.
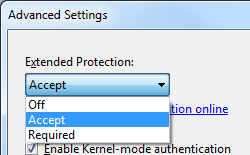
Click OK to close the Advanced Settings dialog box.
Configuration
The element is configurable at the site, application, or virtual directory level in the ApplicationHost.config file.
Attributes
| Attribute | Description |
|---|---|
| authPersistNonNTLM | Optional Boolean attribute. |
Specifies whether IIS automatically reauthenticates every non-NTLM (for example, Kerberos) request, even those on the same connection. False enables multiple authentications for the same connections.
Note: A setting of true means that the client will be authenticated only once on the same connection. IIS will cache a token or ticket on the server for a TCP session that stays established.
The default is false .
Setting this flag to true specifies that authentication persists only for a single request on a connection. IIS resets the authentication at the end of each request, and forces reauthentication on the next request of the session.
The default value is false .
Specifies whether Windows authentication is enabled.
The default value is false .
Specifies whether Windows authentication is done in kernel mode. True specifies that Windows authentication uses kernel mode.
Kernel-mode authentication may improve authentication performance and prevent authentication problems with application pools that are configured to use a custom identity.
As a best practice, do not disable this setting if you use Kerberos authentication and have a custom identity on the application pool.
The default is true .
Child Elements
| Element | Description |
|---|---|
| extendedProtection | Optional element. |
Specifies extended protection options for Windows authentication.
Note: This element was added in IIS 7.5.
Specifies security support providers used for Windows authentication.
Configuration Sample
The following default element is configured at the root ApplicationHost.config file in IIS 7.0, and disables Windows authentication by default. It also defines the two Windows authentication providers for IIS 7.0.
The following example enables Windows authentication and disables Anonymous authentication for a Web site named Contoso.
Sample Code
The following examples disable Anonymous authentication for a site named Contoso, then enable Windows authentication for the site.


