- autochk autochk
- Комментарии Remarks
- Radio Button. Auto Check Свойство
- Определение
- Значение свойства
- Примеры
- Комментарии
- Autochk not found on Windows 10 [QUICK FIX]
- What to do if the autochk program isn’t found?
- 1.Run a check disk for the drives and let it repair them
- Chkdsk countdown is too long? You can reduce it with this simple trick!
- 2. Create a new drive
- What is Autocheck?
- What is autocheck windows
autochk autochk
Запускается при запуске компьютера и до Windows Server, начиная с проверки логической целостности файловой системы. Runs when the computer is started and prior to Windows Server starting to verify the logical integrity of a file system.
Autochk.exe — это версия chkdsk , которая выполняется только на дисках NTFS и только до запуска Windows Server. Autochk.exe is a version of chkdsk that runs only on NTFS disks and only before Windows Server starts. программу Autochk нельзя запускать непосредственно из командной строки. autochk cannot be run directly from the command-line. Вместо этого Autochk запускается в следующих ситуациях: Instead, autochk runs in the following situations:
При попытке запустить chkdsk на загрузочном томе. If you try to run chkdsk on the boot volume.
Если chkdsk не может получить монопольное использование тома. If chkdsk cannot gain exclusive use of the volume.
Если том помечен как «грязный». If the volume is flagged as dirty.
Комментарии Remarks
Программу командной строки Autochk нельзя запустить непосредственно из командной строки. The autochk command-line tool cannot be directly run from the command-line. Вместо этого используйте программу командной строки chkntfs , чтобы настроить способ запуска Autochk при запуске. Instead, use the chkntfs command-line tool to configure the way you want autochk to run at startup.
Для предотвращения запуска программы Autochk на определенном томе или нескольких томах можно использовать средство chkntfs с параметром /x . You can use chkntfs with the /x parameter to prevent autochk from running on a specific volume or multiple volumes.
Radio Button. Auto Check Свойство
Определение
Получает или задает значение, показывающее, будет ли автоматически изменяться значение Checked и внешний вид элемента управления, когда он выбирается щелчком. Gets or sets a value indicating whether the Checked value and the appearance of the control automatically change when the control is clicked.
Значение свойства
Значение true , если значение Checked и внешний вид элемента управления автоматически изменяются событием Click. В противном случае — значение false . true if the Checked value and the appearance of the control automatically change on the Click event; otherwise, false . Значение по умолчанию — true . The default value is true .
Примеры
В следующем примере кода создается и инициализируется объект RadioButton , который получает внешний вид переключателя, присваивает его AutoCheck свойству значение false и добавляет его в Form . The following code example creates and initializes a RadioButton, gives it the appearance of a toggle control, sets its AutoCheck property to false , and adds it to a Form.
Комментарии
Если Checked задано значение false , RadioButton часть элемента управления должна быть возвращена в коде Click обработчика событий. If the Checked value is set to false , the RadioButton portion of the control must be checked in code in the Click event handler. Кроме того, если RadioButton является частью RadioButton группы управления, это свойство гарантирует, что только один элемент управления будет проверяться в определенный момент времени. In addition, if the RadioButton is part of a RadioButton control group, this property ensures that only one of the controls is checked at a given time.
Если AutoCheck свойство имеет значение false , группа RadioButton элементов управления не будет действовать как взаимоисключающая группа, и Checked свойство должно быть Обновлено в коде. If the AutoCheck property is set to false , a group of RadioButton controls will not act as a mutually exclusive group and the Checked property must be updated in code.
Autochk not found on Windows 10 [QUICK FIX]

Have you received Autochk program not found – skipping autocheck message during a reboot performed by Windows setup? Actually, this error happened to a lot of users and some of them declared that they have also received this error message while trying to clone their operating system to a new drive or on the resized partition.
What to do if the autochk program isn’t found?
1.Run a check disk for the drives and let it repair them
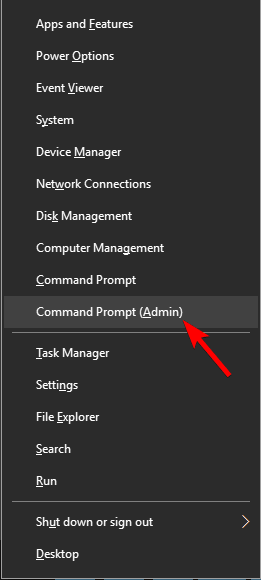
- Open Command Prompt as administrator.

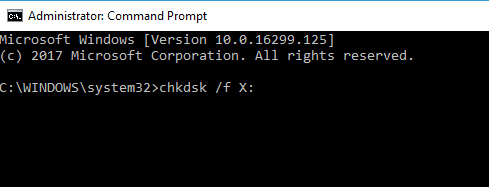
- When Command Prompt opens enter chkdsk /R X: (X: represents the drive letter of the volume that you want to check), and press Enter.
- If asked to schedule a scan, press Y.
- Restart your PC.
- During a reboot, your system will perform a chkdsk scan. Bear in mind that this process can take a while, so don’t interrupt it.
- Once the scan is finished, check if the problem is resolved. If not, be sure to scan other drives as well.
Chkdsk countdown is too long? You can reduce it with this simple trick!
2. Create a new drive
Attention: You will be asked to work now in your system registry hive, so please make sure to create a copy of it, just to be sure that you are on the safe side.
- Go to the Startup recovery environment and to choose Command Prompt. Type regedit and press Enter.
- After this, you will have to select the HKEY_Local_Machine hive, then to click on File>Load Hive.
- Navigate to Windows\system32\config to search the new drive/partition that you have cloned and select the file named SYSTEM.
- Now, you will have to put a name for the hive that will be displayed in the Registry Editor.
- After this, you will have to go to the HKEY_Local_Machine\SYSTEM\MountedDevices and now search in the list for an entry named DosDevicesC:.
If you don’t have MountedDevice, you’ll have to recreate it manually. To do that, follow these steps:
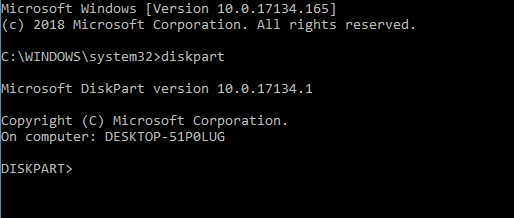
- Type diskpart in Command Prompt.
- Enter list disk to see all available storage disks on your PC.
- Look for the new disk (you can recognize it by its size) and then write sel disk X (X = this will be the number of the disk).
- Now, just write uniqueid disk to see the disk ID.
- After this, you will have to compare this ID to the volume IDs from the registry window and find one that matches.
- After this, just right-click on Registry, then new-binary value and name it DosDeviceC:.
- Then double-click the entry with ??Volume at the beginning and copy the first line.
- Now, just paste this into the new entry C: and repeat this for the second line.
- In this moment, the first volume entry should have the same Data with your new entry’s data.
- In order to finalize this and save your changes in the registry, you will have to select system_new hive and then click on File>Unload hive.
- Now you can boot into Windows.
We hope that these two solutions helped you resolve the Autochk not found error. If you found our solutions helpful, let us know in the comments section below.
What is Autocheck?
02-10-2009 04:02 AM
- Mark as New
- Bookmark
- Subscribe
- Permalink
- Email to a Friend
- Flag Post
 I’m a newbie of course! All I want to do is ask a question about AutoCheck on Windows XP Media Center 2005? That buzzard is driving me crazy! (Autocheck)
Thanks for your help and guidance! Everytime I try to take ownership of my drives I get up to right at the welcome before getting on the desktop and it says «Can not find Autocheck which means «UHOH, you get to reinstall again!’ It really irritates me!
Thank you!
02-11-2009 04:17 AM
- Mark as New
- Bookmark
- Subscribe
- Permalink
- Email to a Friend
- Flag Post
I am not an HP Employee.
02-11-2009 11:08 AM
- Mark as New
- Bookmark
- Subscribe
- Permalink
- Email to a Friend
- Flag Post
Try restarting the computer, press F8 multiple times and when you get the Advanced Boot Options choose Safe Mode, then folow the guide below.
Follow these steps, and then quit Registry Editor:
- Click Start , click Run , type regedit , and then click OK .
- Locate and then click the following key in the registry:
Method 1: Remove the Chkdsk.exe or the Autochk.exe program from Scheduled Tasks
Follow these steps to remove the Chkdsk.exe or the Autochk.exe program from the list of scheduled tasks in the Scheduled Tasks feature.
- Click Start , point to All Programs , point to Accessories , point to System Tools , and then click Scheduled Tasks .
- Click either Chkdsk or Autochk in the list of scheduled tasks.
- Under Folder Tasks , click Delete this item .
What is autocheck windows
Иногда у штатной программы Windows Проверка диска случается сбой: при каждой загрузке/перезагрузке ПК начинается проверка диска. Конечно, этот процесс можно прервать, нажав любую клавишу. Но при следующей загрузке/перезагрузке ПК проверка диска начнется вновь. Что делать?
В таких случаях, даже если проверку завершить (при этом возможны два варианта: ошибки найдены и исправлены, или ошибок не найдено), при следующей загрузке/перезагрузке ПК сканирование диска начнется вновь…
Что делать?
1. Выполните проверку дисков системы.
2. Чтобы программа проверки диска «не доставала» при каждом запуске ПК, можно подредактировать Реестр Windows:
– нажмите Пуск –> Выполнить… –> в поле Открыть введите regedit –> OK;
– раскройте раздел [HKEY_LOCAL_MACHINE\SYSTEM\CurrentControlSet\Control\Session Manager];
– найдите мультистроковый (REG_MULTI_SZ) параметр BootExecute со значением autocheck autochk /r \??\ : autocheck autochk *;
– измените его значение на значение по умолчанию – autocheck autochk *;
– раскройте раздел [HKEY_LOCAL_MACHINE\SYSTEM\ControlSet001\Control\Session Manager];
– найдите мультистроковый (REG_MULTI_SZ) параметр BootExecute со значением autocheck autochk /r \??\ : autocheck autochk *;
– измените его значение на значение по умолчанию – autocheck autochk *;
– раскройте раздел [HKEY_LOCAL_MACHINE\SYSTEM\ControlSet002\Control\Session Manager];
– найдите мультистроковый (REG_MULTI_SZ) параметр BootExecute со значением autocheck autochk /r \??\ : autocheck autochk *;
– измените его значение на значение по умолчанию – autocheck autochk *;
– закройте Редактор реестра.
Иногда в этих разделах значение параметра BootExecute соответствует значению по умолчанию (autocheck autochk *), но проверка диска всё равно происходит при каждой загрузке/перезагрузке ПК.
В таких случаях можно удалить параметры BootExecute из указанных разделов (необходимо отметить один нюанс: если вы удалите параметры BootExecute, проверки диска при загрузке/перезагрузке ПК больше не будет, но будет кратковременно появляться сообщение «autochk* program not found – skipping AUTOCHECK. ».
3. Если файловая система диска – NTFS, можно попробовать еще такой способ:
– нажмите Пуск –> Выполнить… –> в поле Открыть окна Запуск программы введите chkntfs /x : –> OK.
Примечания
1. Внимание! При работе с Редактором реестра Windows следует соблюдать осторожность, а то можно такого наредактировать, что придется переустанавливать операционную систему.
2. Утилита CHKNTFS выводит или изменяет параметры проверки диска во время загрузки.
Ключи утилиты CHKNTFS:
том – определяет букву диска (с последующим двоеточием), точку подключения или имя тома.
/D – восстанавливает стандартные параметры компьютера; все диски проверяются при загрузке и CHKDSK запускается при обнаружении ошибок.
/T:time – изменяет обратный отсчет AUTOCHK на указанный отрезок времени в секундах. Если время не указано, показывает текущую настройку.
/X – исключает стандартную проверку диска при загрузке. Сведения об исключенных ранее дисках не сохраняются.
/C – запрашивает выполнение проверки диска при следующей загрузке; если на диске обнаружены ошибки, запускается CHKDSK.
Если никакие параметры не указаны, CHKNTFS отображает или состояние бита обнаружения ошибок для диска или его проверку при следующей перезагрузке.
3. Значение мультистрокового (REG_MULTI_SZ) параметра BootExecute по умолчанию – autocheck autochk *. Если вы запланируете проверку диска, то значение этого параметра дополнится записью autocheck autochk /r \??\ :.


