- Getting started with Event Tracing for Windows in C#
- Introduction
- What you’ll need
- Getting started
- Process ETW traces in .NET
- Next steps
- Tracing
- Generating and Viewing WWSAPI Traces
- Enabling and Viewing WWSAPI traces in Event Viewer (works on Windows Vista and above)
- Enabling and Viewing WWSAPI traces using Wstrace.bat Script (works on XPSP2 and above)
- Using tracing commands
- Tracing File format
- Collecting WWSAPI ETW Trace File using ETW tools (works on XPSP2 and above)
- Viewing WWSAPI ETW Trace File traces using wstracedump.exe tool (works on Windows XP and above)
- Viewing WWSAPI ETW Trace File traces using ETW tools (works on Windows Vista and above)
- Security
- Netsh Commands for Network Trace
- In this topic
- Using Netsh trace commands
- Identifying scenarios
- Obtaining trace provider details
- Using filters to limit ETL trace file details
- Example Netsh trace filter parameters and usage
- Starting and stopping trace
- Using the files rendered by trace
- Commands in the Netsh trace context
- convert
- Syntax
- Parameters
- Example command
- correlate
- Syntax
- Parameters
- Remarks
- Example command
- diagnose
- Syntax
- Parameters
- Remarks
- Example command
- show CaptureFilterHelp
- Syntax
- Parameters
- Example command
- show globalKeywordsAndLevels
- Syntax
- Parameters
- Remarks
- Example command
- show helperclass
- Syntax
- Parameters
- Remarks
- Example commands
- show interfaces
- Syntax
- Parameters
- Remarks
- Example command
- show provider
- Syntax
- Parameters
- Remarks
- Example commands
- show providers
- Syntax
- Parameters
- Example command
- show scenario
- Syntax
- Parameters
- Remarks
- Example command
- show scenarios
- Syntax
- Parameters
- Example command
- show status
- Syntax
- Parameters
- Example command
- start
- Syntax
- Parameters
- Remarks
- Example commands
- Syntax
- Parameters
Getting started with Event Tracing for Windows in C#
Jan 11, 2019 · 4 min read
Introduction
Event Tracing for Windows (ETW) provides a mechanism to trace and log events that are raised by user-mode applications and kernel-mode drivers. ETW is implemented in the Windows operating system and provides developers a fast, reliable, and versatile set of event tracing features.
Event Tracing for Windows® (ETW) is a general-purpose, high-speed tracing facility provided by the operating system. Using a buffering and logging mechanism implemented in the kernel, ETW provides a tracing mechanism for events raised by both user-mode applications and kernel-mode device drivers. Additionally, ETW gives you the ability to enable and disable logging dynamically, making it easy to perform detailed tracing in production environments without requiring reboots or application restarts. The logging mechanism uses per-processor buffers that are written to disk by an asynchronous writer thread. This allows large-scale server applications to write events with minimum disturbance. ETW was first introduced on Windows 2000. Since then, various core OS and server components have
adopted ETW to instrument their activities, and it’s now one of the key instrumentation technologies on Windows platforms. A growing number of third-party applications are using ETW for instrumentation as well, and some take advantage of the events provided by Windows itself. ETW has also been abstracted into the Windows preprocessor (WPP) software tracing technology, which provides a set of easy-to-use macros for tracing “printf” style messages for debugging during development.
What you’ll need
- Windows Vista or newer
- Visual Studio
Getting started
Load up Visual Studio and create a New Project (Ctrl+Shift+N). We’re going to choose a Console App (.NET Framework) for this.

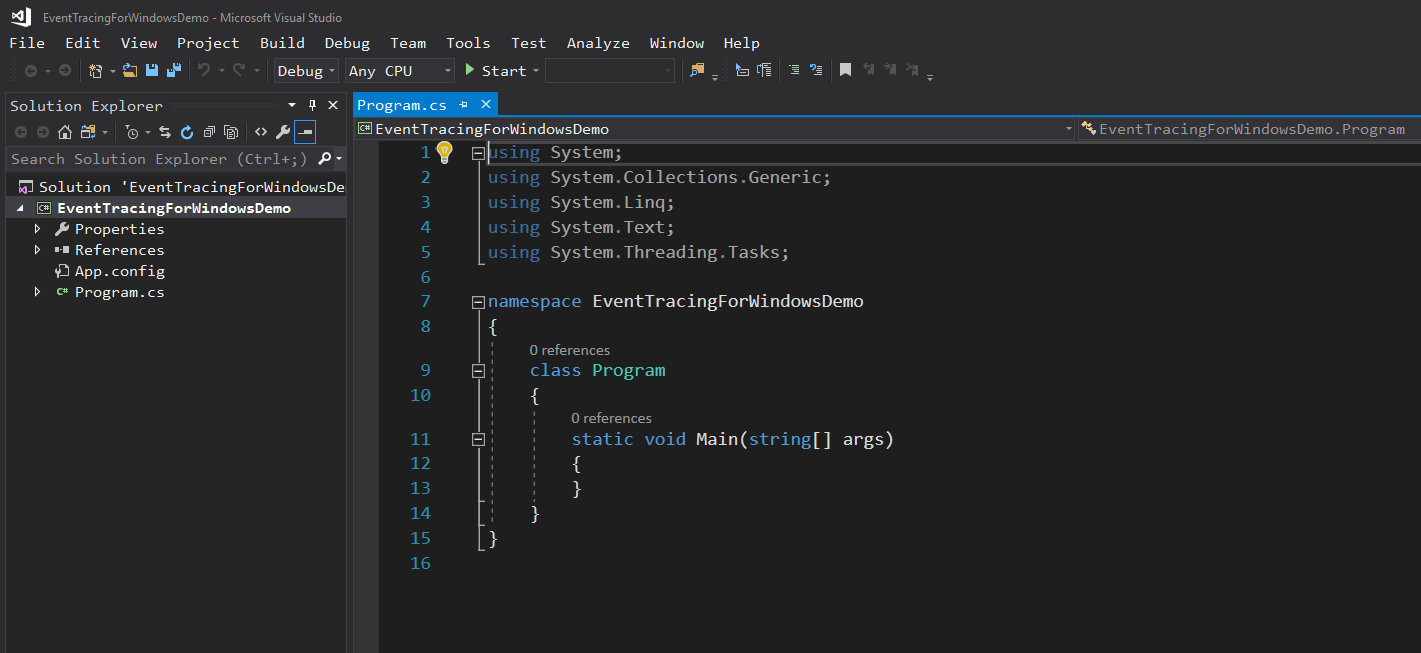
Once the project is created, you should be looking at the Program.cs source code window that looks something like this (your theme/colors/fonts may be different than mine.)
Next, we will add the required NuGet package to this project by launching the NuGet Package Manager. You can get to it by clicking Tools | NuGet Package Manager | Manage NuGet Packages for Solution.
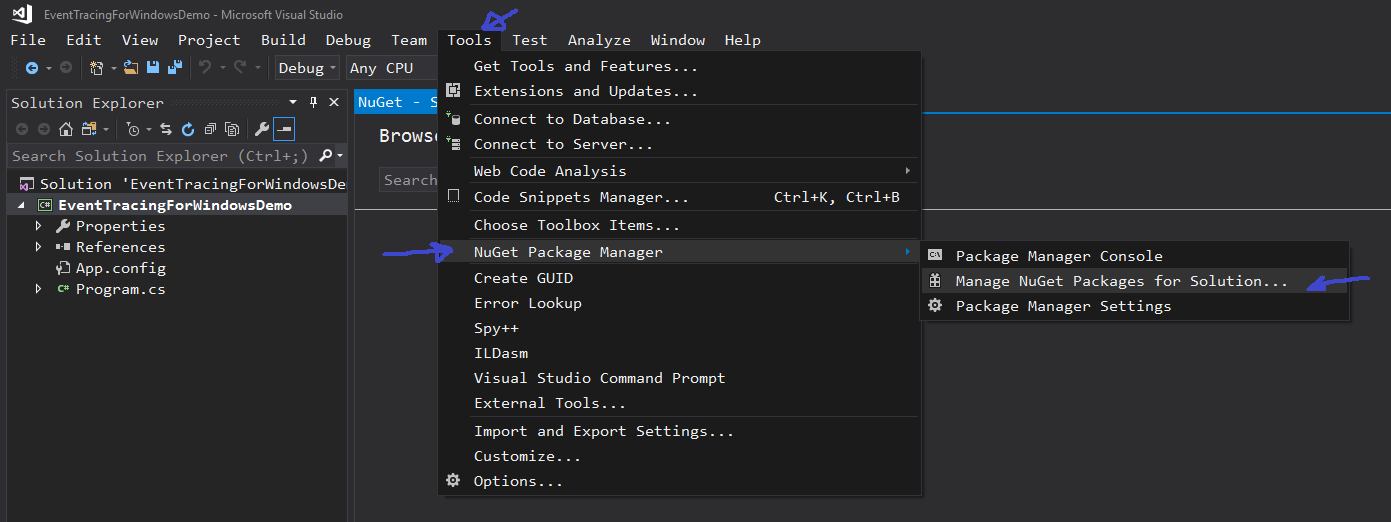
From there, you will want to click Browse and locate the Microsoft.Diagnostics.Tracing.TraceEvent library which can be found by typing “ tracing.traceevent” in the Browse search bar.

Once you find it, click the package and add it to your solution.
Process ETW traces in .NET
Event Tracing for Windows (ETW) is a powerful trace collection system built-in to the Windows operating system. Windows has deep integration with ETW, including data on system behavior all the way down to the kernel for events like context switches, memory allocation, process create and exit, and many more. The system-wide data available from ETW makes it a good fit for end-to-end performance analysis or other questions that require looking at the interaction between by many components throughout the system.
Unlike text logging, ETW provides structured events designed for automated data processing. Microsoft has built powerful tools on top of these structured events, including Windows Performance Analyzer (WPA), which provides a graphical interface for visualizing and exploring the trace data captured in a ETW trace file (.etl).
Inside Microsoft, we heavily use ETW traces to measure the performance of new builds of Windows. Given the volume of data produced the Windows engineering system, automated analysis is essential. For our automated trace analysis, we heavily use C# and .NET, so we created the .NET TraceProcessing API for accessing many kinds of ETW trace data. This technology is also used inside Windows Performance Analyzer to power several of its tables.
The .NET TraceProcessing NuGet packages allow you to analyze your own applications and systems with the same tools that Microsoft uses to analyze Windows.
Next steps
In this overview, you learned what .NET TraceProcessing is.
Tracing
Tracing uses Event Tracing for Windows (ETW). To take advantage of the tracing tools available with Windows ServerВ 2008В R2, install the Microsoft Windows SDK from the MSDN Downloads site.
There are three tracing levels supported:
- Verbose (all available traces).
- Info (informational traces).
- Error (error traces).
The following events are traced:
- Any errors (Level=Error, Level=Info or Level=Verbose).
- Entry/Exit of an API (Level=Info or Level=Verbose).
- Start and completion of any IO (Level=Info or Level=Verbose)
- Exchanged SOAP messages (Level=Verbose, available on Windows 2003 SP1 and later)
Generating and Viewing WWSAPI Traces
WWSAPI uses the manifest based events on Windows Vista and above. As a result, the tracing experience has some differences based on the operating system version. Generating ETW traces can be done by using the in-box ETW tools on all supported platforms. However viewing the ETW traces in a nice format requires custom tools on Windows XP SP2 and Windows 2003 SP1. There are few different ways of collecting and viewing WWSAPI ETW event traces depending on the operating system version.
Enabling and Viewing WWSAPI traces in Event Viewer (works on Windows Vista and above)
- Run eventvwr.msc from command line or run menu.
- Click the view link on the Actions pane on the right and enable Show Analytic and Debug logs option.
- Browse to Application and Service Logs\Microsoft\Windows\WebServices providers on the left pane.
- Right click the Tracing provider and select Enable log.
- Run your scenario.
- When you refresh the event viewer page, you should start seeing the WWSAPI tracing entries.
Enabling and Viewing WWSAPI traces using Wstrace.bat Script (works on XPSP2 and above)
The wstrace.bat batch file provides a convenient way to:
- Create a trace log
- Delete a trace log
- Enable and disable tracing
- Update the tracing level (info/error/verbose)
- Converting trace logs to CSV files
The batch file uses logman.exe for all commands, with the exception of converting the logs to CSV file, which requires a custom tool (wstracedump.exe).
Using tracing commands
The following command creates a log that uses info, error or verbose level. This command requires elevated privileges.
wstrace.bat create [info | error | verbose]
The following command deletes the log. This command requires elevated privileges.
wstrace.bat delete
The following command enables tracing. You must first create a log.
wstrace.bat on
The tracing level (info, error or verbose) can be modified as follows:
wstrace.bat update [info | error | verbose]
To dump the trace output, use the following command:
wstrace.bat dump > temp.csv
The events will be dumped to the CSV file until Ctrl-C is pressed or tracing is disabled.
Tracing File format
The CSV files created by wstrace.bat are simple comma-separated-variable text files. These files may be opened in Excel, Notepad, etc.
The columns of the file are as follows:
- TimeStamp — Time stamp of when the event was recorded
- ProcessID — ULONG ID of the process recording the event
- ThreadID — ULONG ID of the thread recording the event
- Event — Enumerated value of the event type may be («api enter» | «api pending» | «api ExitSyncSuccess» | «api ExitSyncFailure» | «api ExitAsyncSuccess» | «api ExitAsyncFailure» | «io started» | «io completed» | «io failed» | «error» | «received message start» | «received message» | «received message stop» | «sending message start» | «sending message» | «sending message stop»)
- Operation — The name of the operation being invoked. Typically this maps to the API being called.
- Error — Optional HRESULT error number
- Info — Optional information about the event
Collecting WWSAPI ETW Trace File using ETW tools (works on XPSP2 and above)
Enabling ETW tracing for WWSAPI
logman start wstrace -bs 64 -ft 1 -rt -p Microsoft-Windows-WebServices [flags [level]] [-o ] -ets
to create and start the ETW tracing session. Logman.exe is an in-box ETW tool available on all supported platforms. Note that you need to use Microsoft_Windows_WebServices as the provider name on XPSP2 and W2K3. You can run logman query providers to see the list of registered providers. Microsoft-Windows-WebServices (or Microsoft_Windows_WebServices) provider should be listed unless it is not registered. The provider is normally registered during setup. However it can also be manually registered by running wevtutil.exe im (on Windows Vista and Later) or mofcomp.exe (on XPSP2 and W2K3).
Flags can be used to filter the traces by their kind. It can be OR’d value of the following trace kinds. If not supplied, all trace kinds are enabled.
- 0x1 — API entry/exit traces.
- 0x2 — Error traces.
- 0x4 — IO traces.
- 0x8 — SOAP message traces.
- 0x10 — Binary message traces.
Level can be used to filter the traces by their level. It should be one of the following values. If not supplied, all trace levels are enabled.
- 0x1 — Fatal traces.
- 0x2 — Error traces.
- 0x3 — Warning traces.
- 0x4 — Informational traces.
- 0x5 — Verbose traces.
EtlLogFileName is the path to the ETW event log file to be created (use .etl extension). If not provided, ETW will pick a random name which can be queried later. This file should not reside on user’s profile directory. ETW event log file (.etl file) is in binary format. It can be consumed by ETW applications, but it is not in human readable format. Next step describes how to view its content.
Run your scenario
Collecting ETW event log file.
logman stop wstrace -ets
to stop the ETW tracing session. This is when ETW stops logging the events. ETW event log file (specified in EtlLogFileName parameter) is ready to consume. It can either be viewed locally (instructions are given below) or sent to the product group for investigation.
End to end example using ETW tools:
logman start wstrace -bs 64 -ft 1 -rt -p Microsoft-Windows-WebServices -o mytrace.etl -ets
echo .. run your scenario..
logman stop wstrace -ets
tracerpt mytrace.etl -o mytrace.xml
wstrace.htm
echo .. use mytrace.xml and wstrace.xsl in the opened page ..
Viewing WWSAPI ETW Trace File traces using wstracedump.exe tool (works on Windows XP and above)
Wstracedump.exe is a custom developed ETW consumer tool which processes events in the WWSAPI ETW trace file and produces human readable output. It can produce output from all supported platforms. See its usage (wstracedump.exe -?) for more information.
Viewing WWSAPI ETW Trace File traces using ETW tools (works on Windows Vista and above)
Tracerpt.exe is the tool to view the content of an ETW event log file and available on all supported platforms. It can be used to generate CSV, EVTX or XML dump files from an ETW event log file. However the generated output file has human readable traces only on Windows Vista and later. These instructions describes how to generate the XML dump file and use it along with an xsl file to display the traces in a nice format (xsl file is very trivial and may be altered if different formats are desired).
tracerpt -o
to create an XML dump from the binary ETL file (tracerpt.exe creates the output file in XML format by default. Run tracerpt -? To see other available formats).
At this point, you can see the tracing information in the XML file. Additionally, you can open the wstrace.htm file and use the xml dump file and the wstrace.xsl file to see the traces in a nicer format. Note that the files need to be on the local machine to be able to use this html file on IE.
Security
When enabling tracing, administrators should take into account that it consumes additional disk space and computation power. A malicious client or application may exhaust system resources unless tracing settings are configured with reasonable limits. When using message tracing feature, messages carrying sensitive information such as credentials, personal information, etc. may be persisted to the disk or be viewed by anyone who has access to the system event viewer. As a mitigation to this issue, tracing can be enabled by System or Administrator users on Windows 2003 and later. Message tracing is disabled on Windows XP on which any user can turn tracing on.
The following enumeration is used with tracing:
Netsh Commands for Network Trace
Applies To: Windows Server 2012
For information about Netsh Trace commands for computers running Windows® 7 and Windows Server® 2008 R2, see Netsh Commands for Network Trace in Windows Server 2008 R2 and Windows 7 in the Windows Server 2008 and Windows Server 2008 R2 technical library on TechNet.
On computers running Windows ServerВ® 2012 and WindowsВ® 8, you can use the Netsh Trace context from a command prompt to enable and configure network tracing to assist you when troubleshooting network connectivity problems.
In this topic
Using Netsh trace commands
This section provides an overview of Netsh trace usage.
The examples in this section, Using Netsh trace commands, are documented as if you have entered the Netsh trace context. If you have not already entered the Netsh trace context, you can run these commands from the command prompt by prepending Netsh trace to each example.
Identifying scenarios
The Netsh trace context contains predefined sets of trace providers, known as scenarios, which you can enable for troubleshooting. To view a complete list of scenarios and a brief description of each scenario’s purpose, type show scenarios.
Following is an example of the results that are rendered by running the Netsh trace show scenarios command:
When you have identified the scenario that appears to be most relevant to your issues, you can see a list of all of the providers included in that scenario. For example, to see all of the providers enabled under the LAN scenario, type show scenario lan.
Following is an example of the results that are rendered by running the Netsh trace show scenario lan command:
Obtaining trace provider details
To obtain a complete list of providers, you can type show providers from within the Netsh trace context. The show providers command lists – by name and GUID — every available provider, including providers that are not relevant to networking.
Following is a short excerpt of the list of providers that are rendered as a result of running the show providers command:
You can obtain details about a specific provider by typing show provider followed by the provider name. For example, to see details about the Microsoft-Windows-Dhcp-Client provider, type show provider name=Microsoft-windows-dhcp-client.
Following is an example of the results that are rendered by running the show provider name=Microsoft-windows-dhcp-client command:
Using filters to limit ETL trace file details
When troubleshooting, it is frequently beneficial to target tracing results by limiting irrelevant tracing details. For example, if you are running traces over an extended period of time, or if you are running tracing scenarios in which multiple providers are enabled, the resulting ETL trace file can become very large. If the ETL trace file becomes too large, the ETW buffer constraints may cause some traces to be dropped. Additionally, reducing the amount of data in the ETL trace file can simplify troubleshooting by reducing the amount of data to review.
You can use Netsh trace filters to reduce the ETL trace file size. The trace filters that you can apply to individual providers are:
ETW levels
ETW keywords
The Netsh trace context also supports packet filtering capability that is similar to Network Monitor. See the Remarks section within the Netsh trace start command section in this topic for information about trace packet filter parameters and usage.
To see a list of filters which can be applied, type show CaptureFilterHelp.
The following example is an excerpt of the filter information that is displayed by running the show CaptureFilterHelp command.
Example Netsh trace filter parameters and usage
Following is an example start command for Netsh trace that includes filter parameters.
- start InternetClient provider=Microsoft-Windows-TCPIP level=5 keywords=ut:ReceivePath,ut:SendPath
In this example, the level is set to 5, which means that 5 events is the maximum number of events that will be shown. The keywords ut:ReceivePath and ut:SentPath filter the events to show only the events that are traced on the receive or send path.
255 is the maximum that is supported by ETW. ETW maximums can vary by provider, within the range of 0 – 255. In the example, the value of 5 is the highest level supported by Microsoft-Windows-TCPIP.
See the Remarks section within the Netsh trace start command in this topic for additional details concerning trace filter parameters and usage.
Starting and stopping trace
You can start a trace for all of the providers in a given scenario. For example, to start a trace for all of the providers enabled under the InternetClient scenario, type start scenario=internetclient. You can also start a trace for additional providers not included in that particular scenario. For example, you might want to start traces for all of the providers enabled under the WLAN scenario and also for the DHCP provider. To do this, you can type start scenario=wlan provider=Microsoft-Windows-Dhcp-Client.
To stop tracing, type stop from within the Netsh trace context.
Using the files rendered by trace
When tracing is stopped, two files are generated by default:
An Event Trace Log (ETL) file. The ETL file collects trace events, which can be viewed using tools such as Network Monitor. By default, the ETL is saved as nettrace.etl.
You can specify a different name by including the tracefile= FileName .etl parameter when starting the trace, where FileName is the name you specify for the saved .etl file.
A .cab file. The .cab file contains detailed information about the software and hardware on the system, such as the adapter information, build, operating system, and wireless settings. By default, the .cab file will be named nettrace.cab by default, unless another name was specified as indicated above. The .cab file will contain two files, which will always be named as follows:
Report.etl. Report.etl is a duplicate copy of the information included in nettrace.etl.
Report.html. The report.html file includes additional information about the trace events, as well as other information that was collected by trace.
To receive the most detailed information, include the command parameter report=yes when starting a trace.
Commands in the Netsh trace context
This section provides usage details for commands in the Netsh trace context.
convert
Converts a trace file in ETL format into the specified format.
Syntax
Parameters
input
Required. Specifies the input ETL trace file.
output
Optional. Specifies the name of the converted file. If unspecified, the output file name defaults to the input name.
dump
Optional. Specifies the file format of the converted trace file: .CSV .XML .EVTX .TXT No. If unspecified, the converted file output defaults to .txt.
Report
Optional. Specifies whether to generate an HTML report. If unspecified, the parameter defaults to “no.”
overwrite
Optional. Specifies whether this instance of the trace conversion command overwrites files that were rendered from previous trace conversions. If unspecified, the parameter defaults to “no.”
tmfpath
Optional. Specifies the path (folder location) of the tmf files that are used for decoding WPP traces.
Example command
- convert input=ExampleTestTrace.etl output=TestTrace dump=XML report=yes
correlate
Normalizes or filters a trace file to a new output file.
Syntax
Parameters
input
Required. Specifies the input trace file name.
output
Required. Specifies the file name of the output file.
filter
Optional. Specifies that trace output is rendered only for events that are related to the specific Activity GUID. If unspecified, the default entry for filter is null; the filter parameter is ignored.
overwrite
Optional. Overwrites existing files. If unspecified, the default entry for overwrite is no.
retaincorrelationevents
Optional. Retains correlation events. If unspecified, the default entry for retaincorrevents is no.
retainpii
Optional. Specifies that events containing personally identifiable information (pii) are kept. If unspecified, the default entry for retainpii is yes.
retainglobalevents
Optional. Specifies that global events are kept. If unspecified, the default entry forВ retainglobalevents is yes.
Remarks
Filter activity ID is a GUID expressed in the form
Personally identifiable information includes packet capture events.
Example command
- correlate input=exampleTraceFileName.etl output=NewTraceFileName.etl overwrite=yes retaincorrelationevents=no retainpii=yes retainglobalevents=yes
diagnose
Starts a diagnostic session.
Syntax
Diagnose **scenario=**ScenarioNameВ **namedAttribute=**attributeValue [[saveSessionTrace=]<yes|no>] [[report=]yes|no] [[capture=]yes|no]
Parameters
scenario
Required. Specifies the name of the scenario.
namedAttribute
Required. Specifies the attribute value.
namedAttributes change depending on the scenario, and can be discovered by running the Netsh Trace show scenario command.
saveSessionTrace
Optional. If parameter saveSessionTrace is unspecified and parameter report is set to yes, then the default entry for saveSessionTrace is yes. If parameter saveSessionTrace is unspecified and parameter report is set to no or is unspecified, then the default entry for saveSessionTrace is no.
report
Optional. If unspecified, the default entry for report is no.
capture
Optional. If unspecified, the default entry for capture is no.
Remarks
Diagnose command behavior for parameters capture and report:
The following table summarizes the results that are rendered by the use of the various combinations of the capture and report parameters:
capture=
report=
Results:
The diagnostic results will display, but neither the ETL nor CAB files are created.
The diagnostic results will display, and only ETL file is created. The ETL file is created with both traces and packets.
The diagnostic results will display, and both the ETL and CAB files are saved. The ETL file is saved with both traces and packets.
The diagnostic results will display, and both ETL and CAB files are created. Only events are saved in the ETL file; no packets are saved.
The diagnostic results will display, ETL file is created with trace events only. The CAB file is not created.
If parameters capture and report are not specified the diagnostic results will display, but neither the ETL nor CAB files are saved.
If parameter capture=yes and parameter report=no the diagnostic results will display, and only ETL file is saved. The ETL file is saved with both traces and packets.
If parameter capture=yes and parameter report=yes, then the diagnostic results will display, and both the ETL and CAB files are saved. The ETL file is saved with both traces and packets.
If parameter capture=no and parameter report=yes, then the diagnostic results will display, and both ETL and CAB files are saved. Only events are saved in the ETL file; no packets are saved.
If parameter capture=no and parameter report=no, the diagnostic results will display, ETL file is saved with trace events only. The CAB file is not saved.
In all cases, if the ETL file is saved and capture=yes, ETL file will contain both packet captures and trace events
Example command
- Diagnose scenario=internetclient namedAttribute=https://www.Microsoft.comsaveSessionTrace=yes report=no
show CaptureFilterHelp
Displays the supported capture filters and filter usage.
Syntax
В show CaptureFilterHelpВ
Parameters
There are no parameters associated with this command
Example command
- show CaptureFilterHelp
show globalKeywordsAndLevels
Displays a list of global keywords and the levels that may be used with the start command.
Syntax
show globalKeywordsAndLevelsВ
Parameters
There are no parameters associated with this command.
Remarks
Following is an example of the global levels and keywords that are displayed by running the command show globalKeywordsAndLevels.
You can specify the global levels and keywords in the start command as shown in the following example of the start command: start InternetClient provider=Microsoft-Windows-TCPIP level=5 keywords=ut:ReceivePath,ut:SendPath. This is explained in greater detail in the section: Example Netsh trace filter parameters and usage
Example command
- show globalKeywordsAndLevels
show helperclass
Displays the helper class name, description and lists the dependent helper classes. Additionally, this command also lists possible root causes and repairs that can be returned by the helper class.
Syntax
show helperclass **name=**helperClassName
Parameters
- name
Required. Specifies the name of the helperclass for which to display information.
Remarks
Helper class names are case sensitive. For example, you cannot substitute wininethelperclass, if WinInetHelperClass is the correct, case-sensitive name.
Example commands
- Show helperclass name=WinInetHelperClass
show interfaces
Displays a list of network interfaces.
Syntax
show interfaces
Parameters
There are no parameters associated with this command.
Remarks
Example command
show provider
For the provider specified, displays the keywords and levels that can be used with the start command.
Syntax
show provider **name=**providerIdOrName
Parameters
- name
Required. Specifies the provider name or provider identification (Id) GUID.
Remarks
This displays the keywords and levels that the specified provider supports, which can be used when starting a tracing session.
Example commands
show provider name=Microsoft-Windows-TCPIP
show provider name=B92CF7FD-DC10-4C6B-A72D-1613BF25E597
show providers
Displays a list of the providers that can be used with the start command.
Syntax
show providers
Parameters
There are no parameters associated with this command.
Example command
show scenario
Displays information for the specified scenario.
Syntax
show scenario **name=**scenarioName
Parameters
- name
Required. Specifies the name of the scenario for which to display information.
Remarks
This command displays information about a scenario, including:
Attributes that might be required by the diagnose command.
The list of providers that would be enabled for the specified scenario.
The default keywords and levels that would be applied for the specified scenario.
Example command
- show scenario name=DirectAccess
show scenarios
Displays a list of the scenarios that can be used with the start command.
Syntax
show scenarios
Parameters
There are no parameters associated with this command.
Example command
show status
Displays the current tracing configuration.
Syntax
show status
Parameters
There are no parameters associated with this command.
Example command
start
Starts a network tracing session.
Syntax
start [[scenario=]Scenario1,Scenario2] [[globalKeywords=]keywords] [[globalLevel=]level] [[capture=]<yes|no>][[**capturetype=**physical|vmswitch|both] [[report=]<yes|no>] [[persistent=]<yes|no>] [[traceFile=]Path\Filename] [[maxSize=]MaxFileSizeInMB] [[fileMode=]<single|circular|append>] [[overwrite=]<yes|no>] [[correlation=]<yes|no|disabled>] [[provider=]ProviderIdOrName] [[keywords=]KeywordMaskOrSet] [[level=]level] [[provider=]Provider2IdOrName] [[keywords=]Keyword2MaskOrSet] [[level=]level2]
Parameters
scenario
Optional. Specifies the scenarios that are applied to the trace session.
globalKeywords
Optional. Specifies the global keywords that are applied to the trace session.
globalLevel
Optional. Species at what level the traces should be collected across all the providers. For example, the command netsh trace start scenario=internetclient globallevel=win:error will capture only error events; the command netsh trace show globalkeywordsandlevel displays list of options.
capture
Optional. Specifies whether packet capture is enabled in addition to trace events. If unspecified, the default entry for capture is no.
capturetype
Specifies whether packet capture needs to be enabled for physical network adapters only, virtual switch only, or both network adapters and virtual switch.
report
Optional. Specifies whether a complementing report will be generated in addition to the trace file report. If unspecified, the default entry for report is no.
persistent
Optional. Specifies whether the tracing session resumes upon restarting the computer, and continues to function until the “Netsh trace stop” command is issued. If unspecified, the default entry for persistent is no.
traceFile
Optional. Specifies the location to save the output file. If unspecified, the output file is saved using the default path and filename: “traceFile=%LOCALAPPDATA%\Temp\NetTraces\NetTrace.etl”
maxSize
Optional. Specifies the maximum size in MB for saved trace files. If the maxSize parameter is unspecified, the default value of 250 MB is used. MB 0=no maximum. To specify the maxSize=0 for the no tracing file max size option, you must also specify filemode=single. By default, filemode=circular.
fileMode
Optional. Specifies which file mode is applied when tracing output is generated: single|circular|append. If unspecified, the default entry “fileMode=circular” is used.
overwrite
Optional. Specifies whether an existing trace output file – in either the specified or default location — will be overwritten. If parameter traceFile is not specified, then the default location and filename is applied, and any pre-existing version of the trace file is automatically overwritten. See parameter traceFile for default path and filename details.
correlation
Optional. Specifies whether related events will be correlated and grouped together. If unspecified, the default entry “correlation=yes” is applied.
provider
Optional. Specifies additional providers to enable for tracing.
keywords
Optional. Specifies the keywords to enable for the corresponding provider.
level
Optional. Specifies the level to enable for the corresponding provider.
Remarks
Capture filters are only supported when capture is explicitly enabled with capture=yes. You can use the show CaptureFilterHelp command to display the list of supported capture filters and their usage.
Follow is a list and brief explanation of the ETW levels that you can specify by using the level parameter.
Critical. Captures only critical events.
Errors. Captures only critical events and error events.
Warnings. Captures only critical events, error events, and warning events.
Informational. Captures only critical events, error events, warning events, and informational events.
Verbose Captures all events.
You can view a complete list of keywords for a specific provider by typing show provider, followed by the provider name. For example, you can type show provider Microsoft-Windows-TCPIP to display information about the Microsoft-Windows-TCPIP provider, including the list of supported keywords.
Example commands
start scenario=InternetClient capture=yesВ
Starts tracing for the InternetClient scenario and dependent providers with packet capture enabled for physical network adapters only.
Tracing will stop when the «Netsh trace stop» command is issued or when the system reboots.
Default location and name will be used for the output file. If an old file exists, it will be overwritten.
start provider=Microsoft-windows-wlan-autoconfig keywords=state,ut:authenticationВ
Starts tracing for the Microsoft-windows-wlan-autoconfig provider.
Tracing will stop when the «Netsh trace stop» command is issued or when the system reboots.
Default location and name will be used for the output file.
If an old file exists, it will be overwritten.
Trace will only log events with the keywords ‘state’ or ‘ut:authentication.’
You can use the Netsh trace show provider command to display the supported keywords and levels.
The Netsh trace context also supports packet filtering capability that is similar to Network Monitor. You can turn on packet capturing by specifying capture=yes in the Netsh trace start command. You can use packet filtering to capture specific packets in a trace file. For example, you can type **start capture=yes ipv4.address=**x.x.x.x, (where x.x.x.x is the IP address), to only capture only those packets containing ipv4 traffic using that specific source or destination address.
To obtain additional information about how to use packet filtering, you can type show capturefilterHelp.
Stops a network tracing session that is currently in progress.
Syntax
stop
Parameters
There are no parameters associated with this command.


