- Установка и настройка сервера Cobbler для автоматической установки ОС по сети.
- Установка Cobbler
- Настройка Cobbler
- Подготовка образа установочного образа системы
- Создание kickstart файла для установки
- Запуск установки по сети
- Automate and manage systems installation with Cobbler
- Easily set up and administer a network installation environment with Cobbler
- What the tool offers
- How Cobbler is designed
- Using Cobbler
- Configuring Cobbler
- Installing Fedora 17 systems
- Creating profiles
- Associating machines with the profiles
- Starting the installation
- Cobbler even easier: the web interface
- Conclusion
Установка и настройка сервера Cobbler для автоматической установки ОС по сети.
Cobbler-это Linux система, для автоматической установки и обновления операционных систем по сети. Незаменимая вещь для системных администраторов которым по долгу службы приходится разворачивать систему сразу на нескольких десятков машин.
Установка Cobbler
Устанавливаем репозиторий epel-release
Устанавливаем сам cobbler с необходимыми пакетами
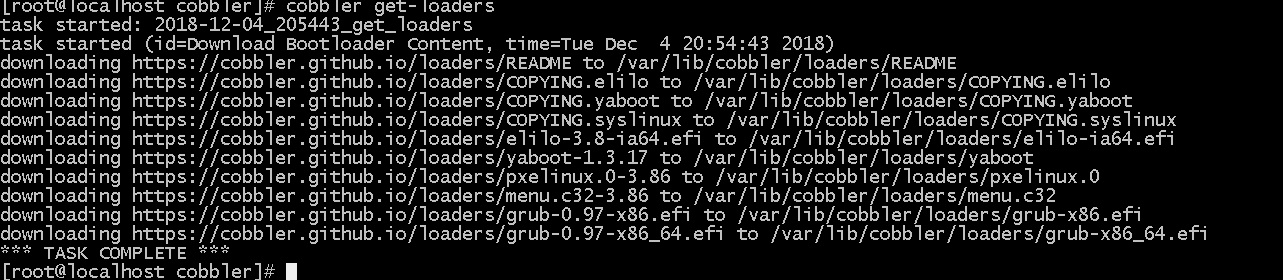
Запускаем cobbler и другие сервисы необходимые для работы и добавляем их в автозагрузку
Если запущен selinux то отключаем его, редактируем файл /etc/selinux/config
Добавляем разрешения в firewalld
подключаемся к веб интерфейсу
 Вводим логин пароль cobbler/cobbler
  Если вы видите эту страницу, то первую часть установки можно считать завершенной. Все дальнейшие настройки можно делать как через консоль так и через веб интерфейс.
Настройка Cobbler
Задаем пароль root. Этот пароль будет устанавливаться в новых устанавливаемых системах, если не задан в kickstart файле. Для этого генерим хэш пароля

Сохраняем оригинальный файл /etc/cobbler/settings на всякий случай.
Редактируем settings приведя его к следующему виду
В параметр default_password_crypted прописываем сгенерированный хэш next_server – адрес tftp сервера server – ip cobbler сервера У нас tftp и cobber сервер на одной машине, поэтому указываем ip адрес сервера. Редактируем файл /etc/cobbler/dhcp.template, в нем прописываем подсеть которая будет выдаваться по DHCP клиентам 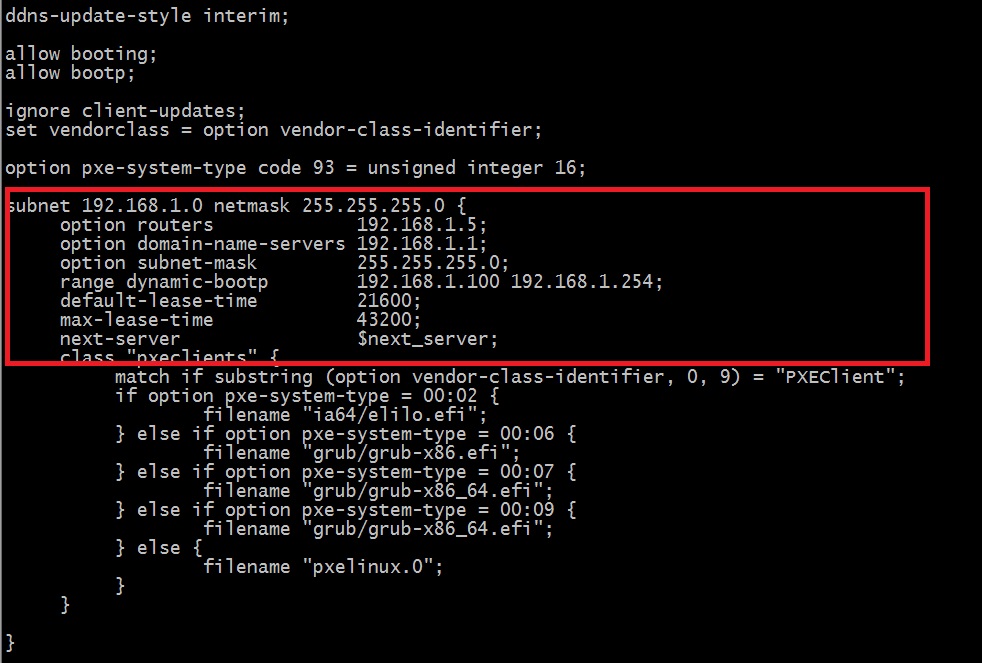 Отредактируем файл /etc/cobbler/dnsmasq.template указав диапазон адресов выдаваемых PXE клиентам
 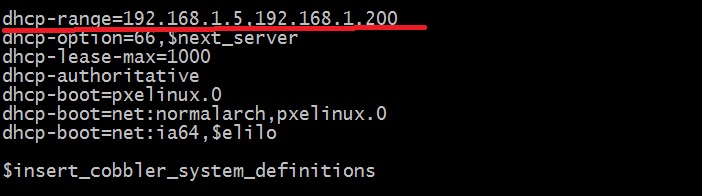 Перезапускаем cobbler
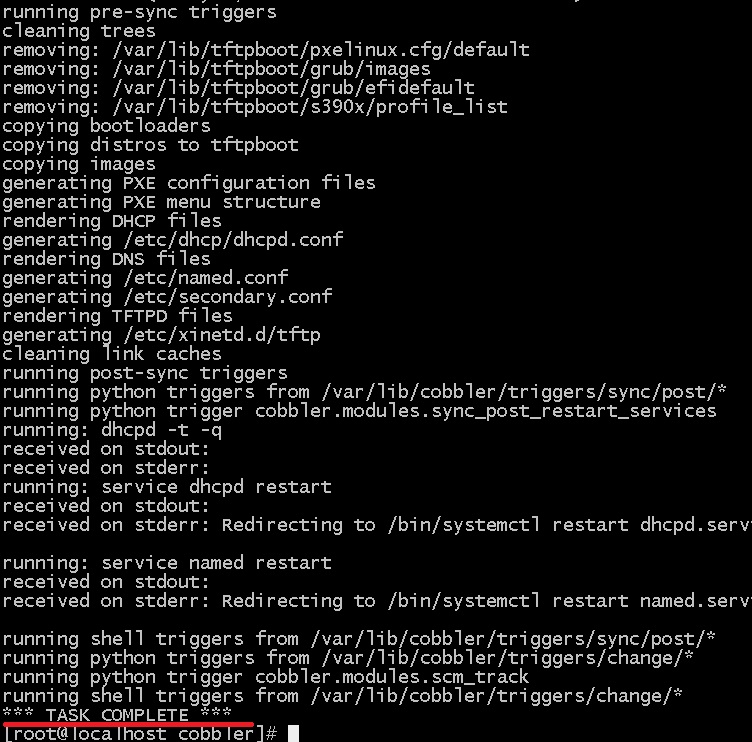 Если видим TASK COMPLETE значит синхронизация прошла успешно Проверяем что все нормально
Вывод показывает следующее
В общем критических замечаний нет, ну давайте исправим и эти Запускаем команду
 Редактируем /etc/debmirror.conf и /etc/debmirror.conf
снова проверяем кобблер
Теперь вывод показывает что никаких замечаний нет
Подготовка образа установочного образа системы
Следующим шагом монтируем iso образ. Загрузим на наш сервер iso образ какой нибудь системы, например Centos 7
Монтируем iso образ в mnt
Переходим в веб интерфейс и импортируем образ, для этого переходим на вкладку Import DVD, Заполняем поля и нажимаем Run 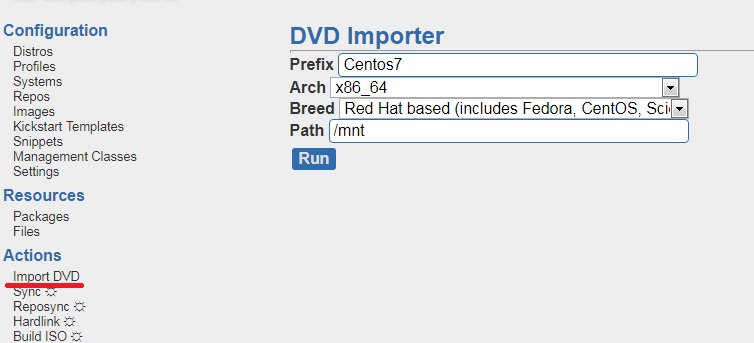
Или через консоль
Если получили ошибку
 Удаляем директорию /var/www/cobbler/ks_mirror/CentOS7-x86_64
Обнавляем сигнатуру и перезапускаем сервис.
Снова импортируем образ системы.
Если все успешно вы увидите следующий вывод 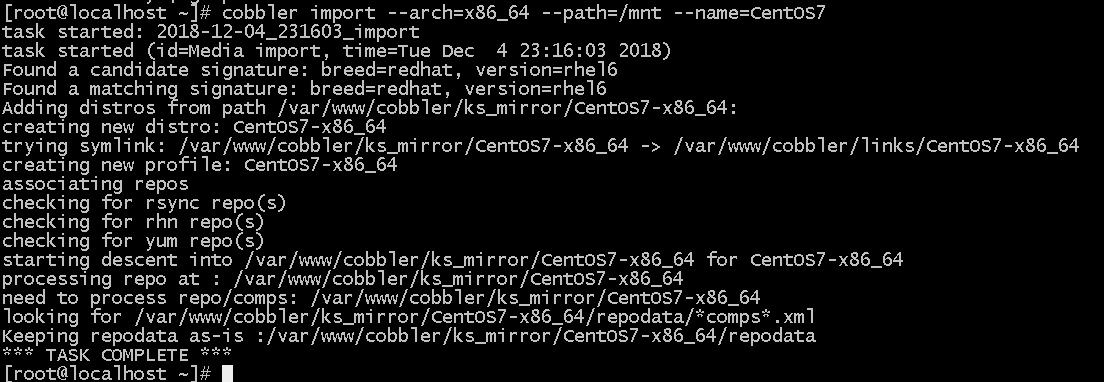 Смотрим смонтированные образы
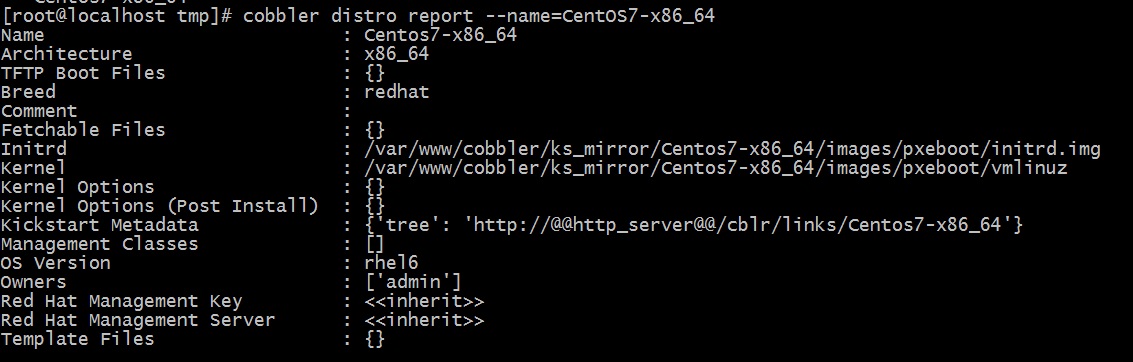
Или через веб интерфейс меню Distros 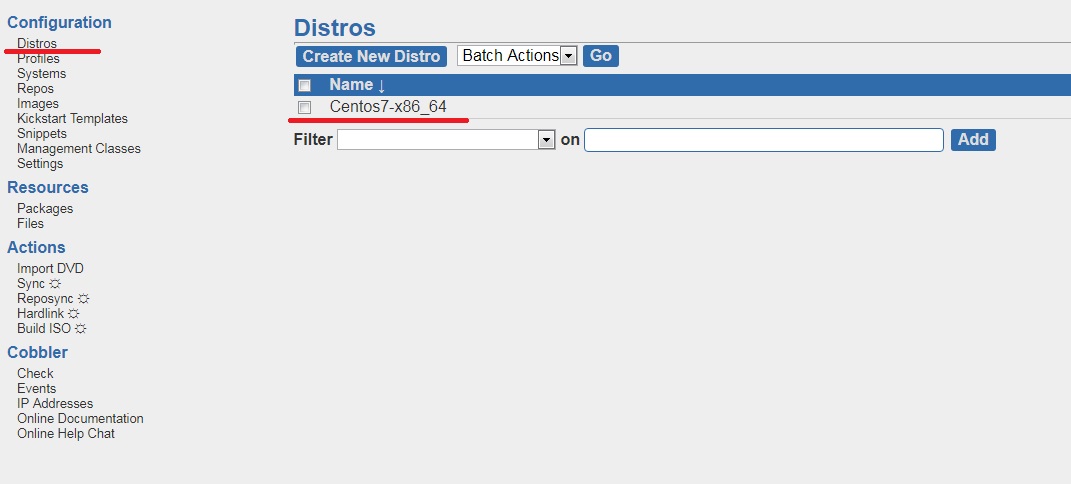 Информацию о сборке можно посмотреть командой
Создание kickstart файла для установки
Следующим шагом создаем Kickstart файл. Назовем его Centos7.ks. В этом файле задаем параметры для автоматической установки, такие как пароль для пользователя root, настройки сети и т.д. Директория для kickstart файлов /var/lib/cobbler/kickstarts.
Запуск установки по сети
Включаем компьютер на который нужно установить систему, в качестве источника загрузки выбираем загрузку по сети Net boot. Если все сделано правильно, то мы увидим как наш компьютер получает ip адрес и начинает загружать по tftp ОС 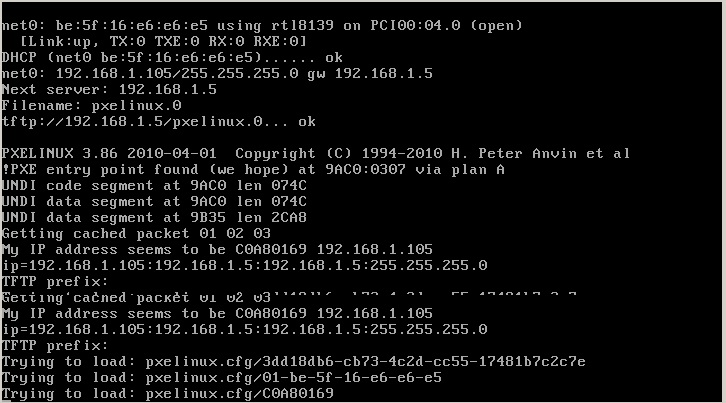 На следующем шаге выбираем наш загрузочный образ в меню загрузки, все остальные действия при установке произойдут в автоматическом режиме
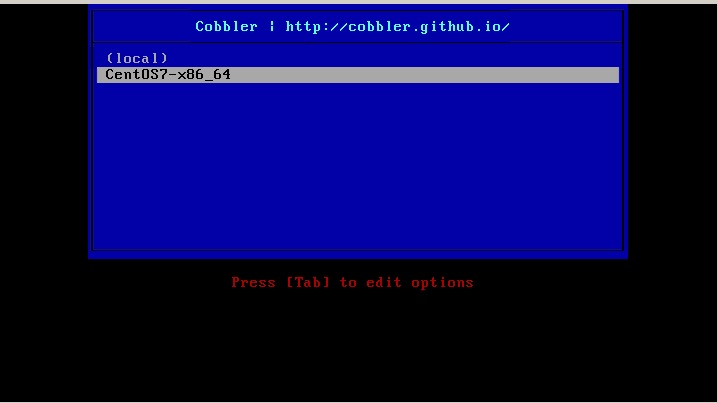
Если вы нашли ошибку, пожалуйста, выделите фрагмент текста и нажмите Ctrl+Enter.
Источник
Automate and manage systems installation with Cobbler
Easily set up and administer a network installation environment with Cobbler
By Paulo Pinatti
Published June 7, 2013
Setting up a network environment can involve many steps until everything is ready to start the installation. You must:
- Configure services such as DHCP, TFTP, DNS, HTTP, FTP, and NFS
- Fill individual client machine entries in DHCP and TFTP configuration files
- Create automatic deployment files (such as kickstart and autoinst)
- Extract installation media to HTTP/FTP/NFS repositories.
The process is not straightforward, and manual registration of each client machine that must be provisioned can be annoying. Any parameter change to the provisioning of a machine — such as a different operating system to be used — demands a manual intervention in configuration and possibly automatic deployment files. When the number of machines increases, elements like the TFTP directory can get messy unless you pay close attention to the files organization.
Cobbler addresses these shortcomings by creating a central point of management for all aspects of machine provisioning. It can reconfigure services, create repositories, extract operating system media, act or integrate with a configuration management system, control power management, and more. Cobbler creates a layer of abstraction where you can run commands like “add new repository” or “change client machine operating system.” Cobbler takes care of everything — creating or updating configuration files, restarting services, or extracting media to newly created directories. The intention is to hide all the system-related issues so you can focus on the task itself.
This article covers how Cobbler is designed, its main features, and examples of how to use those features to provision machines quickly and easily. First, its features.
Tivoli Configuration Manager
IBM Tivoli® Configuration Manager is an integrated software distribution and asset management suite that consists of two main components, Software Distribution and Inventory, and various services. Tivoli Configuration Manager controls configuration, distribution, change, version, and asset management in a multiplatform environment.
What the tool offers
With Cobbler, you can install machines without manual intervention. Cobbler sets up a PXE boot environment (it also supports PowerPC by using yaboot) and controls all aspects that are related to installation, such as network boot services (DHCP and TFTP) and repository mirroring. When you want to install a new machine, Cobbler:
- Uses a previously defined template to configure the DHCP service (if manage DHCP is enabled)
- Mirrors a repository (yum or rsync) or extracts a media to register a new operating system
- Creates an entry in the DHCP configuration file for the machine to be installed with the parameters that you specify (IP and MAC addresses)
- Creates the appropriate PXE files under the TFTP service directory
- Restarts the DHCP service to reflect the changes
- Restarts the machine to begin installation, if power management was enabled
Cobbler has a good range of distribution support: Red Hat, Fedora, CentOS, Debian, Ubuntu, and SuSE. When you add an operating system (usually by using an ISO file), Cobbler knows how to extract the appropriate files and adjust the network services to boot the machines correctly.
Cobbler can work with kickstart templating. Systems that are based on Red Hat or Fedora use kickstart files to automate the installation process. By using templates, you can have base kickstart templates and then define how variables are replaced in them for a profile or machine configuration. For example, a template can contain two variables, $domain and $machine_name. In a Cobbler configuration, a profile specifies domain=mydomain.com , and each machine that uses this profile specifies its name in the machine_name variable. All machines in that profile are installed with the same kickstart and configured for domain=mydomain.com , while each has its own machine name. You can still use the kickstart template to install other machines in different domains and with different machine names.
To help manage systems, Cobbler can connect to various power management environments through fence scripts. Cobbler supports apc_snmp, bladecenter, bullpap, drac, ether_wake, ilo, integrity, ipmilan, ipmitool, lpar, rsa, virsh, and wti. To reinstall a machine, run a reboot system foo command, and Cobbler runs the appropriate fence script with the necessary credentials and information (such as the machine slot number) for you.
In addition to these features, you can use a configuration management system (CMS). You have two choices: an internal system in the tool, or an integration with an existing external CMS such as Chef or Puppet. With the internal system, you can specify file templates, which are processed according to configuration parameters (the same way the kickstart templates are) and copied to the location you determine. This function is useful when you must deploy configuration files automatically to specific machines.
With the koan client, Cobbler can provision virtual machines and reinstall systems from the client side. I do not discuss the configuration management and koan features because they are beyond the scope of this article. However, they are useful features that are worth exploring. (For more information, see resources on the right.)
How Cobbler is designed
The configuration structure of Cobbler is based on a set of registered objects. Each object represents an entity that is associated with another entity (the object points to another object, or another object points to it). When one object points to another object, it inherits the data of the pointed object and can override or add more specific information. The following types of objects are defined:
- Distribution: Represents an operating system. It carries information about the kernel and initrd, plus other data such as kernel parameters.
- Profile: Points to a distribution, a kickstart file, and possibly repositories, plus other data such as more specific kernel parameters.
- System: Represents the machine to be provisioned. It points to a profile or an image and contains information about IP and MAC addresses, power management (address, credentials, type), and more specialized data.
- Repository: Holds mirroring information for a yum or rsync repository.
- Image: Can replace a distribution object for files that do not fit in this category (for example, cannot be divided in kernel and initrd).
Based on what objects are registered and the association between them, Cobbler knows how to change the file system to reflect the configuration. Because the internals of the system configuration are abstracted, you can focus just on what you want to do.
Figure 1. Cobbler objects relationship

EPEL packages
Cobbler packages for RHEL and CentOS are distributed through EPEL (Extra Packages for Enterprise Linux), a special interest group of the Fedora community. EPEL maintains a set of additional packages for Enterprise Linux, including the Red Hat Enterprise Linux (RHEL), CentOS, and Scientific Linux (SL) distributions. Find more information at the Fedora Project.
Using Cobbler
The options to configure and use Cobbler include command line, API, XML-RPC, and web UI. I primarily focus on the command-line option.
Cobbler has packages for the Fedora, RHEL, CentOS, Ubuntu, and OpenSuse distributions (see EPEL packages). I base the instructions on a Fedora system — you can easily adjust them to another system if you prefer.
First, install the tool and the fence-agents package, which Cobbler uses for power management activities. As the root user, issue the install command of the distribution’s package manager:
yum -y install cobbler fence-agents
Once the packages are installed, start the necessary services:
To test whether Cobbler is running correctly, type cobbler check . This command reports configuration points that might need adjustment. Don’t worry about them; the command is just a guidance to help users. You will configure the relevant aspects on the next steps (the only exceptions are the SELinux warnings, adjust them by following the instructions from Cobbler). If you happen to get a connection error message, verify that the services — and the SELinux logs, if enabled — were correctly started. You might need to set the SELinux boolean httpd_can_network_connect_cobbler to true ( setsebool -P httpd_can_network_connect_cobbler 1 ). If so, remember to restart the services afterward.
Configuring only some services
Cobbler can be configured to manage only certain services if that fits your needs. For example, you might administer a file server, but another machine in the network that you cannot access serves DHCP. In this case, the DHCP administrator sets the filename option to ask for a boot file (pxelinux.0 for x86 or yaboot for PowerPC) and the next_server option to point to the IP address of your file server. The machines that are booted in the network ask for the boot file from your server. You then configure Cobbler to manage the TFTP service and register the machines in the tool so that it serves the appropriate files to those machines.
Configuring Cobbler
The main Cobbler configuration file is /etc/cobbler/settings. Open it with your text editor, and set the following options:
- manage_dhcp: 1
- manage_dns: 1
- manage_tftpd: 1
- restart_dhcp: 1
- restart_dns: 1
- pxe_just_once: 1
- next_server:
- server:
The options manage_* and restart_* are self-explanatory. The option next_server is used in the DHCP configuration file to tell the machines what is the address of the server that provides the boot file. The option server is used during the machine installation to refer to the Cobbler server address. Finally, the option pxe_just_once prevents installation loops in machines that are configured to always boot from the network. When this option is activated, the machine tells Cobbler that the installation is finished. Cobbler changes the netboot flag of the system object to false, forcing the machine to boot from the local disk. You use this option later in the example.
You might not activate all the options (see Configuring only some services). In this example, configure Cobbler to manage all the services, because that’s a common scenario and demonstrates how to configure them.
Now that Cobbler knows which services to manage, tell it which programs to use. The options are:
- DHCP: ISC dhcpd or dnsmasq
- DNS: BIND or dnsmasq
- TFTP: in.tftpd or cobbler’s internal TFTP
Using dnsmasq for DHCP and DNS is a good idea because configuring it is easy. Use in.tftpd because it’s the system default. Edit the file /etc/cobbler/modules.conf with the settings in Listing 1:
Listing 1. Configuration settings
Cobbler uses a template to create the configuration files for the services. Editing the dnsmasq template at /etc/cobbler/dnsmasq.template is necessary to adjust network information such as the gateway address and IP range to be used. Assume the server that runs Cobbler is also the gateway, and our IP range is 192.168.122.5-192.168.122.254, enter this line in the file:
Usually you want to block unregistered clients from booting from the server. To do that, add the parameter dhcp-ignore=tag:!known . (In older versions, the syntax might be different: dhcp-ignore=#known . If in doubt, you can insert both versions.) The file content is similar to the code in Listing 2:
Listing 2. dnsmasq template file
Cobbler is almost ready for use. Restart the service and synchronize the changes to the filesystem for them to take effect. Remember also to restart the xinetd service to make TFTP available. Run the commands:
You can add distributions and repositories, create profiles, and register systems. Remember to verify that your firewall configuration allows traffic on the ports that the network services TFTP, DHCP, and HTTP/HTTPS use.
Installing Fedora 17 systems
Prepare Cobbler to install Fedora 17 systems with two available options: Xfce or GNOME desktop. To add the Fedora installation tree, first download the ISO media and then run the following commands to mount the media and extract its content. (In some systems, Cobbler might not see the mounted directory content and fails to import the media. If this problem happens to you, restart the Cobbler service after the mount command.):
Cobbler now copies the media content to the filesystem. Be patient: The operation can take a while to complete. The command cobbler import is handy because it automatically creates a distribution and a profile object for you. You can also point Cobbler directly to a network repository. The result is similar to Listing 3:
Listing 3. Result of the cobbler import command
This profile is the parent of the two other profiles that you will create for each desktop you want installed.
Before you do that, however, consider that you have a yum repository with more packages to use in the installations. To do that, create a repository object:
For the yum repository URL, Cobbler accepts http://, ftp://, rsync://, filesystem paths, and ssh locations (by using private key-based authentication). The reposync operation is important because it copies files from the remote repository. If you create the repository object but do not run reposync , your repository is empty and your installation is likely to fail.
To complete the repository activation, associate the repository to a profile. Associate it to the Fedora profile with the command:
Creating profiles
The next step is to create the profiles. For an automatic installation, specify a kickstart file with the kickstart template feature. Create a simple kickstart that is based on the files available from /var/lib/cobbler/kickstarts. Then, in the %packages section, define a variable $desktop_pkg_group, which later is substituted to determine which desktop packages are installed. Listing 4 shows the content of the kickstart file:
Listing 4. Contents of the kickstart file
The variables that start with $ are replaced by the Cheetah program (see resources on the right), which Cobbler uses to process its templates. If you are familiar with Cheetah templates, the rules are the same. To learn more about the internal Cobbler variables such as $yum_config_stanza, look at the available kickstarts from /var/lib/cobbler/kickstarts.
After you create the file, copy it to /var/lib/cobbler/kickstarts (if you don’t, Cobbler might fail to use it). Cobbler knows the value of $desktop_pkg_group because you define it when you create the profiles with the —ksmeta option. With this option, you determine the value to use when you replace a variable in the kickstart template. The commands in Listing 5 create the Xfce and GNOME profiles:
Listing 5. Commands to create the Xfce and GNOME profiles
The —parent parameter tells these profiles to inherit from the Fedora profile. The profiles use the Fedora distribution and the additional Flash-plugin repository. To make sure that everything is correct, you can verify the kickstart content after it processes. The result is similar to Listing 6:
Listing 6. Verifying kickstart content
The variable $dekstop_pkg_group was correctly replaced by @xfce-desktop, which tells the Anaconda installer to install the Xfce desktop package group.
Associating machines with the profiles
You are almost ready to start an installation. The last step is to associate the machines (one for each desktop) with the profiles you want them installed with. The commands are in Listing 7:
Listing 7. Associating machines with their profiles
The power management feature in Cobbler can power on, power off, and reboot the machines for you. This function is also useful when you have many machines and must organize power management information such as user and passwords for each because Cobbler registers them in its base. Suppose machine desktop-xfce-1 is in an IBM Bladecenter at bay 2, and desktop-gnome-1 is a machine that is managed with an RSA board. You can set up your systems as shown in Listing 8:
Listing 8. Adding power management information
Remember to apply all the changes to the filesystem:
Finally, you can install the machines.
Starting the installation
You’re ready to boot the machines and install them. They must be configured to boot from the network — if they aren’t, they might boot from the hard disk and never start the installation. If you activated power management, Cobbler can reboot the machine for you so you can start the installation with a simple command:
This command makes Cobbler connect to the Bladecenter with the credentials you specified and issue a reboot command for blade 2. The blade restarts with a network boot and receives the boot files from Cobbler. The installation takes place automatically, and the process ends when the Fedora login screen is displayed.
Cobbler even easier: the web interface
You might want to easily visualize the Cobbler objects and reuse object values for repetitive tasks on a daily basis. Cobbler offers a useful web interface so you can do that. To use it, start by installing its package:
After you install the package, configure the Cobbler authorization and authentication system so you can log in. The configuration is available in the file /etc/cobbler/modules.conf, and it looks like the code in Listing 9:
Listing 9. Default Cobbler authorization and authentication system configuration
The help comments in Listing 9 show that authentication options such as LDAP, PAM, and configuration file are available. Because PAM is fairly common, use that for authentication. In the authorization section, define which users have clearance to use the tool. Set the module value to authz_ownership so you can specify in the users.conf file who are able to access the web interface. The configuration looks like the code in Listing 10:
Listing 10. Authentication and authorization configuration for the Cobbler web interface
Save the file. Next, you need a system user named myuser (if you don’t have one, create it with useradd myuser && passwd myuser ). Then, open the file /etc/cobbler/users.conf and add myuser to the admins group (this group has full access to objects), as in Listing 11:
Listing 11. Adding myuser to the admins group in the authorization file
The configuration is done. Now restart the Cobbler and Apache services to apply the changes:
The web interface is straightforward (see Figure 2): The menu on the left shows the configuration classes (such as repositories, systems, distributions, and profiles), resources (for configuration management), and actions (import, sync). Click a configuration class to list all objects on the right side of the screen. You can apply list filters and do different actions through the buttons (Edit, Copy, Rename, Delete) next to each item.
Figure 2. Cobbler web interface

Conclusion
Cobbler, a tool for automating and facilitating systems installations, uses network boot to control and initiate the installations. Other Cobbler features include repository mirroring, kickstart templating, and connectivity with power management systems.
A description of the configuration objects of the tool and how they relate to each other demonstrates Cobbler’s internal design. The structure, which is based on associated objects and inheritance between them, provides good abstraction and reuse, which facilitates the task of configuring an environment for systems installation.
You learned how to install and configure Cobbler, plus how to use its commands to create a configuration suitable for automatically installing machines. Finally, you learned to install and configure the web interface as a practical alternative to perform daily activities.
Cobbler can simplify the life of system administrators. The features not explored in the article, including the XML-RPC API, configuration management, and the koan client, make Cobbler even more powerful and point the way to further exploration.
Источник


