VMware Workstation 4.5
Setting Up Hardware Profiles in Virtual Machines
Setting Up Hardware Profiles in Virtual Machines
Certain operating systems use hardware profiles to load the appropriate drivers for a given set of hardware devices. If you have a dual-boot system and want to use a virtual machine to boot a previously installed operating system from an existing partition, you must set up «physical» and «virtual» hardware profiles.
Only users who are familiar with VMware Workstation virtual machines and the Windows hardware profiles concept should attempt this.
Each virtual machine provides a platform that consists of the following set of virtual devices:
- Virtual DVD/CD-ROM
- Virtual IDE and SCSI hard disk drives
- Standard PCI graphics adapter
- Standard floppy disk drive
- Intel 82371 PCI Bus Master IDE controller
(includes primary and secondary IDE controllers) - BusLogic BT-958 compatible SCSI host adapter
- Standard 101/102-key keyboard
- PS/2-compatible mouse
- AMD PCnet-PCI II compatible Ethernet adapter
- Serial ports (COM1-COM4)
- Parallel ports (LPT1-LPT2)
- Two-port USB hub
- Sound card compatible with the Sound Blaster AudioPCI
- 82093AA IOAPIC
This set of virtual devices is different from the set of physical hardware devices on the host computer and is independent of the underlying hardware with a few exceptions (the processor itself is such an exception). This feature provides a stable platform and allows operating system images installed within a virtual machine to be migrated to other physical machines, regardless of the configuration of the physical machine.
If an operating system is installed directly into a VMware Workstation virtual machine, the operating system properly detects all the virtual devices by scanning the hardware. However, if an operating system is already installed on the physical computer (for example, in a dual-boot configuration), the operating system already is configured to use the physical hardware devices. In order to boot such a preinstalled operating system in a virtual machine, you need to create separate hardware profiles in order to simplify the boot process.
Microsoft Windows operating systems, beginning with Windows 95 and Windows NT 4.0, allow you to create hardware profiles. Each hardware profile is associated with a set of known devices. If more than one hardware profile exists, the system prompts the user to choose between different hardware profiles at boot time.
Windows 95, Windows 98, Windows Me, Windows 2000, Windows XP and Windows Server 2003 use Plug and Play at boot time to confirm that the actual devices match the chosen hardware profile. Mismatches lead to the automatic detection of new devices. Although this operation succeeds, it can be fairly slow.
Windows NT does not have Plug and Play support and uses the hardware profiles to initialize its devices. Mismatches lead to errors reported by the device drivers and the devices are disabled.
In order to set up hardware profiles for your physical and virtual machines, follow these steps:
- Before running VMware Workstation to boot an operating system previously installed on a disk partition, boot the operating system natively and create two hardware profiles, which you can call Physical Machine and Virtual Machine. To do this, open Control Panel >System, then click the Hardware Profiles tab or click the Hardware tab, then click Hardware Profiles, depending on the operating system. Click the Copy button and name the copies appropriately.
- Windows NT only: While still running the operating system natively, use the Device Manager to disable some devices from the Virtual Machine hardware profile. To do this, open Control Panel >Devices, then select the individual devices to disable. Devices to disable in the Virtual Machine hardware profile include audio, MIDI and joystick devices, Ethernet and other network devices and USB devices. Remember to disable them in the Virtual Machine hardware profile only.
Skip this step if you are running Windows 95, Windows 98, Windows Me, Windows 2000, Windows XP or Windows Server 2003. The initial Plug and Play phase detects device mismatches.
Do not reboot the virtual machine. Click No in the System Settings Change/Reboot dialog box.
Windows Server 2003, Windows XP or Windows 2000 automatically detects and loads the driver for the AMD PCnet PCI Ethernet card. At this point, you should install VMware Tools inside the virtual machine. Allow the virtual machine to reboot after VMware Tools has been installed. Once Windows Server 2003, Windows XP or Windows 2000 reboots inside the virtual machine, select a new SVGA resolution from the Settings tab of the Display Properties dialog box to increase the size of the virtual machine’s display window.
Windows 95 and Windows 98 guests: You should see New Hardware Detected dialog boxes as Plug and Play runs and discovers the virtual hardware. Windows prompts you for locations to search for device drivers. Most of the device drivers are available in the existing operating system installation, but you may need the installation CD-ROM for some networking device drivers. Windows also asks you to reboot your system several times as it installs the device drivers.
In some instances, Windows may not recognize the CD-ROM drive when it prompts you to insert the CD-ROM to look for device drivers during the initial hardware detection. In such cases, you can cancel the installation of the particular device or try pointing to C:\windows\system\ to search for device drivers on the hard disk. Any failed device installations may be performed at a later time after the CD-ROM drive is recognized.
After Windows has installed the virtual hardware and its drivers, you can remove the failed devices corresponding to the physical hardware using the Device Manager (Control Panel > System > Device Manager).
Select the device, then click the Remove button. If a device appears in multiple hardware profiles, you can select the hardware profile or profiles from which to remove the device.
If you want to enable the virtual machine’s sound adapter to work inside the Windows 9x guest operating system, finish the remaining steps in this section, then refer to Configuring Sound.
Windows NT guests only: After the operating system has finished booting in the virtual machine, view the event log to see which physical devices have failed to start properly. You can disable them from the Virtual Hardware profile using the Device Manager (Control Panel > Devices).
If you want to enable the virtual machine’s sound adapter to work inside the Windows NT guest operating system, finish the remaining steps in this section, then refer to Configuring Sound.
Confirm that your virtual devices specifically, the network adapter are working properly.
Windows 95 and Windows 98 guests: If any virtual device is missing, you can detect it by running Control Panel > Add New Hardware.
Install VMware Tools. VMware Tools appears and runs in both hardware configurations but affects only the virtual machine.
Note: The next time you reboot Windows natively using the Physical Machine hardware profile, some virtual devices may appear in the device list. You can disable or remove these virtual devices from the Physical Machine hardware profile in the same way that you removed physical devices from the virtual machine hardware profile in step 6, above.
Easy Ways To Find Hardware & Other Computer Specifications
At your fingertips when you need it
“What do you mean how much RAM do I have? It’s a computer, how should I know?” If you’ve found yourself saying this, you will know the frustration of not having technical answers. It can also delay getting the help you need.
Let’s look at some tools to keep those answers at your fingertips.

Find Basic System Information In Windows
This is the easiest way to find your computer’s name, type of processor or CPU, how much RAM it has, and what version of Windows is on it.
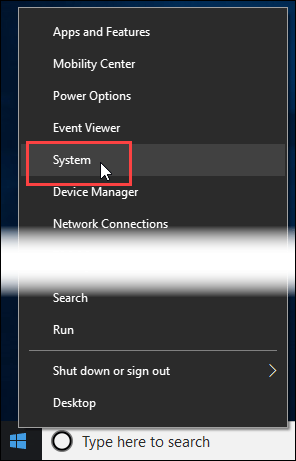
Simply right-click on the Windows button in the bottom-left corner of your screen, and then click System.
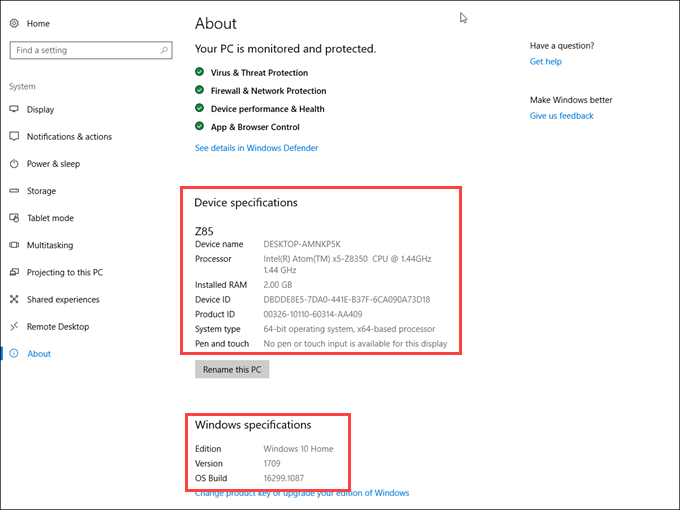
In the window that opens, look near the middle for Device specifications. That’s where you’ll find the Device name, Processor, Installed RAM, and other information.
The Edition and Version of Windows installed is found just below that in Windows specifications.
Find Specific Device & Driver Information In Windows
Ever had problems with a certain piece of hardware and the tech asked you, “What driver are you using?” How should you know? What is a driver anyway?
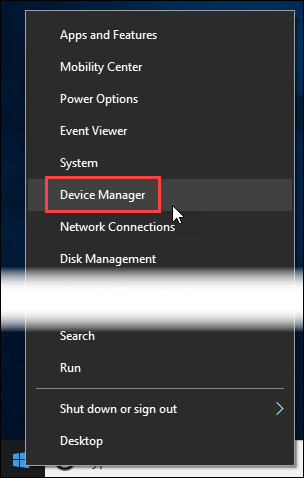
But you can get it quickly. Right-click on the Windows button again, then click on Device Manager.
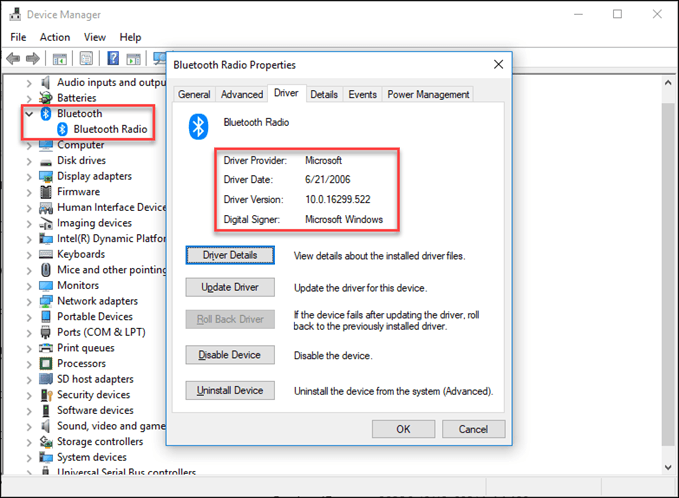
In the Device Manager window, you can drill down into the specific device and get more information. Once you’ve found it, double click on it to see its Properties windows.
Now go to the Driver tab and the information you need is right there. This is also a spot where you can update drivers, and disable or uninstall a problem device.
Get & Save Computer Specs Easily
Want to record your computer’s hardware specs quickly and easily? Speccy is the tool for you, and it’s free. You may want to get the portable app version if you work on different computers and want to track all their specs.
We’ve also got an article to help you learn about portable apps and why you should use them. We’ll be using the portable version of Speccy, but there is no significant difference in using either the desktop or portable app.
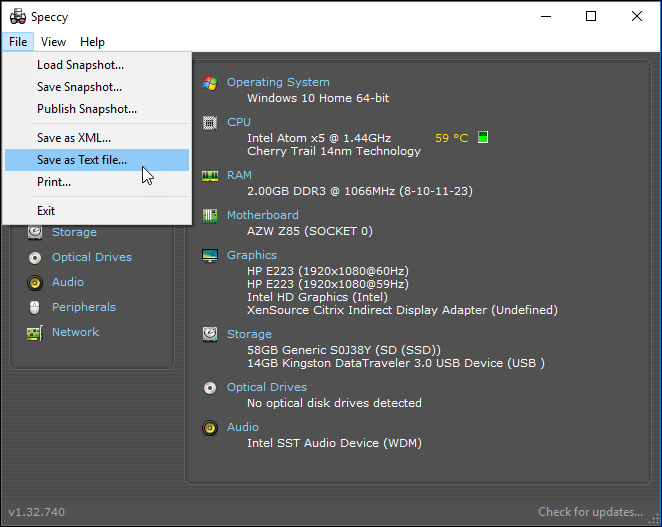
When you first open Speccy, it will start to gather information about your computer right away. You can see it analyzing the motherboard, graphics, storage, optical drives, and audio.
In the second between starting Speccy and getting this screen shot, it already got information on the operating system, CPU, and RAM.
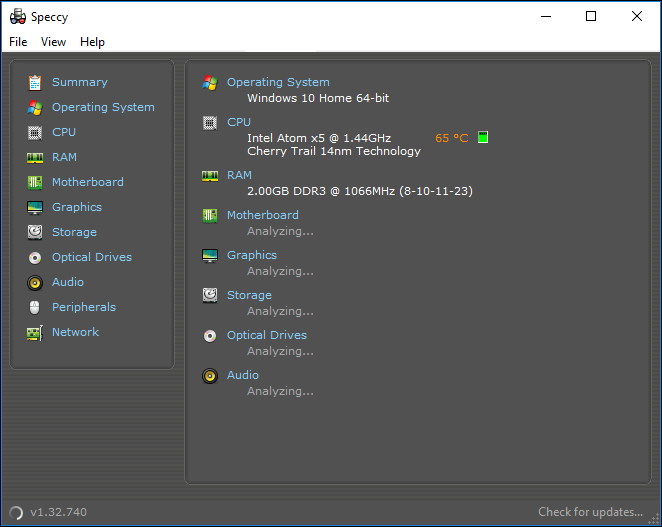
Note that it shows the CPU temperature as well. That’s a key piece of information in troubleshooting many computer problems. It doesn’t just measure this once. Leave Speccy open and you can watch the temperature change. Better yet, run Speccy in the system tray and it will display your current CPU temperature.
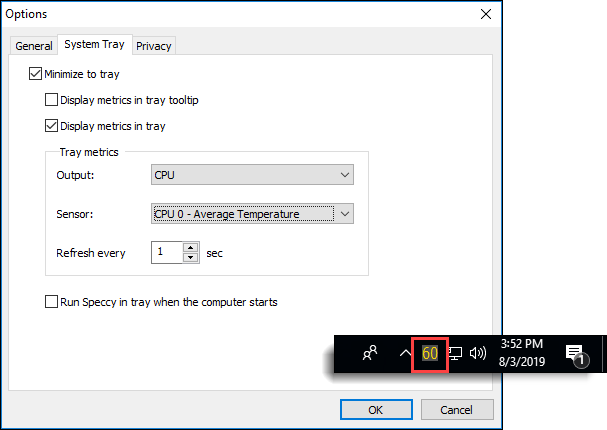
- Click on View > Options.
- In the Options window, go to the System Tray tab.
- Check the Minimize to tray box. Now when you minimize Speccy, it will just reside in your system tray and not directly on your taskbar.
- Check Display metrics in tray so it will show you the CPU temperature. The other options can be left at their default values, but feel free to play around with it.
- Click the OK button to apply the settings and then minimize it to your tray. You’ll see the temperature displayed, like in the image below.
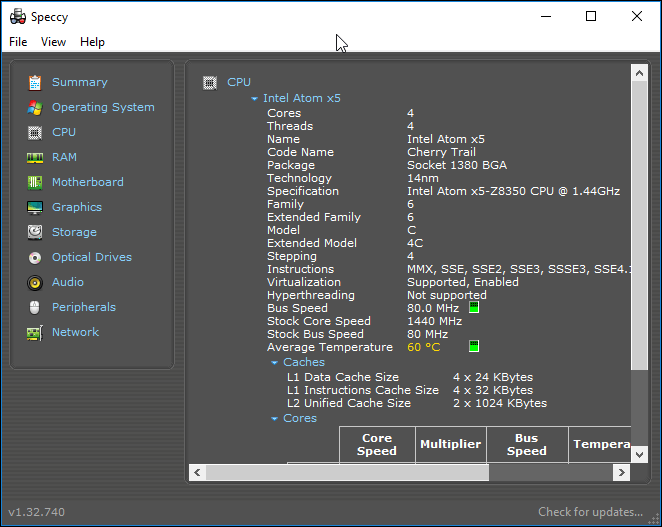
Clicking on any of the headings on the left side of Speccy will give you more detail about that part of your computer than you probably would ever care to have. But your IT person might want to have it. Now you can get it for them.
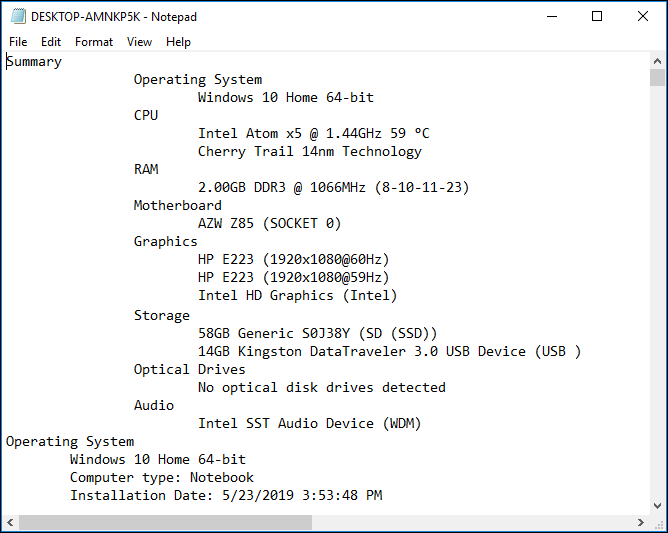
Would you like to keep this information so you can refer to it later, maybe in the computer shop? You can. Click on File > Save as Text File and save it anywhere you’d like.
You could print it as well, but there’s a lot of information and it will print a lot of pages. Best to save the text file and then you can print off only the information you want.
Once you’ve got Speccy, you’ve got a quick, large window into the insides of your computers. There isn’t much more information that you could get about your computer.
Now You Know Your Computer
That’s a lot of information to digest. Take your time and poke around. You can’t hurt anything with either Speccy or System Information. You could cause issues in Device Manager, so it’s best not to change anything in there without professional guidance, but it’s okay to look.
Armed with this new power, you can quickly, and confidently, give your technicians the information they need. Trust me, they’ll appreciate it and you’ll get the help you need quicker. Do you help people with their computers? Share this article with them so they can help you help them.
Guy has been published online and in print newspapers, nominated for writing awards, and cited in scholarly papers due to his ability to speak tech to anyone, but still prefers analog watches. Read Guy’s Full Bio


