- Set up IP Forwarding
- Requirements:
- To set-up:
- Configuring Port Forwarding on Windows
- How to Configure Port Forwarding on Windows 10 using Netsh Portproxy?
- Managing Port Forwarding Rules in Windows
- Port Forwarding in Hyper-V Server
- How to Forward Ports on Your Router
- Some games and programs only work if you open a specific port
- How Do You Set Up Port Forwarding?
- Give the Device a Static IP Address
- Use Your Computer to Set Up a Static IP Address
- Use Your Router to Set Up a Static IP Address
- Set Up Port Forwarding
- More on Open Ports
Set up IP Forwarding
The successful implementation of IP forwarding enables one workstation to sit on two LANs and to act as a gateway forwarding IP packets from one LAN to another. IP forwarding is also referred to as ‘bridging’ networks.
Requirements:
- At least two network cards installed in the workstation or server.
- Each network card to be connected to a different LAN
To set-up:
On the ‘gateway’ PC:
- Ensure that a correct IP address is specified for each network card and that the IP address is static and not allocated from a DHCP server.
- Enabled IP forwarding:
- Open ‘Control Panel’
- Double click on ‘Network Connections’ to open it.
- Select/highlight the two network connections to ‘bridge’.
- Right click and select ‘Bridge Connections’.
- Open ‘Control Panel’
- Double click on ‘Network’.
- Click the ‘Protocols’ tab.
- Double click on ‘TCP/IP Protocol’.
- Click the ‘Routing’ tab.
- Tick ‘Enable IP Forwarding’
On the workstations that will use the gateway, the workstation must be set-up to use the gateway:
- Open a command/DOS session.
- Type:
Route add -p mask
Route add -p mask
For example, if the remote subnet address is 192.0.0.x with a mask of 255.255.255.0, and the address of the gateway on the local LAN is 10.1.137.1, then the route command would be:
Route –p add 192.0.0.0 mask 255.255.255.0 10.1.137.1
or this could be expressed using the name of the gateway thus:
Route –p add 192.0.0.0 mask 255.255.255.0 GatePC
The ‘-p’ flag makes the route permanent across reboots. By default route changes are lost when the workstation is rebooted.
Instead of specifying the IP address of the gateway, the name of the gateway can be specified.
You will need to be logged in as a local administrator of the workstation to do this.
Workstations that will use the gateway will not know the IP addresses of the ‘remote’ workstations. These must be defined explicitly:
- Edit or create the file ‘ C:\WINNT\System32\drivers\etc\lmhosts.sam ’ with a text editor (such as notepad ).
- Add a line at the end of the file of the following form for each ‘remote’ workstation that this workstation needs to talk to:
For example, if the remote computer were called ‘portable_brain’ and its IP address on the remote network were ‘10.1.128.29’ then the following should be appended to the lmhosts file:
As a rule each computer listed in the lmhosts file should have a reciprocal entry in its lmhosts file.
- If the name specified in the LMHOSTS file is different from the real host-name then communications will still be possible but it will not be possible to mount shared drives.
These notes have been tested with Windows NT4, W2K and XP Workstation.
About the author: Brian Cryer is a dedicated software developer and webmaster. For his day job he develops websites and desktop applications as well as providing IT services. He moonlights as a technical author and consultant.
Configuring Port Forwarding on Windows
You can configure network ports forwarding in all Windows versions without using third-party tools. Using a port forwarding rule, you can redirect an incoming TCP connection (IPv4 or IPv6) from the local TCP port to any other port number, or even to a port on a remote computer. Moreover, it is not necessary for Windows to have a service that listens on a specific TCP port. Windows port forwarding is most commonly used to bypass firewalls or to hide an internal host or service from the external network (NAT/PAT).
In the Linux world, port forwarding is configured quite simply using iptables or firewalld. On Windows Server systems, the Routing and Remote Access Service (RRAS) is typically used to configure port redirections. However, there is an easier way to configure the port forwarding, which works well in any Windows version.
How to Configure Port Forwarding on Windows 10 using Netsh Portproxy?
You can configure port forwarding in Windows using the Portproxy mode of the Netsh command. The command syntax is as follows:
netsh interface portproxy add v4tov4 listenaddress=localaddress listenport=localport connectaddress=destaddress connectport=destport
where
- listenaddress – is a local IP address to listen for incoming connection (useful if you have multiple NICs or multiple IP addresses on one interface);
- listenport – local listening TCP port number (the connection is waiting on);
- connectaddress – is a local or remote IP address (or DNS name) to which you want to redirect incoming connection;
- connectport – is a TCP port to which the connection from listenport is forwarded to.
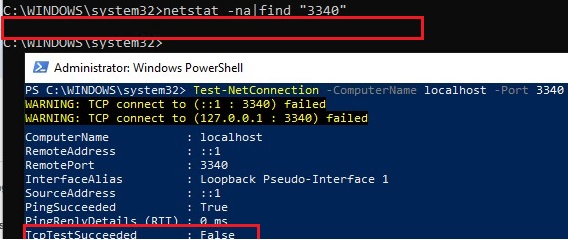
Let’s suppose our task i is to make the RDP service to respond on a non-standard port, for example 3340 (the port can be changed in the settings of the Remote Desktop service, but we are using RDP to make it easier to demonstrate port forwarding). To do this, we need to redirect incoming traffic from TCP port 3340 to another local port – 3389 (this is the default RDP port number).
netstat -na|find «3340»
Alternatively, you can check that the port is not listening locally using the PowerShell cmdlet Test-NetConnection:
Test-NetConnection -ComputerName localhost -Port 3340
To create a port forwarding rule on Windows 10, run a command prompt as an administrator and run the following command:
netsh interface portproxy add v4tov4 listenport=3340 listenaddress=10.1.1.110 connectport=3389 connectaddress=10.1.1.110
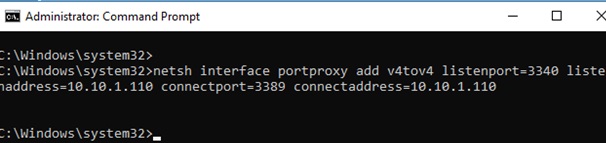
Where 10.10.1.110 – the current IP address of this computer.
Now, use the netstat tool to check that Windows is now listening on local port 3340:
netstat -ano | findstr :3340


IPv6 support must be enabled on the network interface for which the port forwarding rule is created.
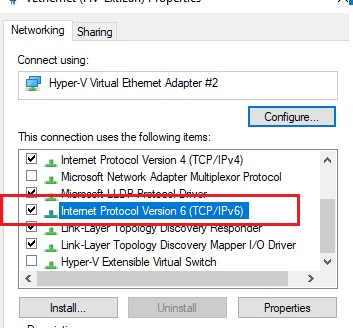
These are the prerequisites for the correct operation of port forwarding. Without the IP Helper service and without IPv6 support enabled, the port redirection won’t work.
To make port forwarding work on Windows Server 2003/XP, you must additionally set the IPEnableRouter parameter to 1 in the registry key HKLM\SYSTEM\ControlSet001\Services\Tcpip\Parameters.
You can find out what process is listening on the specified port using its PID (in our example, the PID is 636):
tasklist | findstr 636
Let’s try to connect to this port from a remote computer using any RDP client. Port 3340 should be specified as the RDP port number. It is specified after the colon following the RDP server address. For example, 10.10.1.110:3340
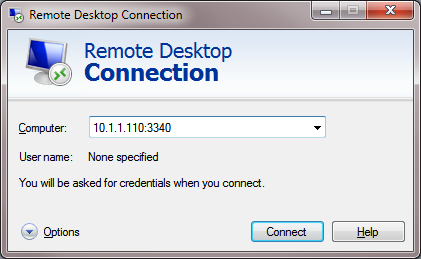
The RDP connection should be established successfully.
If you want to forward an incoming TCP connection to a remote computer, use the following command:
netsh interface portproxy add v4tov4 listenport=3389 listenaddress=0.0.0.0 connectport=3389 connectaddress=192.168.100.101
This rule will redirect all incoming RDP traffic (from local TCP port 3389) from this computer to a remote host with an IP address 192.168.1.100.
Managing Port Forwarding Rules in Windows
netsh advfirewall firewall add rule name=”forwarded_RDPport_3340” protocol=TCP dir=in localip=10.1.1.110 localport=3340 action=allow
Or using the New-NetFirewallRule PowerShell cmdlet:
New-NetFirewallRule -DisplayName «forwarder_RDP_3340» -Direction Inbound -Protocol TCP –LocalPort 3340 -Action Allow
When creating an incoming firewall rule for port 3340 via Windows Defender Firewall graphical interface, no program needs to be associated with it. This port is only listened by the network driver.
You can create any number of Windows port forwarding rules. All netsh interface portproxy rules are persistent and are stored in the system after a Windows restart.
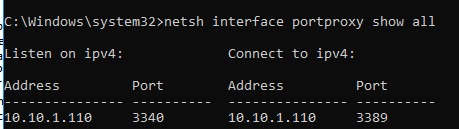
To display a list of all active TCP port forwarding rules on Windows, run the command:
netsh interface portproxy show all
In our case there is only one forwarding rule from local port 3340 to 3389:
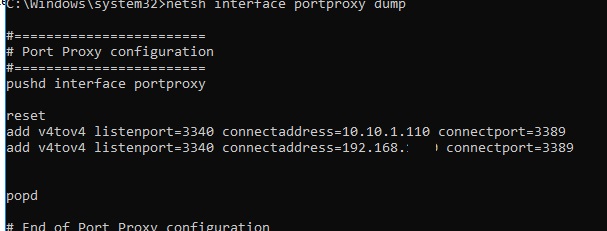
netsh interface portproxy dump
To remove a specific port forwarding rule:
netsh interface portproxy delete v4tov4 listenport=3340 listenaddress=10.1.1.110
To remove all existing mapping rules and completely clear the port forwarding rules table:
netsh interface portproxy reset
You can use Windows Server with the RRAS and NAT role installed to configure port forwarding for UDP traffic. You can configure port forwarding between server interfaces using the graphical snap-in ( rrasmgmt.msc ) or with the command:
netsh routing ip nat add portmapping Ethernet1 udp 0.0.0.0 53 192.168.100.100 53
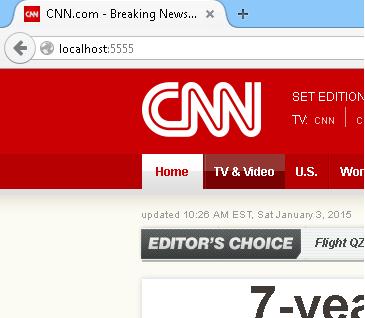
Another portproxy feature is an opportunity to make it look like any remote network service is running locally.
For example, let’s redirect the connection from the local port 5555 to a remote HTTP server with IP address 157.166.226.25 (CNN website):
netsh interface portproxy add v4tov4 listenport=5555 connectport=80 connectaddress= 157.166.226.25 protocol=tcp
Now if you go to http://localhost:5555/ in your browser, the CNN Start page will open. So despite the browser is accessing the local computer, it opens a page from an external web server.
Port forwarding rules can also be used to forward a port from the external IP address of a physical NIC to a port of a virtual machine running on the same host. In Hyper-V, you can configure port forwarding on a Virtual Switch level (see below).
Windows cannot forward a range of TCP ports. If you need to forward multiple ports, you will have to manually create multiple portproxy forwarding rules. The easiest way is to generate a list of netsh interface portproxy add commands with different port numbers in notepad and then paste them into the command prompt for execution.
Port Forwarding in Hyper-V Server
When using the Hyper-V role on your computer (it can be installed on both Windows 10 and Windows Server, or as a free Hyper-V Server), you can configure DNAT port forwarding rules using PowerShell. Suppose you want to redirect all https traffic that your Hyper-V host receives to the IP address of the virtual machine running on the host. To do this, use the Hyper-V StaticMapping commands.
First you need to create a Virtual Switch with NAT:
New-VMSwitch -Name «HTTPS-NAT» -SwitchType NAT -NATSubnetAddress 192.168.100.0/24
Then you need to connect the necessary VM to the specified vswitch and enable the address translation rule for all virtual machines connected through this Hyper-V virtual switch:
New-NetNat -Name HTTPS-NAT -InternalIPInterfaceAddressPrefix 192.168.100.0/24
Add-NetNatStaticMapping -ExternalIPAddress «0.0.0.0/24» -ExternalPort 443 -Protocol TCP -InternalIPAddress «192.168.100.77» -InternalPort 443 -NatName HTTPS-NAT
After executing these PowerShell commands, all HTTPS traffic that comes to port 443 of the Hyper-V host will be forwarded to the private IP address of the virtual machine.
How to Forward Ports on Your Router
Some games and programs only work if you open a specific port
:max_bytes(150000):strip_icc()/tim-fisher-5820c8345f9b581c0b5a63cf.jpg)
:max_bytes(150000):strip_icc()/ryanperiansquare-de5f69cde760457facb17deac949263e-180a645bf10845498a859fbbcda36d46.jpg)
Specific ports must be open on your router for some video games and programs to work properly. Although the router has some ports open by default, most are closed and only usable if you manually open these ports. When your online video games, file server, or other networking programs don’t work, access the router and open the specific ports that the application needs.
:max_bytes(150000):strip_icc()/how-to-port-forward-4163829-2b9af562716d480b99375518ff5c5c6a.png)
How Do You Set Up Port Forwarding?
The traffic that passes through your router does so through ports. Every port is like a special pipe made for a specific kind of traffic. When you open a port on a router, it allows a particular data type to move through the router.
The act of opening a port, and choosing a device on the network to forward those requests to, is called port forwarding. Port forwarding is like attaching a pipe from the router to the device that needs to use the port—there’s a direct line-of-sight between the two that allows data flow.
For example, FTP servers listen for incoming connections on port 21. If you have an FTP server set up that nobody outside your network can connect to, open port 21 on the router and forward it to the computer you use as the server. When you do this, that new, dedicated pipe moves files from the server, through the router, and out of the network to the FTP client that’s communicating with it.
:max_bytes(150000):strip_icc()/open-port-21-router-5beb897b46e0fb0026a1d3c4.png)
The same is true for other scenarios like video games that need the internet to communicate with other players, torrent clients that require specific ports to be open for uploading files, and instant messaging applications that only send and receive messages through a specific port.
Every networking application needs a port to run on, so if a program or application isn’t working when everything else is set up correctly, open the port on the router and forward requests to the right device (for example, a computer, printer, or game console).
Port range forwarding is similar to port forwarding but is used to forward an entire range of ports. A certain video game might use ports 3478 through 3480, for example, so instead of typing all three into the router as separate port forwards, forward that whole range to the computer running that game.
Below are two primary steps you need to complete to forward ports on a router. Because every device is different, and because there are many router variations, these steps are not specific to any device. If you need additional help, refer to the user manual for the device, for example, the user guide for your router.
Give the Device a Static IP Address
The device that will benefit from the port forward needs to have a static IP address. This way, you don’t have to change the port forwarding settings each time it obtains a new IP address.
For example, if your computer runs torrenting software, assign a static IP address to that computer. If your gaming console uses a specific range of ports, it needs a static IP address.
There are two ways to do this: from the router and from the computer. When you set up a static IP address for your computer, it’s easier to do it there.
Use Your Computer to Set Up a Static IP Address
To set up a Windows computer to use a static IP address, first identify which IP address it’s using currently.
:max_bytes(150000):strip_icc()/Capture-e8d700d8ccbe4cd8a175ecfcfdf6201d.JPG)
Type this command, then press Enter:
:max_bytes(150000):strip_icc()/001-how-to-port-forward-4163829-9343323ab4aa477dbe829005fdd1956f.jpg)
Record the following: IPv4 Address, Subnet Mask, Default Gateway, and DNS Servers.
:max_bytes(150000):strip_icc()/002-how-to-port-forward-4163829-88752bf8e84a4d5c8afdee034c927e9e.jpg)
If you see more than one IPv4 Address entry, look for the one under a heading like Ethernet adapter Local Area Connection, Ethernet adapter Ethernet, or Ethernet LAN adapter Wi-Fi. Ignore anything else, like Bluetooth, VMware, VirtualBox, and other non-default entries.
Now, you can use that information to set up the static IP address.
Open the Run dialog box (press WIN+R), enter ncpa.cpl, and select OK to open Network Connections.
:max_bytes(150000):strip_icc()/Capture-8e3e1b07019643a88b6279928d19ecaa.JPG)
Right-click or tap-and-hold the connection that has the same name as the one you identified in Command Prompt. For example, Ethernet0.
Select Properties from the menu.
:max_bytes(150000):strip_icc()/003-how-to-port-forward-4163829-85dc2ab8a1d141fb843f3cde9ea83174.jpg)
Choose Internet Protocol Version 4 (TCP/IPv4) from the list, then select Properties.
:max_bytes(150000):strip_icc()/004-how-to-port-forward-4163829-d3cd57e15a58444887a73117d03cd576.jpg)
Select Use the following IP address.
:max_bytes(150000):strip_icc()/005-how-to-port-forward-4163829-76322c8b82144fb78bd4677e72a50ece.jpg)
Enter the details you copied from Command Prompt: IP address, subnet mask, default gateway, and DNS servers.
:max_bytes(150000):strip_icc()/006-how-to-port-forward-4163829-4255aa89def442fc8037307f1ccc0ba8.jpg)
Choose OK when you’re done.
:max_bytes(150000):strip_icc()/007-how-to-port-forward-4163829-837ef2f8d29545d9903fb9ff9d45b931.jpg)
If you have several devices on your network that get IP addresses from DHCP, don’t reserve the same IP address you found in Command Prompt. For example, if DHCP is set up to serve addresses from a pool between 192.168.1.2 and 192.168.1.20, configure the IP address to use a static IP address that falls outside that range to avoid address conflicts. For example, use 192.168.1.21 or above. If you’re not sure what this means, add 10 or 20 to the last digit in your IP address and use that as the static IP in Windows.
You can also set up a Mac to use a static IP address, as well as Ubuntu and other Linux distributions.
Use Your Router to Set Up a Static IP Address
Another option is to use the router to set up a static IP address. Do this when a non-computer device needs an unchanging address (like a gaming console or a printer).
:max_bytes(150000):strip_icc()/Capture-12115eedaef64bee92f263999c4f5419.JPG)
Locate a Client List, DHCP Pool, DHCP Reservation, or similar section of the settings. The section lists the devices currently connected to the router. The IP address of the device is listed along with its name.
:max_bytes(150000):strip_icc()/Capture-6c209f9d375748539c86f894b16987c0.JPG)
Look for a way to reserve one of those IP addresses to tie it with that device so that the router always uses it when the device requests an IP address. You might need to select the IP address from a list or choose Add or Reserve.
The above steps are generic since static IP address assignment is different for each router, printer, and gaming device. Follow these links for instructions on reserving IP addresses for NETGEAR, Google, Linksys, Xbox One, PlayStation 4, and Canon printers..
To make your public IP address static so that you can access your devices from an outside network, pay for a static IP. A workaround involving setting up a dynamic DNS service is just as helpful.
Set Up Port Forwarding
Now that you know the device’s IP address and configured it to stop changing, access the router and set up the port forwarding settings.
Log in to the router as admin. You need to know the router’s IP address, username, and password.
:max_bytes(150000):strip_icc()/Capture-79d8cb8bafe143a389f580ef9c01ef58.JPG)
Locate the port forwarding options. These are different for every router but might be called something like Port Forwarding, Port Triggering, Applications & Gaming, or Port Range Forwarding. These might be buried within other categories of settings like Network, Wireless, or Advanced.
:max_bytes(150000):strip_icc()/008-how-to-port-forward-4163829-aa314eefd6f94453953cdf10d8855b68.jpg)
Type the port number or port range that you want to forward. If you’re forwarding one port, type the same number under both the Internal and External boxes. For port ranges, use the Start and End boxes.
Most games and programs indicate which ports must be open on the router. If you don’t know what numbers to type here, PortForward.com has a list of common ports.
:max_bytes(150000):strip_icc()/Capture-1b6046b346bc400496c04a5b994ca059.JPG)
Choose a protocol, either TCP or UDP. Choose both, if needed. This information should be available from the program or game that explains the port number.
:max_bytes(150000):strip_icc()/Capture-16e9e82e424c4800ac7c8bf69cee259e.JPG)
Type the static IP address you chose.
If asked, name the port trigger anything that makes sense to you. If it’s for an FTP program, call it FTP. Call it Medal of Honor if you need the port open for that game.
:max_bytes(150000):strip_icc()/Capture-abf2d40f36824b01b097ba58628e1d0f.JPG)
Enable the port forwarding rule with an Enable or On option.
Here’s an example of what it looks like to forward ports on a Linksys WRT610N:
:max_bytes(150000):strip_icc()/linksys-wrt610ng-port-forward-5ad9f9d5ff1b780037049dc1.PNG)
Some routers have a port forward setup wizard that makes it easier to configure. For example, the router might first give you a list of devices already using a static IP address and then let you choose the protocol and port number from there.
Here are some other port forwarding instructions that are more specific to these brands of routers: D-Link, NETGEAR, TP-Link, Belkin, Google, Linksys.
More on Open Ports
If forwarding a port on your router doesn’t allow the program or game to work on your computer, find out if a firewall program blocked the port. The same port needs to be open on the router and your computer for the application to use it.

To see if the Windows Firewall is blocking a port that you opened on the router, temporarily disable the firewall and then test the port again. If the port is closed on the firewall, edit some settings to open it.
When you open a port on the router, traffic can flow in and out of it. When you scan the network for open ports, you should see everything that’s open from the outside. There are websites and tools build specifically for this.
Here are some reasons why you would check for open ports:
- To avoid getting into the router to check.
- To make sure the port opened correctly when a program or game isn’t working.
- To make sure a port you closed is actually closed.
:max_bytes(150000):strip_icc()/open-port-check-tool-5ad9f878c67335003723ed3f.PNG)
Several places offer a free open port checker. PortChecker.co and NetworkAppers have online port checkers that scan a network from the outside. Advanced Port Scanner and FreePortScanner are useful for scanning other devices within your private network.
Only one port forward can exist for every instance of that port. For example, if you forward port 3389 (used by the Remote Desktop remote access program) to a computer with the IP address 192.168.1.115, that same router can’t also forward port 3389 to 192.168.1.120.
In cases like this, the only solution, if possible, is to change the port the program uses. This may be possible from the software settings or through a registry hack. In the RDP example, if you edit the Windows Registry on the 192.168.1.120 computer to force Remote Desktop to use a different port like 3390, you could set up a new port forward for that port and use Remote Desktop on two computers within the same network.


