- Как извлечь ISO файлы в Linux
- Что такое файл ISO?
- Зачем создавать ISO?
- Открытие файла ISO
- Извлечение ISO с помощью GNOME Archive Manager
- Не используете GNOME?
- Извлечение ISO с помощью командной строки
- Разве извлечение файла ISO действительно так просто?
- 3 Ways to Extract and Copy Files from ISO Image in Linux
- Mount or Extract ISO File in Linux
- Extract ISO Content Using 7zip Command
- Extract ISO Content Using isoinfo Command
- If You Appreciate What We Do Here On TecMint, You Should Consider:
- Как смонтировать файл образа ISO в Linux
- How to Mount ISO File on Linux
- В этом руководстве мы объясним, как монтировать файлы ISO в Linux.
- Как смонтировать файлы ISO с помощью командной строки
- Монтирование файлов ISO с помощью Gnome
- Вывод
- How to mount an ISO image/file under Linux
- How to Mount ISO File on Linux
- More about loop devices on Linux
- Procedure to mount ISO file/images under Linux
- How do I unmount the ISO image on Linux?
- How to mount an ISO file using a GUI app on Linux
- How to install furiusisomount app
- Mounting ISO Files using Linux Gnome or KDE GUI
- Conclusion
Как извлечь ISO файлы в Linux

Возможно, вы уже загружали файл изображения ранее, и есть большая вероятность, что он использовал популярное расширение ISO. Эти (обычно довольно большие) файлы представляют собой цифровые версии оптических дисков. Все файлы, содержащиеся на этом диске, находятся в архиве ISO.
Как Apple MacOS и более новые версии Microsoft Windows, Linux имеет встроенную поддержку для монтирования файлов образов. Это означает, что вам не обязательно нужно программное обеспечение сторонних производителей для доступа к архивам ISO и файлам внутри.
На самом деле есть несколько способов сделать это, поэтому вы можете выбрать метод, который вам подходит.
Что такое файл ISO?
Формат файла изображения был популярным способом распространения программного обеспечения в Интернете, поскольку широкополосные скорости позволили нам сделать это. Если вы уже установили дистрибутив Linux, скорее всего, вы сделали это, используя файл ISO. Если вы не установили версию Linux, поиск ISO-файла для загрузки, вероятно, станет вашим первым шагом.
Формат файла ISO представляет собой цифровой архив содержимого диска на оптическом носителе. Вы можете создать ISO-образ из любого оптического носителя, например, CD, DVD и Blu-ray.
Есть одно заметное исключение. Вы не можете использовать формат файла ISO для создания образа аудио CD, так как они не используют компьютерную файловую систему. В этих случаях рассмотрите комбинации изображений BIN / CUE.
Файлы ISO используют файловую систему ISO 9660. Для этих изображений также возможно использование файловой системы UDF (универсальный формат диска) в некоторых случаях. Данные в архиве распакованы.
Зачем создавать ISO?
Образы ISO позволяют вам записать свой собственный установочный диск Linux для использования на вашем компьютере или передать кому-то еще. Поскольку Linux является бесплатным программным обеспечением с открытым исходным кодом, никто не угрожает подать в суд на вас за распространение программного обеспечения.
В наши дни многие ISO-образы слишком велики для CD. Несмотря на то, что вы можете выбрать DVD, часто в инструкциях рекомендуется использовать флэш-накопитель USB. Плюс есть много вариантов использования живого CD или USB-накопителя. помимо установки Linux.
Файлы ISO не используются исключительно для Linux. Этот формат является хорошим способом создания точных резервных копий оптических дисков или распространения других типов больших программ.
Открытие файла ISO
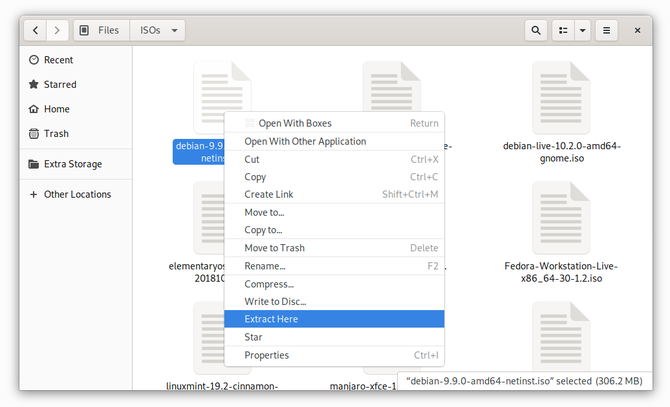
Откровенно говоря, эта работа может быть намного проще, чем вы думаете. Многие дистрибутивы поставляются с возможностью извлечения ISO-образов через меню правой кнопки мыши. Найдите свой ISO-образ в файловом менеджере, щелкните правой кнопкой мыши и найдите опцию Извлечь здесь. Вы можете быть просто приятно удивлены!
Если это не так, существуют приложения для чтения ISO, которые либо предустановлены, либо в выбранном вами магазине приложений вашего дистрибутива.
Извлечение ISO с помощью GNOME Archive Manager
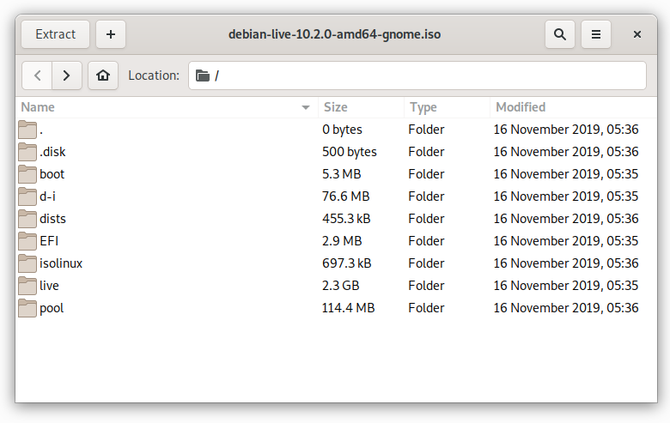
Если вы не хотите извлекать все файлы одновременно, вам не нужно. Вместо этого откройте любую программу, которую использует ваш дистрибутив Linux для управления сжатыми архивами, например, в форматах ZIP и TAR. Менеджер архивов GNOME (также известный как File Roller) используется по умолчанию во многих дистрибутивах, включая Ubuntu и Fedora, поэтому мы будем использовать это в качестве нашего примера.
Сначала выберите Меню > Открыть и перейдите к ISO, который вы хотите открыть (кнопка с тремя горизонтальными линиями является кнопкой Меню ). Файлы и папки, содержащиеся внутри, теперь должны появиться, как если бы вы открывали ZIP-архив. Теперь вы можете перейти к выбору битов, которые вы хотите извлечь и куда на вашем компьютере вы хотите эти файлы.
Не используете GNOME?
Нет проблем. Открытие ISO-файлов является стандартной частью многих приложений для управления архивами Linux. Например, в KDE Plasma вы можете открывать файлы ISO с помощью инструмента архивации Ark. Engrampa — это менеджер архивов, созданный для рабочей среды MATE, который также может открывать файлы ISO.
Если вам нужен подход, который работает независимо от того, какой дистрибутив или окружение рабочего стола вы предпочитаете, и на компьютерах без графического интерфейса, то вы можете вместо этого использовать метод командной строки.
Извлечение ISO с помощью командной строки
Сначала вам нужно будет создать папку для монтирования образа. Для этого откройте редактор командной строки и введите:
Введите ваш пароль, когда спросят. Теперь мы можем смонтировать файл, набрав:
Замените на местоположение вашего файла ISO. Например:
Теперь вы можете перейти к папке, которую вы создали, и получить доступ к файлам в ISO. На этом этапе вы можете закрыть терминал. Вы можете использовать свой файловый менеджер, чтобы просмотреть ISO и выбрать, какие файлы вы хотите.
Но если вы хотите извлечь весь ISO через командную строку, вы можете скопировать содержимое папки, набрав:
Эта команда скопирует весь лот в отдельную папку «iso» в папке «Документы». Параметр -r указывает операции рекурсивного копирования, то есть вы хотите также скопировать содержимое папки, а не только саму папку.
Примечание . Если предыдущая команда не смогла смонтировать ваш ISO, вы можете попробовать:
Разве извлечение файла ISO действительно так просто?
Да, процесс действительно так прост. Чаще всего нет необходимости загружать дополнительное программное обеспечение.
Но если вы хотите полноценное приложение, посвященное этой единственной работе, посмотрите AcetoneISO. Это бесплатная альтернатива DAEMON Tools с открытым исходным кодом, приложение для управления ISO, доступное для Windows и macOS. Может показаться знакомым, если вы уже привыкли к такому способу выполнения работы или хотите получить дополнительный набор функций.
Или, если вы действительно хотите испачкать руки, вы можете попробовать объединить несколько файлов ISO вместе, используя скрипт.
Источник
3 Ways to Extract and Copy Files from ISO Image in Linux
Let’s say you have a large ISO file on your Linux server and you wanted to access, extract or copy one single file from it. How do you do it? Well in Linux there are couple ways do it.
For example, you can use standard mount command to mount an ISO image in read-only mode using the loop device and then copy the files to another directory.
Mount or Extract ISO File in Linux
To do so, you must have an ISO file (I used ubuntu-16.10-server-amd64.iso ISO image) and mount point directory to mount or extract ISO files.
First create an mount point directory, where you will going to mount the image as shown:
Once directory has been created, you can easily mount ubuntu-16.10-server-amd64.iso file and verify its content by running following command.
![]() Mount ISO File in Linux
Mount ISO File in Linux
Now you can go inside the mounted directory (/mnt/iso) and access the files or copy the files to /tmp directory using cp command.
![]() Copy Files From ISO File in Linux
Copy Files From ISO File in Linux
Note: The -r option used to copy directories recursively, if you want you can also monitor progress of copy command.
Extract ISO Content Using 7zip Command
If you don’t want to mount ISO file, you can simply install 7zip, is an open source archive program used to pack or unpack different number of formats including TAR, XZ, GZIP, ZIP, BZIP2, etc..
Once 7zip program has been installed, you can use 7z command to extract ISO file contents.
![]() 7zip – Extract ISO File Content in Linux
7zip – Extract ISO File Content in Linux
Note: As compared to Linux mount command, 7zip seems much faster and smart enough to pack or unpack any archive formats.
Extract ISO Content Using isoinfo Command
The isoinfo command is used for directory listings of iso9660 images, but you can also use this program to extract files.
As I said isoinfo program perform directory listing, so first list the content of ISO file.
![]() List ISO Content in Linux
List ISO Content in Linux
Now you can extract a single file from an ISO image like so:
Note: The redirection is needed as -x option extracts to stdout.
![]() Extract Single File from ISO in Linux
Extract Single File from ISO in Linux
Well, there are many ways to do, if you know any useful command or program to extract or copy files from ISO file do share us via comment section.
If You Appreciate What We Do Here On TecMint, You Should Consider:
TecMint is the fastest growing and most trusted community site for any kind of Linux Articles, Guides and Books on the web. Millions of people visit TecMint! to search or browse the thousands of published articles available FREELY to all.
If you like what you are reading, please consider buying us a coffee ( or 2 ) as a token of appreciation.

We are thankful for your never ending support.
Источник
Как смонтировать файл образа ISO в Linux
How to Mount ISO File on Linux
В этом руководстве мы объясним, как монтировать файлы ISO в Linux.
Файл ISO — это архивный файл, который обычно содержит полный образ CD или DVD. Например, большинство операционных систем, таких как Windows, Linux и macOS, распространяются как образы ISO.
Файлы ISO могут быть извлечены с использованием популярных архивных программ, смонтированы на петлевом устройстве и записаны на флэш-накопитель USB или чистый компакт-диск.
Как смонтировать файлы ISO с помощью командной строки
Команда mount позволяет прикреплять (монтировать) файлы ISO в определенной точке монтирования в дереве каталогов.
Инструкции в этом разделе должны работать с любым дистрибутивом Linux, включая Ubuntu, Debian и CentOS.
Начните с создания точки монтирования, это может быть любое место, которое вы хотите:
Смонтируйте файл ISO в точку монтирования, введя следующую mount команду:
Здесь важен -o loop вариант. Он сообщает команде для сопоставления устройства цикла с указанным файлом ISO и монтирует это устройство в указанной точке монтирования.
Не забудьте заменить /path/to/image.iso путь к файлу ISO.
Чтобы просмотреть содержимое ISO-образа, используйте ls команду:
Вы также можете открыть файловый менеджер для просмотра содержимого ISO.
Размонтируйте файл ISO с помощью umount команды, за которой следует каталог, куда был смонтирован образ:
Если файловая система используется, umount команда не сможет отсоединить файловую систему.
Монтирование файлов ISO с помощью Gnome
Если вы используете дистрибутив Linux, в котором в качестве среды рабочего стола используется Gnome, вы можете смонтировать файл ISO, используя приложение монтирования образа диска Gnome.
Найдите файл ISO, который вы хотите смонтировать, и щелкните по нему правой кнопкой мыши. В контекстном меню выберите опцию «Открыть с помощью образа диска».

После того, как образ смонтирован, на рабочем столе должен появиться значок устройства. Дважды щелкните по нему, и откроется файловый менеджер Gnome.
Чтобы демонтировать файл ISO, щелкните правой кнопкой мыши значок устройства и выберите «демонтировать».
Вывод
В Linux вы можете монтировать файлы ISO с помощью mount команды. Пользователи настольных компьютеров могут использовать графические инструменты, такие как Gnome Disk Image Mounter.
Источник
How to mount an ISO image/file under Linux
H ow do you mount ISO file on Linux using the CLI and GUI app? First, try to understand an ISO image. It is an archive file (disk image) of an optical disc using a conventional ISO (International Organization for Standardization) format. ISO image files typically have a file extension of .ISO. The name “ISO” comes from the ISO 9660 file system used with CD-ROM or DVD media, but an ISO image can also contain UDF file system because UDF is backward-compatible to ISO 9660. You can mount an ISO file or images via the loop device under Linux. It is possible to specify transfer functions (for encryption/decryption or other purposes) using loop device. This page explains how to mount ISO files on Linux.
How to Mount ISO File on Linux
- Create the mount point directory on Linux: sudo mkdir /mnt/iso
- Mount the ISO file on Linux: sudo mount -o loop /path/to/my-iso-image.iso /mnt/iso
- Verify it, run: mount OR df -H OR ls -l /mnt/iso/
- Unmount the ISO file using: sudo umount /mnt/iso/
More about loop devices on Linux
The loop device is a block device that maps its data blocks not to a physical device such as a hard disk or optical disk drive, but to the blocks of a regular file in a filesystem or to another block device. This can be useful for example to provide a block device for a filesystem image stored in a file, so that it can be mounted with the mount command.
A loop device is a pseudo-device that makes a file accessible as a block device. Loop devices are often used for CD ISO images and floppy disc images. Mounting a file containing a filesystem via such a loop mount makes the files within that filesystem accessible. They appear in the mount point directory using following Linux commands. So, how do you mount an ISO image file under Linux? You need to use the mount commandas follows:
Let us see all commands and examples in details.
Procedure to mount ISO file/images under Linux
First, you must login as a root user, if not root user then switch to root user using the su command:
$ su —
One can use the sudo command:
$ sudo -i
Next, create the directory i.e. mount point using the mkdir command, run:
# mkdir -p /mnt/disk
Finally, use the mount command as follows to mount iso file called disk1.iso:
# mount -o loop disk1.iso /mnt/disk
OR
# mount -o loop /path/to/disk1.iso /mnt/disk
Verify it with the df command or mount command:
# df -H
# mount
# ls -l /mnt/disk/
Change directory to list files stored inside an ISO image:
# cd /mnt/disk/
# ls -l
To copy files using the cp command:
$ cp file1 file2 /home/vivek/Downloads
Mounting ISO files on Linux using mount command
How do I unmount the ISO image on Linux?
Use the following command to unmount the ISO file/image on Linux:
$ sudo umount /mnt/disk/
OR
$ sudo umount /path/to/disk1.iso
Verify it:
$ df -H
$ mount
$ ls -l /mnt/disk/
How to mount an ISO file using a GUI app on Linux
Not a fan of the CLI? Try image management utility called furiusisomount:
Furius ISO Mount is a simple application for mounting ISO, IMG, BIN, MDF and NG image files even without burning them to disk. It provides the following features:
1. Automatically Mounts ISO, IMG, BIN, MDF and NRG image files.
2. Creates a mount point in your home directory.
3. Unmounts the Image files and mnd more.
How to install furiusisomount app
Type the following apt-get command/apt command on a Debian/Ubuntu/Mint Linux:
$ sudo apt install furiusisomount
Start furiusisomount:
$ furiusisomount &
Sample outputs:
Mount an ISO file on Linux using Furius ISO Mount GUI app
Just select an ISO image an click on the mount button. Open your file browser:
- No ads and tracking
- In-depth guides for developers and sysadmins at Opensourceflare✨
- Join my Patreon to support independent content creators and start reading latest guides:
- How to set up Redis sentinel cluster on Ubuntu or Debian Linux
- How To Set Up SSH Keys With YubiKey as two-factor authentication (U2F/FIDO2)
- How to set up Mariadb Galera cluster on Ubuntu or Debian Linux
- A podman tutorial for beginners – part I (run Linux containers without Docker and in daemonless mode)
- How to protect Linux against rogue USB devices using USBGuard
Join Patreon ➔
View mounted iso image in Ubuntu Linux file manager
Mounting ISO Files using Linux Gnome or KDE GUI
Conclusion
You learned how to use the mount, unmount command and GUI apps for mounting the ISO9660 images or files. For more information see:
| Category | List of Unix and Linux commands |
|---|---|
| Documentation | help • mandb • man • pinfo |
| Disk space analyzers | df • duf • ncdu • pydf |
| File Management | cat • cp • less • mkdir • more • tree |
| Firewall | Alpine Awall • CentOS 8 • OpenSUSE • RHEL 8 • Ubuntu 16.04 • Ubuntu 18.04 • Ubuntu 20.04 |
| Linux Desktop Apps | Skype • Spotify • VLC 3 |
| Modern utilities | bat • exa |
| Network Utilities | NetHogs • dig • host • ip • nmap |
| OpenVPN | CentOS 7 • CentOS 8 • Debian 10 • Debian 8/9 • Ubuntu 18.04 • Ubuntu 20.04 |
| Package Manager | apk • apt |
| Processes Management | bg • chroot • cron • disown • fg • glances • gtop • jobs • killall • kill • pidof • pstree • pwdx • time • vtop |
| Searching | ag • grep • whereis • which |
| Shell builtins | compgen • echo • printf |
| Text processing | cut • rev |
| User Information | groups • id • lastcomm • last • lid/libuser-lid • logname • members • users • whoami • who • w |
| WireGuard VPN | Alpine • CentOS 8 • Debian 10 • Firewall • Ubuntu 20.04 |
Comments on this entry are closed.
Cheers, worked like a charm 🙂
Quick comment:
You need the kernel module loop for it; people that get the error about it in mount should get the latest copy of the linux source and proceed to compile the correct module which is under block devices
Other than that it works 😉
Just what i needed, mahalo!
Thanks! This was very very easy to find and follow. I’m new to linux and this is the reason I made the swicth, the help that everyone give make learning linux easy and fun. Thank you for your time, thank you!
sweet! worked cleanly, no stupid paid software for windows needed to do such a simple task!
Looks like we cant mount it for RW. Bloody well then.
You’d have to finalize the RW disc so that it becomes an iso image. You can still erase the disc later.
I think he means mounting the iso file for reading and writing.
This tip was a great help! I only need to read the iso for installations so thanks a heap!
richard, to edit bootable ISO mount it as it’s described here, copy it’s contents to some directory, edit files you need and generate new ISO by command:
sudo mkisofs -o /tmp/new.iso -b isolinux/isolinux.bin -c isolinux/boot.cat -no-emul-boot -boot-load-size 4 -boot-info-table -J -R -V “new iso name” .
Works like a charm. It kept me from Burning a DVD for a computer that didn’t read DVDs. I did a Net Install of Linux over FTP. I copied the File to a Linux FTP Server, mounted the ISO and did an install. Sweet.
But what if I don’t have root? Or am too lazy to su or sudo?
Источник


