What is kali linux forensic mode
Kali Linux “Live” provides a “forensic mode”, a feature first introduced in BackTrack Linux. The “Forensic mode live boot” option has proven to be very popular for several reasons:
- Kali Linux is widely and easily available, many potential users already have Kali ISOs or bootable USB drives.
- When a forensic need comes up, Kali Linux “Live” makes it quick and easy to put Kali Linux on the job.
- Kali Linux comes pre-loaded with the most popular open source forensic software, a handy toolkit when you need to do forensic work.
When booted into the forensic boot mode, there are a few very important changes to the regular operation of the system:
First, the internal hard disk is never touched. If there is a swap partition it will not be used and no internal disk will be auto mounted. We verified this by first taking a standard system and removing the hard drive. A hash was taken of the drive using a commercial forensic package. We then reattached the drive to the computer and booted Kali Linux “Live” in forensic mode. After using Kali for a period of time, we then shut the system down, removed the hard drive, and took the hash again. These hashes matched, indicating that at no point was anything changed on the drive in any way.
The other, equally important, change is that auto-mounting of removable media is disabled. USB thumb drives, CDs, and the like will not be auto-mounted when inserted. The idea behind this is simple: in forensic mode, nothing should happen to any media without direct user action. Anything that you do as a user is on you.
If you plan on using Kali for real world forensics of any type, we recommend that you don’t just take our word for any of this. All forensic tools should always be validated to ensure that you know how they will behave in any circumstance in which you are going to be using them. Finally, while Kali continues to focus on providing the best collection of open source penetration testing tools available, it is always possible that we may have missed your favorite open source forensic tool. If so, let us know! We are always on the lookout of high quality open source tools that we can add to Kali to make it even better.
Updated on: 2021-Sep-27
Author: g0tmi1k
Источник
Статья Kali Linux. Forensic Tools
Приветствую всех пользователей и гостей Сodeby)
Специально пропустил слово форум в приветствии, ибо Codeby это уже давно больше чем просто форум, у нас есть уже мобильный клиент на андроид, на подходе МК для iOS, и скоро выйдет свой дистрибутив для пентеста, а самое главное дружное сообщество людей которым интересна тема ИБ, это я все к тому что хватит наверное тролить друг друга (камень в этот огород ) и выяснять какая операционная система лучше (камень в этот огород ), везде есть свои плюсы и минусы.
Ребята, давайте жить дружно)))

Дело было вечером, делать было нечего, и вот что из этого получилось)))
Пока CodebyOS готовится, пишем про Kali
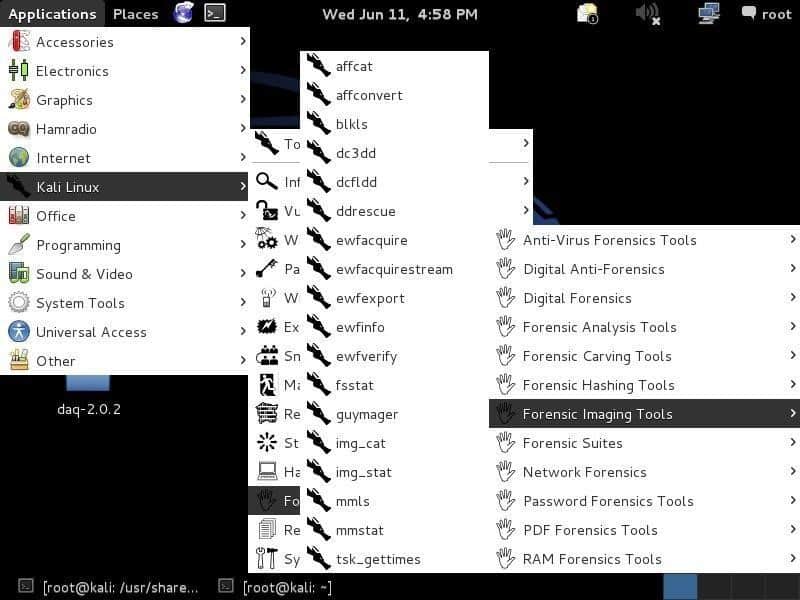
Во многих случаях Kali Linux считается одним из самых популярных дистрибутивов в области безопасности. Kali содержит множество программ, которые могут использоваться для ведения целого ряда операций на основе безопасности. Один из разделов инструментария является вкладка Forensic, этот раздел содержит набор инструментов, которые сделаны с явной целью проведения цифровой криминалистики.
Форензика становится все более важной в нынешнее время, когда многие преступления совершаются с использованием цифровых технологий, и понимание цифровой криминалистики будет ни для кого не лишним
Эта статья, обзор нескольких програм для криминалистики, которыми обладает Kali Linux. Итак, давайте начнем:
Autopsy
Этим инструментом пользуются военные и правоохранительные органы когда приходит время для проведения криминалистической экспертизы. Этот пакет, вероятно, является одним из самых надежных, доступных, с открытым исходным кодом, он сочетает в себе функции многих других небольших пакетов, здесь они все сфокусированы в одном аккуратном приложении с пользовательским интерфейсом на основе веб-браузера.
Autopsy используется для исследования образов дисков. Когда вы нажимаете на ярлык в меню он запускает службу, и ее пользовательский интерфейс становится доступен в веб-браузере по адресу https://Localhost:9999/autopsy . Программа предоставляет пользователю полный набор параметров, необходимых для создания нового файла дела: имя случая, описание, имя следователя, имя хоста, часовой пояс и т. Д.
Надежность — вот что делает Autopsy таким отличным инструментом.
Binwalk
Этот инструмент используется при работе с бинарными образами, он имеет возможность находить встроенный файл и исполняемый код, исследуя файл образа. Это очень мощный инструмент для тех, кто знает, что они делают, его можно использовать для поиска конфиденциальной информации которая может быть использована для обнаружения взлома.
Утилита написана на python и использует библиотеку libmagic, что делает его годным к использованию с magic-сигнатурами. Работает с сжатыми или заархивированные файлами, заголовками, файловыми системами, ядром Linux и т.д. Для облегчения работы в нем имеется файл подписей, который содержит наиболее часто встречающиеся подписи.
Bulk Extractor
Это очень интересный инструмент, когда специалист пытается извлечь данные из файла, этот инструмент может вырезать адреса электронной почты, URL-адреса, номера платежных карт и т.д. Утилита работает с каталогами, файлами и образами диска. Данные могут быть частично повреждены или сжаты, Bulk Extractor все равно найдет.
Инструмент содержит функции, которые помогают создавать шаблон поиска данных, которые находятся неоднократно, например, URL-адреса, идентификаторы электронной почты и т.д. Есть функция, с помощью которой он создает список слов из найденных данных, это может помочь взломать пароли зашифрованных файлов.
Chkrootkit
Данная утилита используется в основном с live режима ОС, она выполняет локальную проверку хоста на наличие руткитов.
Состоит из модулей, где каждый предназначен для разных методов проверки. Сhkrootkit по умолчанию проводит полную проверку всеми модулями.
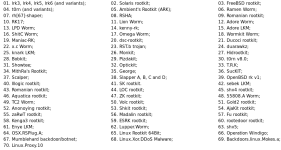
Руткиты определяемые программой
Foremost
Есть удаленные файлы, которые могут помочь в решении инцидентa? Нет проблем, Foremost — это простой в использовании пакет с открытым исходным кодом, который может достать данные из отформатированных дисков. Само имя файла не может быть восстановлено, но данные могут быть вырезаны.
Galleta.
Про эту утилиту много не скажешь, анализ куки файлов IE
Hashdeep
По названию понятно что эта программа предназначена для работы с хешами, а именно с вычислением. Может выполнить поиск файлов по известным хешам, или отображать файлы не совпадающие с задаными хешами. Одной из сильных сторон является выполнение рекурсивных хеш-вычислений с использованием множества алгоритмов, которые являются неотъемлемой частью времени.
Volafox
Это инструмент анализа памяти, который был написан на Python, он ориентирован на криптографию памяти для MAC OS X. Он работает с инфраструктурой Intel x86 и IA-32e. Если вы пытаетесь найти вредоносное ПО или любую другую вредоносную программу, которая была или находится в системной памяти, эта утилита подойдет.
Volatility
Это отличнейший инструмент, про него есть отдельная тема на нашем форуме))
Всем спасибо за прочтение и хорошего настроения)))
n01n02h

Приветствую всех пользователей и гостей Сodeby)
Специально пропустил слово форум в приветствии, ибо Codeby это уже давно больше чем просто форум, у нас есть уже мобильный клиент на андроид, на подходе МК для iOS, и скоро выйдет свой дистрибутив для пентеста, а самое главное дружное сообщество людей которым интересна тема ИБ, это я все к тому что хватит наверное тролить друг друга (камень в этот огород ) и выяснять какая операционная система лучше (камень в этот огород ), везде есть свои плюсы и минусы.
Ребята, давайте жить дружно))) Посмотреть вложение 17333
Дело было вечером, делать было нечего, и вот что из этого получилось)))
Пока CodebyOS готовится, пишем про Kali
Во многих случаях Kali Linux считается одним из самых популярных дистрибутивов в области безопасности. Kali содержит множество программ, которые могут использоваться для ведения целого ряда операций на основе безопасности. Один из разделов инструментария является вкладка Forensic, этот раздел содержит набор инструментов, которые сделаны с явной целью проведения цифровой криминалистики.
Форензика становится все более важной в нынешнее время, когда многие преступления совершаются с использованием цифровых технологий, и понимание цифровой криминалистики будет ни для кого не лишним
Эта статья, обзор нескольких програм для криминалистики, которыми обладает Kali Linux. Итак, давайте начнем:
Autopsy
Этим инструментом пользуются военные и правоохранительные органы когда приходит время для проведения криминалистической экспертизы. Этот пакет, вероятно, является одним из самых надежных, доступных, с открытым исходным кодом, он сочетает в себе функции многих других небольших пакетов, здесь они все сфокусированы в одном аккуратном приложении с пользовательским интерфейсом на основе веб-браузера.
Autopsy используется для исследования образов дисков. Когда вы нажимаете на ярлык в меню он запускает службу, и ее пользовательский интерфейс становится доступен в веб-браузере по адресу https://Localhost:9999/autopsy . Программа предоставляет пользователю полный набор параметров, необходимых для создания нового файла дела: имя случая, описание, имя следователя, имя хоста, часовой пояс и т. Д.
Посмотреть вложение 17334
Функциональность включает в себя: анализ временной шкалы, поиск по ключевым словам, веб-артефакты, фильтрацию хэшей, мультимедиа, индикаторы компромитации и еще множество возможностей. Программа принимает образы дисков в форматах RAW или E01 и генерирует отчеты в формате HTML, XLS, Body, в зависимости от того, что требуется для конкретного случая.
Посмотреть вложение 17335
Надежность — вот что делает Autopsy таким отличным инструментом.
Binwalk
Этот инструмент используется при работе с бинарными образами, он имеет возможность находить встроенный файл и исполняемый код, исследуя файл образа. Это очень мощный инструмент для тех, кто знает, что они делают, его можно использовать для поиска конфиденциальной информации которая может быть использована для обнаружения взлома.
Утилита написана на python и использует библиотеку libmagic, что делает его годным к использованию с magic-сигнатурами. Работает с сжатыми или заархивированные файлами, заголовками, файловыми системами, ядром Linux и т.д. Для облегчения работы в нем имеется файл подписей, который содержит наиболее часто встречающиеся подписи.
Посмотреть вложение 17336
Bulk Extractor
Это очень интересный инструмент, когда специалист пытается извлечь данные из файла, этот инструмент может вырезать адреса электронной почты, URL-адреса, номера платежных карт и т.д. Утилита работает с каталогами, файлами и образами диска. Данные могут быть частично повреждены или сжаты, Bulk Extractor все равно найдет.
Инструмент содержит функции, которые помогают создавать шаблон поиска данных, которые находятся неоднократно, например, URL-адреса, идентификаторы электронной почты и т.д. Есть функция, с помощью которой он создает список слов из найденных данных, это может помочь взломать пароли зашифрованных файлов.
Chkrootkit
Данная утилита используется в основном с live режима ОС, она выполняет локальную проверку хоста на наличие руткитов.
Состоит из модулей, где каждый предназначен для разных методов проверки. Сhkrootkit по умолчанию проводит полную проверку всеми модулями.
Руткиты определяемые программой
Посмотреть вложение 17337
Foremost
Есть удаленные файлы, которые могут помочь в решении инцидентa? Нет проблем, Foremost — это простой в использовании пакет с открытым исходным кодом, который может достать данные из отформатированных дисков. Само имя файла не может быть восстановлено, но данные могут быть вырезаны.
Galleta.
Про эту утилиту много не скажешь, анализ куки файлов IE
Hashdeep
По названию понятно что эта программа предназначена для работы с хешами, а именно с вычислением. Может выполнить поиск файлов по известным хешам, или отображать файлы не совпадающие с задаными хешами. Одной из сильных сторон является выполнение рекурсивных хеш-вычислений с использованием множества алгоритмов, которые являются неотъемлемой частью времени.
Volafox
Это инструмент анализа памяти, который был написан на Python, он ориентирован на криптографию памяти для MAC OS X. Он работает с инфраструктурой Intel x86 и IA-32e. Если вы пытаетесь найти вредоносное ПО или любую другую вредоносную программу, которая была или находится в системной памяти, эта утилита подойдет.
Volatility
Это отличнейший инструмент, про него есть отдельная тема на нашем форуме))
Всем спасибо за прочтение и хорошего настроения)))
Источник
How to Use Kali Linux Forensics Mode
Kali Linux ‘Live’ provides a Forensic mode where you can just plug in a USB containing a Kali ISO. Whenever a forensic need arises you are able to do what you need without installing anything extra using the Kali Linux Live (Forensic Mode). Booting into Kali (Forensic mode) does not mount system hard drives, hence the operations you perform on the system do not leave any trace.
How to Use Kali’s Live (Forensic Mode)
To use “Kali’s Live (Forensic Mode),” you will need a USB drive containing Kali Linux ISO. To make one, you can follow official guidelines from Offensive Security, here:
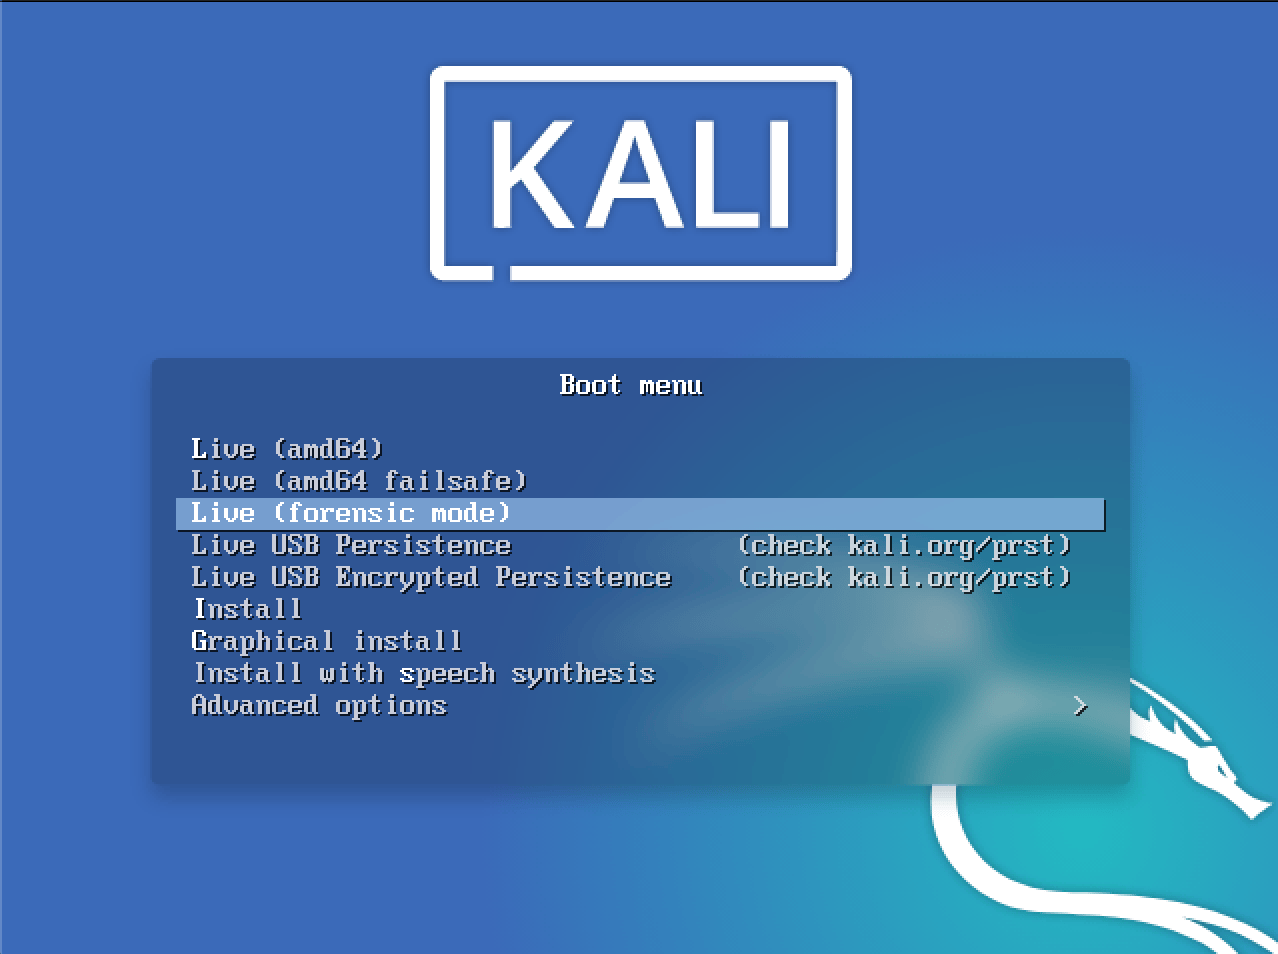
After preparing the Live Kali Linux USB, plug it in and restart your PC to enter the Boot loader. There, you will find a menu like this one:
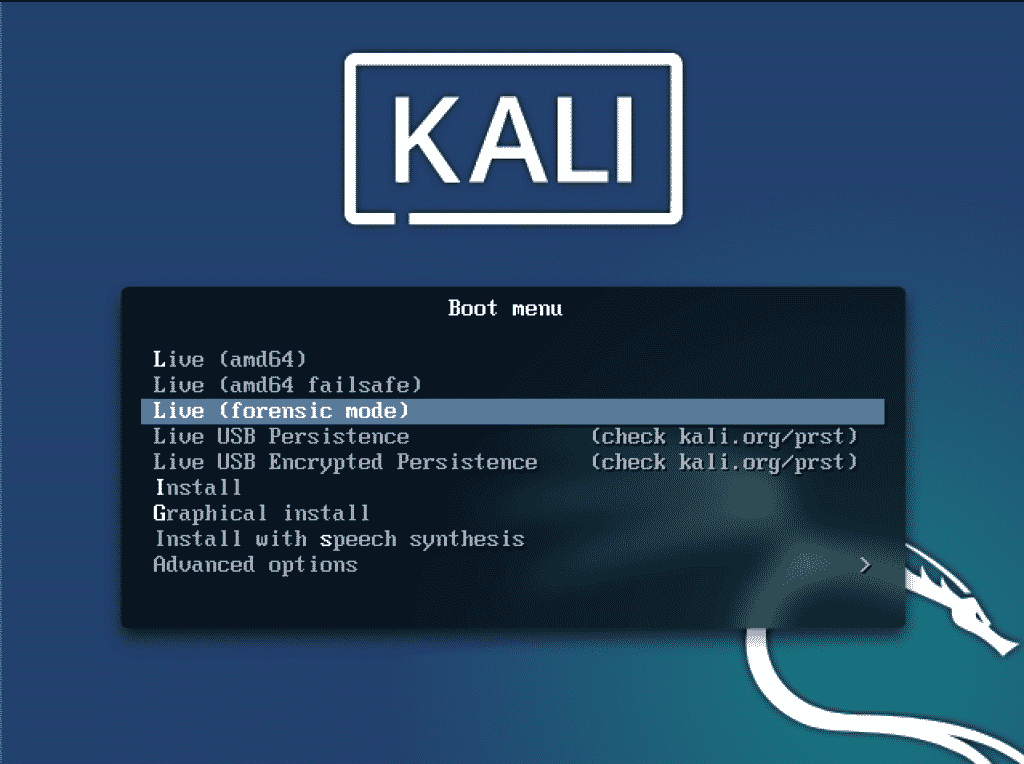
Clicking on the Live (Forensic mode) will take you right into the forensics mode containing the tools and packages required for your forensic needs. In this article we will look at how to organize your digital forensics process using the Live (Forensic mode).
Copying Data
Forensics requires imaging of System Drives containing data. The first thing we need to do is make a bit-by-bit copy of the file, hard drive, or any other type of data on which we need to perform forensics. This is a very crucial step because if it is done wrong, then all the work can go to waste.
The regular backups of a drive or file do not work for us (the forensic investigators). What we need is a bit-by-bit copy of data on the drive. To do this, we will use the following dd command:
$ dd if = source > of = destination > bs = byte size >
We need to make a copy of the drive sda1, so we will use the following command. It will make a copy of sda1 to sda2 512 byes at a time.
$ dd if = / dev / sda1 of = / dev / sda2 bs = 512
Hashing
With our copy of the drive, anyone can question its integrity and could think that we placed the drive intentionally. To generate proof that we have the original drive, we will use hashing. Hashing is used to assure the image integrity. Hashing will provide a hash for a drive, but if a single bit of data is changed, the hash will change and we will know if it has been replaced or is the original. To ensure the integrity of the data and that nobody can question its originality, we will copy the disk and generate an MD5 hash of it.
First, open dcfldd from the forensics toolkit.
The dcfld interface will look like this:
Now, we will use the following command:
$ dcfldd if = / dev / sda of = / media / image.dd hash =md5 bs = 512
/dev/sda: the drive you want to copy
/media/image.dd: the location and name of the image you want it to copy to
hash=md5: the hash you want to generate e.g md5, SHA1, SHA2, etc. In this case it is md5.
bs=512: number of bytes to copy at a time
One thing we should know is that Linux doesn’t provide drives names with a single letter like in windows. In Linux, hard drives are separated by hd designation, such as had, hdb, etc. For SCSI (small computer system interface) it is sd, sba, sdb, etc.
Now, we have the bit by bit copy of a drive on which we want to perform forensics. Here, forensic tools will come into play, and anyone with a knowledge of using these tools and can work with them will come in handy.
Tools
Forensics mode already contains famous open-source ToolKits and packages for forensic purposes. It is good to understand Forensics to inspect the crime and backtrack to whoever has done it. Any knowledge of how to use these tools would come in handy. Here, we will take a quick overview of some tools and how to get familiar with them
Autopsy
Autopsy Is a tool utilized by the military, law enforcement, and different agencies when there is a forensic need. This bundle is presumably one of the most powerful ones accessible through open-source, it consolidates the functionalities of numerous other littler bundles that are progressively engaged in their methodology into one flawless application with an internet browser-based UI.
Now, how about we open any program and explore the location above. This will essentially take us to the nearby web server on our framework (localhost) and get to port 9999 where Autopsy is running. I am utilizing the default program in Kali, IceWeasel. When I explore that address, I get a page like the one seen below:

Its functionalities incorporate – Timeline investigation, keyword search, hash separating, data carving, media, and markers of a bargain. Autopsy accepts disk images in raw oe EO1 formats and give results in whatever format is required usually in XML, Html formats.
BinWalk
This tool is utilized while managing binary images, it has the ability of finding the inserted document and executable code by investigating the image file. It is an amazing asset for those who know what they are doing. When utilized right, you very well may discover delicate data covered up in firmware images that might reveal a hack or be used to discover an escape clause to misuse.
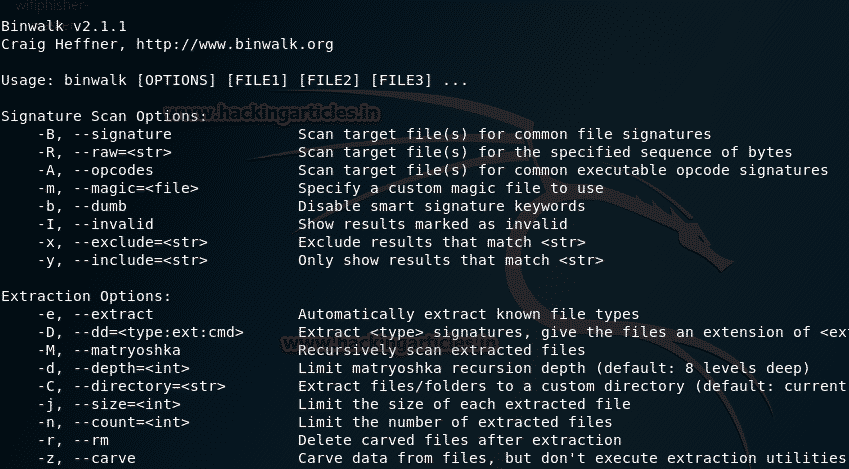
This tool is written in python and it uses the libmagic library, making it ideal for use with enchantment marks made for Unix record utility. To make things simpler for examiners, it contains an enchantment signature record which holds the most regularly discovered marks in firmware, which makes it simpler to spot inconsistencies.
Ddrescue
It duplicates information from one document or square gadget (hard drive, cd-rom, etc.) to another, attempting to protect the great parts first if there should arise an occurrence of read mistakes.
The essential activity of ddrescue is completely programmed. That is, you do not need to sit tight for a blunder, stop the program, and restart it from another position. If you utilize the mapfile highlight of ddrescue, the information is saved proficiently (just the required squares are perused). Likewise, you can intrude on the salvage whenever and continue it later at a similar point. The mapfile is a basic piece of ddrescue’s viability. Utilize it except if you know what you are doing.
To use it we will use the following command:
$ dd_rescue infilepath > outfilepath >
Dumpzilla
Dumpzilla application is created in Python 3.x and is used for extracting the measurable, fascinating data of Firefox, Ice-weasel, and Seamonkey programs to be examined. Because of its Python 3.x turn of events, it probably will not work appropriately in old Python forms with specific characters. The application works in an order line interface, so data dumps could be diverted by pipes with devices; for example, grep, awk, cut, sed. Dumpzilla allows users to picture the following areas, search customization and concentrate on certain areas:
- Dumpzilla can show live activities of users in tabs/windows.
- Cache data and thumbnails of previously opened windows
- User’s downloads, bookmarks, and history
- Browser’s saved passwords
- Cookies and session data
- Searches, email, comments
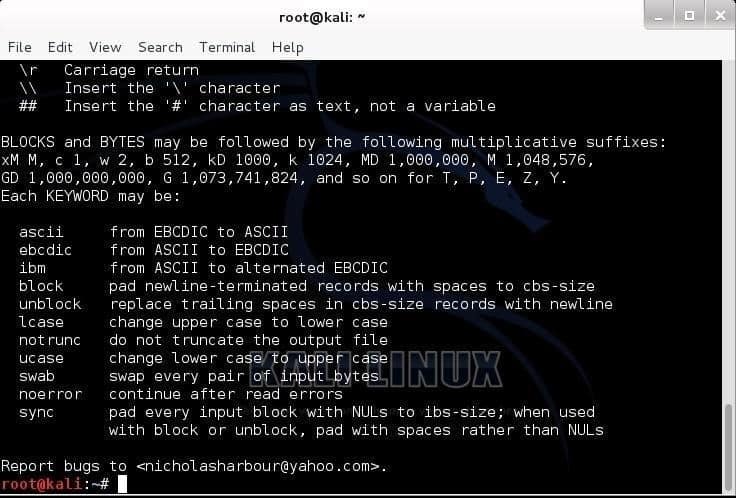
Foremost
Erase documents that may help unravel a computerized episode? Forget about it! Foremost is a simple-to-use, open-source bundle that can cut information out of arranged circles. The filename itself probably will not be recouped however the information it holds can be cut out. Foremost can recover jpg, png, bmp, jpeg, exe, mpg, ole, rar, pdf and a lot of other types of files.
$ foremost -h
foremost version 1.5.7 by Jesse Kornblum, Kris Kendall, and Nick Mikus.
$ foremost [ -v | -V | -h | -T | -Q | -q | -a | -w-d ] [ -t type > ]
[ -s blocks > ] [ -k size > ]
[ -b size > ] [ -c file > ] [ -o dir > ] [ -i file ]
-V – display copyright information and exit
-t – specify file type. (-t jpeg,pdf …)
-d – turn on indirect block detection (for UNIX file-systems)
-i – specify input file (default is stdin)
-a – Write all headers, perform no error detection (corrupted files)
-w – Only write the audit file, do not write any detected files to the disk
-o – set output directory (defaults to output)
-c – set configuration file to use (defaults to foremost.conf)
-q – enables quick mode. Searches are performed on 512 byte boundaries.
-Q – enables quiet mode. Suppress output messages.
-v – verbose mode. Logs all messages to screen
Bulk Extractor
This is an exceptionally useful tool when an examiner is hoping to separate specific sort of information from the computerized proof record, this device can cut out email addresses, URL’s, installment card numbers, and so on. This tool takes a shot at catalogues, files, and disk images. The information can be halfway ruined, or it tends to be compacted. This device will discover its way into it.
This feature includes highlights which help make an example in the information that is found over and again, for example, URL’s, email ids and more and presents them in a histogram group. It has a component by which it makes a word list from the information discovered. This can help with splitting the passwords of scrambled documents.

RAM Analysis
We have seen memory analysis on hard drive images, but sometimes, we must capture data from live memory (Ram). Remember that Ram is a volatile memory source, which means it loses its data like open sockets, passwords, processes running as soon as it is turned off.
One of the many good things about memory analysis is the ability to recreate what the suspect was doing at the time of a mishap. One of the most famous tools for memory analysis is Volatility.
In Live (Forensics mode), first, we will navigate to Volatility using the following command:
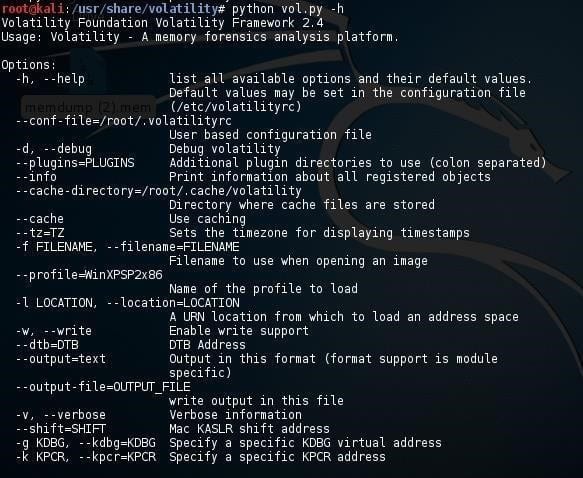
As volatility is a Python script, enter the following command to see the help menu:
$ python vol. py -h
Before doing any work on this memory image, first we need to get to its profile by using the following command. The profile image helps volatility to know where in memory addresses the important information resides. This command will examine memory file for evidence of operating system and key information:
$ python vol. py imageinfo -f = location of image file >
Volatility is a powerful memory analysis tool with tons of plugins that will help us investigate what the suspect was doing at the time of the computer seizure.
Conclusion
Forensics is increasingly becoming more and more essential in today’s digital world, where every day, many crimes are committed using digital technology. Having forensic techniques and knowledge in your arsenal is always an extremely useful tool to fight against cyber-crime on your own turf.
Kali is equipped with the tools needed to perform forensics, and by using Live (Forensic Mode), we do not have to keep it in our system all the time. Instead, we can just make a live USB or have Kali ISO ready in a peripheral device. In case forensic needs pop up, we can just plug in the USB, switch to Live (Forensic Mode) and get the job done smoothly.
About the author

Usama Azad
A security enthusiast who loves Terminal and Open Source. My area of expertise is Python, Linux (Debian), Bash, Penetration testing, and Firewalls. I’m born and raised in Wazirabad, Pakistan and currently doing Undergraduation from National University of Science and Technology (NUST). On Twitter i go by @UsamaAzad14
Источник


