- Ubuntu Wiki
- LaunchpadStepByStepInstructions
- Creating an Account
- SSH Keys
- Saying Hello
- Creating a New Branch
- Managing Files and Folders
- Committing Code
- Uploading to Launchpad
- Ubuntu Wiki
- Launchpad
- Answers
- More about Launchpad Answers
- Bug Reporting
- Bug Triage
- Ubuntu package building and hosting
- Blueprints
- Translations
- Code Hosting
- What is edge.launchpad.net and how does it work?
- 2 Answers 2
- What is launchpad linux
- About
- Hackaday
Ubuntu Wiki
LaunchpadStepByStepInstructions
Creating an Account
First of all you’ll need a launchpad account. You can create one over at https://launchpad.net/+login .
SSH Keys
To upload code you will require an SSH key. This is so you can prove to launchpad/bazaar that you are who you say you are. If you don’t already have one, here’s how to make one.
Logged in under your own user account type the following into a console.
You will now be asked for a secret password. Choose one and press enter. Your key has now been generated. You can see it by typing.
Note that in Linux,
is a shortcut for your homedir, given the example above, it’s like typing
Go to your launchpad profile now, and copy/paste the text from the file you opened in the section above, into the section marked Update SSH Keys. That’s that bit done.
Saying Hello
Now you need to introduce yourself to bazaar.
bzr whoami 'Your Name email@example.com'
Note: don’t forget the <> make a difference!
Creating a New Branch
To create a bazaar branch on your computer, navigate to the folder that contains you code, and type the following.
Managing Files and Folders
You now need to tell bazaar which files or folders within the branch you want to record changes to. For this example we have a branch folder called ‘test’, which contains the files ‘hello.php’, ‘install.txt’ and a sub folder called ‘stuff’.
You need to tell bazaar which files and folders you want to add to the system. You can do this by issuing the command:
This will add all of the files and folders in the current directory recursively.
You can also add files and folders individually.
If ‘stuff’ contained any files, those files would be added too.
To remove a file (in this instance ‘install.txt’) you can either delete them the folder on your computer, or run
bzr remove install.txt
Committing Code
When you have your code in a state that you want to upload then you need to run the commit command. This creates a revision and allows you to add a message regarding the changes you’ve made.
bzr commit -m "added my first file"
You can also selectively commit specific files.
bzr commit -m "added GPL licence info" install.txt
Uploading to Launchpad
Now that you’ve finished editing your code and getting it ready on your local computer, you’ll want to upload it to launchpad.
bzr push sftp://UserName@bazaar.launchpad.net/
To break down that url a little more, Username is your Launchpad username, after the
you can then include either your launchpad username or a teamname, project is the name of the project in the launchpad url and branch is what you would like to call the branch.
Note that the project must be created in launchpad before you can publish to it. If you don't want to publish to a particular project, you can push to the +junk project instead
bzr push sftp://uberperson@bazaar.launchpad.net/
would create a branch called 'development' in the 'ubuntu' project which can be edited by anyone in 'uber-dev-team'. The person who created this upload would have the username 'uberperson' on launchpad.
Give it a couple of minutes, and you should be able to see your files go live on the launchpad site.
Источник
Ubuntu Wiki
Launchpad
Launchpad is a software collaboration platform created by Canonical. Ubuntu is one of the many projects that use this website. We use it for
Some highlights of the new Launchpad 3.0
Launchpad is also an open source project in itself, to which you can join. Start page for developing Launchpad itself is https://dev.launchpad.net/. And Launchpad has a Launchpad project page as well https://launchpad.net/launchpad.
Answers
Launchpad Answers is a community based answer tracker. It is a great place to ask questions about Launchpad projects (ex. Ubuntu, Inkscape) . Some of the strengths of Launchpad Answers over other support resources are:
- tracking user questions in a similar way to bug reports
- notifying volunteer support contacts of new questions
- building a searchable knowledge base of good answers
- allowing people to ask questions and offer support in different languages.
It also serves as a simple ticketing system for tracking Launchpad admin requests.
More about Launchpad Answers
Asking for help: find out how to use Launchpad to get help with software.
Offering help: how to help other people and become an ..answer contact.
The two most common uses of Launchpads Bug feature by Ubuntu users is to report bugs and to triage bugs. Reporting Bugs you experience in Ubuntu and Ubuntu programs gives you a voice in getting problems with your software fixed. With Open Source Software you can fix, complain about, and help resolve issues with the software.
Bug Reporting
Bug Triage
If you have questions, feel free to ask other members of the LP Focus Group, or in the #ubuntu-bugs IRC channel.
Ubuntu package building and hosting
Using Launchpad, you can build and distribute packages for operating systems that use Debian-style packaging. Right now, Launchpad's packaging system (sometimes called Soyuz) supports the build and distribution of packages for Ubuntu. Learn More.
To start.
Installing software from a ppa.
Publishing to a PPA to distribute software
Blueprints
With very little administrative overhead, Blueprint helps you to create a roadmap for your project and shepherd individual features through to release. Learn more.
Translations
Code Hosting
Using Launchpad, you can publish Bazaar branches of your code and, optionally, associate them with projects. You can even import Subversion and CVS repositories into Bazaar branches.
If you're already familiar with Subversion or CVS, it's worth noting that Bazaar is a distributed version control system.
Learn more about publishing, browsing and getting hold of the code you want.
Launchpad (последним исправлял пользователь 63 2009-11-18 17:18:56)
The material on this wiki is available under a free license, see Copyright / License for details.
Источник
What is edge.launchpad.net and how does it work?
Quite often I find myself on edge.launchpad.net instead of the 'usual' launchpad. It looks exactly the same as traditional launchpad, so I wonder if there is any difference. This happens usually when I go to launchpad by clicking a link on a third party website. Somehow people prefer to link to the edge subdomain of launchpad, or at least I have such impression.
So what exactly is the edge.launchpad.net? And why some people prefer it than the usual launchpad.net?
Looking for information I was always redirected to https://help.launchpad.net/LaunchpadReleases and https://help.launchpad.net/BetaTesting , but I didn't find there anything about edge. I guess it may be something like a testing environment, if yes, than how does it differ from staging.launchpad.net and qastaging.launchpad.net?

2 Answers 2
There is absolutely no difference between edge.launchpad.net and launchpad.net. It used to be used for easy testing of new Launchpad code, but is now deprecated.
Back in the olden days (well about twelve months ago) then anyone could join a special group on Launchpad. If you were a member of this testing group then whenever you visited launchpad.net you were automatically redirected to edge.launchpad.net. Because of this automatic redirection, a lot of people forgot about it, and posted links to edge.launchpad.net all over the place. Although this wasn't harmful (anyone could go test on edge.launchpad.net) I can see people being confused by it.
For some reason they've let the domain hang around for a while, to be honest they've probably just forgotten about turning it off (well redirecting everyone back to launchpad.net).
Anyway, the point is that right now, you get exactly the same results whether you view edge or the main domain.
Источник
What is launchpad linux
The Ubuntu version of Apple's/MacOS Launchpad application. The shortcut is meant to be placed on a dock as a keyboard-free alternative to pressing Super+A.

Install the dependency by opening Terminal and running:
Open the deb file and proceed with installation
Open Terminal and run:
or navigate to the /usr/share/applications folder manually
Drag the Launchpad icon onto the dock

In Terminal run:
Add your information to the end of the file (mine below, I used an URL instead of email):
Create a folder called launchpad-1.0 and place the shell script inside
- Add a .desktop file and a .png file
- Edit the .desktop file to Exec where the shell script will be placed and set Path to that folder (more on that below)
From inside the launchpad-1.0 folder, run:
Inside the newly generated debian folder:
- Create an install file that specifies where the files in launchpad-1.0 get installed to (the paths are used in the .desktop file)
- Edit the rules file and add override_dh_usrlocal:
- Edit the control file by changing Section, Homepage, Depends, and Description
Create a folder outside launchpad-1.0 called post-dh_make-files Back up the finalized install, rules, and control files in here so that they don't need to be edited each time on future runs of dh_make and instead can be copied+pasted into the generated debian folder
From inside the launchpad-1.0 folder, run:
Distribute the generated .deb file as an application installer
Thanks to https://blog.packagecloud.io/eng/2016/12/15/howto-build-debian-package-containing-simple-shell-scripts/ for providing a great starting point with regard to packaging shell scripts into deb files
Icon made by Pixel Buddha from www.flaticon.com
About
The Ubuntu version of Apple's/MacOS Launchpad application
Источник
Hackaday
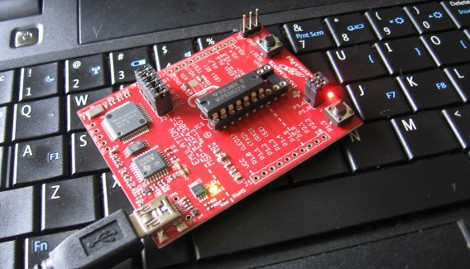
When TI released their Launchpad development board at the end of June it generated a lot of Buzz. Here’s a package that delivered a programmer, debugger, two microcontrollers, and some accessories for less than five bucks (including shipping). They even provided a choice of two software suites but only for users running Windows who don’t mind proprietary software. If you’re looking to go another way you should consider trying out the open source alternative MSPGCC. After the break we’ll take a look at getting the tool-chain up and running in a Linux environment.
We’ll be working with Ubuntu 10.04 Lucid Lynx. When the Launchpad is connected to USB it is identified and mounted to /dev/ttyACM0. It’s not immediately apparent how to use the device but fortunately it can be done. To talk to the hardware for programming and debugging we’ll need to use MSPDebugger. For compiling our code we’ll be using the MSPGCC open source compiler package.
Compiling and Installing MSPGCC
The first thing we’ll need to do is satisfy our build dependencies.
Now we’ll checkout the source code from the subversion repository:
Next we enter the directory and start compiling:
This will take some time so go read some posts and come back in 20-45 minutes.
To add the tools we just installed to the path, we need to edit the /etc/profile file:
Add this line to the end of the file (CTRL-X to exit once you’re done):
Now reload the profile you just edited for this to take effect:
Great, now you have the tools necessary to compile your C code into an .elf file that the microprocessor will understand. Next we’ll need a way to get that file onto the chip.
Compiling MSPDebug
We’ll use the MSPDebug instructions for downloading and compiling. First you need to go to the download page and get the latest version. We downloaded version 0.9 and will use that in the filename for the following commands. Now go to the directory where you saved that download and unpack the archive, compile, and install the package using the following set of commands:
That should take just a few seconds and it’s the last of the tools that we need. Next we can use our new software to connect with the device.
The code
It’s best to try out some proven code the first time around. Download our simple code package to test out the compiler and use the debugger for programming. This is much simpler than the temperature demo found on Ramblings and Broken Code be we are using their Makefile and once you’re comfortable with the process there’s a lot of great code examples in that package.
Unpack the code, open a terminal window, and navigate to the directory where the files are located. Compile the file by typing:
If that went well, great. If you get an error like “msp430-gcc: command not found” there’s something wrong with your path to the MSPGCC tools.
Connecting to the chip
MSPDebug is what we use to connect to the chip. The following command will most likely NOT work for you:
Spitting out the error message:
This is most likely caused by a permission problem. This will work if you add ‘sudo’ to the beginning but that’s not ideal. Let’s add a UDEV rule to take care of the Launchpad every time we plug it in. We need to create a rule file that has this line of code in it:
Use nano to open and edit this file. Press CTRL-X to exit when you’re finished, then reload UDEV:
*** If you need more help with this, take a look at our guide to writing udev rules ***
Unplug the Launchpad and plug it back in. Make sure you’re in the same directory as the ‘main.elf’ file created by the compiler earlier. Now give MSPDebug another try:
Now you will be greeted with the (mspdebug) prompt. It’s just a matter of programming the chip and running that program:
Both LEDs will start blinking at about 1 Hz. Congratulations, you’ve compiled and loaded a program using open source tools.
A look into how the code works:
Let’s take a quick look into how this simple program works in an effort to get you comfortable with learning to code with MSPGCC. The keywords used in the code are defined in the include files from MSPGCC. You need to spend some time in the /opt/msp430-gcc-4.4.3/msp430/include/msp430 directory until you get used to the keywords. Once you get the hang of it you can probably guess new keywords based on what you read in the datasheets for the microprocessors.
Our code blinks two LEDs. Blinking means we need to use some method of tracking time. First let’s investigate the system clock:
Download a copy of the MSP430x2xx family datasheet (we’re using Rev. E) and follow along. This is a more useful document than the chip-specific datasheet as it lists the operating information for all of the peripherals.
Review the various system clock features in Section 5.1 paying attention to LFXT1CLK, VLOCLK, and ACLK. Next read Section 5.2 on page 289 which tells us that after power-up the system clock will be running at 1.1 MHz. If we used the system clock for timing we’re going to have trouble counting high enough with a 16-bit timer for a meaningful delay. Be we can use the auxiliary clock instead. The same page of the datasheet tells us that the ACLK is sourced from LFXT1CLK (an external crystal or clock source) but let’s change that. The VLOCLK can be used as a source for the auxiliary clock and it runs at 12 kHz, so 1-second timing is well within the range of a 16-bit counter. Let’s set up the clock source. Section 5.2.2 clearly tells us “VLOCLK source is selected by setting LFXT1Sx = 10 when XTS = 0.”. Now we just check the register description until we find that LFXT1S is set on register BCSCTL3 and then write code to implement this setting:
Next we want to set up an interrupt based on the auxiliary clock. In Section 12 you can read about TimerA. We’ll configure it to run in UP mode. On page 410 the configuration of the timer control register TACTL is covered. We need TASSELx to be set to use ACLK and MCx configured for UP mode. Notice that the settings for each portion of the register are listed in binary next to the description. We can use these to select the proper bits. Setting the MC bits to 1 (binary 01) and TASSEL bits to 1 (binary 01) with the following code:
Now we must enable the capture/compare interrupt for TimerA compare/capture register 0:
Now we can start the timer by writing a value to it. Because we are using the internal very low oscillator at 12 kHz, we can count up to 11999 to keep track of about 1 second passing (0 is counted and that’s why we set the compare match for one cycle less than the clock speed):
And finally we enable global interrupts:
Now we just need some code in an Interrupt Service Routine that will toggle the LEDs:
We pulled all of this together to make the example file. Take some to trying to understand what the datasheet is telling you. Although they can be confusing, everything you need to know is there.
Источник


