- Как написать свой первый Linux device driver
- Подготовительные работы
- Инициализация
- Удаление
- How to install a device driver on Linux
- Learn how Linux drivers work and how to use them.
- Subscribe now
- Two approaches to finding drivers
- 1. User interfaces
- 2. Command line
- Check if a driver is already installed
- Add the repository and install
- Linux: How to find the device driver used for a device?
- 8 Answers 8
- Device Drivers, Part 1: Linux Device Drivers for Your Girl Friend
- Of drivers and buses
- Drivers have two parts
- Verticals
- Multiple-vertical drivers
- Summing up
- RELATED ARTICLESMORE FROM AUTHOR
- OpenStack Xena is Live With More Integrations, New Features
- Samsung Introduces Open Source Software Solution for CXL Memory Platform
- Linux Kernel Programming
- 78 COMMENTS
Как написать свой первый Linux device driver
Здравствуйте, дорогие хабрачитатели.
Цель данной статьи — показать принцип реализации драйверов устройств в системе Linux, на примере простого символьного драйвера.
Для меня же, главной целью является подвести итог и сформировать базовые знания для написания будущих модулей ядра, а также получить опыт изложения технической литературы для публики, т.к. через полгода я буду выступать со своим дипломным проектом (да я студент).
Это моя первая статья, пожалуйста не судите строго!
Получилось слишком много букв, поэтому я принял решение разделить статью на три части:
Часть 1 — Введение, инициализация и очистка модуля ядра.
Часть 2 — Функции open, read, write и trim.
Часть 3 — Пишем Makefile и тестируем устройство.
Перед вступлением, хочу сказать, что здесь будут изложены базовые вещи, более подробная информация будет изложена во второй и последней части данной статьи.
Подготовительные работы
Спасибо Kolyuchkin за уточнения.
Символьный драйвер (Char driver) — это, драйвер, который работает с символьными устройствами.
Символьные устройства — это устройства, к которым можно обращаться как к потоку байтов.
Пример символьного устройства — /dev/ttyS0, /dev/tty1.
К вопросу про проверсию ядра:
Драйвер представляет каждое символьное устройство структурой scull_dev, а также предостовляет интерфейс cdev к ядру.
Устройство будет представлять связный список указателей, каждый из которых указывает на структуру scull_qset.
Для наглядности посмотрите на картинку.

Для регистрации устройства, нужно задать специальные номера, а именно:
MAJOR — старший номер (является уникальным в системе).
MINOR — младший номер (не является уникальным в системе).
В ядре есть механизм, который позволяет регистрировать специализированные номера вручную, но такой подход нежелателен и лучше вежливо попросить ядро динамически выделить их для нас. Пример кода будет ниже.
После того как мы определили номера для нашего устройства, мы должны установить связь между этими номерами и операциями драйвера. Это можно сделать используя структуру file_operations.
В ядре есть специальные макросы module_init/module_exit, которые указывают путь к функциям инициализации/удаления модуля. Без этих определений функции инициализации/удаления никогда не будут вызваны.
Здесь будем хранить базовую информацию об устройстве.
Последним этапом подготовительной работы будет подключение заголовочных файлов.
Краткое описание приведено ниже, но если вы хотите копнуть поглубже, то добро пожаловать на прекрасный сайт: lxr
Инициализация
Теперь давайте посмотрим на функцию инициализации устройства.
Первым делом, вызывая alloc_chrdev_region мы регистрируем диапазон символьных номеров устройств и указываем имя устройства. После вызовом MAJOR(dev) мы получаем старший номер.
Далее проверяется вернувшееся значение, если оно является кодом ошибки, то выходим из функции. Стоит отметить, что при разработке реального драйвера устройства следует всегда проверять возвращаемые значения, а также указатели на любые элементы (NULL?).
Если вернувшееся значение не является кодом ошибки, продолжаем выполнять инициализацию.
Выделяем память, делая вызов функции kmalloc и обязательно проверяем указатель на NULL.
Стоит упомянуть, что вместо вызова двух функций kmalloc и memset, можно использовать один вызов kzalloc, который выделят область памяти и инициализирует ее нулями.
Продолжаем инициализацию. Главная здесь функция — это scull_setup_cdev, о ней мы поговорим чуть ниже. MKDEV служит для хранения старший и младших номеров устройств.
Возвращаем значение или обрабатываем ошибку и удаляем устройство.
Выше были представлены структуры scull_dev и cdev, которые реализуют интерфейс между нашим устройством и ядром. Функция scull_setup_cdev выполняет инициализацию и добавление структуры в систему.
Удаление
Функция scull_cleanup_module вызывается при удалении модуля устройства из ядра.
Обратный процесс инициализации, удаляем структуры устройств, освобождаем память и удаляем выделенные ядром младшие и старшие номера.
С удовольствием выслушаю конструктивную критику и буду ждать feedback’a.
Если вы нашли ошибки или я не правильно изложил материал, пожалуйста, укажите мне на это.
Для более быстрой реакции пишите в ЛС.
Источник
How to install a device driver on Linux
Learn how Linux drivers work and how to use them.

Subscribe now
Get the highlights in your inbox every week.
One of the most daunting challenges for people switching from a familiar Windows or MacOS system to Linux is installing and configuring a driver. This is understandable, as Windows and MacOS have mechanisms that make this process user-friendly. For example, when you plug in a new piece of hardware, Windows automatically detects it and shows a pop-up window asking if you want to continue with the driver’s installation. You can also download a driver from the internet, then just double-click it to run a wizard or import the driver through Device Manager.
Second, most default Linux drivers are open source and integrated into the system, which makes installing any drivers that are not included quite complicated, even though most hardware devices can be automatically detected. Third, license policies vary among the different Linux distributions. For example, Fedora prohibits including drivers that are proprietary, legally encumbered, or that violate US laws. And Ubuntu asks users to avoid using proprietary or closed hardware.
To learn more about how Linux drivers work, I recommend reading An Introduction to Device Drivers in the book Linux Device Drivers.
Two approaches to finding drivers
1. User interfaces
If you are new to Linux and coming from the Windows or MacOS world, you’ll be glad to know that Linux offers ways to see whether a driver is available through wizard-like programs. Ubuntu offers the Additional Drivers option. Other Linux distributions provide helper programs, like Package Manager for GNOME, that you can check for available drivers.
2. Command line
What if you can’t find a driver through your nice user interface application? Or you only have access through the shell with no graphic interface whatsoever? Maybe you’ve even decided to expand your skills by using a console. You have two options:
- Use a repository
This is similar to the homebrew command in MacOS. By using yum, dnf, apt-get, etc., you’re basically adding a repository and updating the package cache.
- Download, compile, and build it yourself
This usually involves downloading a package directly from a website or using the wget command and running the configuration file and Makefile to install it. This is beyond the scope of this article, but you should be able to find online guides if you choose to go this route.
Check if a driver is already installed
Before jumping further into installing a driver in Linux, let’s look at some commands that will determine whether the driver is already available on your system.
The lspci command shows detailed information about all PCI buses and devices on the system:
Or with grep:
For example, you can type lspci | grep SAMSUNG if you want to know if a Samsung driver is installed.
The dmesg command shows all device drivers recognized by the kernel:
Or with grep:
Any driver that’s recognized will show in the results.
If nothing is recognized by the dmesg or lscpi commands, try these two commands to see if the driver is at least loaded on the disk:
Tip: As with lspci or dmesg, append | grep to either command above to filter the results.
If a driver is recognized by those commands but not by lscpi or dmesg, it means the driver is on the disk but not in the kernel. In this case, load the module with the modprobe command:
Run as this command as sudo since this module must be installed as a root user.
Add the repository and install
There are different ways to add the repository through yum, dnf, and apt-get; describing them all is beyond the scope of this article. To make it simple, this example will use apt-get, but the idea is similar for the other options.
1. Delete the existing repository, if it exists.
where NAME_OF_DRIVER is the probable name of your driver. You can also add pattern match to your regular expression to filter further.
2. Add the repository to the repolist, which should be specified in the driver guide.
where REPOLIST_OF_DRIVER should be specified from the driver documentation (e.g., epel-list).
3. Update the repository list.
4. Install the package.
5. Check the installation.
Run the lscpi command (as above) to check that the driver was installed successfully.
Источник
Linux: How to find the device driver used for a device?
If my target has one device connected and many drivers for that device loaded, how can I understand what device is using which driver?
8 Answers 8
Example. I want to find the driver for my Ethernet card:
First I need to find coordinates of the device using lspci ; then I find driver that is used for the devices with these coordinates.


sudo lspci -v will show it. like this:
You can also combine it with grep like this:

For USB based devices you can see the driver name by using the lsusb command:
And/or you use lshw which enumerates the devices on all buses including USB, PCI, etc so you can see which driver it uses:
If you just want to plainly use sysfs and doesn’t want to deal with all these commands which eventually looks inside sysfs anyways, here’s how:
say, what is the module/driver for eth6? «sfc» it is
or better yet.. let readlink resolve the path for you.
so. to figure out what are the drivers for all of your network interfaces:

You can use the lsmod command to get the status of loaded modules / devices drivers in the Linux Kernel.
For a specific device, you can use dmesg |grep to get the details too.
Источник
Device Drivers, Part 1: Linux Device Drivers for Your Girl Friend
“After a week of hard work, we finally got our driver working,” were Pugs’ first words when he met his girlfriend, Shweta.
“Why? What was your driver up to? Was he sick? And what hard work did you do?” asked Shweta. Confused, Pugs responded, “What are you talking about?”
Now it was Shweta’s turn to look puzzled, as she replied, “Why ask me? You tell me — which of your drivers are you talking about?”
When understanding dawned on him, Pugs groaned, “Ah c’mon! Not my car drivers — I am talking about a device driver on my computer.”
“I know about car and bus drivers, pilots, and even screwdrivers; but what is this ‘device driver’?” queried Shweta, puzzled.
That was all it took to launch Pugs into a passionate explanation of device drivers for the newbie — in particular, Linux device drivers, which he had been working on for many years.
Of drivers and buses
A driver drives, manages, controls, directs and monitors the entity under its command. What a bus driver does with a bus, a device driver does with a computer device (any piece of hardware connected to a computer) like a mouse, keyboard, monitor, hard disk, Web-camera, clock, and more.
Further, a “pilot” could be a person or even an automatic system monitored by a person (an auto-pilot system in airliners, for example). Similarly, a specific piece of hardware could be controlled by a piece of software (a device driver), or could be controlled by another hardware device, which in turn could be managed by a software device driver. In the latter case, such a controlling device is commonly called a device controller. This, being a device itself, often also needs a driver, which is commonly referred to as a bus driver.
General examples of device controllers include hard disk controllers, display controllers, and audio controllers that in turn manage devices connected to them. More technical examples would be an IDE controller, PCI controller, USB controller, SPI controller, I2C controller, etc. Pictorially, this whole concept can be depicted as in Figure 1.  Figure 1: Device and driver interaction
Device controllers are typically connected to the CPU through their respectively named buses (collection of physical lines) — for example, the PCI bus, the IDE bus, etc. In today’s embedded world, we encounter more micro-controllers than CPUs; these are the CPU plus various device controllers built onto a single chip. This effective embedding of device controllers primarily reduces cost and space, making it suitable for embedded systems. In such cases, the buses are integrated into the chip itself. Does this change anything for the drivers, or more generically, on the software front?
The answer is, not much — except that the bus drivers corresponding to the embedded device controllers are now developed under the architecture-specific umbrella.
Drivers have two parts
Bus drivers provide hardware-specific interfaces for the corresponding hardware protocols, and are the bottom-most horizontal software layers of an operating system (OS). Over these sit the actual device drivers. These operate on the underlying devices using the horizontal layer interfaces, and hence are device-specific. However, the whole idea of writing these drivers is to provide an abstraction to the user, and so, at the other “end”, these do provide an interface (which varies from OS to OS). In short, a device driver has two parts, which are: a) device-specific, and b) OS-specific. Refer to Figure 2. 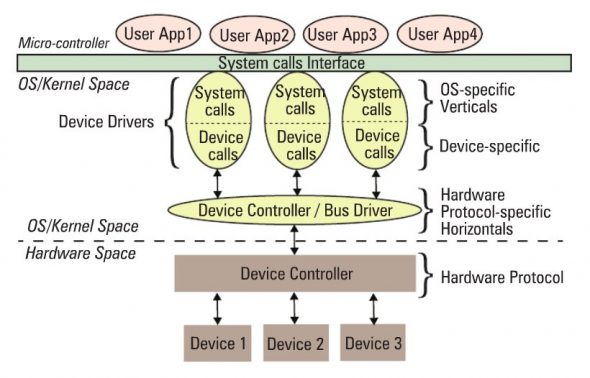 Figure 2: Linux device driver partition
The device-specific portion of a device driver remains the same across all operating systems, and is more about understanding and decoding the device data sheets than software programming. A data sheet for a device is a document with technical details of the device, including its operation, performance, programming, etc. — in short a device user manual.
Later, I shall show some examples of decoding data sheets as well. However, the OS-specific portion is the one that is tightly coupled with the OS mechanisms of user interfaces, and thus differentiates a Linux device driver from a Windows device driver and from a MacOS device driver.
Verticals
In Linux, a device driver provides a “system call” interface to the user; this is the boundary line between the so-called kernel space and user-space of Linux, as shown in Figure 2. Figure 3 provides further classification. 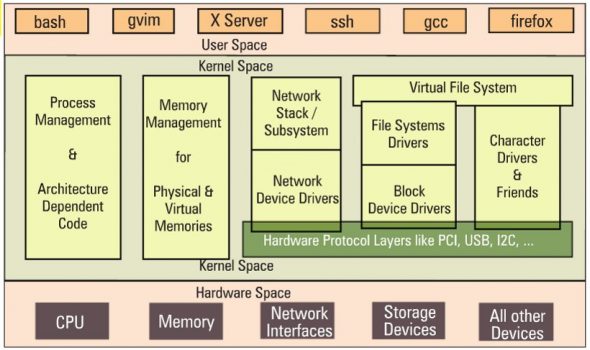 Figure 3: Linux kernel overview
Based on the OS-specific interface of a driver, in Linux, a driver is broadly classified into three verticals:
- Packet-oriented or the network vertical
- Block-oriented or the storage vertical
- Byte-oriented or the character vertical
The CPU vertical and memory vertical, taken together with the other three verticals, give the complete overview of the Linux kernel, like any textbook definition of an OS: “An OS performs 5 management functions: CPU/process, memory, network, storage, device I/O.” Though these two verticals could be classified as device drivers, where CPU and memory are the respective devices, they are treated differently, for many reasons.
These are the core functionalities of any OS, be it a micro-kernel or a monolithic kernel. More often than not, adding code in these areas is mainly a Linux porting effort, which is typically done for a new CPU or architecture. Moreover, the code in these two verticals cannot be loaded or unloaded on the fly, unlike the other three verticals. Henceforth, when we talk about Linux device drivers, we mean to talk only about the latter three verticals in Figure 3.
Let’s get a little deeper into these three verticals. The network vertical consists of two parts: a) the network protocol stack, and b)the network interface card (NIC) device drivers, or simply network device drivers, which could be for Ethernet, Wi-Fi, or any other network horizontals. Storage, again, consists of two parts: a) File-system drivers, to decode the various formats on different partitions, and b) Block device drivers for various storage (hardware) protocols, i.e., horizontals like IDE, SCSI, MTD, etc.
With this, you may wonder if that is the only set of devices for which you need drivers (or for which Linux has drivers). Hold on a moment; you certainly need drivers for the whole lot of devices that interface with the system, and Linux does have drivers for them. However, their byte-oriented cessibility puts all of them under the character vertical — this is, in reality, the majority bucket. In fact, because of the vast number of drivers in this vertical, character drivers have been further sub-classified — so you have tty drivers, input drivers, console drivers, frame-buffer drivers, sound drivers, etc. The typical horizontals here would be RS232, PS/2, VGA, I2C, I2S, SPI, etc.
Multiple-vertical drivers
One final note on the complete picture (placement of all the drivers in the Linux driver ecosystem): the horizontals like USB, PCI, etc, span below multiple verticals. Why is that?
Simple — you already know that you can have a USB Wi-Fi dongle, a USB pen drive, and a USB-to-serial converter — all are USB, but come under three different verticals!
In Linux, bus drivers or the horizontals, are often split into two parts, or even two drivers: a) device controller-specific, and b) an abstraction layer over that for the verticals to interface, commonly called cores. A classic example would be the USB controller drivers ohci, ehci, etc., and the USB abstraction, usbcore.
Summing up
So, to conclude, a device driver is a piece of software that drives a device, though there are so many classifications. In case it drives only another piece of software, we call it just a driver. Examples are file-system drivers, usbcore, etc. Hence, all device drivers are drivers, but all drivers are not device drivers.
“Hey, Pugs, hold on; we’re getting late for class, and you know what kind of trouble we can get into. Let’s continue from here, later,” exclaimed Shweta.
Jumping up, Pugs finished his explanation: “Okay. This is the basic theory about device drivers. If you’re interested, later, I can show you the code, and all that we have been doing for the various kinds of drivers.” And they hurried towards their classroom.
RELATED ARTICLESMORE FROM AUTHOR
OpenStack Xena is Live With More Integrations, New Features
Samsung Introduces Open Source Software Solution for CXL Memory Platform
Linux Kernel Programming
78 COMMENTS
Nicely explained. Good work!
Thanks for the motivation.
A good well explained article related to Linux Device Drivers 3rd Edition, this article explained briefly about linux kernal, their drivers and buses, verticals and much more. At end i concluded for other readers to read this article if want to know about linux architecture.
Thanks for this article. The Related Posts section at the end of the article doesn’t really show related device driver posts. I hope there is some way you can display links to the other articles of this series in related posts so we can continue on with it. Also I know this will take time but ultimately we wish to see all the articles of this series published online on this website. Thank you once again.
here’s the links where all the articles in the series are listed – https://www.opensourceforu.com/tag/linux-device-drivers-series/ – Everything till the November 2011 article (i.e. Parts 1-12) is online.
As for things showing up under related posts, well, that depends on this WP plugin – http://wordpress.org/extend/plugins/yet-another-related-posts-plugin/ – and it only produces posts that are older than the current post under “Related posts”. That’s why, while it cant show the future parts in a series of articles, in future parts of the series it does show the parts from the past.
Everrything is alright but i am not able to install my pc suit, is there any remedy for that?
Nicely explained.. and very easy to understand.. Thanks a ton
Thanks for the appreciation.
Good job. I have noticed mistake: on Figure 2, instead of “Micro-controller” must be “User space”
You are perfectly correct. But we realized that only after it went to print. 🙁
Hi Anil ,
This is Ravi From Bangalore, could me plz tell me how to learn linux device driver ! already i have work early not form scorch on wards, plz send me good data and site also ! ” mrkygr@gmail.com” , this is my id!
Then, start from scratch :). Essential Linux Drivers is one good book to start with.
I have worked on MCU ranging 8051 to cortex M3. but all on window with c/c++.
But now I want to work on linux & mcu.Can you guide how/where to start
Start with this first article & exercise all the 24 set of the series. That should be a good starter.
Its very good article to read and clearly explained.
Thanks. it’s very good nice article.
Thanks Mallesh for reading & appreciating.
Being a guy, as my girlfriend works on GPUs and knows all of this much better than me or most of you, I think the title should be “Device Drivers, Part 1: Linux Device Drivers for Your Boy Friend”.
In other words, this title is utterly sexist and should be changed.
Writing an article doesn’t mean that world’s all guys & gals fall into this bucket. That’s just *a* perspective. There could be hundred & thousands of other perspectives, which we mere mortals would never be able to put down all together. So, what a big deal dude – all this sexist and … stuff. Moreover, these articles are not meant for sexism but for learning the fun way.
“Moreover, these articles are not meant for sexism but for learning the fun way.”
Exactly! Then this one does not have to be sexist :), yet it sadly contributes to the overall nasty atmosphere concerning women and computers. Sorry for my rough first comment, but ordinary (and, in many cases, not intended) sexism is a real problem is the computer science community.
I hope you do believe, that there are people existing around of all varieties. It is just that you have come across a different set than what I have generally come across. And, a writer typically is bound to write from his own experiences in his own perspective – that doesn’t mean that everyone in this world are like that – it is just one of the perspectives. And hence, I do not even see a need or reason to talk about or bring out sexism in such technical scenarios.
The author assumes that the first article being introductory in nature is for the beginners. So there is no question of differentiating between the people as men or women. He has lined up other advanced driver explanations for those who want to learn more.
And author himself has received several awards in his erstwhile organization Intel(at least 11 awards) for his contributions to the embedded domain.
And he is an Entrepreneur too. The author is constantly engaged in sharing thoughts with the other experts and together they keep developing innovative solutions.
Author explains the concepts of drivers with the narration of pugs and sweta in the backdrop just to make drivers interesting to learn for even those who are total novices to kernel. (BTW Pugs is the college nickname of the author !)
Author is enthusiastic in imparting knowledge to all. He mixes fun with teaching and makes the complicated concepts available for consumption for the beginners and then the complicated concepts begin to build on the candidates and they are hugely benefited in the process.
I can vouch for the above fact as I have attended his training sessions.
How does the application connects to the device driver…
Through the device file.
how does the application reaches device file…
Application typically does a explicit open() on the device file.
you mean to say an application calls open which is mapped to device drivers struct <
how is the applications open calling or connecting with device file
through it first paramater. Note that, we call open as follows:
Thanks for the tutorial. Today I just have started the part I. And this really started clearing some of the basic doubts that I had.Still I am getting confused on some points.
-> Bus driver[H/W specific] and device driver[OS specific]. Still couldn’t understand the bus driver part. May be it is bcoz of the words ‘hardware protocols’ ‘hardware-specific interfaces ‘ etc. Could you clarify me with an example if possible.
And do device driver programmers program bus driver as well? or there are two separate group of device drivers for bus and device driver.
Bus driver is also a driver – just that instead of a particular device, it manages a complete bus, on which the devices sit. Example: Pen Drive is a USB device needing a USB device driver (namely the usb-storage); USB itself is a bus, needing a bus driver (namely the usbcore).
Device driver programmers write device specific drivers more often than bus specific drivers, but may need to write bus drivers, in case of new board portings.
I am using RHEL-5, and install “kernel-2.6.15-1.2054_FC5.026test006.src.rpm”
after writing the sample code ofd.c from
and then writing command “make” won’t respond any thing rather it says.”No target specified & no makefile found. Stop”
Where did you do make? I assume it was in the folder with ofd.c and I believe that you have not created the Makefile in that folder, as mentioned in the article mentioned by you. Please do so, and then change the kernel source path in the Makefile to your installed kernel source, before you do make.
So in the case of a USB ethernet adapter, would it be correct to say that the actual network traffic, as in: ethernet frames, are “encapsulated” in USB-specific messages?
Or is it more a case like the following:
1. The driver and controller/device do some kind of USB handshake,
2. The driver then says: “I’m now going to send some end device specific data”
3. The driver sends a datastream which is meaningless to the host (USB) controller, but just blindly passes it through to the end device.
4. The driver then says “now I’m finished sending device specific data”
Just wondering what this would look like on the bus/controller level at that point in time…
First case is correct and second is also correct. It is actually a mix n match of both.
Ah I see, thanks and thanks for the excellent work you’ve done on these articles! 🙂
One more question though, if I may, because this is another thing that isn’t quite clear to me. You speak of this abstraction layer sitting “on top” of the controller drivers. What does it specifically abstract for the higher level (peripheral) driver?
Is it there to abstract the underlying bus technologie? Like say, in case of the evolution of USB2.0 to USB3.0 (or PCI-e 2.0 to PCI-e 3.0 for that matter)? So the higher level driver doesn’t have to be concerned about whether the peripheral device is connected to a USB2 or USB3 port?
And is the Windows equivalent of this the HAL (Hardware Abstraction Layer)?
Yes, it is a sort of HAL. More than abstracting bus technology, it is abstracting the architecture. For example, USB host controller may be on PCI on x86 but on AMBA on ARM. So, the controller driver itself is architecture-specific bus dependent driver, so that all the layers above it could be independent of it.
For device driver book
download and read it for more knowledge
#here i write the ANKIT in the 1 quantum of the scull and by this i am able to write in the kernel layer….
RCS file: application.c,v
Working file: application.c
head: 1.7
branch:
locks: strict
access list:
symbolic names:
keyword substitution: kv
total revisions: 7; selected revisions: 7
description:
make the open call.
—————————-
revision 1.7
date: 2014/05/18 09:45:03; author: root; state: Exp; lines: +1 -1
*** empty log message ***
—————————-
revision 1.6
date: 2014/05/18 09:10:37; author: root; state: Exp; lines: +8 -8
*** empty log message ***
—————————-
revision 1.5
date: 2014/05/18 04:26:31; author: root; state: Exp; lines: +8 -7
*** empty log message ***
—————————-
revision 1.4
date: 2014/05/13 15:18:27; author: root; state: Exp; lines: +1 -0
include the string.h
—————————-
revision 1.3
date: 2014/05/13 15:17:20; author: root; state: Exp; lines: +5 -1
use the write system call.
—————————-
revision 1.2
date: 2014/05/08 06:06:12; author: root; state: Exp; lines: +1 -1
*** empty log message ***
—————————-
revision 1.1
date: 2014/05/08 06:05:16; author: root; state: Exp;
Initial revision
=============================================================================
RCS file: declaration.h,v
Working file: declaration.h
head: 1.4
branch:
locks: strict
access list:
symbolic names:
keyword substitution: kv
total revisions: 4; selected revisions: 4
description:
declare the extern variable as dev, nod, minorno and majorno.
—————————-
revision 1.4
date: 2014/05/07 03:36:11; author: root; state: Exp; lines: +5 -0
define extern for new_dev quantum_size qset_size data_size and device_size
—————————-
revision 1.3
date: 2014/05/06 06:25:08; author: root; state: Exp; lines: +2 -2
*** empty log message ***
—————————-
revision 1.2
date: 2014/05/06 03:29:21; author: root; state: Exp; lines: +6 -0
declare a structure SkullDev with a structure cdev define in cdev,h
—————————-
revision 1.1
date: 2014/05/06 02:07:46; author: root; state: Exp;
Initial revision
=============================================================================
RCS file: devrelease.c,v
Working file: devrelease.c
head: 1.1
branch:
locks: strict
access list:
symbolic names:
keyword substitution: kv
total revisions: 1; selected revisions: 1
description:
—————————-
revision 1.1
date: 2014/05/08 04:56:14; author: root; state: Exp;
Initial revision
=============================================================================
RCS file: header.h,v
Working file: header.h
head: 1.16
branch:
locks: strict
access list:
symbolic names:
keyword substitution: kv
total revisions: 16; selected revisions: 16
description:
including the linux/modules.
includding the linux/init.
define GPL.
—————————-
revision 1.16
date: 2014/05/18 04:25:51; author: root; state: Exp; lines: +1 -1
*** empty log message ***
—————————-
revision 1.15
date: 2014/05/15 10:20:14; author: root; state: Exp; lines: +1 -0
include asm-generic uaccess.h header file for the copy_to_user.
—————————-
revision 1.14
date: 2014/05/13 13:27:30; author: root; state: Exp; lines: +2 -2
*** empty log message ***
—————————-
revision 1.13
date: 2014/05/11 14:39:30; author: root; state: Exp; lines: +4 -0
make the macro for the header because its included multiple times in the program…..and we have to use __header as macro otherwise it leads to a error.
—————————-
revision 1.12
date: 2014/05/07 03:41:07; author: root; state: Exp; lines: +4 -4
define MACROS
—————————-
revision 1.11
date: 2014/05/07 03:31:31; author: root; state: Exp; lines: +27 -1
define macro for QSET_SIZE, QUANTUM_SIZE, DATA_SIZE and DEVICE_SIZE.
define structure ScullQset.
—————————-
revision 1.10
date: 2014/05/06 07:17:41; author: root; state: Exp; lines: +2 -1
include the moduleparam.h for the module_param i.e. passing the arguments in the kernel layer.
—————————-
revision 1.9
date: 2014/05/06 06:36:59; author: root; state: Exp; lines: +1 -1
*** empty log message ***
—————————-
revision 1.8
date: 2014/05/06 06:33:38; author: root; state: Exp; lines: +1 -1
*** empty log message ***
—————————-
revision 1.7
date: 2014/05/06 06:31:04; author: root; state: Exp; lines: +2 -0
include slab.h for the kmalloc and kdev_t for the Macros MINOR and MAJOR.
—————————-
revision 1.6
date: 2014/05/06 06:26:43; author: root; state: Exp; lines: +1 -0
include cdev.h header file for struct cdev
—————————-
revision 1.5
date: 2014/05/06 06:24:27; author: root; state: Exp; lines: +4 -0
declare the struct SkullDev in header instead of in declaration.h.
—————————-
revision 1.4
date: 2014/05/06 02:12:04; author: root; state: Exp; lines: +4 -4
redfine the macro in header file again.
—————————-
revision 1.3
date: 2014/05/06 02:03:21; author: root; state: Exp; lines: +17 -0
include the linux/fs.h
difine the macros DEVNAME N
—————————-
revision 1.2
date: 2014/05/06 01:04:44; author: root; state: Exp; lines: +1 -1
correct the license GPL
—————————-
revision 1.1
date: 2014/05/06 00:58:23; author: root; state: Exp;
Initial revision
=============================================================================
RCS file: cleanup.c,v
Working file: cleanup.c
head: 1.6
branch:
locks: strict
access list:
symbolic names:
keyword substitution: kv
total revisions: 6; selected revisions: 6
description:
use the module_exit(exitfn) and define the declaration of exitfn
—————————-
revision 1.6
date: 2014/05/06 03:28:56; author: root; state: Exp; lines: +1 -0
kfree the memory allocated during kmalloc.
—————————-
revision 1.5
date: 2014/05/06 02:35:09; author: root; state: Exp; lines: +2 -1
include the declaration.h in this.
—————————-
revision 1.4
date: 2014/05/06 02:32:49; author: root; state: Exp; lines: +1 -1
*** empty log message ***
—————————-
revision 1.3
date: 2014/05/06 02:30:41; author: root; state: Exp; lines: +1 -1
the function name we use as __
—————————-
revision 1.2
date: 2014/05/06 02:06:30; author: root; state: Exp; lines: +3 -1
call unregister_chrdev_region for the unregistration.
—————————-
revision 1.1
date: 2014/05/06 01:00:24; author: root; state: Exp;
Initial revision
=============================================================================
RCS file: devopen.c,v
Working file: devopen.c
head: 1.4
branch:
locks: strict
access list:
symbolic names:
keyword substitution: kv
total revisions: 4; selected revisions: 4
description:
write the defination of the devopen
—————————-
revision 1.4
date: 2014/05/13 14:35:37; author: root; state: Exp; lines: +22 -0
call the trim function.
write the defination of the trim function.
—————————-
revision 1.3
date: 2014/05/11 15:53:59; author: root; state: Exp; lines: +3 -2
include declaration.h
—————————-
revision 1.2
date: 2014/05/11 15:26:48; author: root; state: Exp; lines: +12 -0
introduce container of which is used to point out the memory of external device.
—————————-
revision 1.1
date: 2014/05/08 04:56:14; author: root; state: Exp;
Initial revision
=============================================================================
RCS file: devwrite.c,v
Working file: devwrite.c
head: 1.12
branch:
locks: strict
access list:
symbolic names:
keyword substitution: kv
total revisions: 12; selected revisions: 12
description:
write the devwrite function.
map the devwrite function.
—————————-
revision 1.12
date: 2014/05/18 09:42:30; author: root; state: Exp; lines: +1 -1
return the size-ret to the write system call of the application layer i.e application.c program.
—————————-
revision 1.11
date: 2014/05/18 09:16:13; author: root; state: Exp; lines: +1 -1
*** empty log message ***
—————————-
revision 1.10
date: 2014/05/18 05:28:36; author: root; state: Exp; lines: +7 -7
make the scullqset_creat qset_create and quantum_creat
make the 1 quantum for the world emblogic.
and make the 1 scullqset for the world emblogic
—————————-
revision 1.9
date: 2014/05/18 04:26:34; author: root; state: Exp; lines: +31 -15
*** empty log message ***
—————————-
revision 1.8
date: 2014/05/15 14:20:59; author: root; state: Exp; lines: +1 -1
*** empty log message ***
—————————-
revision 1.7
date: 2014/05/15 11:56:09; author: root; state: Exp; lines: +1 -0
*** empty log message ***
—————————-
revision 1.6
date: 2014/05/15 11:53:16; author: root; state: Exp; lines: +6 -0
*** empty log message ***
—————————-
revision 1.5
date: 2014/05/15 11:37:23; author: root; state: Exp; lines: +7 -5
*** empty log message ***
—————————-
revision 1.4
date: 2014/05/15 10:21:47; author: root; state: Exp; lines: +28 -20
write the defination for the create_scullqset, create_qset, and create_quantum.
—————————-
revision 1.3
date: 2014/05/13 17:03:30; author: root; state: Exp; lines: +73 -0
*** empty log message ***
—————————-
revision 1.2
date: 2014/05/13 15:12:20; author: root; state: Exp; lines: +4 -1
give the defination of devwrite()
—————————-
revision 1.1
date: 2014/05/13 15:07:20; author: root; state: Exp;
Initial revision
=============================================================================
RCS file: init.c,v
Working file: init.c
head: 1.31
branch:
locks: strict
access list:
symbolic names:
keyword substitution: kv
total revisions: 31; selected revisions: 31
description:
use the module_init(initfn) and define the declaration of initfn
—————————-
revision 1.31
date: 2014/05/18 04:26:28; author: root; state: Exp; lines: +9 -0
*** empty log message ***
—————————-
revision 1.30
date: 2014/05/13 13:27:32; author: root; state: Exp; lines: +1 -0
*** empty log message ***
—————————-
revision 1.29
date: 2014/05/08 03:47:42; author: root; state: Exp; lines: +4 -4
*** empty log message ***
—————————-
revision 1.28
date: 2014/05/08 03:31:38; author: root; state: Exp; lines: +1 -1
*** empty log message ***
—————————-
revision 1.27
date: 2014/05/08 03:30:27; author: root; state: Exp; lines: +1 -1
*** empty log message ***
—————————-
revision 1.26
date: 2014/05/08 03:28:42; author: root; state: Exp; lines: +4 -2
*** empty log message ***
—————————-
revision 1.25
date: 2014/05/08 03:20:39; author: root; state: Exp; lines: +2 -1
*** empty log message ***
—————————-
revision 1.24
date: 2014/05/08 03:15:11; author: root; state: Exp; lines: +1 -1
*** empty log message ***
—————————-
revision 1.23
date: 2014/05/08 03:05:46; author: root; state: Exp; lines: +3 -3
*** empty log message ***
—————————-
revision 1.22
date: 2014/05/08 03:00:33; author: root; state: Exp; lines: +1 -1
*** empty log message ***
—————————-
revision 1.21
date: 2014/05/08 02:59:54; author: root; state: Exp; lines: +2 -2
*** empty log message ***
—————————-
revision 1.20
date: 2014/05/08 02:13:15; author: root; state: Exp; lines: +4 -3
replace by [] and -> by .
—————————-
revision 1.19
date: 2014/05/08 02:06:31; author: root; state: Exp; lines: +11 -7
print the major and minor number for all nodes.
—————————-
revision 1.18
date: 2014/05/07 03:41:18; author: root; state: Exp; lines: +1 -1
*** empty log message ***
—————————-
revision 1.17
date: 2014/05/07 03:34:19; author: root; state: Exp; lines: +29 -8
call MKDEV
call cdev_add
—————————-
revision 1.16
date: 2014/05/06 07:34:43; author: root; state: Exp; lines: +2 -1
*** empty log message ***
—————————-
revision 1.15
date: 2014/05/06 07:32:45; author: root; state: Exp; lines: +2 -2
*** empty log message ***
—————————-
revision 1.14
date: 2014/05/06 07:23:46; author: root; state: Exp; lines: +2 -2
define the module_param above the init_func
—————————-
revision 1.13
date: 2014/05/06 07:18:42; author: root; state: Exp; lines: +2 -0
define module_param call
—————————-
revision 1.12
date: 2014/05/06 06:44:23; author: root; state: Exp; lines: +2 -1
initilize the struct ScullDev above the function name
—————————-
revision 1.11
date: 2014/05/06 06:24:59; author: root; state: Exp; lines: +5 -5
*** empty log message ***
—————————-
revision 1.10
date: 2014/05/06 03:34:40; author: root; state: Exp; lines: +5 -5
*** empty log message ***
—————————-
revision 1.9
date: 2014/05/06 03:31:46; author: root; state: Exp; lines: +1 -1
*** empty log message ***
—————————-
revision 1.8
date: 2014/05/06 03:26:36; author: root; state: Exp; lines: +9 -0
call kmalloc and allocate the space uptp the structure SkullDev.
SkullDev is used to map the memory of the Device Driver.
defint the *skulldev which is extern and define in the struct SkullDev
—————————-
revision 1.7
date: 2014/05/06 02:55:59; author: root; state: Exp; lines: +1 -1
*** empty log message ***
—————————-
revision 1.6
date: 2014/05/06 02:31:58; author: root; state: Exp; lines: +1 -1
*** empty log message ***
—————————-
revision 1.5
date: 2014/05/06 02:30:20; author: root; state: Exp; lines: +2 -2
the fuction name we use __
—————————-
revision 1.4
date: 2014/05/06 02:24:27; author: root; state: Exp; lines: +2 -2
*** empty log message ***
—————————-
revision 1.3
date: 2014/05/06 02:17:40; author: root; state: Exp; lines: +5 -2
initialize the extern variable to MACRO within the function itself
—————————-
revision 1.2
date: 2014/05/06 02:05:12; author: root; state: Exp; lines: +21 -1
call alloc chr_dev region to register the DD into kernel and then call MAJOR and MINOR to display ita majorno and mno.
—————————-
revision 1.1
date: 2014/05/06 00:59:15; author: root; state: Exp;
Initial revision
=============================================================================
RCS file: prototype.h,v
Working file: prototype.h
head: 1.6
branch:
locks: strict
access list:
symbolic names:
keyword substitution: kv
total revisions: 6; selected revisions: 6
description:
mention the prototype of devopen and devrelease
—————————-
revision 1.6
date: 2014/05/15 11:37:21; author: root; state: Exp; lines: +1 -1
*** empty log message ***
—————————-
revision 1.5
date: 2014/05/15 10:20:55; author: root; state: Exp; lines: +3 -5
write the prototype fot the create_scullqset, create_qset, create_quantun.
—————————-
revision 1.4
date: 2014/05/13 17:03:23; author: root; state: Exp; lines: +4 -0
*** empty log message ***
—————————-
revision 1.3
date: 2014/05/13 15:11:44; author: root; state: Exp; lines: +1 -0
write the prototype of the devwrite()
—————————-
revision 1.2
date: 2014/05/13 14:34:33; author: root; state: Exp; lines: +1 -0
give the prototype of trim function used in the devopen and this trim function is used to flush the data, when its open in WR mode.
—————————-
revision 1.1
date: 2014/05/08 04:56:14; author: root; state: Exp;
Initial revision
=============================================================================
RCS file: fileopr.h,v
Working file: fileopr.h
head: 1.1
branch:
locks: strict
access list:
symbolic names:
keyword substitution: kv
total revisions: 1; selected revisions: 1
description:
this is the mapping of the open close and write system call from the application layer to the kernel system call…
—————————-
revision 1.1
date: 2014/05/18 09:50:00; author: root; state: Exp;
Initial revision
=============================================================================
Hey Ankit, What is this you have pasted for? Please elaborate.
Источник


