- Linux lpr command
- Printing in Linux
- Installing lpr, lpd, and CUPS
- Description
- Syntax
- Options
- Examples
- Related commands
- What does the lpr -h command exactly mean from linux?
- 1 Answer 1
- What is lpr in linux
- lp vs lpr. What to use in case of CUPS and what historical difference?
- 2 Answers 2
- Learn Linux, 101: Manage printers and printing
- Getting it down on paper
- Overview
- Printing in Linux
- Prerequisites
- Some printing history
- Manage print queues
- Manage user print jobs
- Printing files
- CUPS and the CUPS server
- File conversion filters
- Adding printers
- Troubleshooting
Linux lpr command

On Unix-like operating systems, the lpr command submits print jobs.
Printing in Linux
The simplest way to print in Linux is to cat a file to the printing device, like this:
What this command does is read the file my-file-to-print.txt and send it, byte by byte, to the printer device /dev/lp. This name is a symbolic link to the device, and may vary. Your printer may be another device name, for instance lp0. Normally cat sends its output to standard output (the terminal) but here we redirect it to the device /dev/lp with the > operator. Only the superuser can write directly to the printer device, which is why we have to preface the command with sudo.
lpr is much more user-friendly than this, however, and it allows you to queue print jobs. And most importantly, it allows you to access the printer device without being the superuser.
Installing lpr, lpd, and CUPS
The way lpr works, in a nutshell, is: it reads in the file and hands the printable data over to the linux printing daemon, lpd. lpd is a legacy piece of software for Linux, but it is supported under the modern system used by most Linux distributions, CUPS (the Common Unix Printing System).
You may need to manually install CUPS, and lpr itself, to print this way. If you’re operating Debian, or a Debian-derived Linux system like Ubuntu that uses the APT package managements system, you can install them by running the following command:
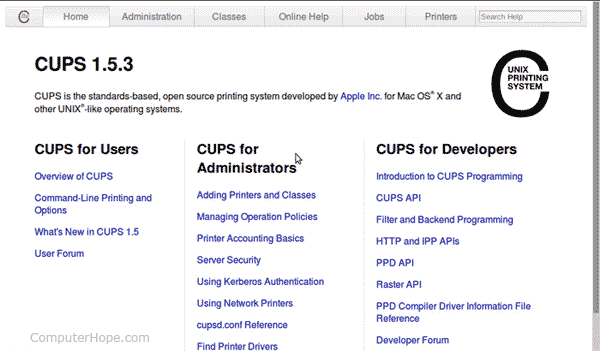
This command will install the Common Unix Printing System on your system. You can now set up CUPS by directing any web browser to the address: http://localhost:631
Doing so opens a web-based CUPS configuration screen, which should look something like this:
Then, from the command line, add your user to the group lpadmin with the command:
This command adds you to the group of users allowed to administer printers on your system. Now go back to the CUPS web administration panel, and under the administration tab, select «Add Printer.» You will be prompted for your username and password, and you can set up a new printer.
Description
lpr submits files for printing. Files named on the command line are sent to the named printer (or the default destination if no destination is specified). If no files are listed on the command-line, lpr reads the print file from the standard input.
Syntax
Options
| -E | Forces encryption when connecting to the server. |
| -H server[:port] | Specifies an alternate server. |
| -C «name« |
-T «name«
Examples
Submits a request to print the file myfile.txt.
cat a file (myfile.txt), piping the output to lpr, which reads its contents from standard input and sends it to the print daemon for printing.
Print 3 copies of myfile.txt.
Related commands
hostname — Set or print the hostname of system.
lp — Print a file on the System V operating system.
lpc — Control line printers.
lpq — List the status of available printers.
lprm — Remove requests from the print queue.
lpstat — List the status of the LP print services.
mail — Read, compose, and manage mail.
Источник
What does the lpr -h command exactly mean from linux?
I am new at Linux and in my school they asked me to give an example of this command
I already know that lpr its for printing and that the option -h disables banner printing.
What banner? As far as I am with Linux I only know to create banners from the banner command
Not how to save it or print it. Is that kind of banner what this -h option refers to?
Could you give me an example?
1 Answer 1
The first page explains what the command does, the second explains the options -o takes and the third explains what the banner page actually is; thus we obtain this paragraph from Wikipedia:
A banner page, also called a burst page, job sheet, or a printer separator, is used in computerized printing in order to separate documents (or «print jobs») from each other and to identify the originator of the print request by username. These pages are typically used in office environments where many people share a small number of printers. In some cases, print jobs are sent to a central processing area where messengers take the printouts back to the owner, but the usual practice in modern office environments is for the user to retrieve his or her own documents. The banner page makes it clear who printed each job.
You can find examples of what banner pages look like on Google Images.
Also, I should note that the Linux banner command is something completely different.
You are responsible for not doing your homework yourself, not me.
Источник
What is lpr in linux
This section discusses how to print files, examine the print queue, remove jobs from the print queue, format files before printing them, and configure your printing environment.
The Linux printing system—the lp system—is a port of the source code written by the Regents of the University of California for the Berkeley Software Distribution version of the UNIX operating system.
By far, the most simplistic way to print in the Linux operating system is to send the file to be printed directly to the printing device. One way to do this is to use the cat command. As the root user, one could do something like
In this case, /dev/lp is a symbolic link to the actual printing device—be it a dot-matrix, laser printer, typesetter, or plotter. (See ln (1) for more information on symbolic links.)
For the purpose of security, only the root user and users in the same group as the print daemon are able to write directly to the printer. This is why commands such as lpr , lprm , and lpq have to be used to access the printer.
Because of this, users have to use lpr to print a file. The lpr command takes care of all the initial work needed to print the file, and then it hands control over to another program, lpd , the line printing daemon. The line printing daemon then tells the printer how to print the file.
When lpr is executed, it first copies the specified file to a certain directory (the spool directory) where the file remains until lpd prints it. Once lpd is told that there is a file to print, it will spawn a copy of itself (what we programmers call forking). This copy will print our file while the original copy waits for more requests. This allows for multiple jobs to be queued at once.
The syntax of lpr (1) is a very familiar one,
If filename is not specified, lpr expects input to come from standard input (usually the keyboard, or another program’s output). This enables the user to redirect a command’s output to the print spooler. As such,
The lpr command accepts several command-line arguments that allow a user to control how it works. Some of the most widely used arguments are: — P printer specifies the printer to use, — h suppresses printing of the burst page, — s creates a symbolic link instead of copying the file to the spool directory (useful for large files), and — # num specifies the number of copies to print. An example interaction with lpr might be something like
This command will create a symbolic link to the file thesis.txt in the spool directory for the printer named dj , where it would be processed by lpd . It would then print a second copy of thesis.txt .
For a listing of all the options that lpr will recognize, see lpr (1).
To view the contents of the print queue, use the lpq command. Issued without arguments, it returns the contents of the default printer’s queue.
The returned output of lpq can be useful for many purposes.
Another useful feature of any printing system is the ability to cancel a job that has been previously queued. To do this, use lprm .
The above command cancels all of the print jobs that are owned by the user who issued the command. A single print job can be canceled by first getting the job number as reported by lpq and then giving that number to lprm . For example,
would cancel job 31 ( thesis.txt ) on the default printer.
The lpc (8) program is used to control the printers that lpd serves. you can enable or disable a printer or its queues, rearrange entries within a queue, and get a status report on the printers and their queues. Lpc is mostly used in a setup where there are multiple printers hanging off one machine.
The above will start the lpc program. By default, this enters you into an interactive mode, and you can begin issuing commands. The other option is to issue an lpc command on the command line.
A list of the available commands are in the lpd man page, but here are a few of the major commands you’ll want to know about. Any commands marked with option can either be a printer name (lp, print, etc) or the keyword all , which means all printers.
- disable option — prevents any new printer job from being entered
- down option — disables all printing on the printer
- enable option — allow new jobs to enter the print queue
- quit (or exit) — leave lpc
- restart option — restarts lpd for that printer
- status option — print status of printer
- up option — enable everything and start a new lpd
Just a quick note here on RedHat’s amazing printtool program. It seems to do everything that a magicfilter would do. RedHat already installs many of the programs to do the filtering. Here’s how I have my printer set up under RH 4.0 with an HP LJ 4L connected to my parallel port (should be the same for other versions of RH as well).
- Become root and fire up printtool (if you su’ed, you remembered to SETENV DISPLAY :0.0 and xhost +, right?)
- Click «Add», and hit «OK» for a local printer.
- Fill in the printer device (/dev/lp1 for me)
- Fill in the input filter — Select a printer type, resolution, and paper size (ljet4, 300×300, and letter)
- Hit «OK» all the way back, and restart the lpd.
Just like rolling an /etc/printcap file by hand, you can have multiple printer definitions for each physical printer. One for different paper sizes, resolutions, etc.
Источник
lp vs lpr. What to use in case of CUPS and what historical difference?
My Debian distro provide the lp and lpr commands for printing from CUPS.
I am a noob to printing in UNIX but have other tech skills.
I tried to find a difference in man lp and man lpr . It seems that lp only have more options.
The gv utility uses lp . I found older threads that explain that lpr is for network printing, while lp is a wrapper around lpr .
I just enjoyed reading:
2 Answers 2
LPR is part of the original BSD printing system. It was fairly simple and straightforward, but it didn’t have all the management capabilities that large print environments wanted. You could hack it to do all sorts of things by shoving filters in the right place, but it was pretty kludgy. It also included a very limited network functionality allowing you to send jobs to a remote printer, but since the protocol was only designed with plain text in mind, it never really had provisions for determining types of documents and translating them to what the printer could understand. Ad-hoc workarounds helped. Since the network protocol was so simple, lots and lots of network printers support it.
System V designed a bigger system which allowed you to have things like printer classes, and a print job would go to the first free printer in the class. (For example, if you had a machine room with three printers.) It also tried to build in more formalized support for filters and things like that, but alas, it’s also really, really old and not really designed for networked environments.
Nowadays, nobody really uses either system. CUPS has taken over the print systems, but it offers the command line tools for both lpr and SYSV printing (lp). That’s just for compatibility. You can use either command you find easiest.
CUPS itself has a nice page explaining the options for both: Command-Line Printing and Options. It states:
CUPS provides both the System V ( lp ) and Berkeley ( lpr ) printing commands for printing files.
Neither of the commands is considered preferred or superior. They are both included in CUPS to provide compatibility with both the System V and Berkeley legacy systems. Have a look at both program’s man pages (lp, lpr) to see which options they support and use whichever one you like best!
Источник
Learn Linux, 101: Manage printers and printing
Getting it down on paper
By Ian Shields
Published February 6, 2018
Overview
In this tutorial, learn to:
- Manage print queues
- Manage user print jobs
- Use CUPS
- Use LPD compatibility commands
- Troubleshoot printing problems
Printing in Linux
Although much of our communication today is electronic and paperless, we still have considerable need to print material from our computers. Bank statements, utility bills, financial and other reports, and benefits statements are just some of the items that we still print. This tutorial introduces you to printing in Linux using CUPS.
About this series
This series of tutorials helps you learn Linux system administration tasks. You can also use the material in these tutorials to prepare for the Linux Professional Institute’s LPIC-1: Linux Server Professional Certification exams.
See ” Learn Linux, 101: A roadmap for LPIC-1” for a description of and link to each tutorial in this series. TThe roadmap is in progress. This tutorial reflects the Version 5.0 objectives as updated on October 29, 2018. As tutorials are completed, they will be added to the roadmap.
CUPS, formerly an acronym for Common UNIX Printing System, is the printer and print job manager for Linux. Early computer printers typically printed lines of text in a particular character set and font size. Today’s graphical printers are capable of printing both graphics and text in a variety of sizes and fonts. Nevertheless, some of the commands you use today have their history in the older line printer daemon (LPD) technology.
This tutorial helps you prepare for Objective 108.4 in Topic 108 of the Linux Server Professional (LPIC-1) exam 102. The objective has a weight of 2.
Prerequisites
To get the most from the tutorials in this series, you need a basic knowledge of Linux and a working Linux system on which you can practice the commands covered in this tutorial. You should be familiar with GNU and UNIX® commands. Sometimes different versions of a program format output differently, so your results might not always look exactly like the listings shown here.
In this tutorial, I use Fedora 27 for examples.
Some printing history
This small history is not part of the LPI objectives but may help you with context for this objective.
Early computers mostly used line printers. These were impact printers that printed a line of text at a time using fixed-pitch characters and a single font. To speed up overall system performance, early mainframe computers interleaved work for slow peripherals such as card readers, card punches, and line printers with other work. Thus was born Simultaneous Peripheral Operation On Line or spooling, a term that is still commonly used when talking about computer printing.
In UNIX and Linux systems, printing initially used the Berkeley Software Distribution (BSD) printing subsystem, consisting of a line printer daemon (lpd) running as a server, and client commands such as lpr to submit jobs for printing. This protocol was later standardized by the IETF as RFC 1179, Line Printer Daemon Protocol.
System also had a printing daemon. It was functionally similar to the Berkeley LPD, but had a different command set. You will frequently see two commands with different options that accomplish the same task. For example, lpr from the Berkeley implementation and lp from the System V implementation each print files.
Advances in printer technology made it possible to mix different fonts on a page and to print images as well as words. Variable pitch fonts, and more advanced printing techniques such as kerning and ligatures, are now standard. Several improvements to the basic lpd/lpr approach to printing were devised, such as LPRng, the next generation LPR, and CUPS.
Many printers capable of graphical printing initially used the Adobe PostScript language. A PostScript printer has an engine that interprets the commands in a print job and produces finished pages from these commands. PostScript is often used as an intermediate form between an original file, such as a text or an image file, and a final form suitable for a particular printer that does not have PostScript capability. Conversion of a print job, such as an ASCII text file or a JPEG image to PostScript, and conversion from PostScript to the final raster form required for a non-PostScript printer is done using filters.
Today, Portable Document Format (PDF), which is based on PostScript, has largely replaced raw PostScript. PDF is designed to be independent of hardware and software and to encapsulate a full description of the pages to be printed. You can view PDF files as well as print them.
Manage print queues
Users direct print jobs to a logical entity called a print queue. In single-user systems, a print queue and a printer are usually equivalent. However, CUPS allows a system without an attached printer to queue print jobs for eventual printing on a remote system, and, through the use of classes to allow a print job directed to a class to be printed on the first available printer of that class.
You can inspect and manipulate print queues. Some of the commands to do so are new for CUPS. Others are compatibility commands that have their roots in LPD commands, although the current options are usually a limited subset of the original LPD printing system options.
You can check the queues known to the system using the CUPS lpstat command. Some common options are shown in Table 1.
Table 1. Options for lpstat
| Option | Purpose |
|---|---|
| -a | Display accepting status of printers. |
| -c | Display print classes. |
| -p | Display print status: enabled or disabled. |
| -s | Display default printer, printers, and classes. Equivalent to -d -c -v . Note that multiple options must be separated as values can be specified for many. |
| -s | Display printers and their devices. |
You may also use the LPD lpc command, found in /usr/sbin, with the status option. If you do not specify a printer name, all queues are listed. Listing 1 shows some examples of both commands.
Listing 1. Displaying available print queues
This example shows two printers, HL-2280DW and XP-610, and a class, anyprint , which allows print jobs to be directed to the first available of these two printers.
In this example, queuing of print jobs to HL-2280DW is currently disabled, although printing is enabled, as might be done in order to drain the queue before taking the printer offline for maintenance. Whether queuing is enabled or disabled is controlled by the cupsaccept and cupsreject commands. Formerly, these were accept and reject , but you will probably find these commands in /usr/sbin are now just links to the newer commands. Similarly, whether printing is enabled or disabled is controlled by the cupsenable and cupsdisable commands. In earlier versions of CUPS, these were called enable and disable , which allowed confusion with the builtin bash shell enable . Listing 2 shows how to enable queuing on printer HL-2280DW while disabling printing. Several of the CUPS commands support a -r option to give a reason for the action. This reason is displayed when you use lpstat , but not if you use lpc .
Listing 2. Enabling queuing and disabling printing
Note that an authorized user must perform these tasks. This may be root or another authorized user. See the SystemGroup entry in /etc/cups/cups-files.conf and the man page for cups-files.conf for more information on authorizing user groups.
Manage user print jobs
Now that you have seen a little of how to check on print queues and classes, I will show you how to manage jobs on printer queues. The first thing you might want to do is find out whether any jobs are queued for a particular printer or for all printers. You do this with the lpq command. If no option is specified, lpq displays the queue for the default printer. Use the -P option with a printer name to specify a particular printer or the -a option to specify all printers, as shown in Listing 3.
Listing 3. Checking print queues with lpq
In this example, five jobs, 4, 6, 7, 8, and 9, are queued for the printer named HL-2280DW and none for XP-610. Using the -P option in this case simply shows that the printer is ready but has no queued hobs. Note that CUPS printer names are not case-sensitive. Note also that user ian submitted a job twice, a common user action when a job does not print the first time.
In general, you can view or manipulate your own print jobs, but root or another authorized user is usually required to manipulate the jobs of others. Most CUPS commands also encrypted communication between the CUPS client command and CUPS server using a -E option
Use the lprm command to remove one of the .bashrc jobs from the queue. With no options, the current job is removed. With the — option, all jobs are removed. Otherwise, specify a list of jobs to be removed as shown in Listing 4.
Listing 4. Deleting print jobs with lprm
Note that user pat was not able to remove the first job on the queue, because it was for user ian. However, ian was able to remove his own job number 8.
Another command that will help you manipulate jobs on print queues is the lp command. Use it to alter attributes of jobs, such as priority or number of copies. Let us assume user ian wants his job 9 to print before those of user pat, and he really did want two copies of it. The job priority ranges from a lowest priority of 1 to a highest priority of 100 with a default of 50. User ian could use the -i , -n , and -q options to specify a job to alter and a new number of copies and priority as shown in Listing 5. Note the use of the -l option of the lpq command, which provides more verbose output.
Listing 5. Changing the number of copies and priority with lp
Finally, the lpmove command allows jobs to be moved from one queue to another. For example, we might want to do this because printer HL-2280DW is not currently printing. You can specify just a hob number, such as 9, or you can qualify it with the queue name and a hyphen, such as HL-2280DW-0. The lpmove command requires an authorized user. Listing 6 shows how to move these jobs to another queue, specifying first by printer and job ID, then all jobs for a given printer. By the time we check the queues again, one of the jobs is already printing.
Listing 6. Moving jobs to another print queue with lpmove
If you happen to use a print server that is not CUPS, such as LPD or LPRng, many of the queue administration functions are handled as subcommands of the lpc command. For example, you might use lpc topq to move a job to the top of a queue. Other lpc subcommands include disable , down , enable , hold , move , redirect , release , and start . These subcommands are not implemented in the CUPS lpc compatibility command.
Printing files
How are print jobs erected? Many graphical programs provide a method of printing, usually under the File menu option. These programs provide graphical tools for choosing a printer, margin sizes, color or black-and-white printing, number of copies, selecting 2-up printing (which is 2 pages per sheet, often used for handouts), and so on. Here I show you the command-line tools for controlling such features, and then a graphical implementation for comparison.
The simplest way to print any file is to use the lpr command and provide the file name. This prints the file on the default printer. The lp command can print files as well as modify print jobs. Listing 7 shows a simple example using both commands. Note that lpr quietly spools the job, but lp displays the job number of the spooled job.
Listing 7. Printing with lpr and lp
Table 2 shows some options that you may use with lpr . Note that lp has similar options to lpr , but names may differ; for example, -# on lpr is equivalent to -n on lp . Check the man pages for more information.
Table 2. Options for lpr
| Option | Purpose |
|---|---|
| -C, -J, or -T | Set a job name. |
| -P | Select a particular printer. |
| -# | Specify number of copies. Note this is different from the -n option you saw with the lp command. |
| -m | Send email upon job completion. |
| -l | Indicate that the print file is already formatted for printing. Equivalent to -o raw . |
| -o | Set a job option. |
| -p | Format a text file with a shaded header. Equivalent to -o prettyprint . |
| -q | Hold (or queue) the job for later printing. |
| -r | Remove the file after it has been spooled for printing. |
Listing 8 shows some of these options in action. I request an email confirmation after printing, that the job be held and that the file be deleted after printing.
Listing 8. Printing with lpr
I now have a held job in the HL-2280DW print queue. What to do? The lp command has options to hold and release jobs, using various values with the -H option. Listing 9 shows how to release the held job. Check the lp man page for information on other options.
Listing 9. Resuming printing of a held print job
Not all of the vast array of available printers support the same set of options. Use the lpoptions command to see the general options that are set for a printer. Add the -l option to display printer-specific options. Listing 10 shows two examples. Many common options relate to portrait/landscape printing, page dimensions, and placement of the output on the pages. See the man pages for details.
Listing 10. Checking printer options
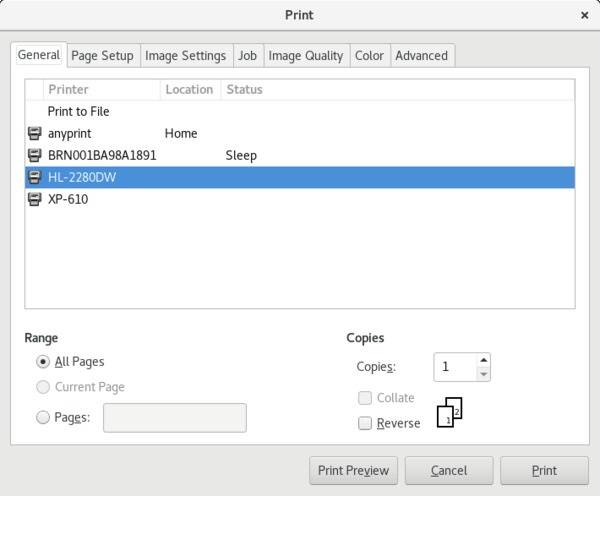
Most GUI applications have a print dialog, often using the File>Print menu choice. shows an example in GIMP, an image manipulation program.
Figure 1. Printing from the GIMP
So far, all our commands have been implicitly directed to the local CUPS print server. You can also direct most commands to the server on another system, by specifying the -h option along with a port number if it is not the CUPS default of 631.
CUPS and the CUPS server
At the heart of the CUPS printing system is the cupsd print server which runs as a daemon process. The CUPS configuration file is normally located in /etc/cups/cupsd.conf. The /etc/cups directory also contains other configuration files related to CUPS. CUPS is usually started during system initialization, but may be controlled by the CUPS script located in /etc/rc.d/init.d or /etc/init.d, according to your distribution. For newer systems using systemd initialization, the CUPS service script is likely in /usr/lib/systemd/system/cups.service. As with most such scripts, you can stop, start, or restart the daemon. See our tutorial Learn Linux, 101: Runlevels, boot targets, shutdown, and reboot for more information on using initialization scripts.
The configuration file, /etc/cups/cupsd.conf, contains parameters that control things such as access to the printing system, whether remote printing is allowed, the location of spool files, and so on. On some systems, a second part describes individual print queues and is usually generated automatically by configuration tools. Listing 11 shows some entries for a default cupsd.conf file. Note that comments start with a # character. Defaults are usually shown as comments and entries that are changed from the default have the leading # character removed.
Listing 11. Parts of a default /etc/cups/cupsd.conf file
File, directory, and user configuration directives that used to be allowed in cupsd.conf are now stored in cups-files.conf instead. This is to prevent certain types of privilege escalation attacks. Listing 12 shows some entries from cups-files.conf. Note that spool files are stored by default in the /var/spool file system as you would expect from the Filesystem Hierarchy Standard (FHS). See the man pages for cupsd.conf and cups-files.conf for more details on these configuration files.
Listing 12. Parts of a default /etc/cups/cups-files.conf
Listing 15 refers to the /etc/printcap file. This was the name of the configuration file for LPD print servers, and some applications still use it to determine available printers and their properties. It is usually generated automatically in a CUPS system, so you will probably not modify it yourself. However, you may need to check it if you are diagnosing user printing problems. Listing 13 shows an example.
Listing 13. Automatically generated /etc/printcap
Each line here has a printer name and printer description as well as the name of the remote machine (rm) and remote printer (rp) on that machine. Older /etc/printcap file also described the printer capabilities.
File conversion filters
You can print many types of files using CUPS, including plain text, PDF, PostScript, and a variety of image formats without needing to tell the lpr or lp command anything more than the file name. This magic feat is accomplished through the use of filters. Indeed, a popular filter for many years was named magicfilter.
CUPS uses Multipurpose Internet Mail Extensions (MIME) types to determine the appropriate conversion filter when printing a file. Other printing packages might use the magic number mechanism as used by the file command. See the man pages for file or magic for more details.
Input files are converted to an intermediate raster or PostScript format using filters. Job information such as number of copies is added. The data is finally sent through a beckend to the destination printer. There are some filters (such as a2ps or dvips ) that you can use to manually filter input. You might do this to obtain special formatting results, or to handle a file format that CUPS does not support natively.
Adding printers
CUPS supports a variety of printers, including:
- Locally attached parallel and USB printers
- Internet Printing Protocol (IPP) printers
- Remote LPD printers
- Microsoft® Windows® printers using SAMBA
- Novell printers using NCP
- HP Jetdirect attached printers
Most systems today attempt to autodetect and autoconfigure local hardware when the system starts or when the device is attached. Similarly, many network printers can be autodetected. Use the CUPS web administration tool (( http://localhost:631 or http://127.0.0.1:631 ) to search for or add printers. Many distributions include their own configuration tools, for example YaST on SUSE systems. shows the CUPS interface using localhost:631 and shows the GNOME printer settings dialog on Fedora 27.
Figure 2. Using the CUPS web interface
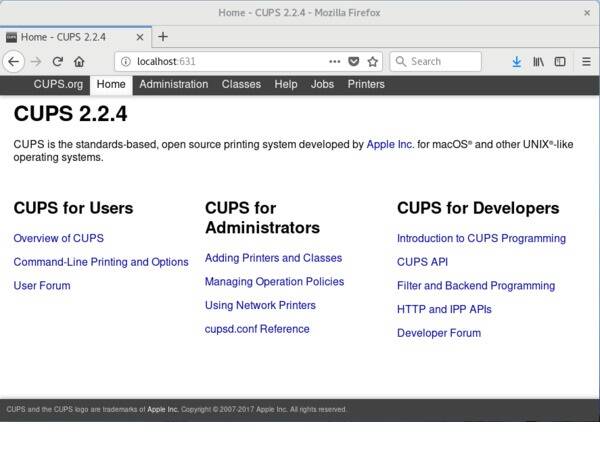
Figure 3. Using printer settings on Fedora 27

You can also configure printers from a command line. Before you configure a printer, you need some basic information about the printer and about how it is connected. If a remote system needs a user ID or password, you will also need that information.
You need to know what driver to use for your printer. Not all printers are fully supported on Linux and some may not work at all, or only with limitations. Check at OpenPrinting.org (see resources on the right) to see if there is a driver for your particular printer. The lpinfo command can also help you identify the available device types and drivers. Use the -v option to list supported devices and the -m option to list drivers, as shown in Listing 14.
Listing 14. Available printer drivers
The Epson-XP-610_Series-epson-escpr-en.ppd.gz driver is located in the /usr/share/ppd/Epson/epson-inkjet-printer-escpr/ directory on my system.
Is you don’t find a driver, check the printer manufacturer’s website in case a proprietary driver is available. For example, at the time of writing Brother has a driver for my HL-2280DW printer, but this driver is not listed at OpenPrinting.org.
Once you have the basic information, you can configure a printer using the lpadmin command as shown in Listing 15. For this purpose, I will create another instance of my HL-2280DW printer for duplex printing.
Listing 15. Configuring a printer
Rather than creating a copy of the printer for duplex printing, you can just create a new class for duplex printing using lpadmin with the -c option .
If you need to remove a printer, use lpadmin with the -x option.
Listing 16 shows how to remove the printer and create a class instead.
Listing 16. Removing a printer and creating a class
You can also set various printer options using the lpadmin or lpoptions commands. See the man pages for more details.
Troubleshooting
If you are having trouble printing, try these tips:
- Ensure that the CUPS server is running. You can use the lpstat command, which will report an error if it is unable to connect to the cupsd daemon. Alternatively, you might use the ps -ef command and check for cupsd in the output.
- If you try to queue a job for printing and get an error message indicating that the printer is not accepting jobs results, use lpstat -a or lpc status to check that the printer is accepting jobs.
- If a queued job does not print, use lpstat -p or lpc status to check that the printer is accepting jobs. You may need to move the job to another printer as discussed earlier.
- If the printer is remote, check that it still exists on the remote system and that it is operational.
- Check the configuration file to ensure that a particular user or remote system is allowed to print on the printer.
- Ensure that your firewall allows remote printing requests, either from another system to your system, or from your system to another, as appropriate.
- Verify that you have the right driver.
As you can see, printing involves the correct functioning of several components of your system and possibly network. In a tutorial of this length, we can only give you starting points for diagnosis. Most CUPS systems also have a graphical interface to the command-line functions that we discuss here. Generally, this interface is accessible from the local host using a browser pointed to port 631 ( http://localhost:631 or http://127.0.0.1:631 ), as shown earlier in .
You can debug CUPS by running it in the foreground rather than as a daemon process. You can also test alternate configuration files if necessary. Run cupsd -h for more information, or see the man pages.
CUPS also maintains an access log and an error log. You can change the level of logging using the LogLevel statement in cupsd.conf. By default, logs are stored in the /var/log/cups directory. They may be viewed from the Administration tab on the browser interface ( http://localhost:631 ). Use the cupsctl command without any options to display logging options. Either edit cupsd.conf, or use cupsctl to adjust various logging parameters. See the cupsctl man page for more details.
The Ubuntu Wiki also has a good page on Debugging Printing Problems.
This concludes your introduction to printing and CUPS.
Источник


