- What Is a Mapped Drive?
- Definition, advantages, and limitations of using mapped drives
- Local Drives vs Mapped Drives
- Advantages of Using Mapped Drives
- Limitations of Mapped Drives
- Using Mapped Drives in Windows
- Map vs Mount
- How to Map a Network Drive in Windows
- How To Map a Network Drive On Windows 10
- Using File Explorer to Map Network Drive Windows 10
- Using Command Prompt to Map a Network Drive Windows 10
- How To Map a Network Drive On Windows 7, 8 & XP
What Is a Mapped Drive?
Definition, advantages, and limitations of using mapped drives
:max_bytes(150000):strip_icc()/tim-fisher-5820c8345f9b581c0b5a63cf.jpg)
A mapped drive is just a shortcut to a drive that’s physically located on a different computer.
The shortcut on your computer looks just like one for a local hard drive (like the C drive) with its own letter assigned to it and opens as if it were, but all the files in the mapped drive are actually physically stored on another computer.
It’s similar to a shortcut you may have on your desktop, like one used to open a picture file in your Pictures folder, but is instead used to access something from a different computer.
:max_bytes(150000):strip_icc()/man-woman-laptop-phone-turnbull-ikon-images-getty-images-57c76ba03df78c71b65a7405.jpg)
Mapped drives can be used to reach resources on a different computer on your local network, as well as files on a website or FTP server.
Local Drives vs Mapped Drives
A file stored locally on your computer may look something like this, where a DOC file is stored inside a folder on your C drive:
To give other people on your network access to this file, you would share it, making it accessible through a path like this (where «FileServer» is the name of your computer):
To make it even easier to access the shared resource, you could have others create a mapped drive to your computer using the above path, like P:\Project_Files, making it look identical to a local hard drive or USB device when on that other computer.
In this example, the user on the other computer could simply open P:\Project_Files to have access to all the files in that folder instead of having to browse through a large collection of shared folders to find the files they want.
Advantages of Using Mapped Drives
Because mapped drives provide the illusion of data being stored locally on your computer, it’s perfect for storing large files, or large collections of files, somewhere else that has more hard drive space.
For example, if you have a small tablet computer that you use a lot, but have a desktop computer on your home network with a much bigger hard drive, storing files in a shared folder on the desktop PC, and mapping that shared location to a drive letter on your tablet, gives you access to far more space than you would otherwise have access to.
Some online backup services support backing up files from mapped drives, which means you can back up data not only from your local computer but also any file you’re accessing through a mapped drive.
Similarly, some local backup programs let you use a mapped drive as if it were an external HDD or some other physically attached drive. What this does is lets you back up files over the network to a different computer’s storage device.
Another benefit is that multiple people can share access to the same files. This means data can be shared among co-workers or family members without the need to send emails back and forth when they’re updated or changed.
Limitations of Mapped Drives
Mapped drives depend entirely on a working network. If the network is down, or your connection to the computer that’s serving the shared files isn’t working properly, you won’t have access to whatever is being stored via the mapped drive.
Using Mapped Drives in Windows
On Windows computers, you can see currently mapped drives, as well as create and remove mapped drives, through File Explorer/Windows Explorer. This is most easily opened with the WIN+E shortcut.
For example, with This PC opened in Windows 10 and Windows 8, you can open and delete mapped drives, and the Map network drive button is how you connect to a new remote resource on the network. Steps for older versions of Windows are a bit different.
:max_bytes(150000):strip_icc()/map-network-drive-windows-10-1a25a45151cb44c7b2f680b89b22bb7b.png)
An advanced way to work with mapped drives in Windows is with the net use command. Follow that link to learn more about how to manipulate mapped drives through the Windows Command Prompt, something that can even be carried over into scripts so that you can create and delete mapped drives with a BAT file.
Map vs Mount
Although they might seem similar, mapping and mounting files are not the same. While mapping files lets you open remote files as if they were stored locally, mounting a file lets you open a file as if it were a folder. It’s common to mount image file formats like ISO or file backup archives.
For example, if you downloaded Microsoft Office in the ISO format, you can’t just open the ISO file and intend for your computer to understand how to install the program. Instead, you could mount the ISO file to trick your computer into thinking it’s a disc you’ve inserted into the disc drive.
Then, you could open the mounted ISO file like you would any disc, and browse, copy, or install its files since the mounting process opened and displayed the archive like a folder.
How to Map a Network Drive in Windows
Tips for Windows XP, Vista, 7, 8, 10 and even via the command prompt
A mapped drive is a shortcut to the specific drive on a different device that enables you to access resources shared on a local network, or files on a FTP server or website.
It looks just like the shortcut on your local hard drive with its own letter, even opening as though it were on the drive, but the files are physically stored on a different computer or device altogether.
Mapping is different from mounting a drive as it allows you to open remote files as though they were stored on your own computer, while mounting allows you to open a file as if it were a folder.

The main limitation with using a mapped network drive is that it depends on a working network, so if it’s down, or the connection isn’t working properly, you can’t access the files in the mapped drive.
How To Map a Network Drive On Windows 10
We’ll show you two ways of mapping a network drive in Windows 10: Using File Explorer and using Command Prompt.
Using File Explorer to Map Network Drive Windows 10
- Connect your network drive to your router.
- Click Start on the taskbar and select Settings>Network & Internet.
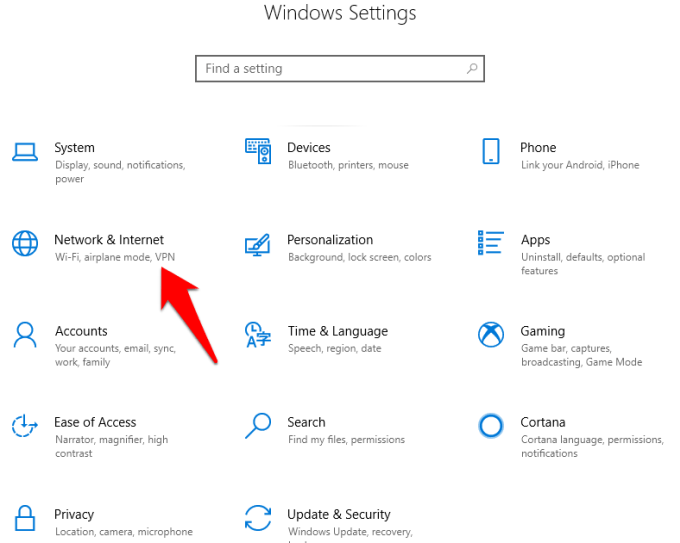
- Go to Change AdvancedSharing options.
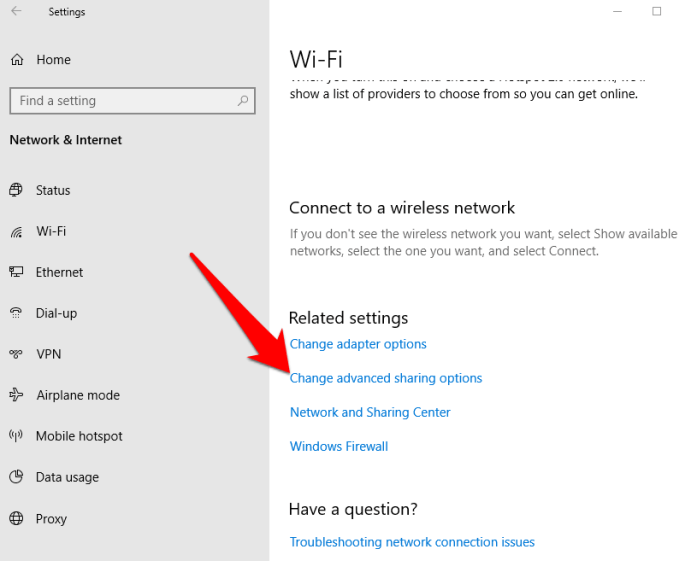
- Click Turn on network discovery.
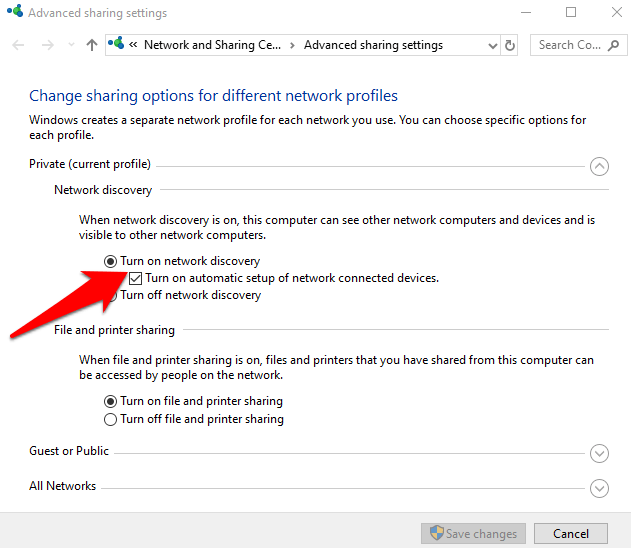
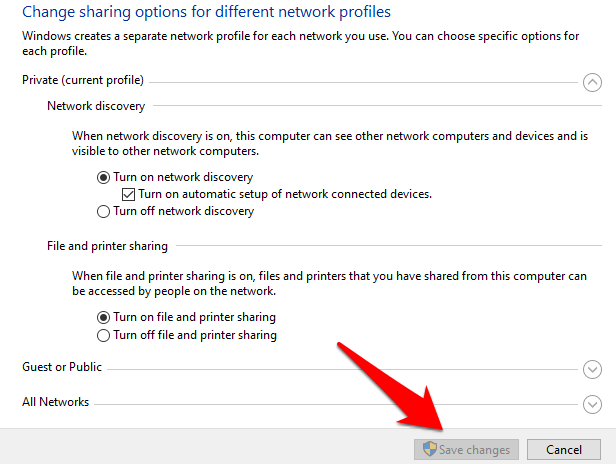
- Click Save changes. If the Save Changes button is grayed out, it means Network Discovery is already enabled, so you can ignore this step.
- Next, open File Explorer by pressing the Windows logo key+E.
- Click This PC and go to the Computer tab. Alternatively, search for This PC with Cortana.
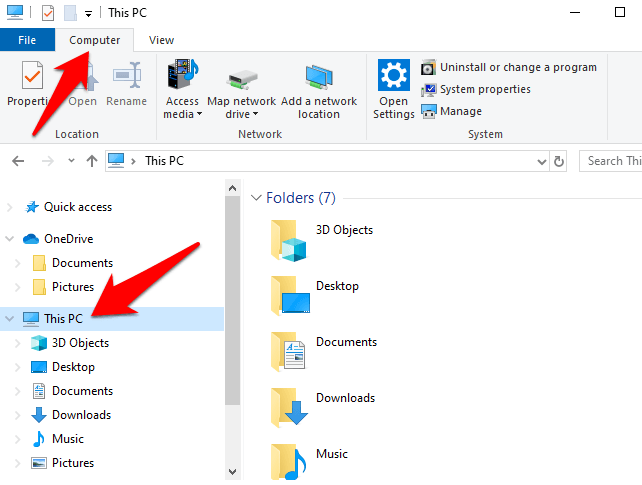
- In the main window, check the letters for each drive you see and note them down so that you don’t create duplicate ones. Avoid using letters C, D and F as these are usually assigned to the local storage and removable media like USB drives and discs. This also ensures you don’t encounter complications down the line.
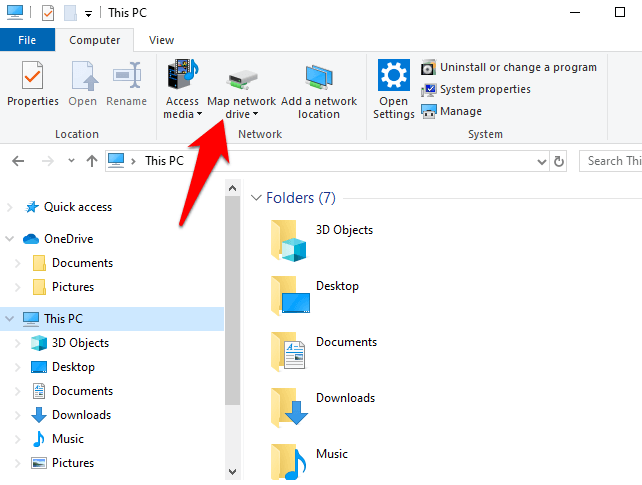
- Click the Map Network Drive button (helps you connect to a new remote resource on the network).
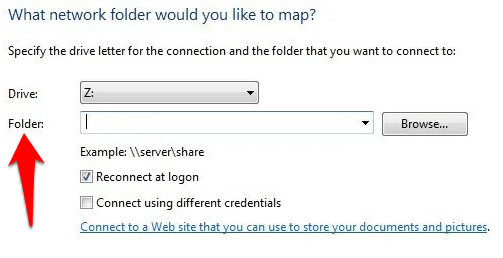
- Select a Drive letter in the drive list, and search for the network drive. To navigate to the drive itself, click Browse in the popup menu.
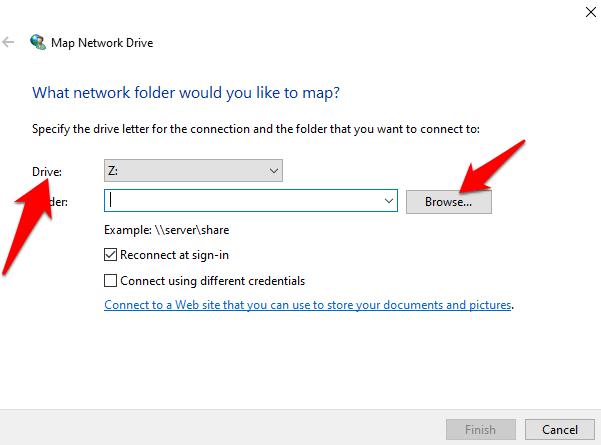
Note: If this is your first network drive, you’ll see one on the drive list. If you have several network drives, you’ll see several of them when you click the Browse button.
- In the Folder box, type the folder or computer path, or click Browse to find it.
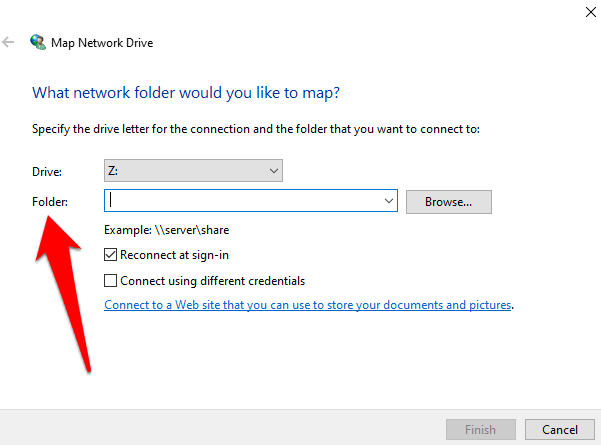
- Select Reconnect at sign-in to connect each time you log into your computer. It ensures the mapped drive is available to you every time, but if you don’t want this, uncheck the box.
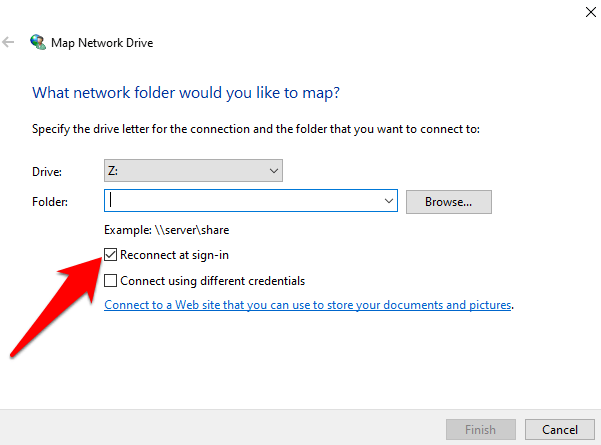
- Find the shared folder in the drive or create a new one, where you can drop files into for access from any location. To create a folder, right-click New Folder, and give it a name you can remember when you need to find it on a different device.
- If you need to access the shared network folder using credentials for a different account, tick Connect using different credentials.
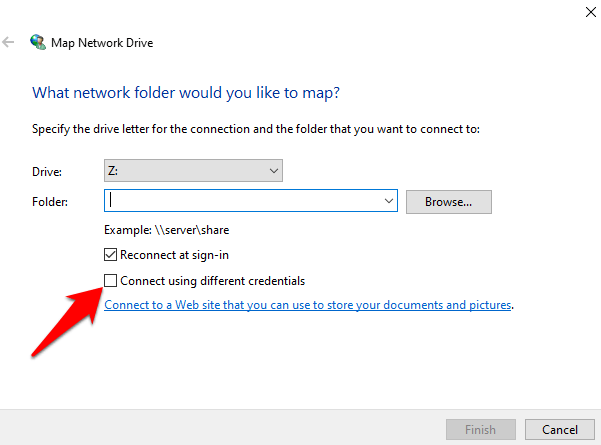
- You’ll get a prompt to enter the shared network login information i.e. username and password of the computer you want to connect to. Use a password you can remember in case other colleagues or family members need to use it.
Note: If your NAS device has a username and password, you may need to enter it to access the drive.
- Click Finish. You’ll see a new window for the drive denoted by the drive letter you assigned earlier. It’ll also display the shared folders, from which you can view and open files on the network drive.
Note: If you’re unable to map a network folder or drive, check whether the computer you’re trying to connect to is turned off, or check whether you have the correct permissions. You can also check with your network administrator.
You’ll see the network drive listed on the sidebar in File Explorer under This PC. From here, you can open it and drag files such as documents, media or others to it. You can also copy/cut and paste as you would with other files and folders.
When you’re done with the mapped drive and don’t need it anymore, just right-click on it and select Disconnect.
Using Command Prompt to Map a Network Drive Windows 10
An advanced way of working with a mapped drive in Windows is by using the net use command in Windows, or in PowerShell if you prefer.
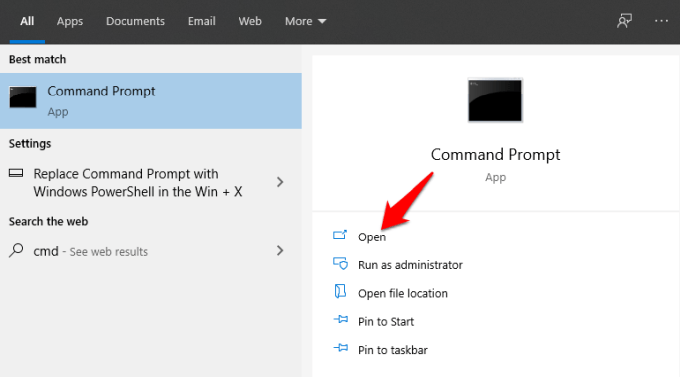
- Click Start and type CMD in the search bar.
- Click Open under Command Prompt.
- In the Command Prompt window, type net use DRIVE: PATH and press Enter. (DRIVE represents the drive letter you’ll use and PATH represents the UNC path for sharing. So it would look something like: net use g: \\tower\entertainment

- You can add your username and password to the command if the share you’re connecting to is protected with a password or other authentication and you don’t want to keep typing the credentials each time you open the network drive.
For example, if our username is OTT and password is bringthatbeatback, the command will look something like: net use g: \\tower\entertainment /user:OTT bringthatbeatback

- When you restart your computer, the mapped drive may disappear, as they’re not persistent by default. In this case, you can add the /persistent switch to make sure they stick around.
To create a persistent connection, type /persistent:Yes so future connections made using this command will be persistent until you turn it off using the /persistent:No toggle.

- To delete the mapped network drive in command prompt, specify the drive letter and add/delete switch as follows: net use DRIVE: /delete. For example, we used drive letter g, so you’ll type the command net use g: /delete
How To Map a Network Drive On Windows 7, 8 & XP
Microsoft stopped supporting Windows 7 as of January 2020, but you can upgrade to Windows 10 so you can get regular security updates and tech support.
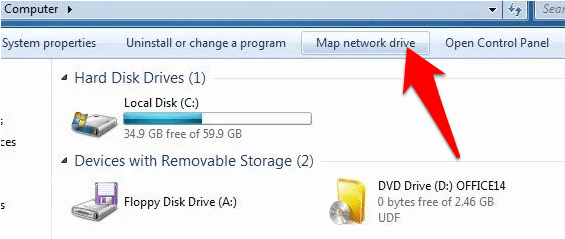
- Mapping a network drive in these older Windows versions is simpler. On the Start menu or desktop, click Computer and then select Map network drive.
- Select the drive letter for the network drive you want to map. In the Folder field, enter the UNC path and then click Finish. Windows XP has several different methods to map a network drive, but the above steps use Windows Explorer to map the drive.
Were you able to map your network drive using the steps we’ve covered in this guide? Tell us in a comment below.
Elsie is a technology writer and editor with a special focus on Windows, Android and iOS. She writes about software, electronics and other tech subjects, her ultimate goal being to help people out with useful solutions to their daily tech issues in a simple, straightforward and unbiased style. She has a BCom degree in Marketing and currently pursuing her Masters in Communications and New Media. Read Elsie’s Full Bio


