- What is nmap in linux
- Contents
- Installation
- Usage
- Specifying the target
- Specifying multiple targets
- List scan
- Default options
- Ping scan
- Ping scan types
- Port scan
- Scan types
- Anti-scanning techniques
- iptables PSD module
- Avoiding detection
- Tips and Tricks
- Limiting scan speed
- Specify targets input from a list file
- Specify targets to exclude from scan
- Spoofing
- Speeding up the scan
- Scan port number 0
- File output formats
- Как пользоваться Nmap для сканирования сети
- Как работает Nmap?
- Синтаксис Nmap
- Как пользоваться Nmap для сканирования портов в Linux
- Выводы
What is nmap in linux
 This article or section needs expansion.
Nmap (“Network Mapper”) is an open source tool for network exploration and security auditing. It was designed to rapidly scan large networks, although it works fine against single hosts. Nmap uses raw IP packets in novel ways to determine what hosts are available on the network, what services (application name and version) those hosts are offering, what operating systems (and OS versions) they are running, what type of packet filters/firewalls are in use, and dozens of other characteristics. While Nmap is commonly used for security audits, many systems and network administrators find it useful for routine tasks such as network inventory, managing service upgrade schedules, and monitoring host or service uptime.
Contents
Installation
Nmap has a GUI called zenmap AUR that can be installed separately, but this article will cover only command-line usage.
Usage
Specifying the target
There are a number of ways to tell Nmap the list of IP addresses to scan. The simplest form is to just pass the address or domain name:
Specifying multiple targets
Using CIDR notation, for example to scan all 256 addresses beginning with 10.1.1 :
Using the dash, for example to scan 10.1.50.1 , 10.1.51.1 and 10.1.52.1 :
Using commas (does what you expect):
List scan
The list scan option ( -sL ) is useful for making sure that correct addresses are specified before doing the real scan:
List scan simply prints the specified addresses without sending a single packet to the target.
Default options
If you specify only an IP address or domain name and no other options:
Nmap will do the following:
- The IP address is reverse-DNS resolved to domain name, or vice-versa in case a domain name is specified (to disable, pass -n )
- Ping scanning using TCP ACK:80 and ICMP. This is equivalent to -PA -PE (to disable, pass -PN )
- Scans the host(s)’s top 1000 most popular ports. When running as root, SYN stealth scan is used. When running as user, connect scan is used.
Ping scan
Ping scanning (host discovery) is a technique for determining whether the specified computers are up and running. Nmap performs ping scan by default before port scan to avoid wasting time on hosts that are not even connected. To instruct Nmap to only perform ping scan:
This will cause Nmap to ping every one of the specified addresses and then report the list of hosts which did respond to the ping.
Nmap uses different kinds of ping packets when run with user or root privileges and when scanning the same or different subnets:
| External IP | Local IP | |
|---|---|---|
| User privileges | TCP SYN at ports 80 & 443 | TCP SYN at ports 80 & 443 and ARP |
| Root privileges | TCP SYN at ports 80 & 443 and IGMP | ARP |
Ping scan types
| Option | Ping scan type |
|---|---|
| -Pn | Disable ping scan entirely |
| -PS | TCP SYN (default at port 80) |
| -PA | TCP ACK (default at port 80) |
| -PU | UDP |
| -PY | SCTP INIT |
| -PE | ICMP Echo |
| -PP | ICMP timestamp |
| -PM | ICMP address mask |
| -PO | Other IP protocol |
| -PR | ARP scan |
-Pn is useful when the machine is heavily firewalled, TCP 80 and 443 ports and IGMP requests are blocked, but the IP address might still have a machine listening on other less common ports.
Port scan
There are 3 main states a port can be in:
- open — there is a program listening and responding to requests on this port
- closed — the host replies with an «error: no program listening on this port» reply to requests to this port
- filtered — the host doesn’t reply at all. This can be due to restrictive firewall rules, which «drop» a packet without sending a reply
In addition to these there are 3 more states that Nmap can classify a port. These are used when Nmap cannot reliably determine the state but suspects two of the three possible states:
- open|closed ( unfiltered ) — the port is either open or closed
- closed|filtered — the port is either closed or filtered
- open|filtered — the port is either open or filtered
By default Nmap scans the 1000 most popular ports found in /etc/nmap/nmap-services . To specify a different number of common ports:
To specify custom port numbers, use -p :
Dashes and commas work just like in #Specifying the target. In addition, it is possible to specify all ports before/after given one by skipping the starting/ending port when using a dash. For example to scan all possible 65535 ports (except port number 0):
Scan types
| Option | Port scan type |
|---|---|
| -sP | Ping scan only |
| -sS | TCP SYN (stealth) (Default as root) |
| -sT | TCP connect (Default as user) |
| -sA | TCP ACK |
| -sF | TCP FIN |
| -sX | TCP FIN, SYN, ACK |
| -sW | TCP window |
| -sM | TCP Miamon |
| -sU | UDP scan |
| -sI | Idle scan |
| -b | FTP bounce scan |
| -sO | Other IP protocol |
Anti-scanning techniques
iptables PSD module
PSD is an extension module of iptables. It is used on some linux-based commercial routers as well.
It has 4 parameters:
- —psd-weight-threshold threshold , default value: 21
Total weight of the latest TCP/UDP packets with different destination ports coming from the same host to be treated as port scan sequence.
- —psd-delay-threshold delay , default value: 300 (3 seconds)
Delay (in hundredths of second) for the packets with different destination ports coming from the same host to be treated as possible port scan subsequence.
- —psd-lo-ports-weight weight , default value: 3
Weight of the packet with privileged (
- —psd-hi-ports-weight weight , default value: 1
Weight of the packet with non-priviliged (>1024) destination port.
The principle behind PSD is simple. If requests from a single IP have gained a value more than threshold in delay seconds, then the IP is classified as a port scanner. In a math expression:
Here are some examples:
- With default parameters, if at least 7 priviliged ports are hit within 3 seconds, it is classified as a port scan.
- With default parameters, if at least 21 non-privilged ports are hit withing 3 seconds, it is classified as a port scan.
- With default parameters, if 4 privileged ports and 9 non-priviliged ports are hit within 3 seconds, it is classified as a port scan, because 4*3 + 9*1 >= 21 .
Avoiding detection
One of the simplest ways to avoid PSD is to simply scan slowly. For default values this parameter would suffice:
Another interesing fact about PSD is that it does not detect a request as a port scan when the ack or rst flags are set (See the function is_portscan in xt_psd.c)
Also, if you are port scanning a host and the latter has an HTTP(S) service running on it, nmap will use Mozilla/5.0 (compatible; Nmap Scripting Engine; https://nmap.org/book/nse.html) as default user agent. Your action will thus be easily detected, especially if an administrator or a robot are taking measures if such an user agent appears in the logs. Hopefully, nmap allows us to change that string easily: just pass -script-args http.useragent=»user agent you want» . Source
Tips and Tricks
Limiting scan speed
Nmap scans are fast. While this is often a desirable feature, it can be counter-productive as well. For example when you want to test your system’s firewall without disabling any activated flood detection rules, or when you want to run a long-term test for a specific port/service. The following options specify how fast Nmap sends packets.
To send a packet at most every 3.333 seconds:
Alternatively, to send a packet every 3.1 seconds:
For other timing and parallelization options, see nmap(1) .
Specify targets input from a list file
Often it is necessary to scan a large number of non-adjacent addresses. Passing them on the command line is usually not convenient. For this reason Nmap supports input from a list file ( -iL ):
Addresses in the file must be separated with a whitespace.
Alternatively, Nmap can read the list from standard input (the — means standard input in many command-line programs):
Specify targets to exclude from scan
The same from a file:
Spoofing
To spoof source IP:
To spoof the source MAC address:
To spoof source port:
Speeding up the scan
By default, Nmap performs DNS/reverse-DNS resolution on targets. To tell Nmap never do any DNS resolution, pass the -n option:
This will speed the scan about 2 times.
Scan port number 0
By default port 0 is skipped from scans, even if -p — is specified. To scan it, it must be explicitly specified. For example to scan every possible port:
Remember that this port number is invalid in RFC standards. However it can be used by malware and the like to avoid more naive port scanners.
File output formats
Nmap has built-in support for for file output alongside with terminal output:
- -oN filename
Normal output, same as the terminal output
- -oX filename
XML output, contains very detailed information about the scan, easy to parse with software
- -oG filename
Grepable output, deprecated
- -oA
All of the above combined. Creates files called sitename.nmap , sitename.xml and sitename.gnmap if no filename is specified
For example to output to the terminal, to file and to XML file:
Источник
Как пользоваться Nmap для сканирования сети
Nmap — это очень популярный сканер сети с открытым исходным кодом, который может использоваться как в Windows, так и в Linux. Программа Nmap или Network Mapper была разработана Гордоном Луоном и на данный момент используется специалистами по безопасности и системными администраторами по всему миру.
Эта программа помогает системным администраторам очень быстро понять какие компьютеры подключены к сети, узнать их имена, а также посмотреть какое программное обеспечение на них установлено, какая операционная система и какие типы фильтров применяются. Функциональность программы может быть расширена за счет собственного скриптового языка, который позволяет администраторам автоматизировать много действий.
Например, с помощью скриптов можно автоматически обнаруживать новые уязвимости безопасности в вашей сети. Namp может использоваться с хорошими и плохими намерениями, будьте аккуратны, чтобы не использовать nmap против закона. В этой инструкции мы рассмотрим как пользоваться namp для сканирования портов в операционной системе Linux. Но сначала нужно попытаться понять как работает эта утилита.
Как работает Nmap?
В компьютерных сетях все подключенные устройства имеют свой ip адрес. Каждый компьютер поддерживает протокол ping, с помощью которого можно определить подключен ли он к сети. Мы просто отправляем ping запрос компьютеру, и если он отзывается, то считаем, что он подключен. Nmap использует немного иной подход. Компьютеры также определенным образом реагируют на те или иные сетевые пакеты, утилита просто отправляет нужные пакеты и смотрит какие хосты прислали ответ.
Но об этом вы, наверное, уже знаете. Более интересно то как Nmap узнает какие сервисы запущены на машине. Суть работы всех сетевых программ основана на портах. Чтобы получить сообщение из сети, программа должна открыть порт на вашем компьютере и ждать входящих соединений. А для отправки сообщения по сети нужно подключиться к уже другой программой (адресатом) порту. Затем программе необходимо будет открыть порт, на котором она будет ждать ответа.
Утилита nmap в процессе сканирования сети перебирает доступный диапазон портов и пытается подключиться к каждому из них. Если подключение удалось, в большинстве случаев, передав несколько пакетов программа может даже узнать версию программного обеспечения, которые ожидает подключений к этому порту. Теперь, после того, как мы рассмотрели основы, рассмотрим как пользоваться nmap для сканирования портов и сети.
Синтаксис Nmap
Команда запуска Nmap очень проста для этого достаточно передать ей в параметрах целевой IP адрес или сеть, а также указать опции при необходимости:
$ nmap опции адрес
Теперь давайте рассмотрим основные опции, которые понадобятся нам в этой статье.
- -sL — просто создать список работающих хостов, но не сканировать порты nmap;
- -sP — только проверять доступен ли хост с помощью ping;
- -PN — считать все хосты доступными, даже если они не отвечают на ping;
- -sS/sT/sA/sW/sM — TCP сканирование;
- -sU — UDP сканирование nmap;
- -sN/sF/sX — TCP NULL и FIN сканирование;
- -sC — запускать скрипт по умолчанию;
- -sI — ленивое Indle сканирование;
- -p — указать диапазон портов для проверки;
- -sV — детальное исследование портов для определения версий служб;
- -O — определять операционную систему;
- -T2 — скорость сканирования, чем больше, тем быстрее;
- -D — маскировать сканирование с помощью фиктивных IP;
- -S — изменить свой IP адрес на указанный;
- -e — использовать определенный интерфейс;
- —spoof-mac — установить свой MAC адрес;
- -A — определение операционной системы с помощью скриптов.
Теперь, когда мы рассмотрели все основные опции, давайте поговорим о том, как выполняется сканирование портов nmap.
Как пользоваться Nmap для сканирования портов в Linux
Дальше рассмотрим примеры nmap. Сначала давайте рассмотрим как найти все подключенные к сети устройства, для этого достаточно использовать опцию -sL и указать маску нашей сети. в моем случае это 192.168.1.1/24. Маску вашей локальной сети вы можете найти, выполнив команду:
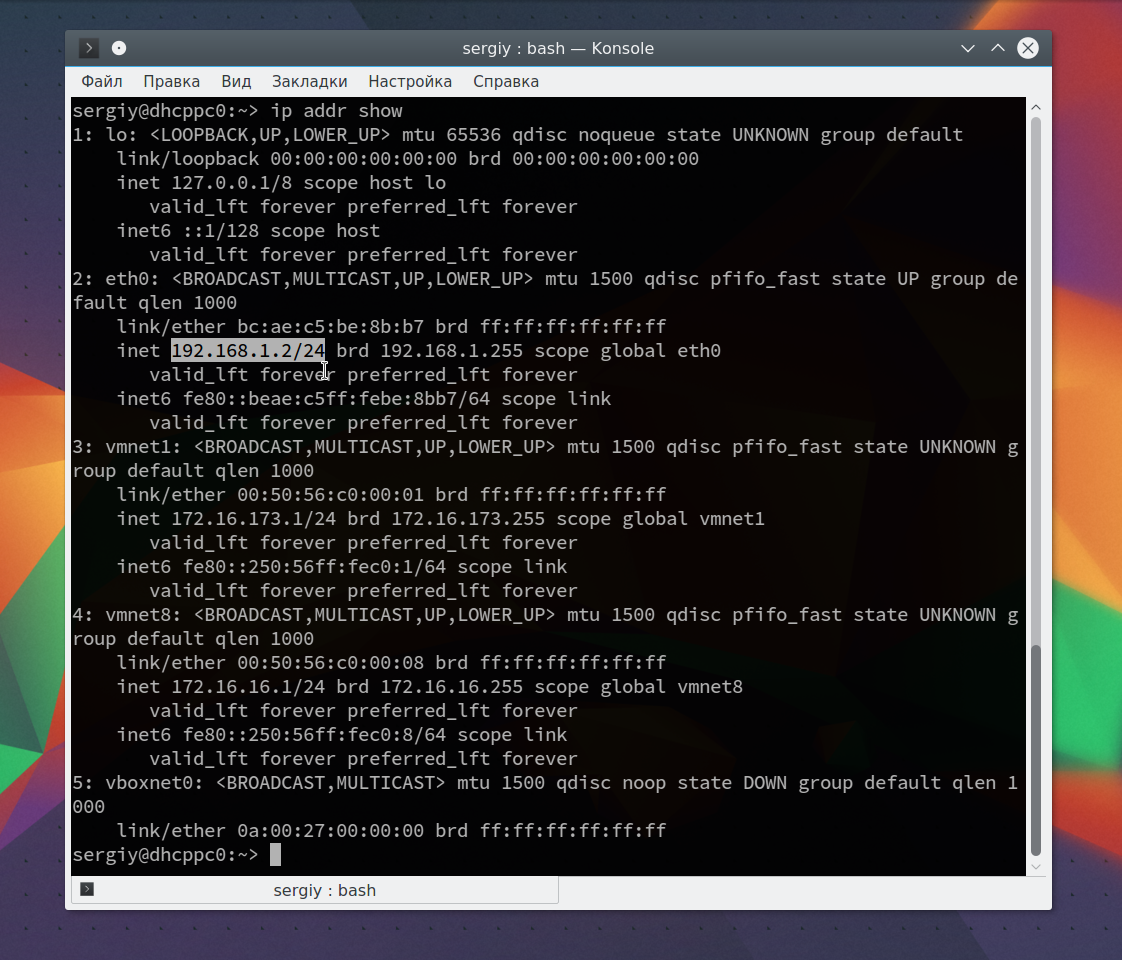
Из вывода для используемого интерфейса возьмите число после слеша, а до слэша укажите ip вашего роутера. Команда на сканирование сети nmap будет выглядеть вот так:
nmap -sL 192.168.1.1/24
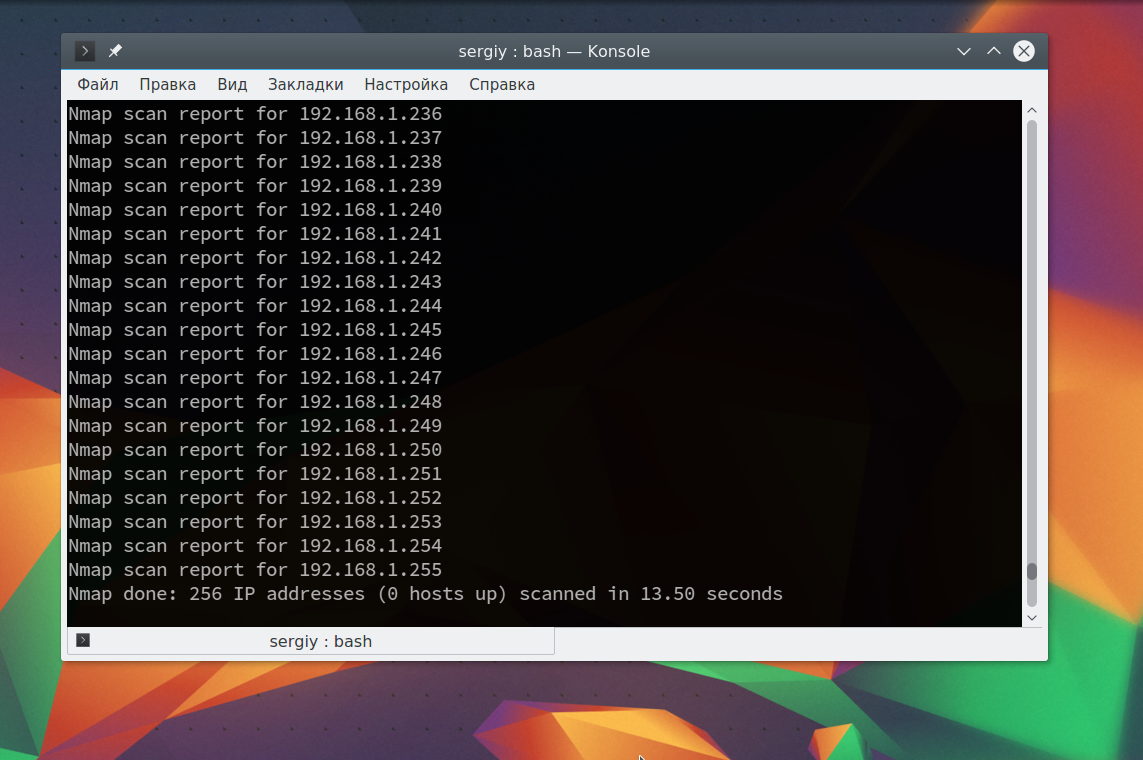
Иногда это сканирование может не дать никаких результатов, потому что некоторые операционные системы имеют защиту от сканирования портов. Но это можно обойти, просто использовав для сканирования ping всех ip адресов сети, для этого есть опция -sn:
nmap -sn 192.168.1.1/24
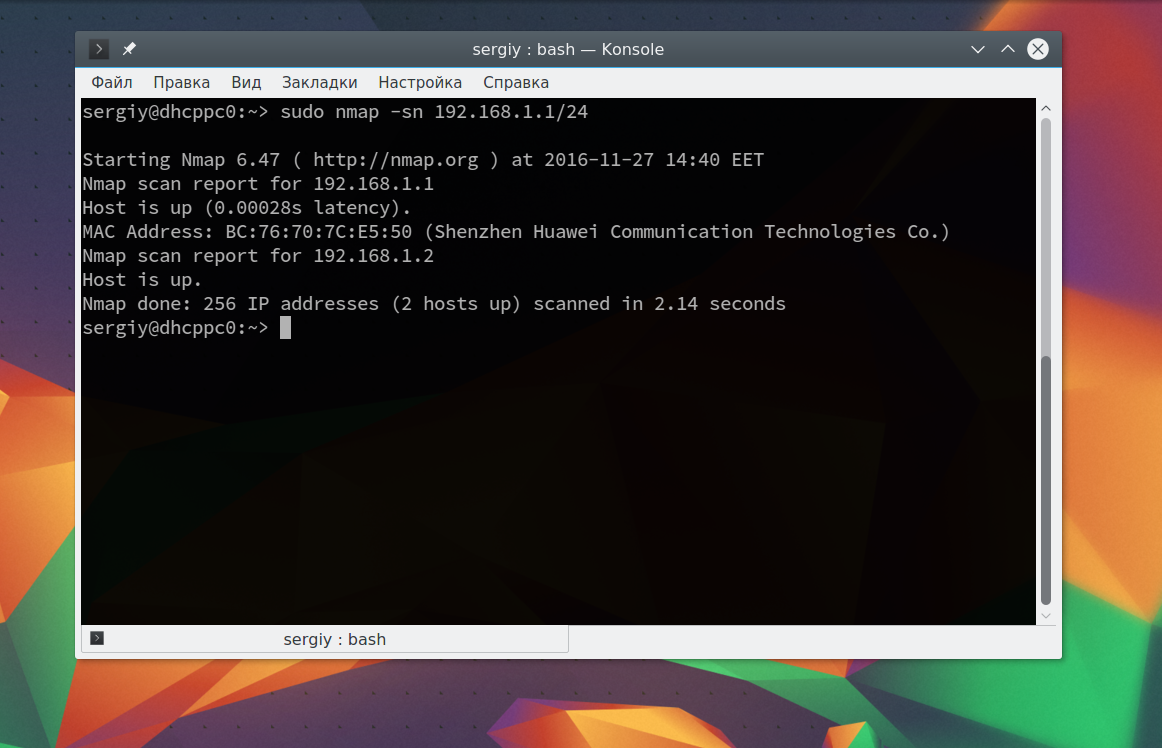
Как видите, теперь программа обнаружила активные устройства в сети. Дальше мы можем сканировать порты nmap для нужного узла запустив утилиту без опций:
sudo nmap 192.168.1.1
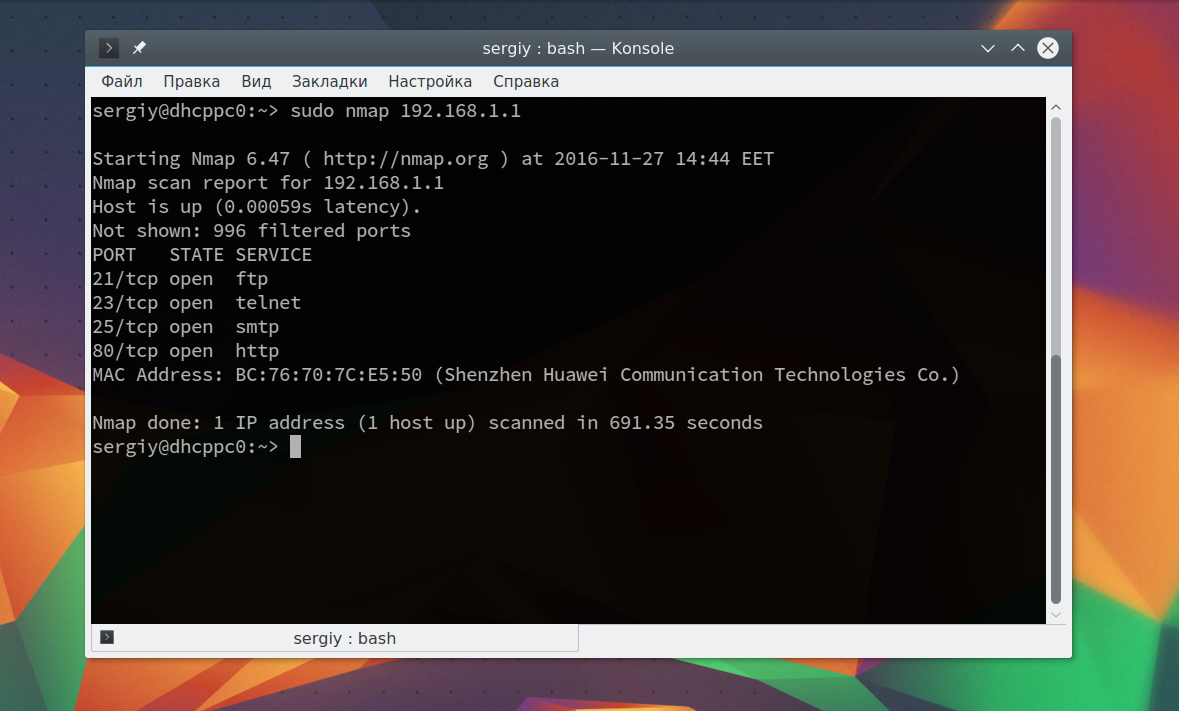
Теперь мы можем видеть, что у нас открыто несколько портов, все они используются каким-либо сервисом на целевой машине. Каждый из них может быть потенциально уязвимым, поэтому иметь много открытых портов на машине небезопасно. Но это еще далеко не все, что вы можете сделать, дальше вы узнаете как пользоваться nmap.
Чтобы узнать более подробную информацию о машине и запущенных на ней сервисах вы можете использовать опцию -sV. Утилита подключится к каждому порту и определит всю доступную информацию:
sudo nmap -sV 192.168.1.1
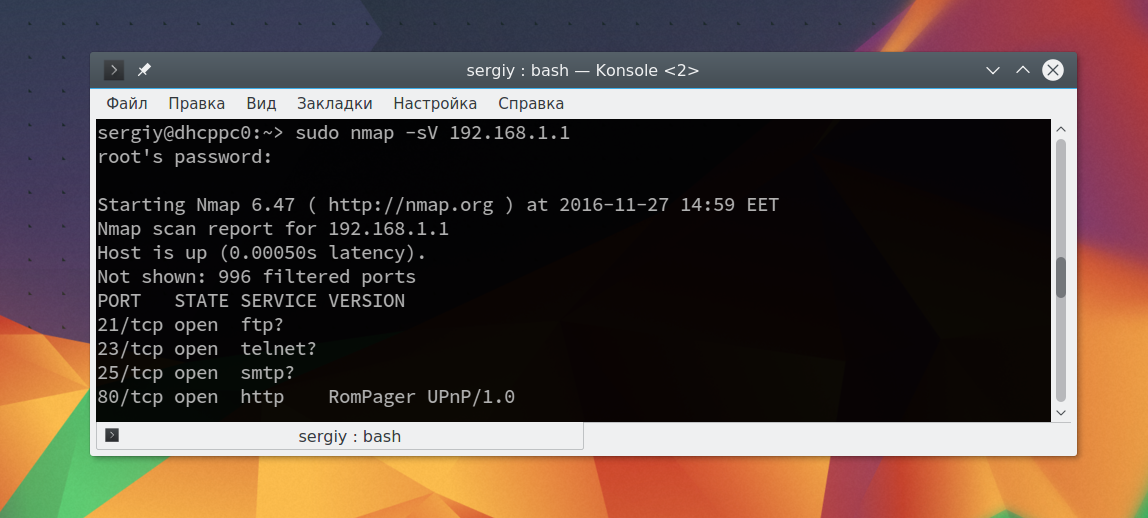
На нашей машине запущен ftp, а поэтому мы можем попытаться рассмотреть эту службу подробнее с помощью стандартных скриптов nmap. Скрипты позволяют проверить порт более детально, найти возможные уязвимости. Для этого используйте опцию -sC и -p чтобы задать порт:
sudo nmap -sC 192.168.56.102 -p 21
Мы выполняли скрипт по умолчанию, но есть еще и другие скрипты, например, найти все скрипты для ftp вы можете командой:
sudo find /usr/share/nmap/scripts/ -name ‘*.nse’ | grep ftp
Затем попытаемся использовать один из них, для этого достаточно указать его с помощью опции —script. Но сначала вы можете посмотреть информацию о скрипте:
sudo nmap —script-help ftp-brute.nse
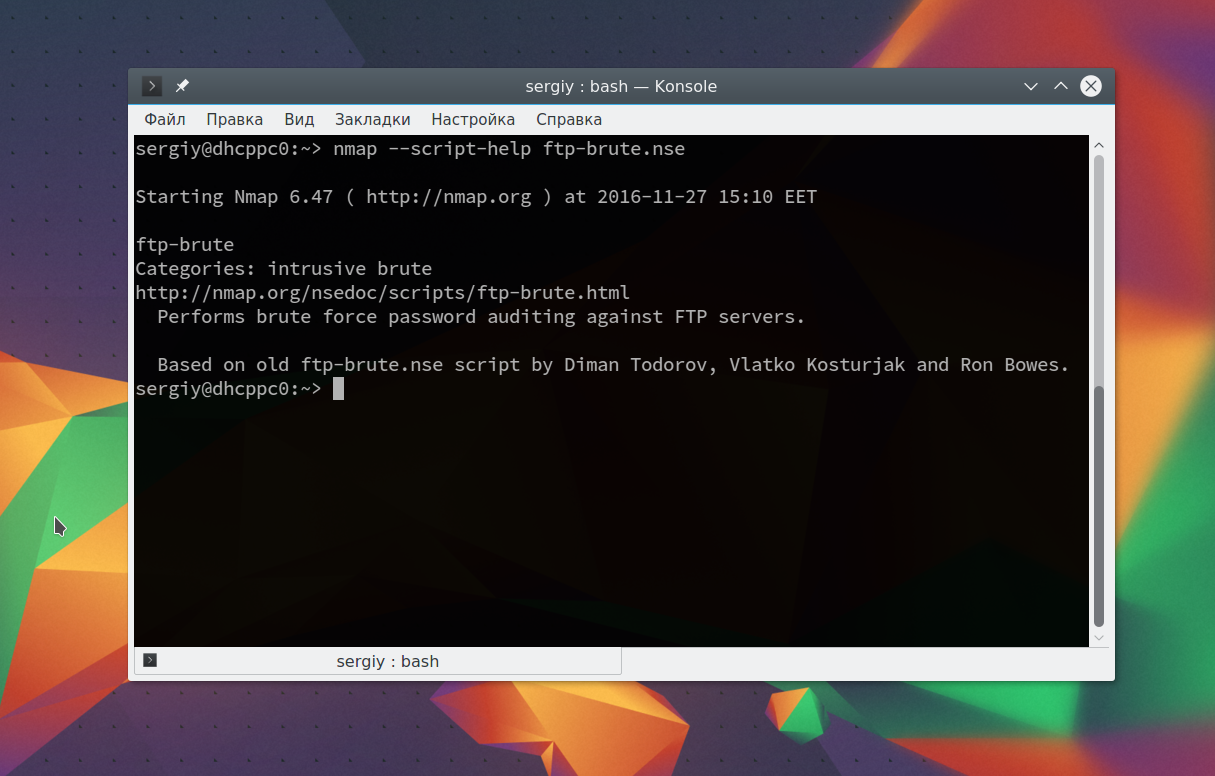
Этот скрипт будет пытаться определить логин и пароль от FTP на удаленном узле. Затем выполните скрипт:
sudo nmap —script ftp-brute.nse 192.168.1.1 -p 21
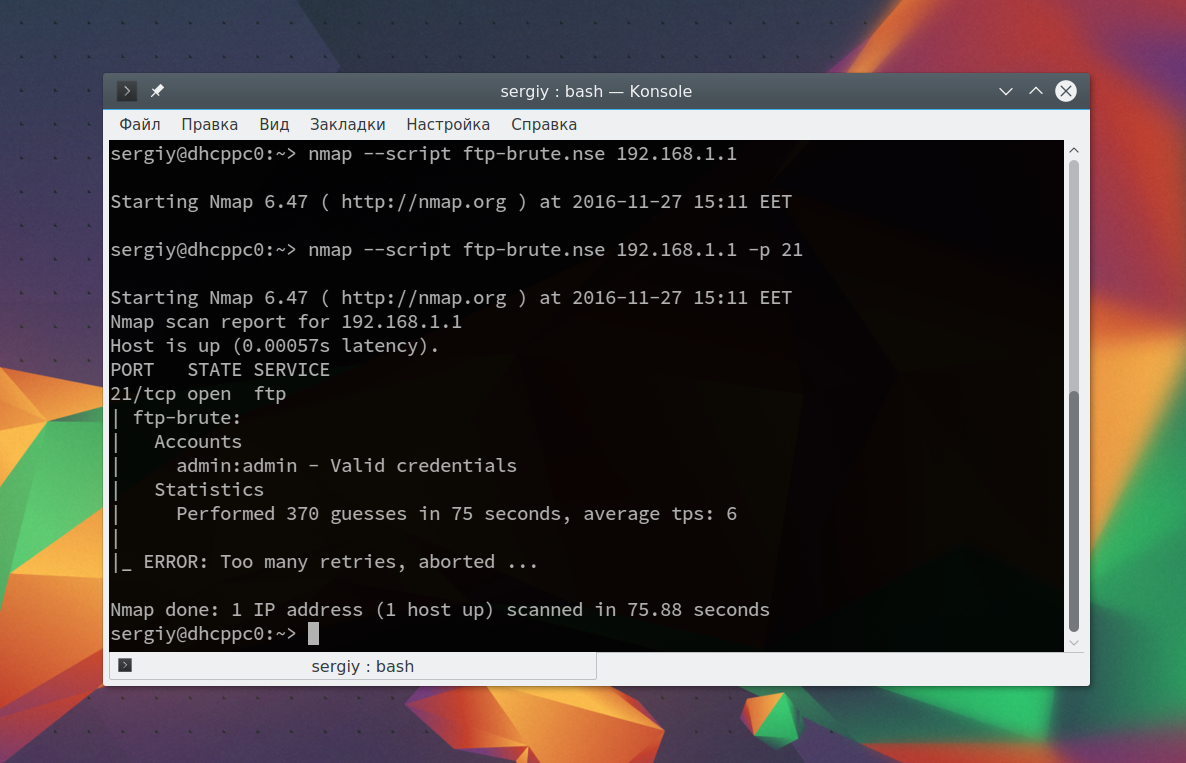
В результате скрипт подобрал логин и пароль, admin/admin. Вот поэтому не нужно использовать параметры входа по умолчанию.
Также можно запустить утилиту с опцией -A, она активирует более агрессивный режим работы утилиты, с помощью которого вы получите большую часть информации одной командой:
sudo nmap -A 192.168.1.1

Обратите внимание, что здесь есть почти вся информация, которую мы уже видели раньше. Ее можно использовать чтобы увеличить защиту этой машины.
Выводы
В этой статье мы рассмотрели как выполняется сканирование портов nmap, а также несколько простых примеров использования этой утилиты. Эти команды nmap могут быть полезными многим системным администраторам, чтобы улучшить безопасность их систем. Но это далеко не все возможности утилиты. Продолжайте экспериментировать с утилитой чтобы узнать больше только не в чужих сетях!
Источник


