- Open SSL
- Cryptography and SSL/TLS Toolkit
- Welcome to OpenSSL!
- Latest News
- Legalities
- How To Install OpenSSL on Windows
- Step 1 – Download OpenSSL Binary
- Step 2 – Run OpenSSL Installer
- Step 3 – Setup Environment Variables
- Step 4 – Run OpenSSL Binary
- Installing OpenSSL on Windows 10 and updating PATH
- Install OpenSSL
- Add OpenSSL to your PATH
- What is OpenSSL and how it works?
- What is OpenSSL?
- Why do you need OpenSSL?
- How to use OpenSSL?
- Check your OpenSSL version
- CSR Generation
- Generate your private key separately
- Extract your public key
- Create the Certificate Signing Request
- -subj Switch- an alternative way to generate the CSR code
- Create your private key and CSR at once
- Check your CSR info
- Send the CSR to the CA
- Verify your certificate’s details
- Ещё раз об OpenSSL
Open SSL
Cryptography and SSL/TLS Toolkit
Welcome to OpenSSL!
OpenSSL is a robust, commercial-grade, and full-featured toolkit for the Transport Layer Security (TLS) and Secure Sockets Layer (SSL) protocols. It is also a general-purpose cryptography library. For more information about the team and community around the project, or to start making your own contributions, start with the community page. To get the latest news, download the source, and so on, please see the sidebar or the buttons at the top of every page.
OpenSSL is licensed under an Apache-style license, which basically means that you are free to get and use it for commercial and non-commercial purposes subject to some simple license conditions.
For a list of vulnerabilities, and the releases in which they were found and fixes, see our Vulnerabilities page.
Latest News
| Date | Item |
| 08-Apr-2021 | Alpha 14 of OpenSSL 3.0 is now available: please download and test it |
| 25-Mar-2021 | OpenSSL 1.1.1k is now available, including bug and security fixes |
| 11-Mar-2021 | Alpha 13 of OpenSSL 3.0 is now available: please download and test it |
| 18-Feb-2021 | Alpha 12 of OpenSSL 3.0 is now available: please download and test it |
| 16-Feb-2021 | OpenSSL 1.1.1j is now available, including bug and security fixes |
| More. |
Legalities
Please remember that export/import and/or use of strong cryptography software, providing cryptography hooks, or even just communicating technical details about cryptography software is illegal in some parts of the world. So when you import this package to your country, re-distribute it from there or even just email technical suggestions or even source patches to the authors or other people you are strongly advised to pay close attention to any laws or regulations which apply to you. The authors of OpenSSL are not liable for any violations you make here. So be careful, it is your responsibility.
Please report problems with this website to webmaster at openssl.org.
Copyright © 1999-2018, OpenSSL Software Foundation.
How To Install OpenSSL on Windows
OpenSSL is a full-featured toolkit for the Transport Layer Security (TLS) and Secure Sockets Layer (SSL) protocols. It is licensed under an Apache-style license. This tutorial will help you to install OpenSSL on Windows operating systems.
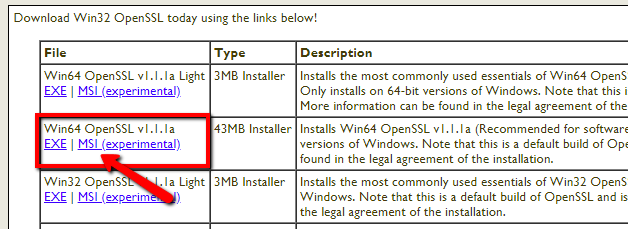
Step 1 – Download OpenSSL Binary
Download the latest OpenSSL windows installer file from the following download page. Click the below link to visit OpenSSL download page:
Step 2 – Run OpenSSL Installer
Now run the OpenSSL installer on your system. The OpenSSL required Microsoft Visual C++ to be installed on your system. If your system doesn’t have Microsoft Visual C++ installed, the installer will show your message like:
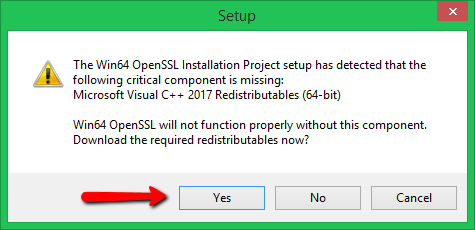
Click Yes to download and install required Microsoft Visual C++ package on your system.
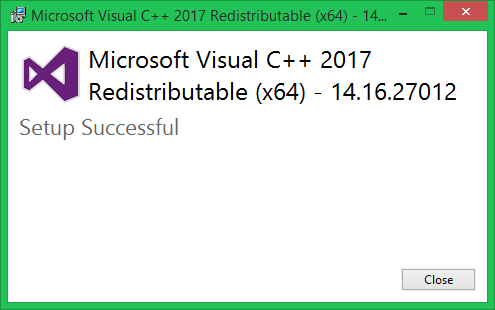
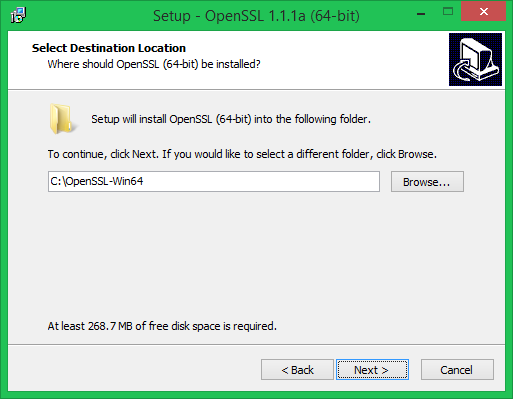
Then again run the OpenSSL installer and follow the wizard.
Step 3 – Setup Environment Variables
Now set the environment variables to function OpenSSL properly on your system. You are required to set OPENSSL_CONF and Path environment variables.
Set OPENSSL_CONF Variable: 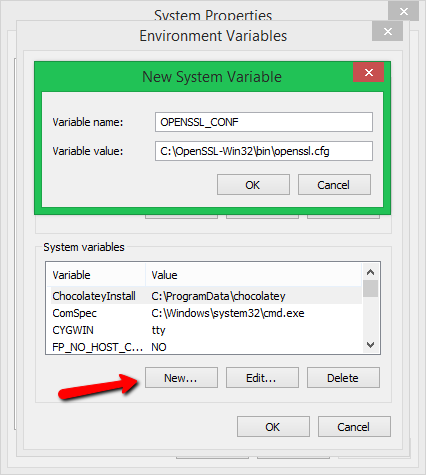
Set Path Variable: 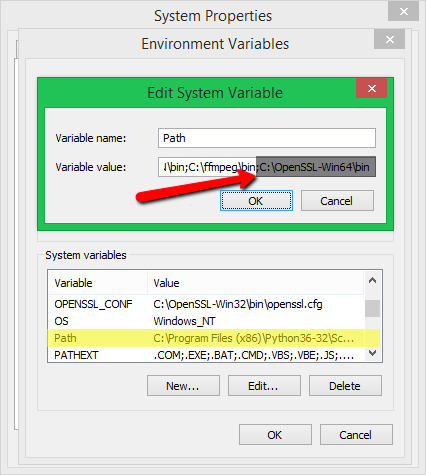
Step 4 – Run OpenSSL Binary
Open a command prompt and type openssl to get OpenSSL prompt. Then run version command on OpenSSL proper to view installed OpenSSL version.
Installing OpenSSL on Windows 10 and updating PATH

I recently discovered a convoluted way to build an iOS .ipa package without using a MacBook. It involves many steps, one of which is using OpenSSL for Windows. Instead of creating one huge blog post with all steps defined in detail, I decided to split them up in bite-size articles. This is one of them. Here I will teach you to do the following:
- Install OpenSSL
- Add OpenSSL to your PATH
Install OpenSSL
This step is a simple one. Simply choose the version that applies to your PC from here. As example, I chose the Win64 OpenSSL v1.1.1g MSI (not the light version) from the table:

Run the EXE or MSI with default settings till completion and that should take care of installing OpenSSL!
Add OpenSSL to your PATH
Why do we want to do this? First off, it’s not a necessity, it just makes it more convenient to use OpenSSL from the command line in the directory of your choice. After the initial install, the openssl.exe is only available from the directory where it resides, namely:
You could open a command prompt from here and perform the operations you want, but as I am using this to create a Certificate Signing Request (CSR) for a specific purpose, I like to create that from the directory where I’d like to keep that CSR. To do that, lets add it to our PATH, which we can find in the Environment Variables. Here we go:
- Hit the Windows button on your keyboard or click it in the task bar, then search for “Environment Variables”.
What is OpenSSL and how it works?
SSL certificates are high demand now. The encryption landscape has changed dramatically since Google launched the “HTTPS Everywhere” campaign. First, they gave an SEO boost as an incentive to install digital certificates, and later, Chrome made HTTPS all but mandatory for everyone. If you don’t use an SSL certificate, popular browsers such as Chrome and Firefox will mark your site as Not Secure.
Proper SSL implementation is crucial to a website’s security and success. And, with so many web owners learning about SSL for the first time, it’s important to equip them with all the necessary tools and utilities. One such tool is OpenSSL.
What is OpenSSL?
Open SSL is an all-around cryptography library that offers open-source application of the TLS protocol. First released in 1998, it is available for Linux, Windows, macOS, and BSD systems. OpenSSL allows users to perform various SSL related tasks, including CSR (Certificate Signing Request) and private keys generation and SSL certificate installation.
Most of the Linux distributions come with OpenSSL pre-compiled, but if you’re on a Windows system, you can get it from here .
Why do you need OpenSSL?
With OpenSSL, you can apply for your digital certificate (Generate the Certificate Signing Request) and install the SSL files on your server. You can also convert your certificate into various SSL formats , as well as do all kind of verifications. More on them in another chapter. All you have to do is learn a few common OpenSSL commands and, with each new certificate, the configuration process will become quicker and easier. Since not all servers provide web user interfaces for SSL management, on some platforms OpenSSL is the only solution to import and configure your certificate.
How to use OpenSSL?
OpenSSL is all about its command lines. Below we’ve put together a few common OpenSSL commands for regular users. If you want to study all the commands, please go to this page .
Check your OpenSSL version
It’s imperative to know what OpenSSL version you have as it determines which cryptographic algorithms and protocols you can use. The latest OpenSSL release at the time of writing this article is 1.1.1. It’s the first version to support the TLS 1.3 protocol. Previous releases still receiving support are 1.0.2 and 1.1.0.
You can check your OpenSSL version by running the following command:
openssl version –a
CSR Generation
You can use OpenSSL to create your CSR code. CSR is a block of encoded text with data about your website and company. You must submit the CSR to your Certificate Authority for approval. The certificate request requires a private key from which the public key is created. While you can use an existing key, it’s recommended to always generate a new private key whenever you create a CSR.
Generate your private key separately
To generate your private key, you need to specify the key algorithm, the key size, and an optional passphrase. The standard key algorithm is RSA, but you can also select ECDSA for specific situations. When choosing a key algorithm, make sure you won’t run into compatibility issues. In this article, we only show how to generate a private key via the RSA algorithm.
For your key size, you should pick 2048 bit when using the RSA key algorithm, and 256 bit when using the ECDSA algorithm. Any key size lower than 2048 is not secure, while a higher value may slow down the performance.
Finally, you should decide whether you need a passphrase for your private key or not. Please note, that certain servers will not accept private keys with passphrases.
Once you’re ready to generate your private key (with RSA algorithm), run the commands below:
openssl genrsa -out yourdomain.key 2048
This command will create the yourdomain.key file in your current directory. Your private key will be in the PEM format.
You can view the encoded contents of your private key via the following command:
To decode your private key, runt the command below:
openssl rsa -text -in yourdomain.key -noout
Extract your public key
To extract your public key from the private key, use the following command:
openssl rsa -in yourdomain.key -pubout -out yourdomain_public.key
Create the Certificate Signing Request
After you’ve successfully generated the private key, it’s time to create your CSR. It will be in PEM format and include details about your company, as well as the public key derived from your private key. Run the following command to generate the CSR:
openssl req -new -key yourdomain.key -out yourdomain.csr
OpenSSL will prompt you to answer a few questions. Use the example below:
- Country Name(2 letter code) : enter the two-letter code of your country. If you have a Business Validation or Extended Validation certificate, make sure the country you submit, is the official residence of your organization
- State or Province Name : type the full name of the state or region where your company is registered
- Locality Name : specify the name of the city or town where your business is located
- Organization Name : enter the officially registered name of your company. For instance, GPI Holding LLC. For Domain Validation certificates, you can put in NA instead
- Organization Unit Name : it’s usually IT or Web Administration. You can sue NA for DV certificates
- Common Name : specify the Fully Qualified Domain Name (FQDN) to which you want to assign your SSL certificate. For example, ssldragon.com. If you want to activate a wildcard certificate, add an asterisk in front of your domain name (e.g. *.ssldragon.com)
- Email Address : provide a valid email address
Note: Next attributes are optional. If you don’t want to fill them in input a dot (.) to leave them blank .
- A challenge password : this is an outdated attribute, no longer required by the Certificate Authorities. To avoid any confusion, leave this field blank
- An Optional Company Name : If your official company name is too long or complex, you can enter a shorter name or your brand name here. Again, to avoid confusion, better ignore this field.
-subj Switch- an alternative way to generate the CSR code
You can also submit your information within the command line itself with help of the –subj switch.
This command will disable the question prompts:
openssl req -new -key yourdomain.key -out yourdomain.csr \ -subj «/C=US/ST=CA/L=San Francisco/O=Your Company, Inc./OU=IT/CN=yourdomain.com»
Create your private key and CSR at once
OpenSSL is so versatile, there’s also a command to generate both your private key and CSR.
openssl req -new \
-newkey rsa:2048 -nodes -keyout yourdomain.key \
-out yourdomain.csr \
-subj «/C=US/ST=CA/L=San Francisco/O=Your Company, Inc./OU=IT/CN=yourdomain.com»
This command generates the private key without a passphrase (-keyout yourdomain.key) and the CSR code (out yourdomain.csr).
Check your CSR info
To ensure you’ve provided the correct information before submitting the CSR to your CA, run the command below:
openssl req -text -in yourdomain.csr -noout –verify
Send the CSR to the CA
Run the cat yourdomain.csr command to view and copy the entire contents of the CSR. Make sure you include —–BEGIN CERTIFICATE REQUEST—– and —–END CERTIFICATE REQUEST— tags, and paste everything into your SSL vendor’s order form.
Verify your certificate’s details
After your CA delivers the SSL certificate to your inbox run the command below to ensure that the certificate’s info matches your private key.
openssl x509 -text -in yourdomain.crt –noout
This concludes our list of common OpenSSL commands. If you’re looking for more information on what is OpenSSL and how it works, this free book is an excellent resource.
Ещё раз об OpenSSL
В моей ещё небольшой практике в сфере информационной безопасности мне пришлось столкнуться с некоторыми вопросами криптографии, а точнее шифрования, внятные ответы на которые мне удалось найти с трудом. Потому решил написать небольшую статью по основам работы с OpenSSL.
В этой статье будут рассмотрены известные вопросы генерации ключей, а также менее известный вопрос шифрования файлов больших объемов. О сертификации здесь не будет речи.
Начнем. На самом деле пока все просто.
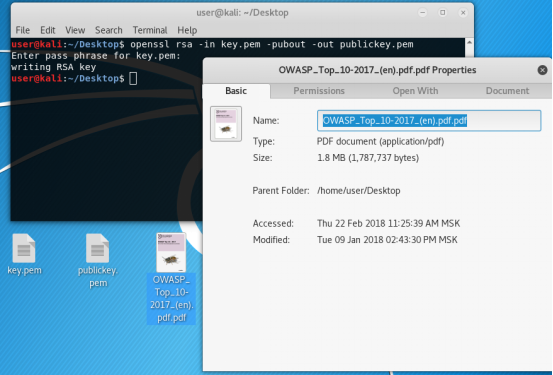
Создадим приватный ключ командой.
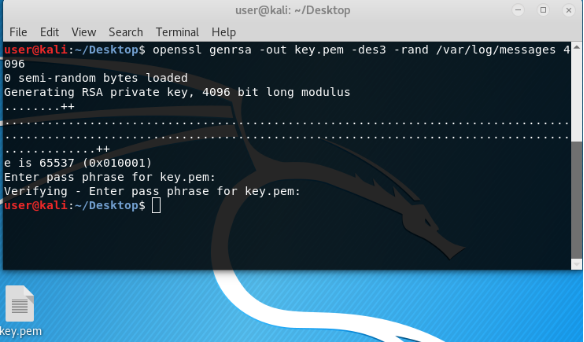
genrsa — парметр указывающий на создание ключа алгоритмом шифрования RSA.
out — где создать ключ.
4096 — длина ключа.
Вообще этого для создания ключа достаточно. Но приватный ключ лучше зашифровать.
aes-256-cfb — алгоритм и режим шифрования.
rand /var/log/messages — рандомное значения из любой папки, лучше взять логи, т.к. с /dev/random или /dev/urandom может все повиснуть наглухо, у меня так и было.
При создании ключа будет запрошен пароль. Пароль — это основа любой защиты, так что постарайтесь покорпеть над ним. И запомнить.
Имеем ключ. Приватный. Никому никогда не показывать и спрятать по принципу Кощея Бессмертного.
На его основе сделаем публичный, который можно хоть на всеобщее обозрение выложить, хоть на лоб приклеить.
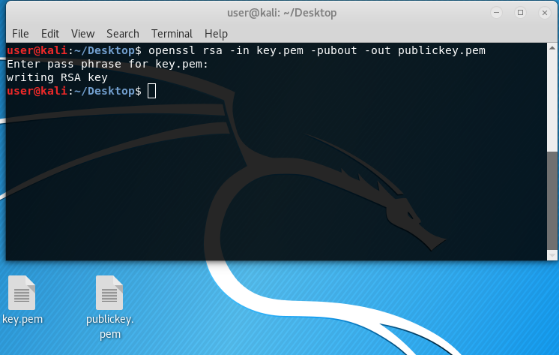
Теперь у нас есть пара ключей. Публичный можно закинуть на сервер, чтобы подключаться к нему по ssh, используя свой приватный ключ. Либо для шифрования небольшого количества данных, например, токена или парольной фразы и т.п.
Задача шифрования большого файла имеет другое решение.
Для шифрования большого количества данных используем, например, этот файл pdf размером 1,8 Mbytes.
Большой объем данных шифруется симметричным алгоритмом шифрования, например, AES. Здесь мы применим и асимметричное шифрование для передачи симметричного ключа, с помощью которого мы и будем шифровать текст.
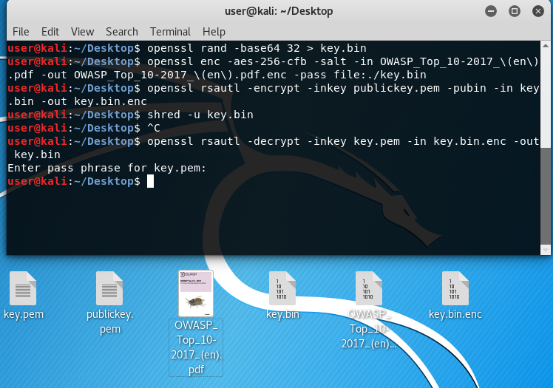
Создадим симметричный сессионный (одноразовый) ключ рандомной последовательностью символов и запишем в файл в представлении base64.
Далее зашифруем файл этим ключом:
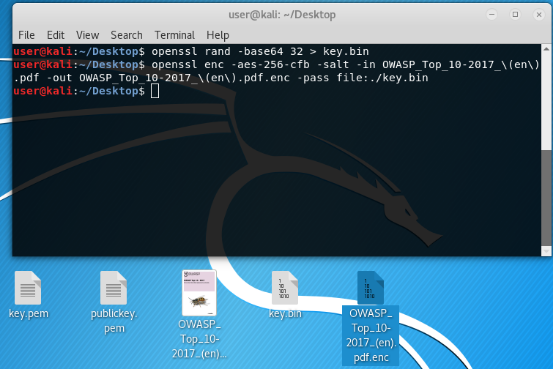
aes-256-cfb — алгоритм и режим шифрования. О режимах здесь не буду говорить. Этот лучший.
salt — соль для большей криптостойкости.
pass file:./key.bin — ключ шифрования.
Далее зашифруем симметричный ключ нашим публичным «ассиметричным» ключом.
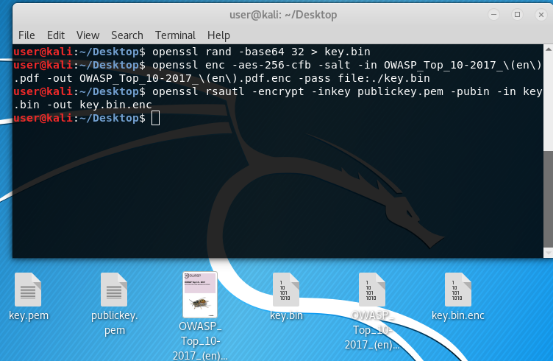
Получили зашифрованный файл и симметричный ключ. Можно слать своему товарищу для расшифровки. Но мы пошлем сами себе, ибо это homework c самим с собой.
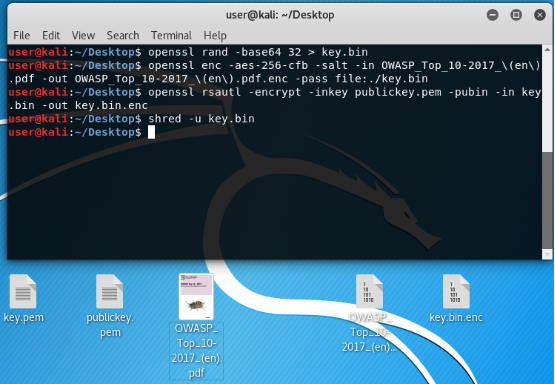
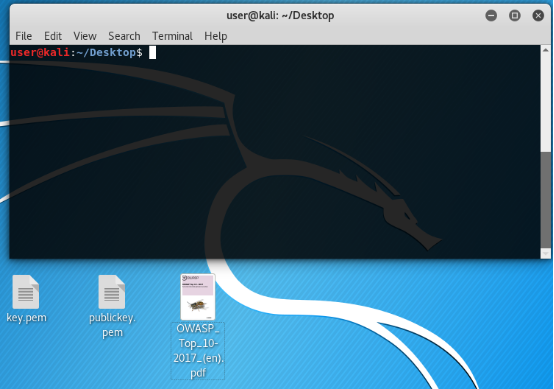
Теперь удалим изначальный симметричный ключ! Чтобы никто и никогда не нашел его.
На картинке внизу его уже нет.
Теперь расшифруем симметричный ключ нашим приватным ассиметричным ключом.
И мы, счастливчики, снова имеем симметричный ключ для расшифрования нашего текста, пока еще зашифрованного.
Картинка снова внизу, там ключ вновь есть.
Теперь расшифруем зашифрованный шифром симметричного шифрования файл нашим недавно зашифрованным, но потом расшифрованным с помощью ассиметричного шифра шифрования симметричным ключом.

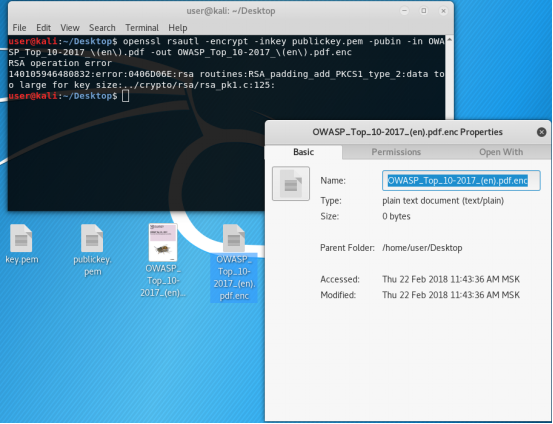
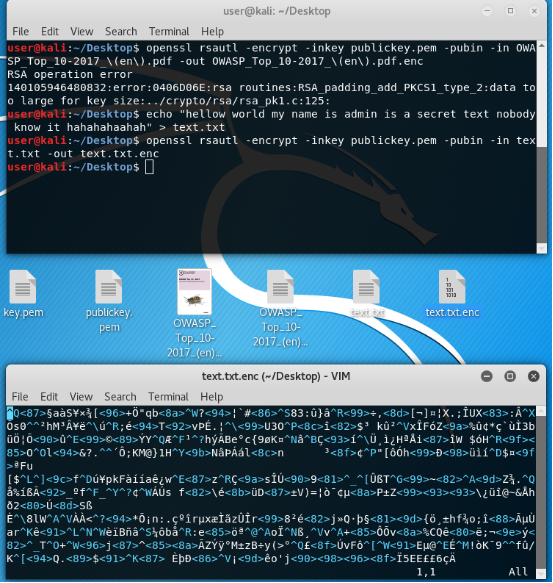
Теперь: Почему так сложно? Почему нельзя взять и сделать все с помощью ассиметричного шифрования?
Пробуем, идем прямиком на грабли;)
Имеем!
Поу — поу — поооооууууу. Ошибка. Слишком много данных для размера ключа. Ибо в ассиметричном шифровании размер ключа должен быть больше или равен открытому тексту.
OpenSSL, как при сделке с дьяволом, дал Вам то, чего Вы попросили, но не чего хотели. Правда, зашифрованный файл оказался пуст.
Но можно зашифровать меньший, чем ключ файл. Попробуем.
Создадим небольшой файл.
Например, я сделал так:
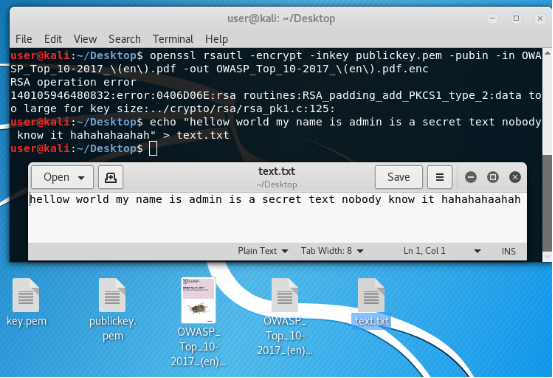
Зашифруем его нашим публичным ключом, который знают все на свете!
Как видим на нижней картинке файл зашифрован. Ничего не понятно! Кому понятно, КТО ВЫ?
Теперь расшифруем, предварительно удалив для чистоты эксперимента исходный файл.
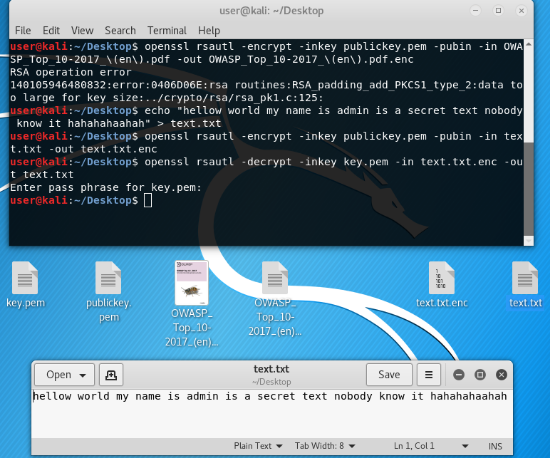
Имеем расшифрованный файл. Все отлично.
Для передачи всего этого зашифрованного добра лучше последнее кодировать в base64. Соответственно перед тем как расшифровать, нужно сначала раскодировать.
Закодировали.


И снова имеем белеберду, которая никому не понятна! Если Вам понятна, то этот документ не для Вас!
Примерно так работает шифрование при создании ключей и шифрованиие данных на примере утилиты OpenSSL.
Позже собираюсь описать режимы шифрования блочных симметричных шифров.


