- Установка Python и pip на Windows
- 64-разрядный Python против 32-разрядного
- Запускаем установщик Python
- Подтверждаем, что Python был установлен правильно
- Установка PIP для Python и базовые команды
- Что такое PIP для Python?
- Устанавливается ли PIP вместе с Python?
- Правильно ли Python установлен?
- Как установить PIP на Windows.
- Как установить PIP на Mac
- Как установить PIP на Linux
- Как установить PIP на Raspberry Pi
- Как обновить PIP для Python
- Как устанавливать библиотеки Python с помощью PIP
- Подписывайтесь на канал в Дзене
- What Is Pip? A Guide for New Pythonistas
- Getting Started With pip
- Installing Packages With pip
- Basic Package Installation
- Using Requirement Files
- Fine-Tuning Requirements
- Production vs Development Dependencies
- Freezing Requirements for Production
- Finding Packages to Use
- Uninstalling Packages
- Alternatives to pip
- Conda Does It All
- Pipenv
- Poetry
- Conclusion: What Is pip ?
Установка Python и pip на Windows
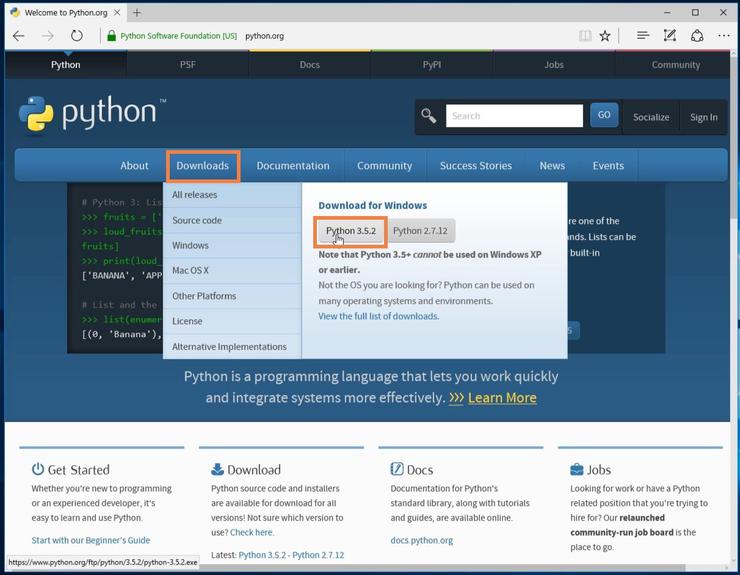
В данном разделе мы научимся устанавливать Python и менеджер пакетов pip на Windows 10 с нуля. Лучший способ установить Python на Windows — это скачать официальный установщик с сайта python.org. Чтобы сделать это, откройте браузер и перейдите по ссылке https://python.org/. После завершения загрузки установщика, откройте «Загрузки». Сайт обнаружит, что вы посетили его с Windows, и предложит скачать последнюю версию Python 3 или Python 2. Если вы не знаете, какую версию использовать, то я рекомендую Python 3. Если вам нужно работать с унаследованным кодом Python 2, тогда вам необходим Python 2. Под вкладками Downloads → Download for Windows нажмите кнопку “Python 3.X.X” (или “Python 2.X.X”), чтобы скачать установочный файл.

64-разрядный Python против 32-разрядного
Если вы гадаете, какую версию Python нужно использовать 64-разрядную или 32-разрядную, вам, скорее всего, понадобится 32-разрядная. Иногда достаточно тяжело найти бинарники для 64-разрядной версии, а это значит, что некоторые сторонние модули могут установиться неправильно на 64-разрядной версии Python. Мое мнение – использовать ту версию, которую конкретно рекомендуют на официальном сайте. Если вы кликните кнопку Python 3 или Python 2 под “Download for Windows”, вы получите именно ту версию, которую выбрали. Помните, Если вы в итоге сделаете неправильный выбор, и захотите перейти на другую версию Python, вы можете просто удалить существующую версию и переустановить его, скачав другой установщик с официального сайта.
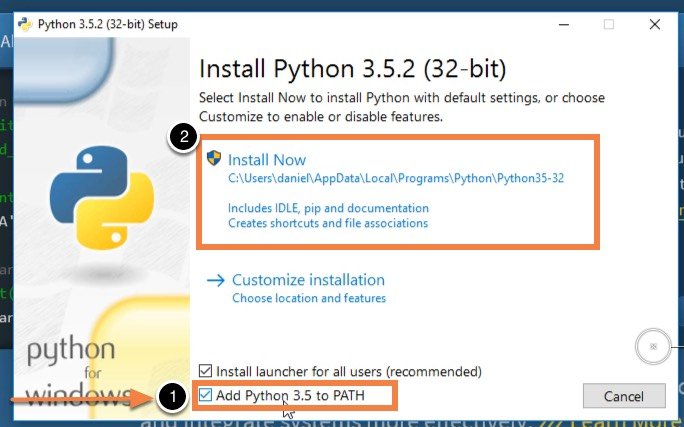
Запускаем установщик Python
По окончанию загрузки установщика, запустите его двойным щелчком мыши, чтобы начать установку Python. Обязательно установите флажок на «Add Python X.Y to PATH» в мастере настройке. Убедитесь, что флажок “Add Python X.Y to PATH” поставлен в установщике, в противном случае у вас будут проблемы с доступом инсталлятора Python к командной стоке. Нажмите «Установить» для начала установки. Установка должна пройти быстро, после чего Python будет готов к запуску на вашей системе. К следующему шагу нужно убедиться, что все было выполнено надлежащим образом.
Подтверждаем, что Python был установлен правильно
По окончанию установки, Python должен быть установлен на вашем компьютере. Давайте убедимся в том, что все было выполнено правильно, протестировав, имеет ли Python доступ к командной строке (cmd) Windows:
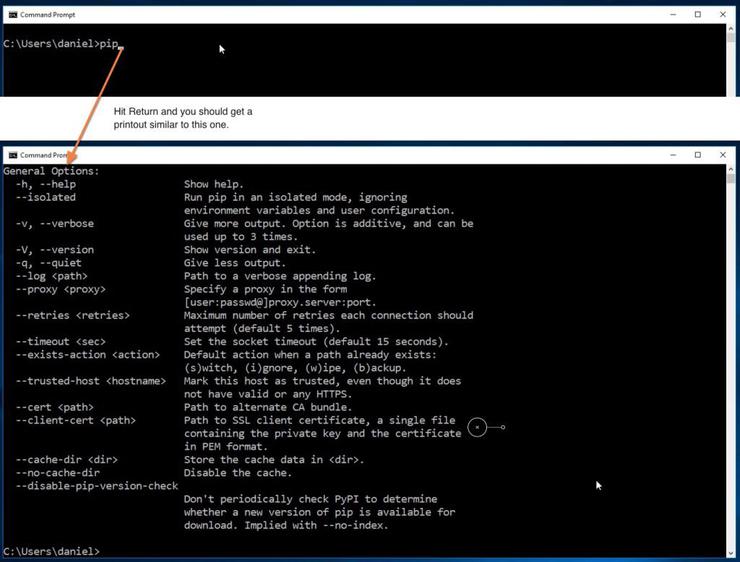
- Откройте командную строку Windows, запустив cmd.exe
- Введите pip и нажмите «Enter»
- Вы увидите справочный текст менеджера пакетов Python под названием “pip”. Если вы получите уведомление об ошибке, повторите этапы установки Python, и убедитесь в том, что вы обладаете рабочей версией Python. Большая часть проблем, с которыми вы можете столкнуться, будут иметь то или иное отношение к неправильной настройке PATH. Переустановка и подтверждение того, что опция “Add Python to PATH” была активирована, должны исправить эту проблему.
Есть вопросы по Python?
На нашем форуме вы можете задать любой вопрос и получить ответ от всего нашего сообщества!
Установка PIP для Python и базовые команды

Как любой серьёзный язык программирования, Python поддерживает сторонние библиотеки и фреймворки. Их устанавливают, чтобы не изобретать колесо в каждом новом проекте. Необходимы пакеты можно найти в центральном репозитории Python — PyPI (Python Package Index — каталог пакетов Python).
Однако скачивание, установка и работа с этими пакетами вручную утомительны и занимают много времени. Именно поэтому многие разработчики полагаются на специальный инструмент PIP для Python, который всё делает гораздо быстрее и проще.
Что такое PIP для Python?
Сама аббревиатура — рекурсивный акроним, который на русском звучит как “PIP установщик пакетов” или “Предпочитаемый установщик программ”. Это утилита командной строки, которая позволяет устанавливать, переустанавливать и деинсталлировать PyPI пакеты простой командой pip .
Если вы когда-нибудь работали с командной строкой Windows и с терминалом на Linux или Mac и чувствуете себя уверенно, можете пропустить инструкции по установке.
Устанавливается ли PIP вместе с Python?
Если вы пользуетесь Python 2.7.9 (и выше) или Python 3.4 (и выше), PIP устанавливается вместе с Python по умолчанию. Если же у вас более старая версия Python, то сначала ознакомьтесь с инструкцией по установке.
Правильно ли Python установлен?
Вы должны быть уверены, что Python должным образом установлен на вашей системе. На Windows откройте командную строку с помощью комбинации Win+X . На Mac запустите терминал с помощью Command+пробел , а на Linux – комбинацией Ctrl+Alt+T или как-то иначе именно для вашего дистрибутива.
Затем введите команду:
На Linux пользователям Python 3.x следует ввести:


Если вы получили номер версии (например, Python 2.7.5 ), значит Python готов к использованию.
Если вы получили сообщение Python is not defined (Python не установлен), значит, для начала вам следует установить Python. Это уже не по теме статьи. Подробные инструкции по установке Python читайте в теме: Скачать и установить Python.
Как установить PIP на Windows.
Следующие инструкции подойдут для Windows 7, Windows 8.1 и Windows 10.
- Скачайте установочный скрипт get-pip.py. Если у вас Python 3.2, версия get-pip.py должны быть такой же. В любом случае щелкайте правой кнопкой мыши на ссылке и нажмите “Сохранить как…” и сохраните скрипт в любую безопасную папку, например в “Загрузки”.
- Откройте командную строку и перейдите к каталогу с файлом get-pip.py.
- Запустите следующую команду: python get-pip.py
Как установить PIP на Mac
Современные версии Mac идут с установленными Python и PIP. Так или иначе версия Python устаревает, а это не лучший вариант для серьёзного разработчика. Так что рекомендуется установить актуальные версии Python и PIP.
Если вы хотите использовать родную систему Python, но у вас нет доступного PIP, его можно установить следующей командой через терминал:
Если вы предпочитаете более свежие версии Python, используйте Homebrew. Следующие инструкции предполагают, что Homebrew уже установлен и готов к работе.
Установка Python с помощью Homebrew производится посредством одной команды:
Будет установлена последняя версия Python, в которую может входить PIP. Если после успешной установки пакет недоступен, необходимо выполнить перелинковку Python следующей командой:
Как установить PIP на Linux
Если у вас дистрибутив Linux с уже установленным на нем Python, то скорее всего возможно установить PIP, используя системный пакетный менеджер. Это более удачный способ, потому что системные версии Python не слишком хорошо работают со скриптом get-pip.py, используемым в Windows и Mac.
Advanced Package Tool (Python 2.x)
Advanced Package Tool (Python 3.x)
pacman Package Manager (Python 2.x)


pacman Package Manager (Python 3.x)
Yum Package Manager (Python 2.x)
Yum Package Manager (Python 3.x)
Dandified Yum (Python 2.x)
Dandified Yum (Python 3.x)
Zypper Package Manager (Python 2.x)
Zypper Package Manager (Python 3.x)
Как установить PIP на Raspberry Pi
Как пользователь Raspberry, возможно, вы запускали Rapsbian до того, как появилась официальная и поддерживаемая версия системы. Можно установить другую систему, например, Ubuntu, но в этом случае вам придётся воспользоваться инструкциями по Linux.
Начиная с Rapsbian Jessie, PIP установлен по умолчанию. Это одна из серьёзных причин, чтобы обновиться до Rapsbian Jessie вместо использования Rapsbian Wheezy или Rapsbian Jessie Lite. Так или иначе, на старую версию, все равно можно установить PIP.
На Rapsbian для Python 2.x следует пользоваться командой pip, а для Python 3.x — командой pip3 при использовании команд для PIP.
Как обновить PIP для Python
Пока PIP не слишком часто обновляется самостоятельно, очень важно постоянно иметь свежую версию. Это может иметь значение при исправлении багов, совместимости и дыр в защите.
К счастью, обновление PIP проходит просто и быстро.
Для Mac, Linux, или Raspberry Pi:
На текущих версиях Linux и Rapsbian Pi следует использовать команду pip3.
Как устанавливать библиотеки Python с помощью PIP
Если PIP работоспособен, можно начинать устанавливать пакеты из PyPI:
Установка определённой версии вместо новейшей версии пакета:
Поиск конкретного пакета:
Просмотр деталей об установленном пакете:
Список всех установленных пакетов:
Список всех устаревших пакетов:
Обновление устаревших пакетов:
Следует отметить, что старая версия пакета автоматически удаляется при обновлении до новой версии.
Полностью переустановить пакет:
Полностью удалить пакет:
Подписывайтесь на канал в Дзене
Полезный контент для начинающих и опытных программистов в канале Лента Python разработчика — Как успевать больше, делать лучше и не потерять мотивацию.
What Is Pip? A Guide for New Pythonistas
Table of Contents
Watch Now This tutorial has a related video course created by the Real Python team. Watch it together with the written tutorial to deepen your understanding: A Beginner’s Guide to Pip
What is pip ? pip is the standard package manager for Python. It allows you to install and manage additional packages that are not part of the Python standard library. This tutorial is an introduction to pip for new Pythonistas.
In this tutorial, you’ll learn about:
- Installing additional packages not included with the standard Python distribution
- Finding packages published to the Python Package Index (PyPI)
- Managing requirements for your scripts and applications
- Uninstalling packages and their dependencies
As you’ll see, the Python community is very active and has created some neat alternatives to pip that you’ll learn about later in this tutorial.
Free Bonus: 5 Thoughts On Python Mastery, a free course for Python developers that shows you the roadmap and the mindset you’ll need to take your Python skills to the next level.
Getting Started With pip
So, what is pip? pip is a package manager for Python. That means it’s a tool that allows you to install and manage additional libraries and dependencies that are not distributed as part of the standard library.
Package management is so important that pip has been included with the Python installer since versions 3.4 for Python 3 and 2.7.9 for Python 2, and it’s used by many Python projects, which makes it an essential tool for every Pythonista.
The concept of a package manager might be familiar to you if you are coming from other languages. JavaScript uses npm for package management, Ruby uses gem, and .NET use NuGet. In Python, pip has become the standard package manager.
The Python installer installs pip , so it should be ready for you to use, unless you installed an old version of Python. You can verify that pip is available by running the following command in your console:
You should see a similar output displaying the pip version, as well as the location and version of Python. If you are using an old version of Python that does not include pip , then you can install it by following the instructions for your system in the pip installation documentation.
You probably want to follow the examples in this tutorial inside a virtual environment to avoid installing packages to the global Python installation. You can learn about virtual environments in Python Virtual Environments: A Primer. The Using Virtual Environments section of that article explains the basics of creating new virtual environments.
Installing Packages With pip
Python is considered a batteries included language. This means that the Python standard library includes an extensive set of packages and modules to help developers with their scripts and applications.
At the same time, Python has a very active community that contributes an even bigger set of packages that can help you with your development needs. These packages are published to the Python Package Index, also known as PyPI (pronounced Pie Pea Eye). PyPI hosts an extensive collection of packages that include development frameworks, tools, and libraries.
Many of these packages simplify Python development by providing friendly interfaces to functionality that already exists in the standard library. For example, you can write a script that retrieves the contents of a web page using only the standard libraries included with Python:
In this script, you import cgi and http.client , both of which are included in the Python standard library. You create an HTTPSConnection object specifying the server and invoke its .request() and .getresponse() to retrieve a response.
From the response, you can retrieve the Content-Type header and parse it using the cgi module to extract the charset in which the page is encoded.
cgi.parse_header() returns a tuple with a main value and a dictionary of parameters. For example, the Content-Type header might contain a value like text/html; charset=ISO-8859-1 .
The tuple will contain the string text/html as the first element, and the second element will be a dictionary in the form <'charset': 'ISO-8859-1'>. Because you only care about the charset parameter, you can ignore the beginning of the tuple using an underscore: _, params = cgi.parse_header(content_type) .
Note: The Meaning of Underscores in Python explains how to use underscores to unpack values from a tuple.
Once you have the encoding of the page, you can read the response and decode it into text. You can run the example in the console to see how it works:
This seems like a lot of work for a small script that retrieves the contents of a web page. Fortunately, there is a Python package that simplifies HTTP requests and provides a nice interface to do exactly what you want.
Basic Package Installation
PyPI hosts a very popular library to perform HTTP requests called requests . You can learn all about it in its official documentation site.
The first step is to install the requests package into your environment. You can learn about pip supported commands by running it with help :
As you can see, pip provides an install command to install packages. You can run it to install the requests package:
You should see an output similar to the one above. You use pip with an install command followed by the name of the package you want to install. pip looks for the package in PyPI, calculates its dependencies, and installs them to ensure requests will work.
You can also see that the current environment is using pip version 18.1 , but version 19.0.1 is available. It also shows the command you should use to update pip , so let’s do that:
Notice that you use python -m to update pip . The -m switch tells Python to run a module as an executable. This is necessary because in order for you to update pip , the old version has to be uninstalled before installing the new version, and removing it while running the tool can cause errors.
When you run pip as a module, Python loads the module in memory and allows the package to be removed while it is being used. You can run packages as if they were scripts if the package provides a top-level script __main__.py .
Now that you have installed requests and upgraded pip , you can use the list command to see the packages installed in your environment:
As you can see, pip has been upgraded to version 19.0.1 (the latest version at the moment), and requests version 2.21.0 has been installed.
The pip install
command always looks for the latest version of the package and installs it. It also searches for dependencies listed in the package metadata and installs those dependencies to insure that the package has all the requirements it needs.
As you can see, multiple packages were installed. You can look at the package metadata by using the show command in pip :
The metadata lists certifi , chardet , idna , and urllib3 as dependencies, and you can see they were also installed.
With the requests package installed, you can modify the example above and see how easy it is to retrieve the contents of a web page:
You can import the requests package as any other standard package because it is now installed in your environment.
As you can see, requests.get() handles the HTTP connection for you and returns a response object similar to the original example but with some interface improvements.
You don’t have to deal with the encoding of the page because requests will handle that for you in most situations. Still, requests provides a flexible interface to handle special cases through the requests.Response object.
Using Requirement Files
The pip install command always installs the latest published version of a package, but sometimes, you may want to install a specific version that you know works with your code.
You want to create a specification of the dependencies and versions you used to develop and test your application, so there are no surprises when you use the application in production.
Requirement files allow you to specify exactly which packages and versions should be installed. Running pip help shows that there is a freeze command that outputs the installed packages in requirements format. You can use this command, redirecting the output to a file to generate a requirements file:
The freeze command dumps all the packages and their versions to standard output, so you can redirect the output to a file that can be used to install the exact requirements into another system. The convention is to name this file requirements.txt , but you can give it any name you want.
When you want to replicate the environment in another system, you can run pip install specifying the requirements file using the -r switch:
The versions of the packages will match those listed in requirements.txt :
You can submit the requirements.txt file into source control and use it to create the exact environment in other machines.
Fine-Tuning Requirements
The problem with hardcoding the versions of your packages and their dependencies is that packages are updated frequently with bug and security fixes, and you probably want to leverage those as soon as they are published.
The requirements file format allows you to specify dependency versions using logical operators that give you a bit of flexibility to insure packages are updated, but still define the base versions of a package.
Open the requirements.txt file in your favorite editor and make the following changes:
You can change the logical operator to >= to tell pip to install an exact or greater version that has been published. When you set a new environment using the requirments.txt file, pip looks for the latest version that satisfies the requirement and installs it. You can upgrade the packages in your requirements file by running the install command with the —upgrade switch:
Nothing was upgraded because you have the latest versions, but if a new version was published for a listed package, then the package would’ve been upgraded.
In an ideal world, new versions of packages would be backwards compatible and would never introduce new bugs. Unfortunately, new versions can introduce changes that will break your application. The requirements file syntax supports additional version specifiers to fine-tune your requirements.
Let’s say that a new version 3.0 of requests is published but introduces an incompatible change that breaks your application. You can modify the requirements file to prevent 3.0 or higher from being installed:
Changing the version specifier for the requests package ensures that any version greater or equal to 3.0 does not get installed. The pip documentation provides all the information about the requirements file format, and you can consult it to learn more about it.
Production vs Development Dependencies
Not all packages that you install during the development of your applications are going to be application dependencies. There are many packages published to PyPI that are development tools or libraries that you want to leverage during the development process.
As an example, you’ll probably want to unit test your application, so you need a unit test framework. A popular framework for unit testing is pytest . You want to install it in your development environment, but you do not want it in your production environment because it isn’t an application dependency.
You create a second requirements file ( requirements_dev.txt ) to list additional tools to set up a development environment:
This requires you to use pip to install both requirement files: requirements.txt and requirements_dev.txt . Fortunately, pip allows you to specify additional parameters within a requirements file. You can modify requirements_dev.txt to also install the requirements from the production requirements.txt file:
Notice that you are using the exact same -r switch to install the production requirements.txt file. The requirements file format allows you to specify additional arguments right on a requirements file.
Freezing Requirements for Production
You created the production and development requirement files and added them to source control. The files use flexible version specifiers to ensure that you leverage bug fixes published by your dependencies. You are also testing your application and are ready to deploy it to production.
You probably want to ensure that the versions of the dependencies you deploy to production are the exact same versions you used in your integration pipeline or build process because you know all the tests pass and the application works.
The current version specifiers don’t guarantee that the same versions will be deployed to production, so you want to freeze the production requirements as you saw earlier.
You create a clean production virtual environment and install the production requirements using the requirements.txt file. Once the requirements are installed, you can freeze the specific versions, dumping the output to a requirements_lock.txt file that you use in production. The requirements_lock.txt file will contain exact versions specifiers and can be used to replicate the environment.
Finding Packages to Use
As you become a more experienced Pythonista, there’ll be a set of packages that you’ll know by heart and that you’ll use in most of your applications. The requests and pytest packages are good candidates to become useful tools in your Python toolbox.
There will be times though when you will need to solve a different problem, and you will want to look for a different tool or library that can help you with it. As you can see above, pip help shows that there is a search command that looks for packages published to PyPI.
Let’s see how this command can help us:
The command takes a set of options listed above and a . The query is just a string to search for and will match packages and their descriptions.
Note: You can use pip help to retrieve additional information about a supported command.
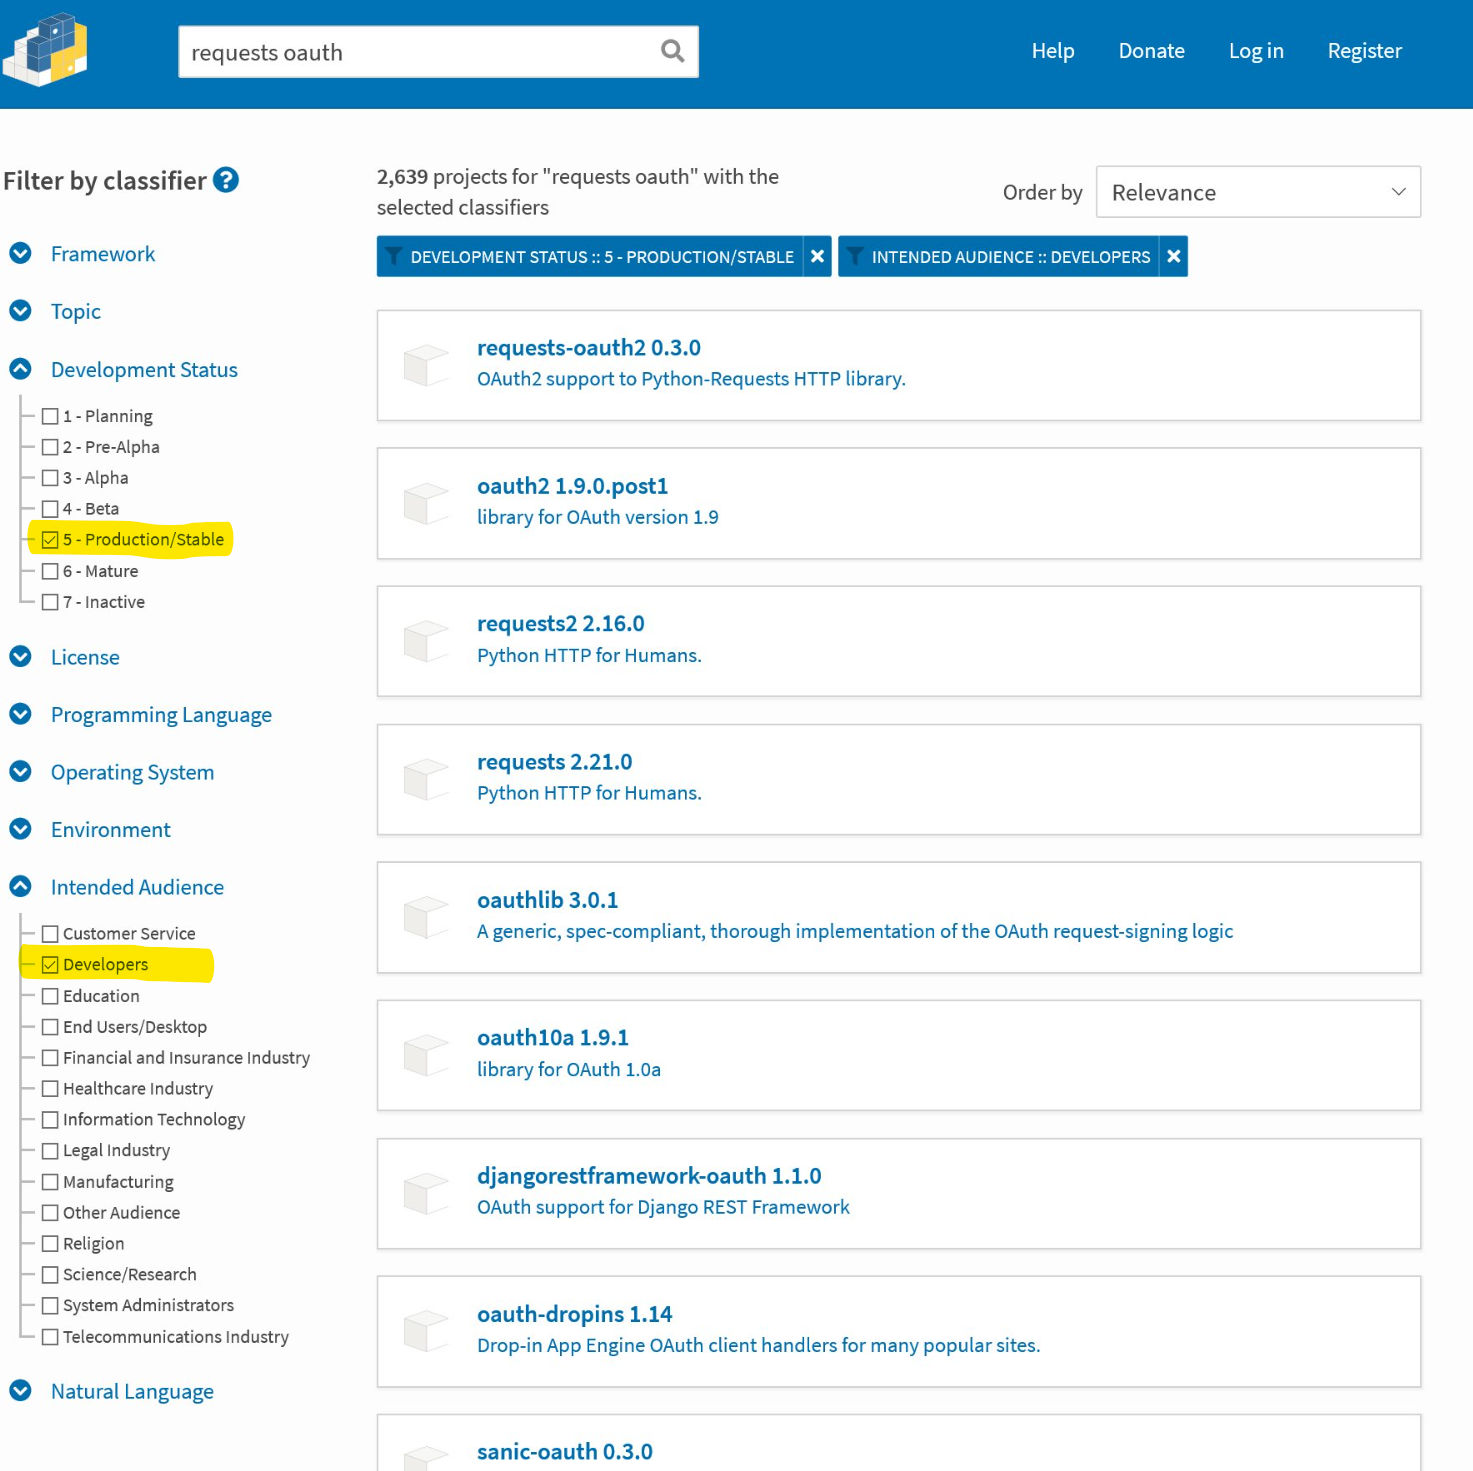
Let’s say your application needs to access a service that is using OAuth2 for authorization. Ideally, there is a library that works with requests or with a similar interface that can help us. Let’s search PyPI for it using pip :
The search term yields quite an extensive collection of packages. Some of them seem specific to a service or technology like django-oauth . Others look promising, like requests-oauth . Unfortunately, there isn’t much information other than a brief description.
Most of the time, you want to search for packages directly in the PyPI website. PyPI provides search capabilities for its index and a way to filter results by the metadata exposed in the package, like framework, topic, development status, and so on.
A search for the same terms in PyPI yields a lot of results, but you can filter them by different categories. For example, you can expand the Intended Audience and select Developers since you want a library that helps you with developing your application. Also, you probably want a package that is stable and production-ready. You can expand the Development Status category and select Production/Stable:
You can apply additional filters and tweak the search terms until you find the package that you are looking for.
The results provide a link to the package page, which contains more information and hopefully some documentation. Let’s take a look at the information for requests-oauth2 :

The project page provides more information, and it seems to have a link to the project homepage. The link takes you to the project repository on GitHub. There, you can see some more information about the project and some usage examples.
Finding the original source code repository can be an invaluable resource. There, you can find some hints about the status of the project by looking at the date of the latest commits, number of pull request and open issues, and so forth.
Another option to find a package is to Google it. Widely used Python libraries will show up at the top of google searches, and you should be able to find a link to the package in PyPI or its source code repository.
Finding the right package may take some time and research, but it will also speed up your development process once you find it.
Uninstalling Packages
Once in a while, you will have to uninstall a package. You either found a better library to replace it, or it is something you don’t really need. Uninstalling packages can be a bit tricky.
Notice that, when you installed requests , pip installed other dependencies too. The more packages you install, the bigger the chances that multiple packages depend on the same dependency. This is where the show command in pip comes in handy.
Before you uninstall a package, make sure you run the show command for that package:
Notice the last two fields Requires and Required-by . The show command tells us that requests requires urllib3 , certifi , chardet , and idna . You probably want to uninstall those two. You can also see that requests is not required by any other package, so it is safe to uninstall it.
You should run the show command against all of the requests dependencies to make sure that no other libraries also depend on them. Once you understand the dependency order of the packages you want to uninstall, you can remove them using the uninstall command:
Uninstalling a package shows you the files that will be removed and will ask for confirmation. If you are sure you want to remove the package because you’ve checked its dependencies and know that nothing else is using it, you can pass a -y switch to suppress the file list and confirmation:
You can specify all the packages you want to uninstall in a single call: pip uninstall -y urllib3 chardet idna requests .
You can also uninstall all the packages listed in a requirements file by providing the -r option. The command will ask confirmation for each individual package, but you can suppress it, if you know what you’re doing, with the -y switch:
Remember to always check the dependencies of packages you want to uninstall. You probably want to uninstall all its dependencies, but uninstalling a package that is being used by others will break your application.
Alternatives to pip
pip is an essential tool for all Pythonistas, and it is used by many applications and projects for package management. This tutorial has helped you with the basics, but the Python community is very active in providing great tools and libraries for other developers to use. These include other alternatives to pip that try to simplify and improve package management.
In this section, you’ll learn about other package management tools available for Python.
Conda Does It All
Conda is a package, dependency, and environment manager for many languages including Python. In fact, its origin comes from Anaconda, which started as a data science package for Python.
Conda is widely used for data science and machine learning applications, and uses its own index to host compatible packages.
Conda not only allows you to manage package dependencies, but it also manages virtual environments for your applications, installs compatible Python distributions, and packages your application for deployment to production.
Setting Up Python for Machine Learning on Windows is a great introduction to Conda that explores package and environment management. The only Windows-specific information is around installation, so it’s still relevant if you use a different OS platform.
Pipenv
Pipenv is another package management tool that “aims to bring the best of all packaging worlds” to Python. It’s gaining a lot of traction among the Python community because it merges virtual environment and package management in a single tool.
It also solves some of the most common hiccups you will run into when manually managing dependencies through pip , like versions of packages, separating development and production dependencies, and locking versions for production.
Pipenv: A Guide to the New Python Packaging Tool is a great start to learn about Pipenv and its approach to package management. Even though the article is tagged as intermediate , the author does a great job of guiding the reader that the article is accessible to anyone starting with Python.
Poetry
Poetry is another pip alternative that is gaining a lot of traction. Like Pipenv, it simplifies package version management and separates development vs production dependencies, and it works by isolating those dependencies into a virtual environment.
If you are coming from JavaScript and npm, then Poetry will look very familiar. It goes beyond package management, helping you build distributions for your applications and libraries and deploying them to PyPI. How to Publish an Open-Source Python Package to PyPI has a good introduction to Poetry and can help you get started.
Conclusion: What Is pip ?
This tutorial answered the question, what is pip? You’ve seen that pip is a package manager for Python, used by many projects to manage dependencies. It’s included with the Python installer, which makes it an essential tool for all Pythonistas to know how to use.
Python provides an extensive standard library suitable for developing all sorts of applications, but the active Python community provides an even larger set of tools and libraries that speed up Python application development.
These tools and libraries are published to the Python Package Index (PyPI), and pip allows developers to install them in their application environments.
In this tutorial, you’ve learned about:
- Installing new packages using pip in the command line and with requirement files
- Managing dependencies, separating development and production requirements, and creating a locked requirements file
- Finding packages through pip and PyPI
- Evaluating package dependencies before uninstalling a package and how pip uninstalls packages
In addition, you’ve learned about the importance of keeping dependencies up to date and alternatives to pip that can help you manage those dependencies.
Feel free to reach out in the comments section below with any questions you might have, and you can always get more information at the pip documentation page.
Watch Now This tutorial has a related video course created by the Real Python team. Watch it together with the written tutorial to deepen your understanding: A Beginner’s Guide to Pip
Get a short & sweet Python Trick delivered to your inbox every couple of days. No spam ever. Unsubscribe any time. Curated by the Real Python team.

About Isaac Rodriguez

Hi, I’m Isaac. I build, lead, and mentor software development teams, and for the past few years I’ve been focusing on cloud services and back-end applications using Python among other languages. Love to hear from you here at Real Python.
Each tutorial at Real Python is created by a team of developers so that it meets our high quality standards. The team members who worked on this tutorial are:


