- Управление квотами Quota Management
- Directory Quotas and FSRM
- Introduction
- Installing, Creating, and Setting Quotas
- Quota Management for Remote Shells
- Quota Settings
- Deprecated Quotas
- Retrieving Quota Configuration Information
- Configuring Shell Quotas
- Quota Management in Windows Server 2016
- Quota Management in Windows Server 2016
- Setting up File Server Resource Manager
- Creating Quotas Using FSRM
Управление квотами Quota Management
Область применения: Windows Server 2019, Windows Server 2016, Windows Server (половина ежегодного канала), Windows Server 2012 R2, Windows Server 2012, Windows Server 2008 R2 Applies to: Windows Server 2019, Windows Server 2016, Windows Server (Semi-Annual Channel), Windows Server 2012 R2, Windows Server 2012, Windows Server 2008 R2
На узле Управление квотами оснастки консоли управления Microsoft ® (MMC) диспетчера ресурсов файлового сервера можно выполнять следующие задачи: On the Quota Management node of the File Server Resource Manager Microsoft ® Management Console (MMC) snap-in, you can perform the following tasks:
- Создавать квоты для задания ограничения пространства, выделяемого для тома или папки, а также формировать уведомления при достижении предела квоты или его превышении. Create quotas to limit the space allowed for a volume or folder, and generate notifications when the quota limits are approached or exceeded.
- Создавать автоматически применяемые квоты, которые применяются ко всем существующим вложенным папкам в томе или папке и ко всем вложенным папкам, которые будут созданы в будущем. Generate auto apply quotas that apply to all existing subfolders in a volume or folder and to any subfolders that are created in the future.
- Определять шаблоны квот, которые можно легко применять к новым томам или папкам, а затем использовать во всей организации. Define quota templates that can be easily applied to new volumes or folders and then used across an organization.
Например, вы можете: For example, you can:
- Установить ограничение в 200 МБ на личные серверные паки пользователей, и при превышении порога хранилища в 180 МБ вам и пользователю будет отправляться уведомление по электронной почте. Place a 200 megabyte (MB) limit on users’ personal server folders, with an email notification sent to you and the user when 180 MB of storage has been exceeded.
- Задать гибкую квоту в 500 МБ для общей папки в группе. Set a flexible 500 MB quota on a group’s shared folder. При достижении данного ограничения хранилища все пользователи в группе получают по электронной почте уведомления о том, что квота временно увеличена до 520 МБ. Это дает пользователям возможность удалить ненужные файлы, обеспечив соответствие установленной политике квоты (500 МБ). When this storage limit is reached, all users in the group are notified by e-mail that the storage quota has been temporarily extended to 520 MB so that they can delete unnecessary files and comply with the preset 500 MB quota policy.
- Получать уведомление при достижении уровня использования пространства временной папкой в 2 гигабайта (ГБ), но не ограничивать квоту этой папки, так как она необходима для службы, работающей на вашем сервере. Receive a notification when a temporary folder reaches 2 gigabytes (GB) of usage, yet not limit that folder’s quota because it is necessary for a service running on your server.
Этот раздел содержит следующие подразделы: This section includes the following topics:
Чтобы настроить уведомления по электронной почте и возможности создания отчетов, необходимо сначала настроить общие параметры диспетчера ресурсов файлового сервера. To set e-mail notifications and reporting capabilities, you must first configure the general File Server Resource Manager options. Если вы просто хотите освободить место на томе, рассмотрите возможность использования Синхронизация файлов Azure с включенным распределением по уровням облака. If you’re just looking to free up space on a volume, consider using Azure File Sync with cloud tiering enabled. Благодаря этому вы можете кэшировать наиболее часто используемые файлы локально и на уровне самых часто используемых файлов в облако, сохранив пространство в локальном хранилище при сохранении производительности. This allows you to cache your most frequently accessed files locally and tier your least frequently accessed files to the cloud, saving local storage space while maintaining performance. Дополнительные сведения см. в разделе Планирование развертывания Синхронизация файлов Azure. For details, see Planning for an Azure File Sync deployment.
Directory Quotas and FSRM
Introduction
Starting with Windows ServerВ® 2003 R2, File Server Resource Manager (FSRM) offers advanced quota and directory management. The quota system can now be based on directories, rather than set by a Windows user. This enables a quick and convenient way to restrict the amount of content uploaded to a Web site’s root directory, rather than configuring per user.
But new to Windows ServerВ® 2008 is the ability to programmatically manage the quotas and other features offered by FSRM. For more information, go to https://msdn.microsoft.com/library/bb613366.aspx.
Installing, Creating, and Setting Quotas
To install the File Server Resource Manager
- Navigate to Administrative Tools and click Server Manager.
- Select the Features node in the left-hand tree view.
- Click Add Features.
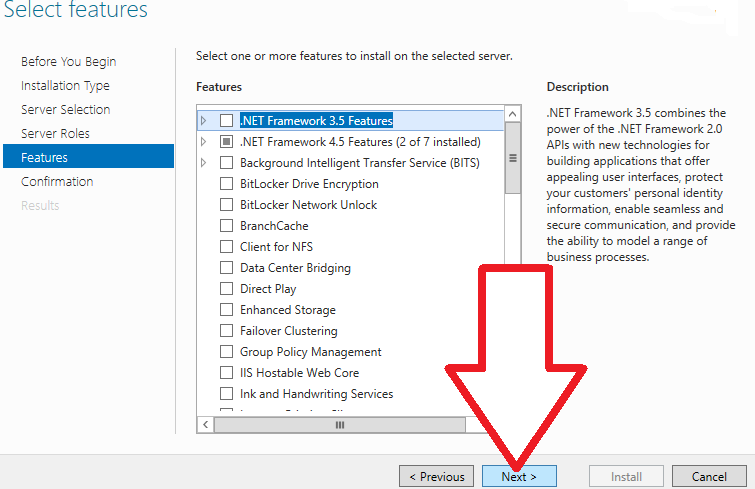
- In the Select Features page of the Add Features Wizard, check FileServer Resource Manager (FSRM), and then click Next.
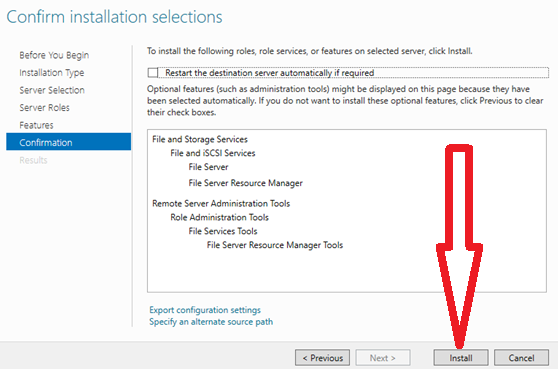
- Click Install to start the installation.
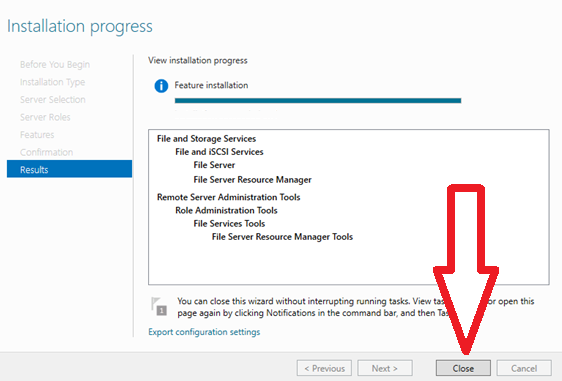
- On the Installation Results page, click Close.
To create a quota template
Navigate to Administrative Tools and click File Server Resource Manager.
Expand the Quota Management node in the left-hand tree view.
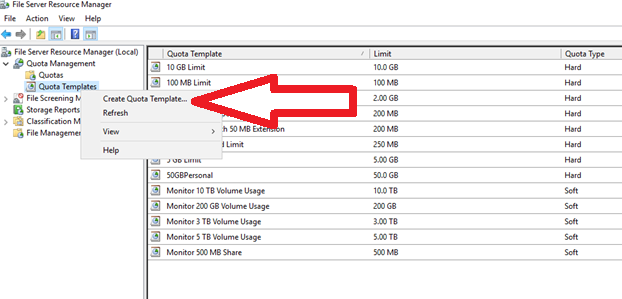
Right-click Quota Templates, and select Create Quota Template.
Copy the properties of an existing template by selecting a template from the Copy properties from quota template drop-down list. Then click Copy.
In the Template Name text box, type a name for the new template, such as Hosting Default Quota.
In the Label text box, type an optional description that will appear next to any quotas derived from the template.
In the Limit text box, type a number and choose a unit (KB, MB, GB, or TB).
Click Hard quota or Soft quota.
(A hard quota prevents users from saving files after the space limit is reached and generates notifications when the volume of data reaches each configured threshold. A soft quota does not enforce the quota limit, but it generates all configured notifications.)
You can configure one or more optional threshold notifications for your quota template, as described in the procedure that follows. After you have selected all the quota template properties that you want to use, click OK to save the template.
To set the quota template for a directory
- Navigate to Administrative Tools and click File Server Resource Manager.
- Expand the Quota Management node in the left-hand tree view.
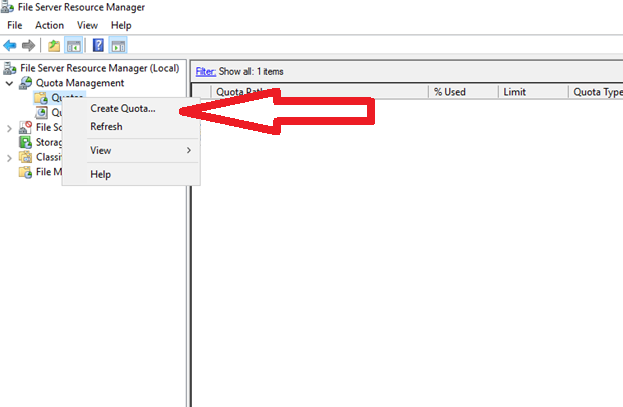
- Right-click Quotas, and select Create Quota.
- Under Quota path, type or browse to the folder that the quota will apply to.
- By default, Create quota on path is checked.
- Under Derive properties from this quota template, select the template that should apply, such as the Shared Hosting Default template created in the steps above.
- Click Create.
Quotas can also be created using the command-line tool dirquota.exe (see C# and PowerShell Scripts Samples). The following command-line sets the directory quota limit to 500 MB for a site directory:
For more information about the File Server Resource Manager, see File Server Resource Manager overview.
Quota Management for Remote Shells
Quota management allows users to manage system resources more efficiently. Windows Remote Management (WinRM) has added a specific set of quotas that provide a better quality of service, help prevent denial of service issues, and allocate server resources to concurrent users. The WinRM quota set is based on the quota infrastructure that is implemented for the Internet Information Services (IIS) service.
Implementing quotas will help to prevent performance degradation and denial of service issues by doing the following:
- Limiting the number of shells and shell processes that a user can create
- Limiting the maximum number of concurrent users
- Managing the amount of memory that is allocated to a shell
- Setting a time-out for shells that are inactive
Quota Settings
The following quotas need to be enforced for remote shell management. These quotas can be configured through the winrm utility or through Group Policy settings. Settings configured by a Group Policy supersede the quotas set by the winrm utility. For more information about setting Group Policies for WinRM, see Installation and Configuration for Windows Remote Management.
The maximum time in milliseconds before an inactive remote shell is deleted. The default is 180000 milliseconds. The minimum time is 1000 milliseconds.
The maximum number of processes allowed per shell, including the shell’s child processes. The default is 25.
The maximum amount of memory allocated per shell, including the shell’s child processes. The default is 1024 MB.
The behavior is unsupported if the MaxMemoryPerShellMB is set to a value that is less than the default.
The maximum number of shells per user. The default is 30.
The maximum number of concurrent users who can open shells. The default is 10.
Deprecated Quotas
WinRM 2.0 sets the MaxShellRunTime quota to read-only. Changing the value for this quota will have no effect on the remote shells.
Retrieving Quota Configuration Information
To check the quota configuration settings, type winrm get winrm/config.
The following snippet is a text-based example of a WinRM configuration with the default quota settings.
Configuring Shell Quotas
Quotas can be set through a Group Policy setting or manually. For more information about specific configuration settings, see Installation and Configuration for Windows Remote Management.
To set a quota with Group Policy
- Open a Command Prompt window as an administrator.
- At the Command Prompt, type gpedit.msc. The Group Policy Object Editor window opens.
- Find the Windows Remote Management and Windows Remote Shell Group Policy Objects (GPO) under Computer Configuration\Administrative Templates\Windows Components.
- On the Extended tab, select a setting to see a description. Double click a setting to edit it.
To set a quota manually
- Open a Command Prompt window as an administrator.
- At the Command Prompt, type winrm set winrm/config/winrs ‘@ <=»«>’
For example, to increase the maximum number of shells per user from 5 to 7, type winrm set winrm/config/winrs ‘@
Quota Management in Windows Server 2016
Quota management is a valuable feature that enables users to restrict the storage capacity of shared resources in Windows Server 2016. If you create quotas, you will limit the space allocated to a volume or a folder—allowing you to practice capacity management conveniently.
Quota Management in Windows Server 2016
To set quotas in Windows Server 2016, you’ll need to use a tool called File Server Resource Manager (FSRM). This tool assists in managing and organising data kept on file servers.
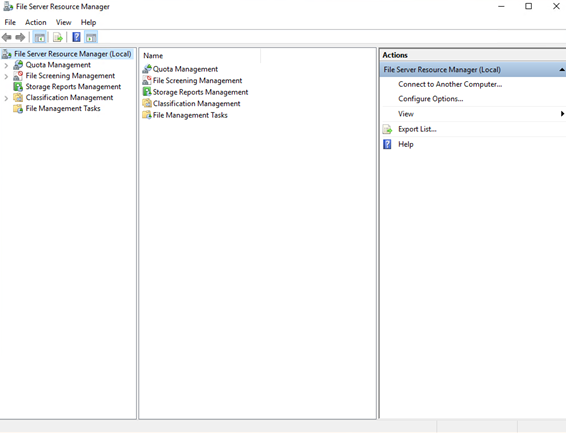
The File Server Resource Manager tool consists of the following five features.
- File classification infrastructure—this feature allows you to organise files and implement policies.
- File management tasks—it enables you to implement conditional policies or tasks.
- Quota management—it assists you to restrict the space available on shared folders.
- File screening management—it allows you to limit the type of files that users can keep. For example, you can set a file screen to prevent users from creating MP3 files on the files server.
- Storage reports—with this feature, you can generate reports to understand trends in disk utilisation and how data is organised, which enables you to spot unauthorised activities.
In this article, we are going to talk about the quota management feature in FSRM.
Setting up File Server Resource Manager
We need to install the File Server Resource Manager tool before using it for quota management.
A quick way to complete its setup is through the GUI server manager.
Here are the steps for installing the tool.
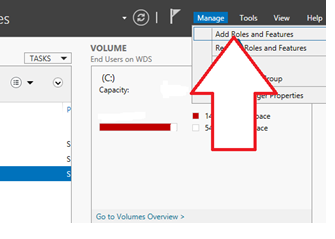
1. Start by logging into the Windows Server 2016. Then, on the Server Manager’s dashboard, click on “Manage” and select “Add Roles and Features”.
2. On the “Before You Begin” screen click “Next”.

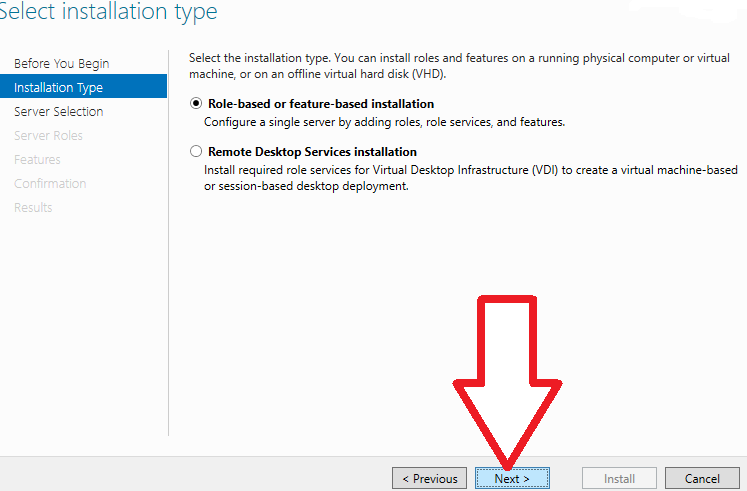
3. Select “Role-based or feature-based installation” and click “Next”.
4. Select your destination server and click “Next”.
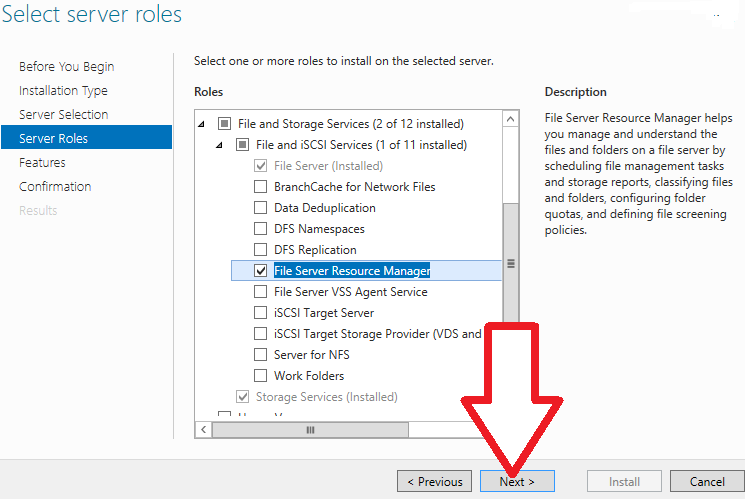
5. On the “Select Server roles” dashboard, expand “File and Storage Services” and “File and iSCSI Services”.
Then, select “File Server Resource Manager” and click “Next”.
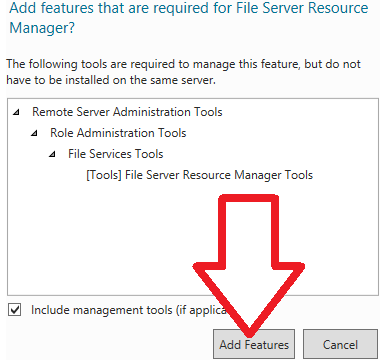
6. On the window that pops up, Click the “Add Features” button to incorporate the required features.
7. If you do not need to add any extra features, just leave the default settings and click “Next”.
8. Confirm the installation selections and Click “Install” to start the process.
9. After the installation process is complete, click the “Close” button.
10. You can now access the File Server Resource Manager from the administrative interface and use it to create quotas.
Creating Quotas Using FSRM
As earlier mentioned, quota management enables you to set restrictions and define the extent of space available for users in the server. For example, you can limit all users to a maximum of 5GB on a shared folder. As such, the users cannot add data to the folder that exceeds 5GB.
You can also configure the File Server Resource Manager tool to be sending notifications whenever the specified usage limit is reached. For example, you can specify that an email is to be sent if 85% of the space has been consumed.
Creating quotas using the FSRM tool is a two-step process:
- Create a template
- Create a quota
a) Create a template
Before setting quotas, you need to either create a quota template or choose a default template already available on the File Server Resource Manager tool.
It is recommended that you create quotas solely from templates. This way, you can easily manage your quotas by making changes to the templates rather than the individual quotas. The one central location for managing quotas eases the enactment of storage policy rules.
Here are the steps for creating a quota template.
1. Under the “Quota Management” Section, right-click the “Quota Templates” button and go for “Create Quota Template”.
2. On the window that pops up, enter the Template name and the space limit. If you choose the “Hard quota” option, users will be unable to surpass the specified limit. A hard quota is good for controlling the amount of data allowed on a folder or a disk.
On the other hand, if you select the “Soft quota” option, users will be able to exceed the allocated limit. A soft quota is mostly used for monitoring space usage and producing notifications.
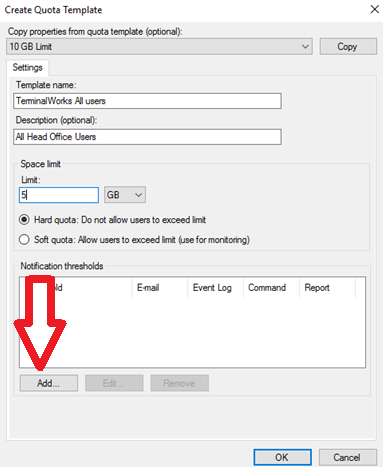
3. Lastly, to set notification thresholds, press the “Add” button. On the window that pops up, input your notification specifications.
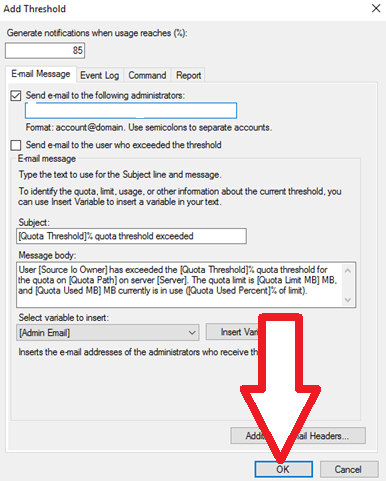
You can specify that an email is to be sent, an entry is to be made to the event log, a command is to be run, or a report is to be generated. For example, you can state that whenever usage reaches 85%, send an email message to the administrator.
Thereafter, click “OK” to complete creating the quota template.
b) Create a quota
After setting up the quota template or using a default quota template, you need to create the quota.
Here are the steps for creating a quota.
1. On the File Server Resource Manager’s dashboard, right-click on “Quotas” and go for “Create Quota”.
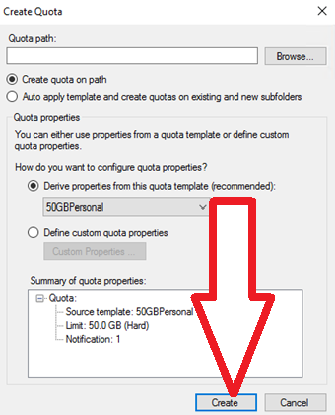
2. On the “Create Quota” window, in the “Quota path” section, browse the path to the volume or folder that the storage capacity restriction will be applied.
Then, choose either the “Create quota on path” or the “Auto apply template and create quota…” option.
If you select the first option, quota will only be applied to the primary folder. For example, if you limit the parent folder to only 5GB, then the other subfolders will share the space specified in the main folder.
On the other hand, if you choose the second option, then the quota will also be applied to the subfolders. For example, if you restrict the main folder to 5GB, then the subfolders will also have individual quotas of 5GB each.
Subsequently, on the “Derive properties from this quota template” option, choose the template you created previously.
If satisfied with the quota properties, click “Create”.
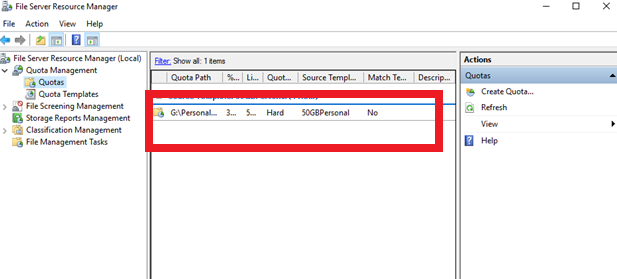
After you’ve created the quota, you can see it on the File Server Resource Manager’s dashboard. Thereafter, you’ll be able to limit the amount of space allowed on your shared resources.
We hope this article has cleared things up.
Do you want to learn about NTFS Permissions, Share Permissions, and how to use them?
Grab your free course HERE!
Prevent Unauthorized Access to Sensitive Windows Folders!
Get your free edition of the easiest and fastest NTFS Permission Reporter now!


