- Восстановление диска компьютера Mac с помощью приложения «Дисковая утилита»
- Запустите приложение «Дисковая утилита»
- Выберите нужный диск в приложении «Дисковая утилита»
- Восстанавливайте сначала тома, затем контейнеры, затем диски
- Если приложение «Дисковая утилита» обнаружило ошибки, которые не может исправить
- Если диск не отображается в приложении «Дисковая утилита»
- OS X Recovery Disk Assistant v1.0
- How to reinstall macOS
- Start up from macOS Recovery
- Apple silicon
- Intel processor
- Reinstall macOS
- Other macOS installation options
- Восстановление диска с помощью Дисковой утилиты на Mac
- Mac Disk Recovery: How to Create an OS X Recovery Disk and Recover Mac Data
- This article will guide you on what an OS X Recovery Disk, how to use it, how to make a Mac OS X Recovery Disk and also how to recover data from Mac hard drive for free.
- What Is an OS X Recovery Disk?
- Part 1 В How to Restore Mac with Recovery Disk Mac
- Part 2 В How to Create an OS X Recovery Disk
- Part 3 В How to Recover Data on Mac Hard Drive
- Recoverit — The Free Software for Mac OS Recovery
- Video Tutorial on Windows and Mac Hard Drive Recovery
- 3 Steps to Recover Files from Mac Hard Disk
- 1. Select the recovery disk
- 2. Scan the Mac recovery disk
- 3. Preview and recover data
Восстановление диска компьютера Mac с помощью приложения «Дисковая утилита»
Использование функции «Первая помощь» в приложении «Дисковая утилита» для восстановления диска.
Приложение «Дисковая утилита» может находить и исправлять ошибки, связанные с форматированием и структурой каталогов диска компьютера Mac. Ошибки могут приводить к неожиданному поведению при работе с компьютером Mac, а существенные ошибки могут препятствовать загрузке компьютера Mac.
Прежде чем продолжить, убедитесь, что у вас есть актуальная резервная копия содержимого компьютера Mac на случай, если потребуется восстановить поврежденные файлы или приложение «Дисковая утилита» обнаружит ошибки, которые не может исправить.
Запустите приложение «Дисковая утилита»
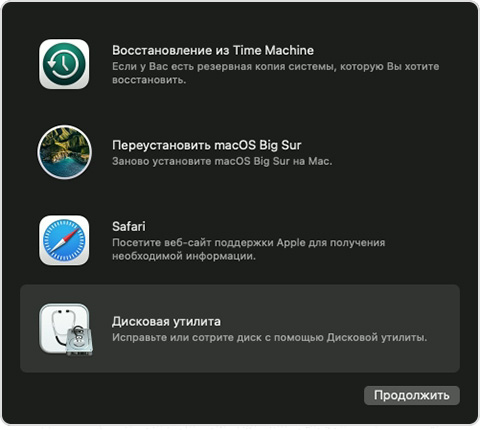
Как правило, вы можете просто запустить приложение «Дисковая утилита» из подпапки «Утилиты» папки «Программы». Если компьютер Mac не запускается надлежащим образом или требуется восстановить загрузочный диск компьютера Mac, запустите приложение «Дисковая утилита» из раздела восстановления macOS:
- Убедитесь в том, что используете компьютер Mac с процессором Apple, а затем выполните следующие действия:
- Компьютер с процессором Apple: включите Mac и продолжайте удерживать нажатой кнопку питания пока на экране не появится окно с параметрами запуска. Щелкните по значку в виде шестеренки (меню «Параметры»), затем нажмите «Продолжить».
- Компьютер с процессором Intel: сразу после включения компьютера Mac нажмите и удерживайте клавиши Command (⌘) и R, пока на экране не появится логотип Apple или другое изображение.
- Возможно, вам потребуется выбрать пользователя, для которого вы знаете пароль. Выбрав пользователя, нажмите «Далее» и введите пароль администратора.
- В окне «Утилиты» в режиме восстановления macOS выберите «Дисковая утилита» и нажмите «Продолжить».

Выберите нужный диск в приложении «Дисковая утилита»
Выберите «Вид» > «Показывать все устройства» (если такая команда доступна) в строке меню или на панели инструментов приложения «Дисковая утилита».
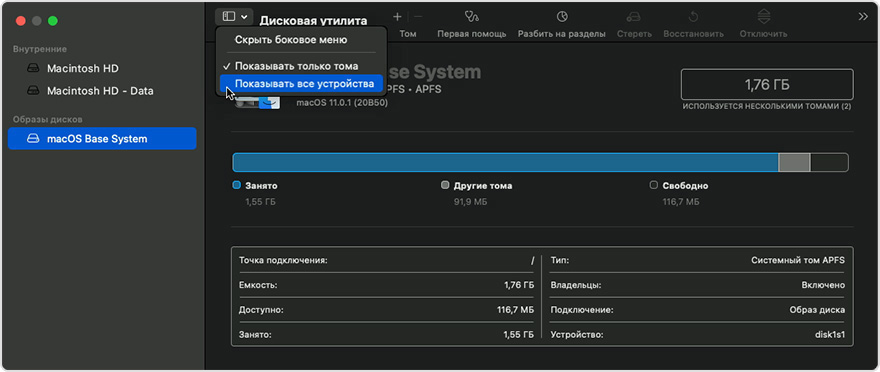
Теперь на боковой панели приложения «Дисковая утилита» должны отображаться все доступные диски или другие устройства хранения, начиная с загрузочного диска. Под каждым диском представлены все контейнеры и тома на этом диске. Не видите нужный диск?

В этом примере на загрузочном диске (APPLE HDD) имеется один контейнер и два тома (Macintosh HD, Macintosh HD — Data). На вашем диске может не быть контейнера, количество томов также может отличаться.
Восстанавливайте сначала тома, затем контейнеры, затем диски
Для каждого диска, для которого требуется выполнить восстановление, выберите последний том на этом диске и нажмите кнопку или вкладку «Первая помощь» .
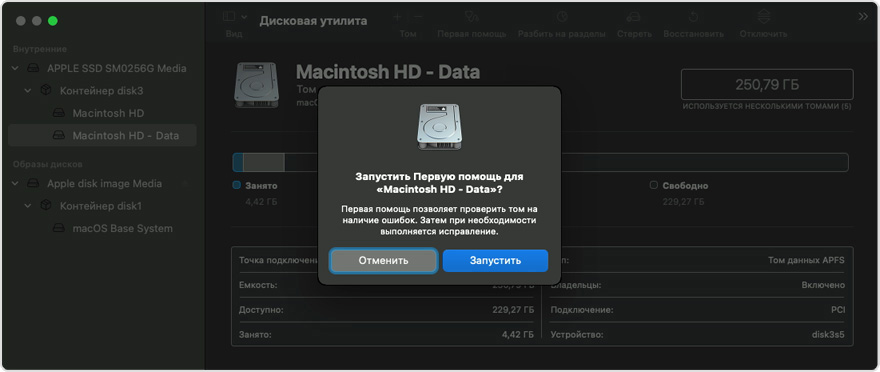
В этом примере имя последнего тома на диске — Macintosh HD — Data.
Нажмите «Запустить», чтобы начать проверку выбранного тома на наличие ошибок.
- Если кнопка «Запустить» отсутствует, нажмите кнопку «Восстановить диск».
- Если кнопка неактивна и вы не можете ее нажать, пропустите данный шаг для выбранного диска, контейнера или тома.
- Если предложено ввести пароль для разблокировки диска, введите пароль администратора.
После того как приложение «Дисковая утилита» закончит проверку тома, выберите следующий элемент над ним на боковой панели, затем снова запустите функцию «Первая помощь». Продолжайте двигаться вверх по списку, запуская функцию «Первая помощь» для всех томов на диске, затем для всех контейнеров на диске и, наконец, для самого диска.
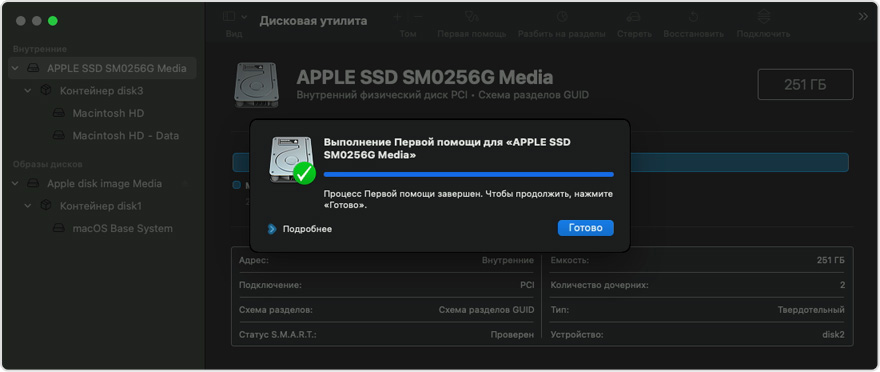
В этом примере порядок восстановления будет следующим: Macintosh HD — Data, Macintosh HD, Container disk3 и APPLE HDD.
Если приложение «Дисковая утилита» обнаружило ошибки, которые не может исправить
Если приложение «Дисковая утилита» обнаружит ошибки, которые не может исправить, сотрите (отформатируйте) диск с помощью приложения «Дисковая утилита».
Если диск не отображается в приложении «Дисковая утилита»
Если приложение «Дисковая утилита» не может обнаружить диск, оно также не сможет обнаружить контейнеры или тома на этом диске. В этом случае выполните следующие действия:
- Выключите компьютер Mac, а затем отсоедините от него все вспомогательные устройства.
- При попытке восстановления внешнего диска убедитесь, что он подключен непосредственно к компьютеру Mac с помощью предположительно исправного кабеля. Выключите диск и включите его снова.
- Если диск по-прежнему не отображается в приложении «Дисковая утилита», возможно, ваш компьютер Mac нуждается в обслуживании. Если вам требуется помощь, обратитесь в службу поддержки Apple.
Источник
OS X Recovery Disk Assistant v1.0
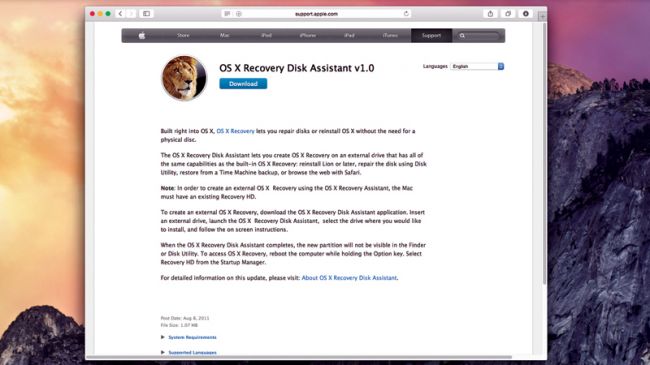
Built right into OS X, OS X Recovery lets you repair disks or reinstall OS X without the need for a physical disc.
The OS X Recovery Disk Assistant lets you create OS X Recovery on an external drive that has all of the same capabilities as the built-in OS X Recovery: reinstall Lion or Mountain Lion, repair the disk using Disk Utility, restore from a Time Machine backup, or browse the web with Safari.
Note: In order to create an external OS X Recovery using the OS X Recovery Assistant, the Mac must have an existing Recovery HD.
To create an external OS X Recovery, download the OS X Recovery Disk Assistant application. Insert an external drive, launch the OS X Recovery Disk Assistant, select the drive where you would like to install, and follow the on screen instructions.
When the OS X Recovery Disk Assistant completes, the new partition will not be visible in the Finder or Disk Utility. To access OS X Recovery, reboot the computer while holding the Option key. Select Recovery HD from the Startup Manager.
For detailed information on this update, please visit: About OS X Recovery Disk Assistant.
Post Date: Aug 8, 2011
File Size: 1.07 MB
- OS X Lion or Mountain Lion
- A Mac running OS X with an existing Recovery HD
- An external USB hard drive or thumb drive with at least 1GB of free space
Note: This utility is not compatible with a disk that is using CoreStorage, including any disk larger than 2.2TB, any disk with FileVault 2 enabled, and all Fusion drives.
Источник
How to reinstall macOS
Use macOS Recovery to reinstall the Mac operating system.
Start up from macOS Recovery
Apple silicon
Turn on your Mac and continue to press and hold the power button until you see the startup options window. Click the gear icon labeled Options, then click Continue.
Intel processor
Make sure that your Mac has a connection to the internet. Then turn on your Mac and immediately press and hold Command (⌘)-R until you see an Apple logo or other image.
If you’re asked to select a user you know the password for, select the user, click Next, then enter their administrator password.
Reinstall macOS
Select Reinstall macOS from the utilities window in macOS Recovery, then click Continue and follow the onscreen instructions.
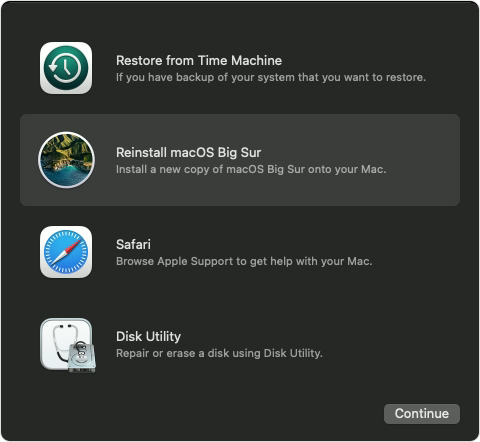
Follow these guidelines during installation:
- If the installer asks to unlock your disk, enter the password you use to log in to your Mac.
- If the installer doesn’t see your disk, or it says that it can’t install on your computer or volume, you might need to erase your disk first.
- If the installer offers you the choice between installing on Macintosh HD or Macintosh HD — Data, choose Macintosh HD.
- Allow installation to complete without putting your Mac to sleep or closing its lid. Your Mac might restart and show a progress bar several times, and the screen might be empty for minutes at a time.
After installation is complete, your Mac might restart to a setup assistant. If you’re selling, trading in, or giving away your Mac, press Command-Q to quit the assistant without completing setup. Then click Shut Down. When the new owner starts up the Mac, they can use their own information to complete setup.
Other macOS installation options
When you install macOS from Recovery, you get the current version of the most recently installed macOS, with some exceptions:
- On an Intel-based Mac: If you use Shift-Option-Command-R during startup, you’re offered the macOS that came with your Mac, or the closest version still available. If you use Option-Command-R during startup, in most cases you’re offered the latest macOS that is compatible with your Mac. Otherwise you’re offered the macOS that came with your Mac, or the closest version still available.
- If the Mac logic board was just replaced, you may be offered only the latest macOS that is compatible with your Mac. If you just erased your entire startup disk, you may be offered only the macOS that came with your Mac, or the closest version still available.
You can also use these methods to install macOS, if the macOS is compatible with your Mac:
- Use the App Store to download and install the latest macOS.
- Use the App Store or a web browser to download and install an earlier macOS.
- Use a USB flash drive or other secondary volume to create a bootable installer.
Источник
Восстановление диска с помощью Дисковой утилиты на Mac
Можно восстановить том из другого тома. При восстановлении одного тома из другого тома создается точная копия исходного тома.
ПРЕДУПРЕЖДЕНИЕ. При восстановлении одного тома в другой все файлы, находящиеся в целевом томе, стираются. Перед восстановлением тома скопируйте нужные Вам файлы из целевого тома в другой том.
В приложении «Дисковая утилита»  на компьютере Mac выберите пункт меню «Вид» > «Показать все устройства».
Если Дисковая утилита еще не открыта, нажмите значок Launchpad  в панели Dock, введите «Дисковая утилита» в поле поиска, затем нажмите значок Дисковой утилиты .
В боковой панели выберите том, который нужно восстановить, затем нажмите кнопку восстановления  .
.
Этот том стирается и становится точной копией.
Нажмите всплывающее меню «Восстановить», затем выберите том, который хотите скопировать.
Нажмите «Восстановить», затем нажмите «Готово».
Для восстановления тома также можно воспользоваться Дисковой утилитой из Утилиты восстановления macOS Recovery. См. статью на сайте поддержки Apple: Сведения о восстановлении ОС macOS.
Источник
Mac Disk Recovery: How to Create an OS X Recovery Disk and Recover Mac Data
This article will guide you on what an OS X Recovery Disk, how to use it, how to make a Mac OS X Recovery Disk and also how to recover data from Mac hard drive for free.

Sue Wayne
Sep 08, 2021 • Filed to: Solve Mac Problems • Proven solutions
Do you know that mini heart attack you get when your Mac crashes or would not start? It is the worst feeling in the world, especially if you have a lifetime worth of work stored inside your machine. What should you do in these situations? As you are probably have been advised many times, backing up your data regularly is a great practice. For Mac users, setting up an OS X Recovery Disk would be beneficial when trouble strikes. For example, it is conducive toВ Mac file recoveryВ while you find data lost.
What Is an OS X Recovery Disk?
The OS X Recovery Disk is a native but hidden recovery volume on your Mac hard drive. This feature can be used to start up your machine and perform emergency maintenance services such as repairing a corrupted drive by running Disk Utility, surf the Internet to assess the problem you might be experiencing or download any necessary updates. You can also use the OS X Recovery Disk to reinstall your operating system and restore lost data from Time Machine backup.
Part 1 В How to Restore Mac with Recovery Disk Mac
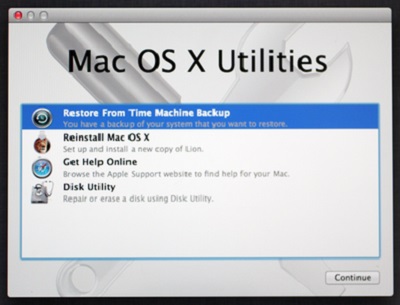
Now that you know that your machine has a built-in recovery tool, you may ask, «How to use the OS X Recovery Disk?» The feature allows you to do the following options:
- Use Time Machine backup to restore your Mac.
- Reinstall Mac OS X with a recovery disk.
- Get help online or check your internet connection.
- Use Disk Utility to verify and repair connected disks.
Here is how to repair Mac disk and recover Mac with OS X Recovery Disk:
- To put your Mac intoВ Recovery Mode, restart your machine and hold down the «Command + R» keys on your keyboard simultaneously. Continue to do this until the Apple logo appears.

- When your Mac has started up, theВ OS X utilityВ window will appear and prompt you to choose one of the four options listed above. (Note: if you do not see this, but instead see a login page, you will need to restart your Mac and do the whole process again).
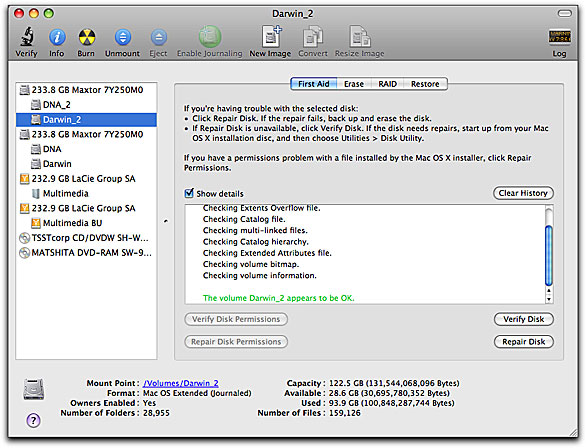
- Click «Disk Utility» and choose the drive you want to repair on your Mac. Open the «First Aid» tab. To check the problem your Mac has, click the «Verify Disk» button. Click the «Repair Disk» button to start fixing this button.
Part 2 В How to Create an OS X Recovery Disk
Since OS X Mountain Lion, everything went digital and maintenance-minded. Mac users could no longer depend on physical recovery disks to help them fix any problems on their machines. But what how can you access this hidden partition if something goes wrong with your hard drive? You can always connect your computer online and initiate the OS X Internet Recovery feature, but realistically, you may not always have an internet connection. This method will also not work if you had upgraded an old Mac to run on a newer version of OS X.
In these situations, having your OS X Recovery Disk easily accessible on an external USB drive or SD card would be beneficial. It is straightforward. Read on to learn how to create OS X Recovery Disk that you can easily access anywhere, anytime. Before you start, here are some of the things you need to adhere to:
- To create an OS X Recovery Disk, make sure that your machine is at least running on OS X Lion or Mountain Lion and that there is an existing Recovery System on its startup volume. If you have a newer Mac, use Internet Recovery to get the system online.
- An external USB drive or SD card with at least 1GB free space.
Once you have made sure both requirements are fulfilled, follow the following steps to create an OS X recovery disk:
- Download theВ Recovery Disk AssistantВ from the Apple website if you do not have it already in your Applications/Utility folder.
- Wait until the download is complete and double-click on the file, which should be named «RecoveryDiskAssistant.dmg.» This will create the Recovery Disk Assistant.appfile — drag it into your Applications folder.
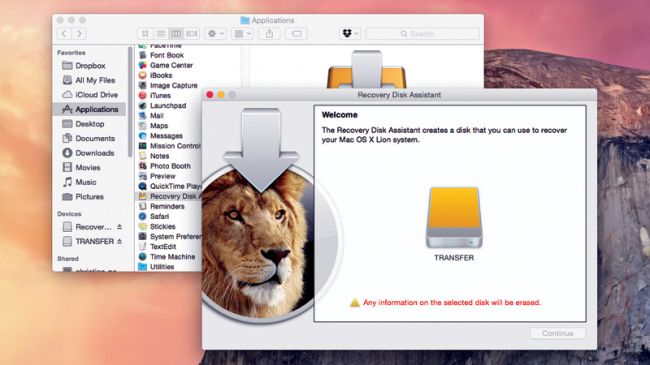
- Attach an external hard drive or USB stick and launch theВ Recovery Disk Assistant. Agree to the terms and conditions and wait until the software detects your external drive.
- Select the drive you want to use to create the OS X Recovery Disk. Click «Continue». (Note: all data in the selected drive will be overwritten so that the wizard can install the needed data to make the external hard drive or USB stick into a recovery disk.)
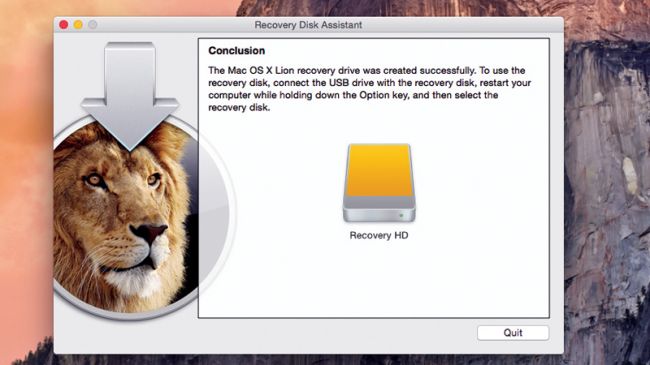
It will take some time for the process to complete. When the software prompts you that it is done, click on the «Quit» button. Eject the new recovery disk and keep it in a safe place. You will be able to use the disk when you need it the most. It is also a good idea to update this disk regularly.
Part 3 В How to Recover Data on Mac Hard Drive
How do I recover files on my Mac for free?
If you just want to recover deleted or lost files from Mac hard drive, you can rely on a free data recovery program to help you do that. For example,В RecoveritВ Free Mac Data Recovery. This file recovery freeware for Mac is dedicated to recovering data on Windows or Mac computer. If you want to retrieve data from an external device, like an external disk or memory card, connect it to your computer and the stored data can also be recovered.
Recoverit — The Free Software for Mac OS Recovery
- Recover documents, photos, videos, emails, and more from Mac hard drive.
- Recover 1000+ types and formats of files in different data loss situations.
- Scan and preview the files before you recover them from all storage devices.
Video Tutorial on Windows and Mac Hard Drive Recovery
This free hard drive data recovery software is easy to use and user-friendly. Watch the video, and you can get three simple steps to recover your data from the hard drive.
Recent Videos from Recoverit
3 Steps to Recover Files from Mac Hard Disk
Download Recoverit Free Data Recovery and take the next three steps to recover Mac hard drive data for free right away.
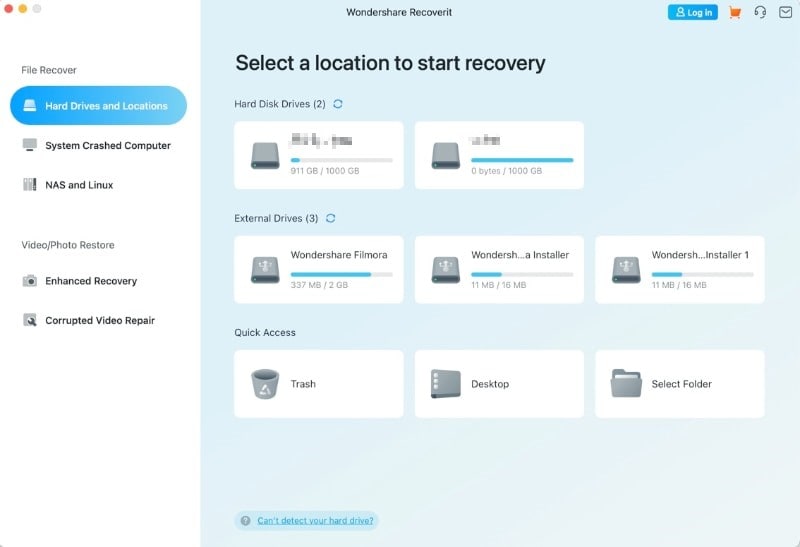
1. Select the recovery disk
To recover data from a Mac hard disk, please select the hard drive where you want to restore Mac data. Click the «Start» button to move forward.
2. Scan the Mac recovery disk
Recoverit Mac Disk Recovery will start an instant and all-around scan on the recovery disk. All the lost, inaccessible or deleted files on Mac will be shown gradually.

3. Preview and recover data
Once the scan ends, all the scanned files will be listed according to the file formats. You can preview the files, select the wanted ones, and click «Recover» to get them back.

Having a built-in recovery solution is excellent, especially when you tend to lose or misplaced recovery disks. It would be great to learn how to use it and have a copy of it stored outside the machine so that you will be able to access it when you cannot do it straight from your computer. Fail to do it? Only want to recover data?В RecoveritВ can help you. Download it andВ recover lost filesВ for free.
Источник


